German 38(t) Weapons Carrier
1/16th scale plastic kit from Hobbyboss
Painted in 2023 - 2024

I began a Hobbyboss 1/16th Tiger I kit some time ago, with the thought of cutting it up to produce large scale “wedgies” as setting for figures in that scale.
Needless to say that I’ve got no further than the assembled tank in a storage box.
And being the type of modeller that I am – “Oh look another kit to start !” and having accumulated one or three other AFV kits in this scale, I thought I’d assemble another one – like you do.
As it was, I thought I’d go for something a little smaller and less ambitious, and again had the initial idea of cutting this into four sections of the hull with the turret as a fifth section to add figures to.
As it had a full interior, maybe I could replicate the hull walls and have a sixth display with a driver figure inside….. Oh the plans were many and varied.
The kit
The instruction booklet is very well set out and clear, and as far as I can tell – I’ll add this early on, when you’re adding the photo etch to the drive cylinder things, there is a mistake, telling you to use both parts ( from memory part A4 ) from the etch fret to the first set of cylinders you assemble. In fact only one of these is added to that side, and the other part is added to the opposite set of cylinders.
All in all there are six etch pieces to go around the two cylinder sets ( right and left ) there are four of one type of etch part and only two of the others.
I‘m sure you’ll understand when you begin assembly.
This is the only mistake I noticed in the instructions.
As for the plastic parts, fit is very good with the location lugs being quite tight in some cases, sometimes so tight in fact that you might question whether you’ve got the components the right way around, and in some cases you feel that glue might not be totally necessary.
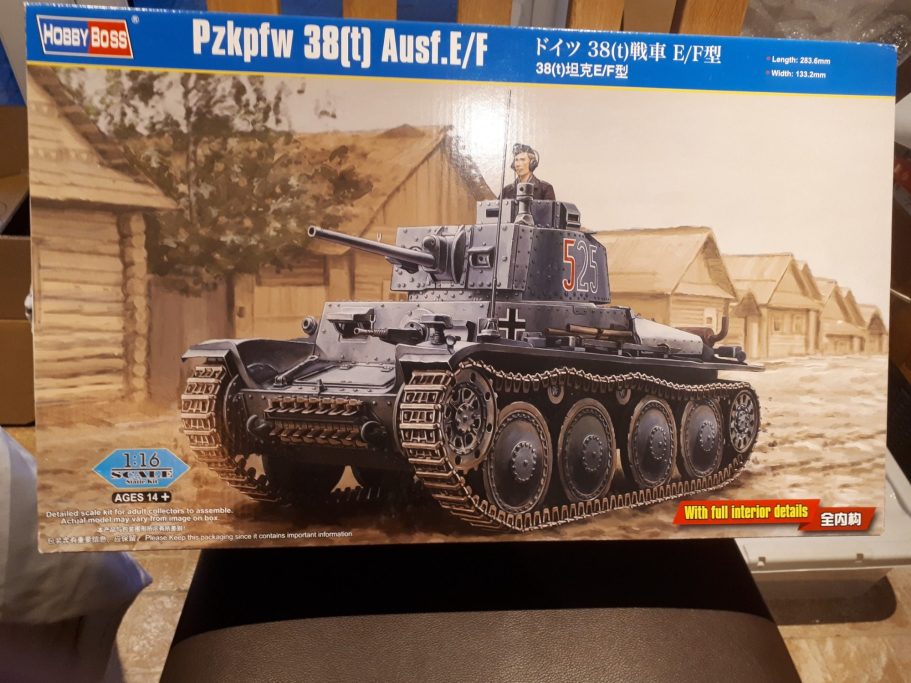
Photo #1 shows the box art, it doesn’t really give you a sense of the size of the box, but I can tell you it’s big. It contains a lot of parts, mainly for all the internal detail, and of course all those separate track links.
Some sprues are repeated – the ones holding the road wheels for example are on four identical sprue trees.
All sprues re clearly labelled, and all parts are numbered so that identifying them is trouble free.
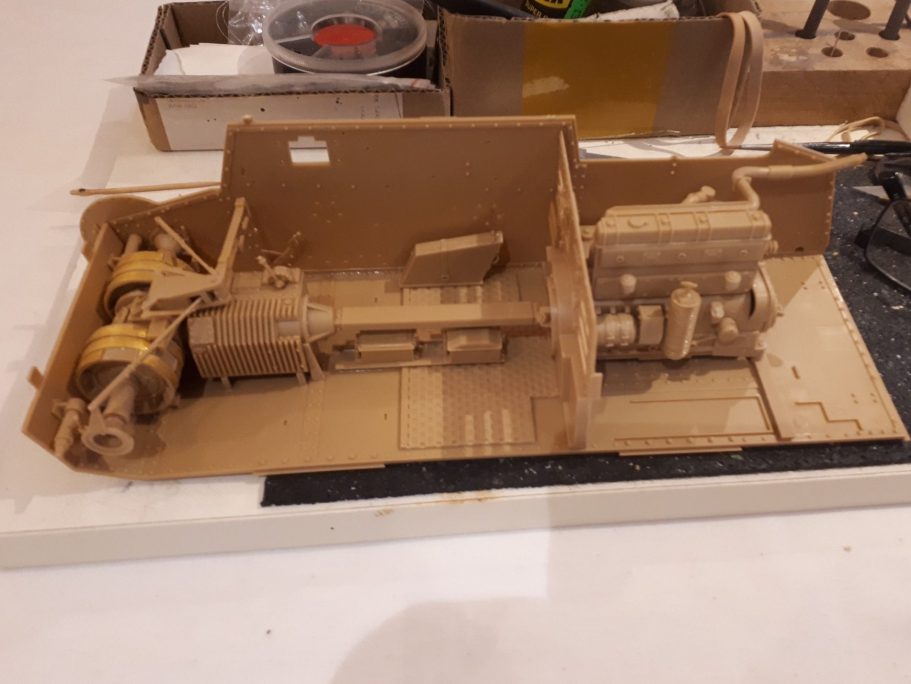
Photo #2 so easy and trouble free in fact that I’d got this little lot assembled before thinking “I’d better take a picture.
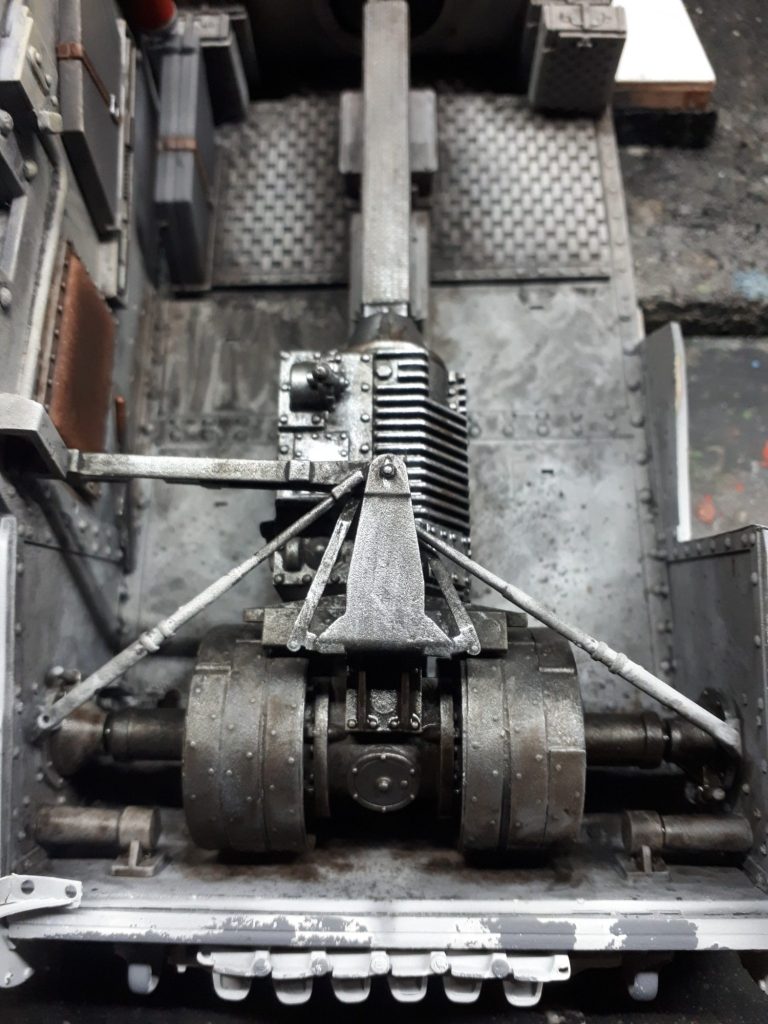
At this point the engine is not glued in position, and the central drive shaft has a lug on it to slide into the engine, with two pins on the hull that the rear end of the engine locates to.
I left the engine separable from the hull to ease painting, just clipping it in place for this shot.
You can perhaps guestimated the size of the kit from the partial inclusion of a set of glasses on the right of the picture.
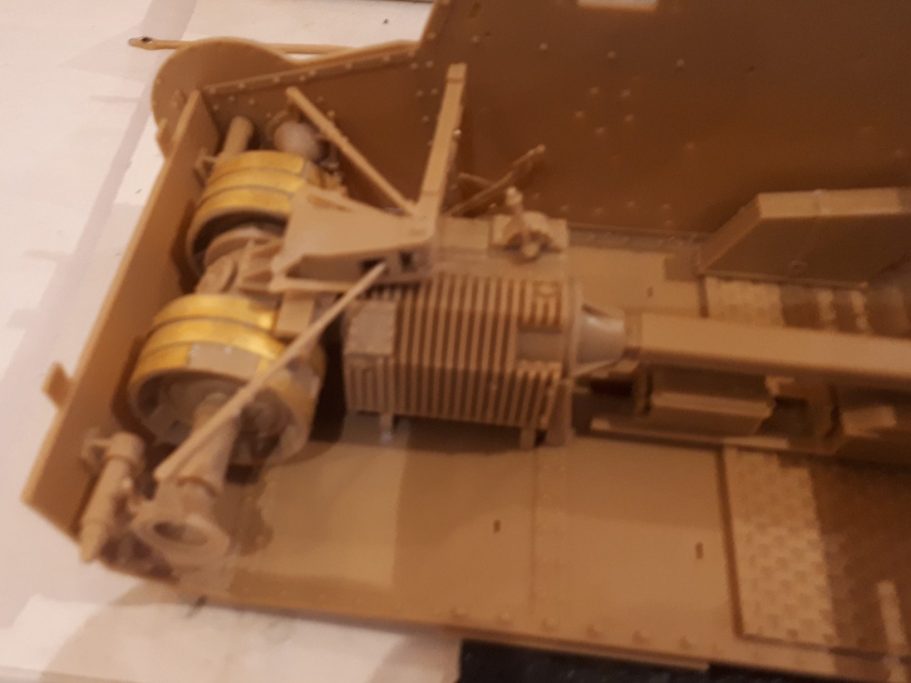
Photo #3, my apologies for the fuzziness, I hadn’t checked the shot before continuing, however it does show the photo etch bands around the cylinders that I noted as being mistakenly numbered in the assembly instructions.

Photo #4 is a close up shot of the engine assembly.
Although I’ve got a “walk-round” book on the 38(t), it doesn’t give the modeller much help with any wiring that could be added to this area. I take it there must be glow plugs for the diesel engine, and other electrical connections, but as I’m unable to identify what or there they might be from the references I have, I thought I’d stick to what was provided in the kit and not start adding spurious bits of wire and cabling “for the sake of making it look busy”.
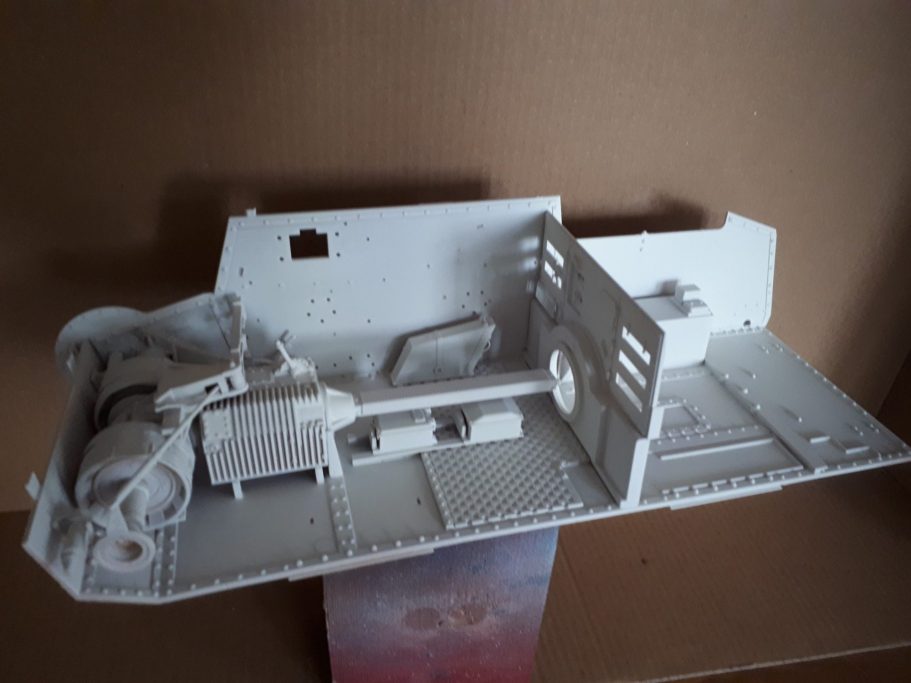
Photo #5 shows the engine removed from it’s location and a couple of light layers of Halfords White Primer added.
After this I then sprayed the whole thing with Grey primer, concentrating on getting the paint on the underneath of parts, then sprayed more White Primer from above so that the grey formed initial shadows within the hull area.
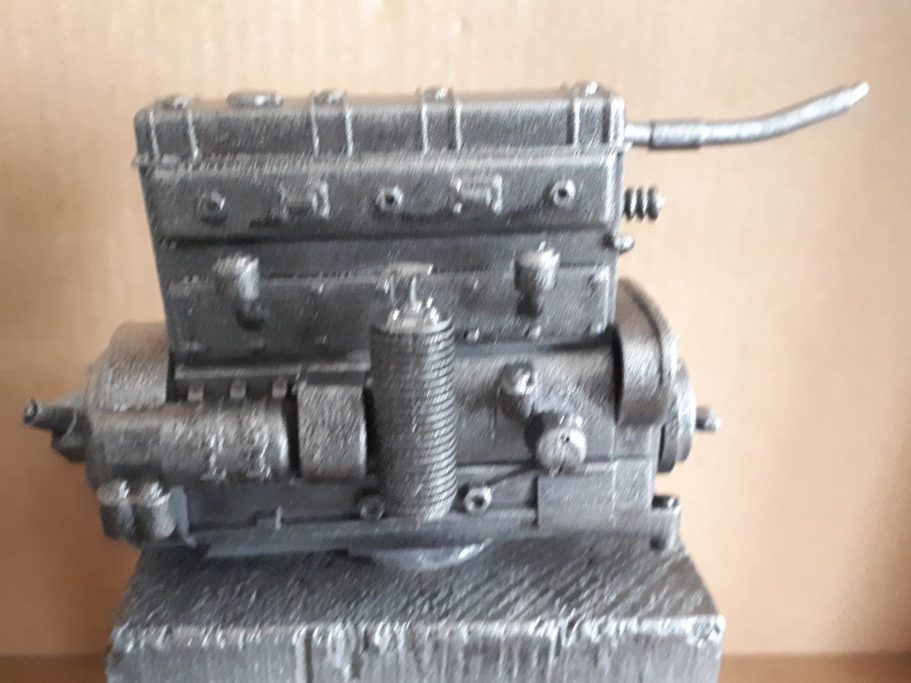
Photo #6 is a fuzzy picture of the engine. Again an initial coat of Grey Primer was sprayed on, then a dark metallic was used to coat the whole engine, with a lighter colour sprayed from above to create initial highlights and shadows from the mix of the two colours.
Granted a lot of this will be lost with washes that will be added later, but it does give an overall start to the effect I wanted to have.
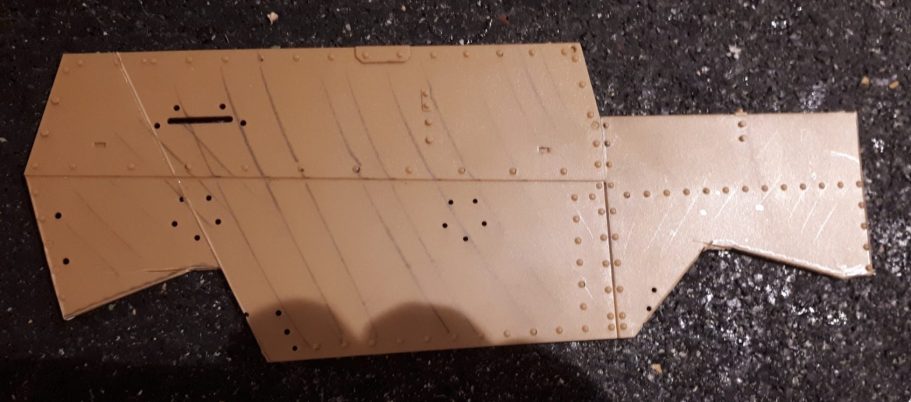
Photo #7 shows a section of the left of the hull that I’ve cut off the single component forming that side.
I decided that it would be too much trouble to replicate the hull walls and floor to make a separate internal view of the vehicle, and took the alternate route of having a cut-away on one side. Shown here is the section I removed, allowing for the suspension and wheels to remain on the vehicle in order to support that side.
Initially I’d considered having some other way of supporting the left side of the hull, or even removing the two middle road wheels, but discarded these ideas, and so the strange shape of this “waste” piece of plastic.
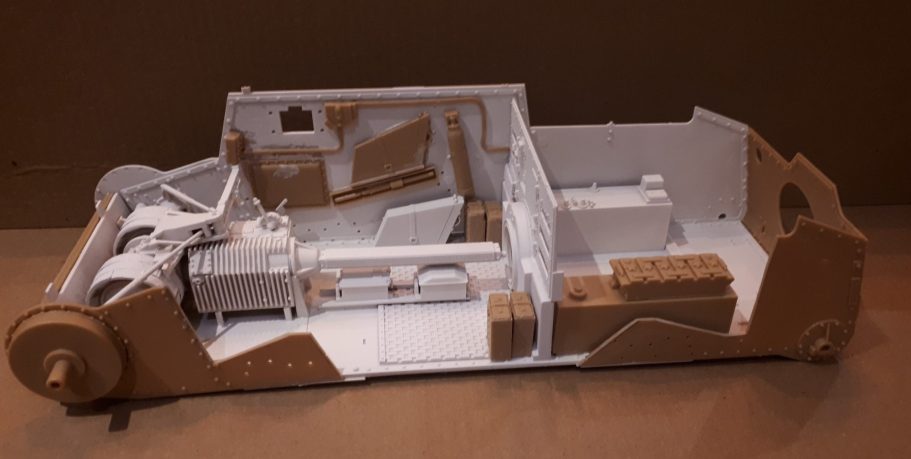
Photo #8 shows the hull with what remained of the left side fastened in place, the location holes for the suspension units visible and hopefully enough of the side panel removed to give a good view of the interior.
Photo #9 shows my method of holding the components for painting, using long pieces of wood with blu-tac to fasten the parts to them, or double sided tape in some cases, and then using spray cans to add the colours.
It’s surprising how accurate you can be with a conventional spray can without having to resort to masking, the hull front with the machine gun fitted was done without any masking, the outer surfaces hit with a grey colour, and the internal areas with white.
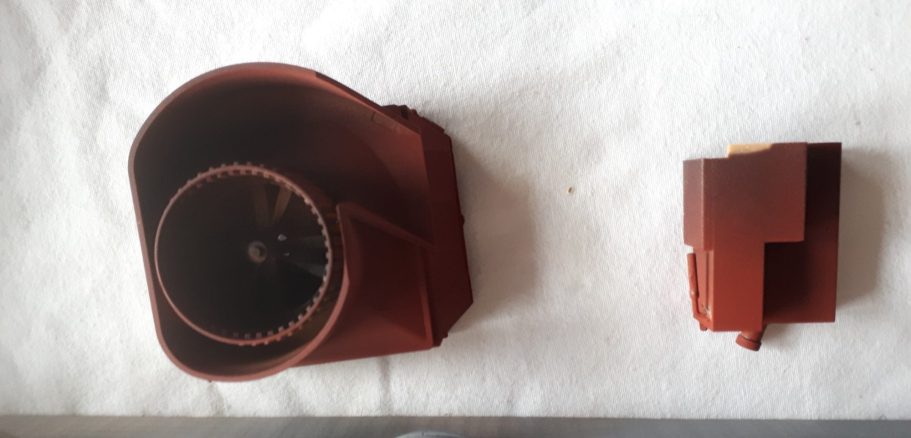
Photo #10 shows a close up of the cooling fan and one of the fuel tanks that will be added to the hull later.
One thing to note if you’re going to paint these as sub assemblies, DON’T glue the rear panel to the hull before final assembly and insertion of the engine and this fan assembly.
I glued the rear panel on, and quite honestly it’s a pig to get the engine and this fan to fit back into the space they need to go in if that panel is fixed in place.
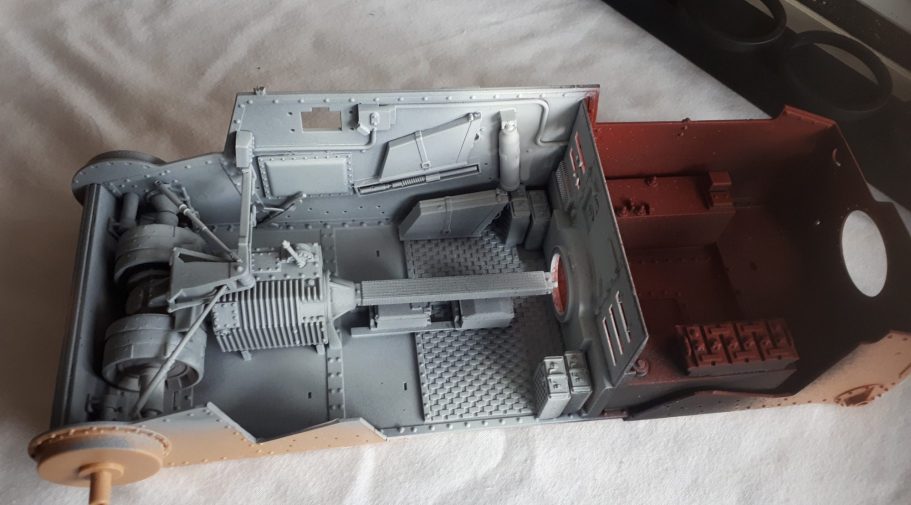
Photo #11 shows the hull painted, the engine area being coloured with an initial coat of Black primer and then Red primer sprayed on to create the highlights.
The effect of the grey followed by white primers can be seen on the forward section in this shot too.
A close up of the front section at this point is shown in photo #12, although there’s a fair amount of detail to be added with a brush, plus some grubbiness and chipping to be painted on too.
Photo #13 shows the suspension units, these have been primed and will be painted and then have weathering added.
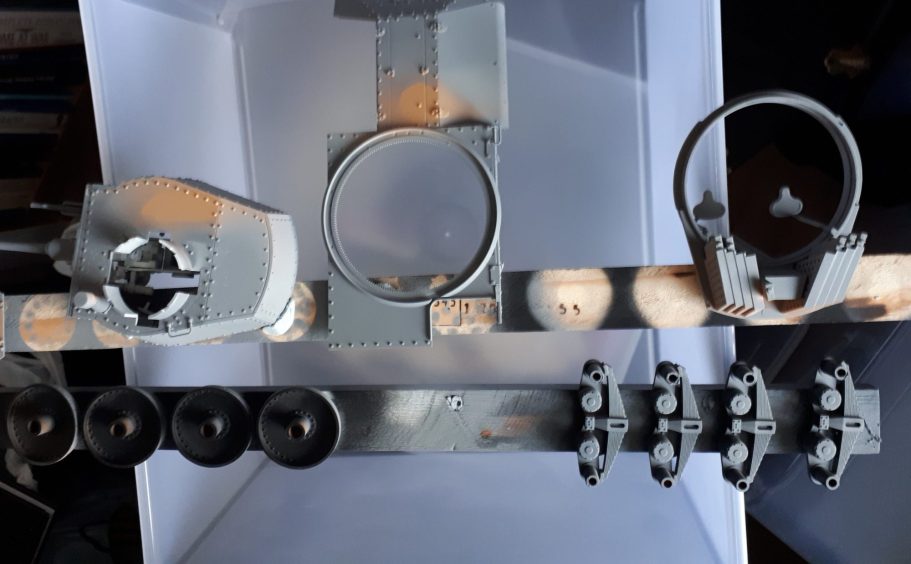
Photo #14, lots more black and then grey primer added to the suspension, wheels and turret assemblies.
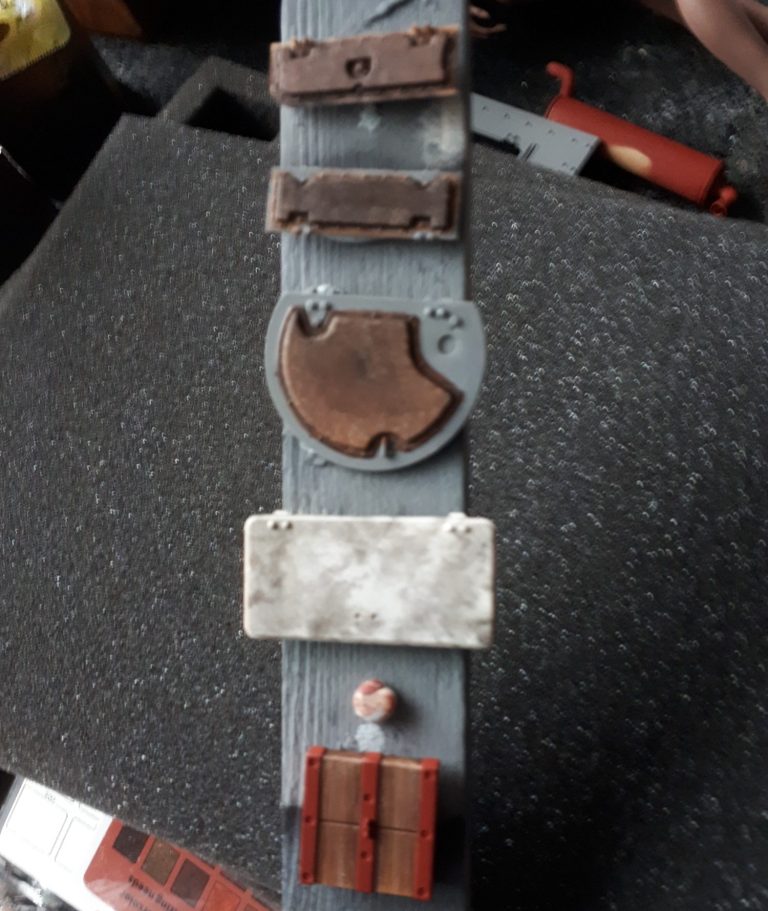
Photo #15, and some detail painting begins. Leather covered padding on the inside faces of hatches, made from an initial coat of Vandyke Brown oils, followed by lighter brown colours ( see my method for painting leather in the “How To section of the website ). Also in this shot is some thinned Vandyke Brown oils being added in a clouded pattern to the inner surface of the forward drive hatch, and wood effect added to the jacking block.
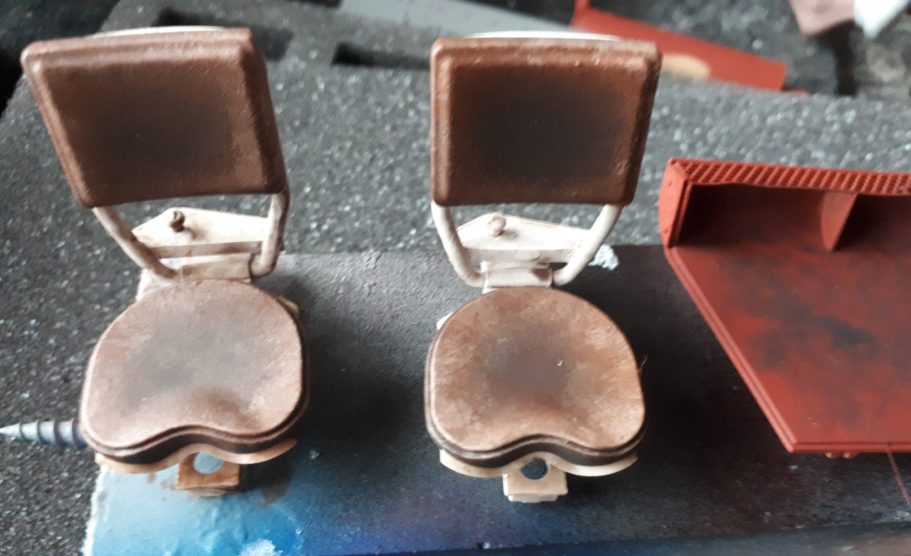
Photo #16, and after grey and white primer has been added to the seats, I painted on oil colours to represent the leather back and seat sections of the chairs.
The grubbied up inside of one of the engine hatches can also be seen in the right hand side of this picture.
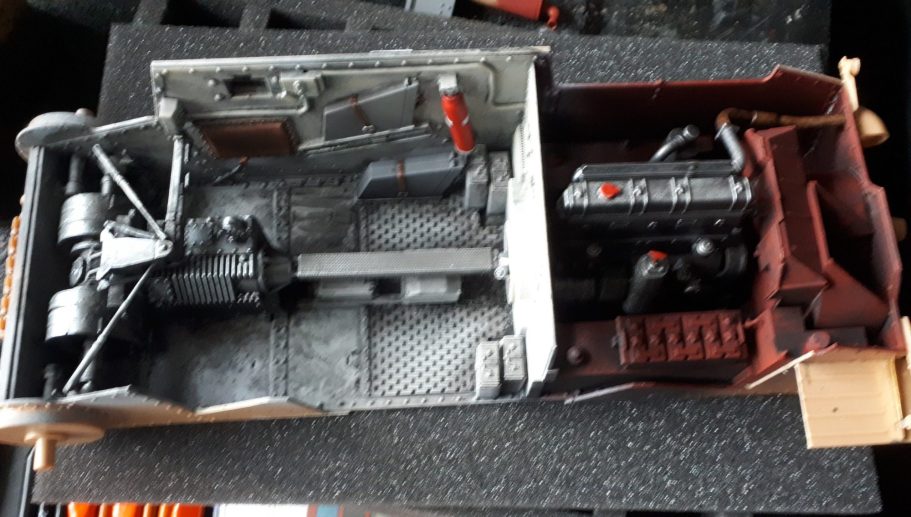
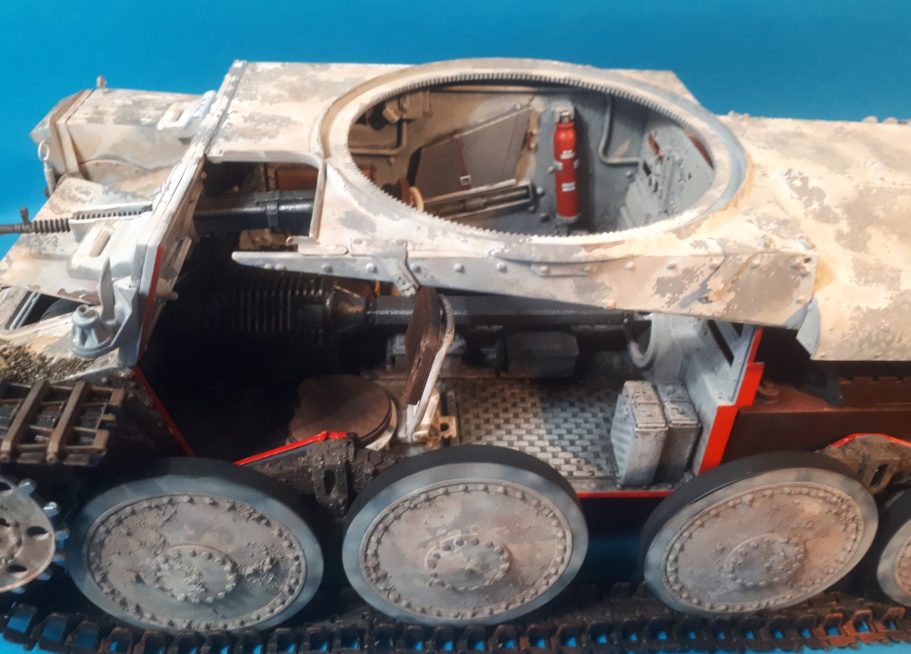
Photo #17, and with a lot of the details and weathering added, the inside of the tank is looking a lot more realistic.
After an interesting selection of curse words were used, the engine and fan assembly have been shoe-horned into position and glue applied.
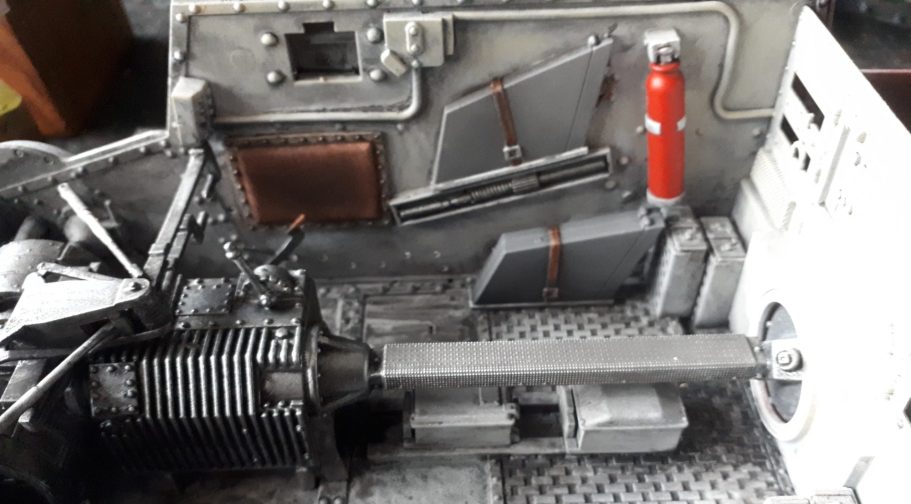
Photo #18 shows a close-up of the forward section at this point. I need to see if there’s a decal on the sheet for the fire extinguisher, or for that matter, any other decals that need adding before fastening the top of the hull in place.
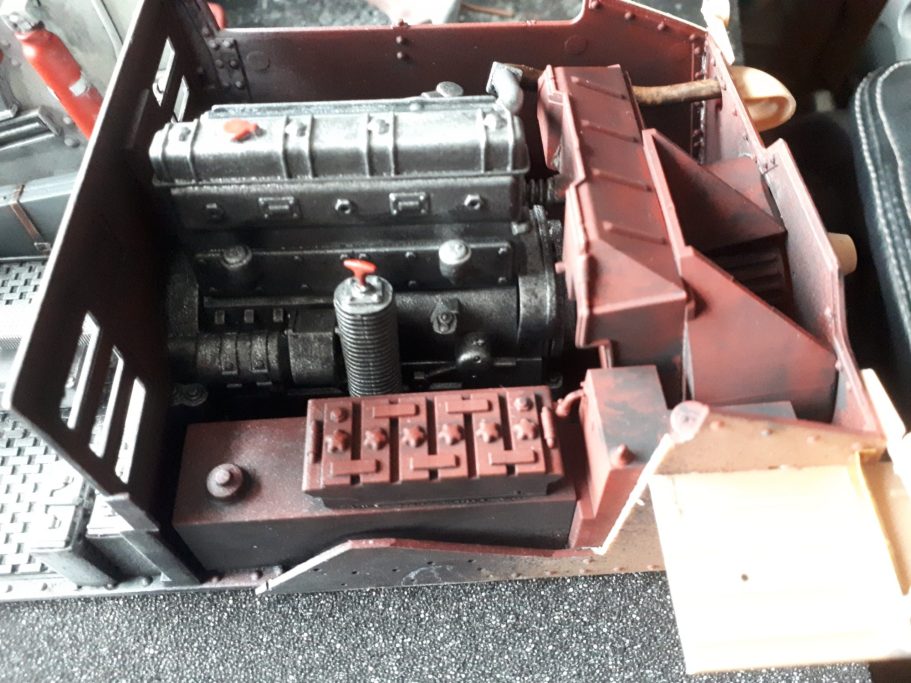
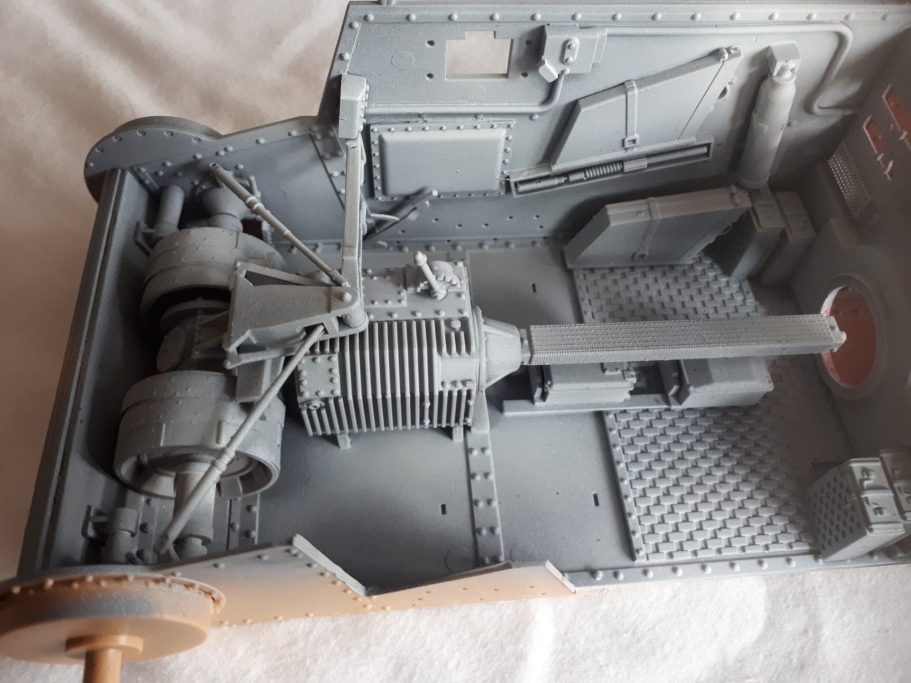
Photo #19 and a close up of the engine bay.
One disappointment was the joint line on the oil filter (?) with it’s little red handle on top. I couldn’t get rid of that line that runs up the side of the two parts once joined, and its presence is glaring to me in this shot.
Black oils, thinned heavily with White Spirit have been added to make the area look well used and dirty, probably most noticeable on the “red lead” coloured sections, but there’s quite a bit been added to make the engine look well-used too.
Masking, Blu-tac and Marmite….
Photo #20 shows the rear deck of the tank, having been temporarily been fastened in place with blu-tac along with all the other panels.
I used kitchen roll and masking tape to seal off the paintwork done on the inside of the tank, and gave the outer areas a coat of grey primer.
I wanted a tank that had been whitewashed for winter operations, but with spring coming and heavy use, the whitewash had chipped and worn off quite a lot.
So here I’ve added Marmite with a fine sponge over the grey primer, then sprayed Tamiya White through an airbrush in a cloudy pattern. The marmite can be seen under the white paint as the textured sections, and will prevent the whit paint from sticking to the surface of the tank in those areas.
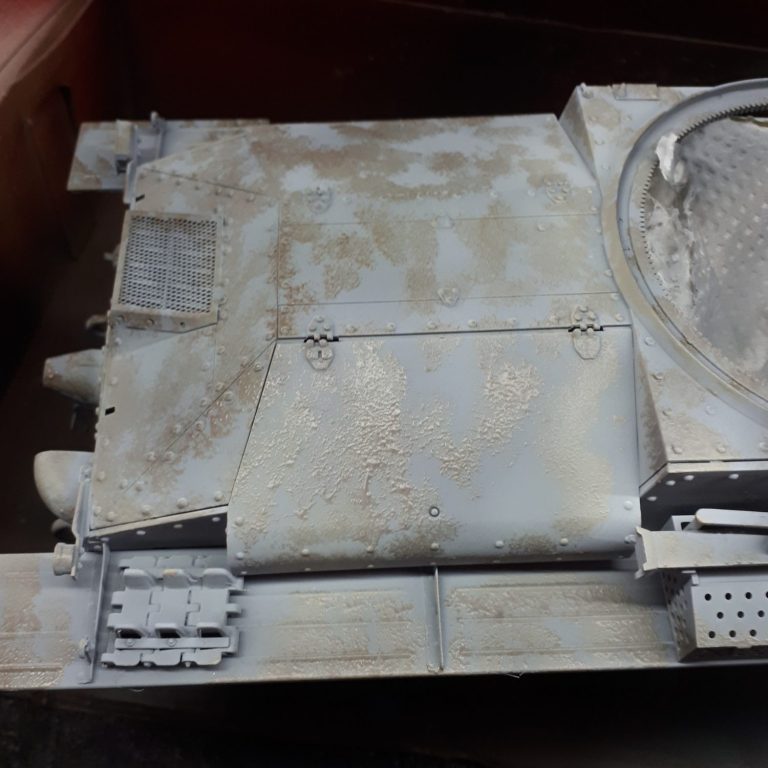
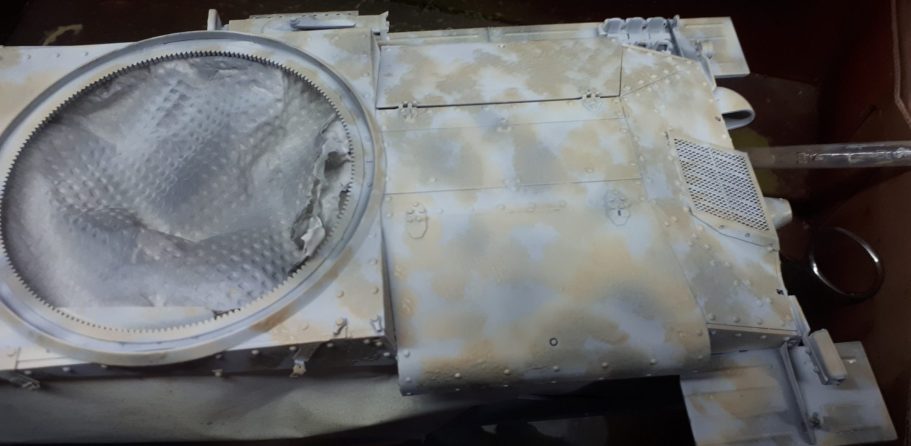
Photo #21 shows another shot of the rear deck, the discoloured sections of Marmite being visible yet again in this picture.
The white paint is given about half an hour to dry, and then a soft brush, soap and water is used to wash the panels of the tank to see what paint is removed.
Photo #22 shows two of the road wheels that were treated in the same way, now having been washed and you can see the random pattern that has been formed with the removal of some of the white paint.
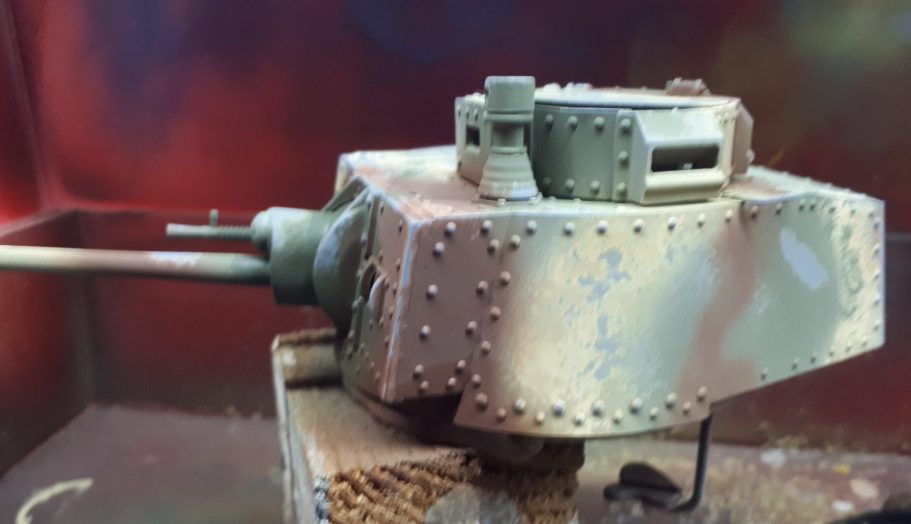
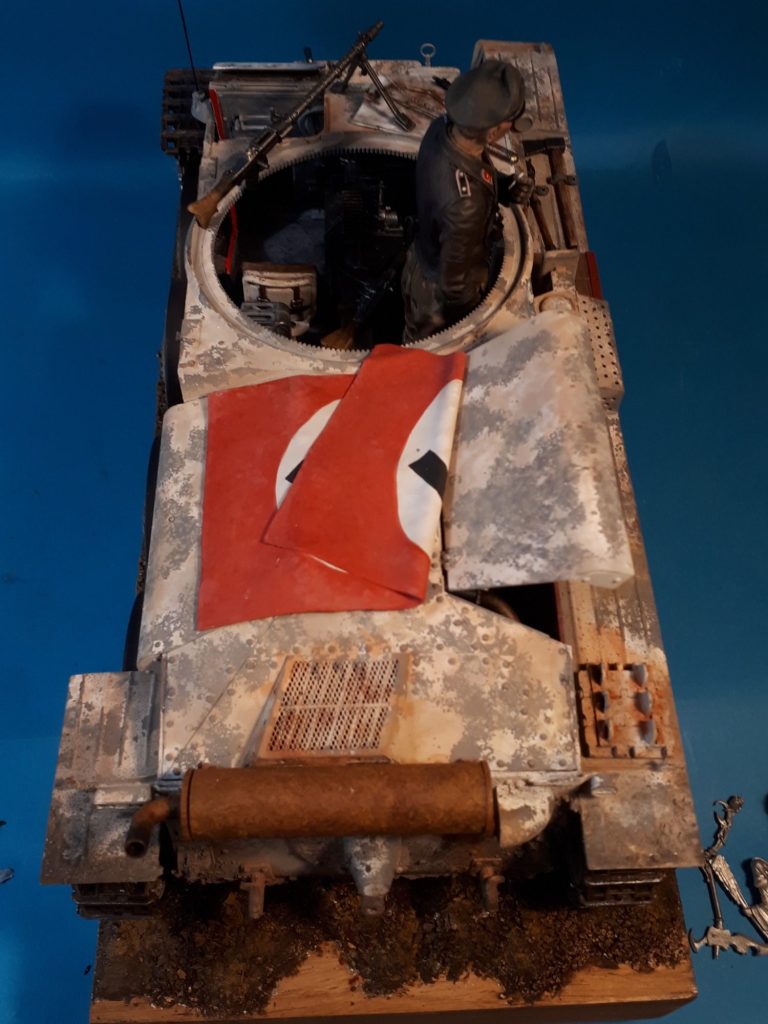
Photo #23. I’ve not spoken about the turret, this is because having looked through my references I saw that the hull of the 38(t) was used as an ammunition carrier, with the turrets being removed. Some turrets were employed as static defences, and to allow more of the internals of the hull to be visible, I thought I might build a base for the turret to be mounted on separately – a chance to use more of the figures I have in this scale perhaps.
Photo #24 and returning to the inside of the hull. I’d used black and some Vandyke Brown oils to add deeper shadows and dirt inside the drive compartment, but added some more Mars Brown oils, again heavily thinned with White Spirit to the forward section, splattering some of the Vandyke Brown onto the floor to look like grease and oil drips and splashes.
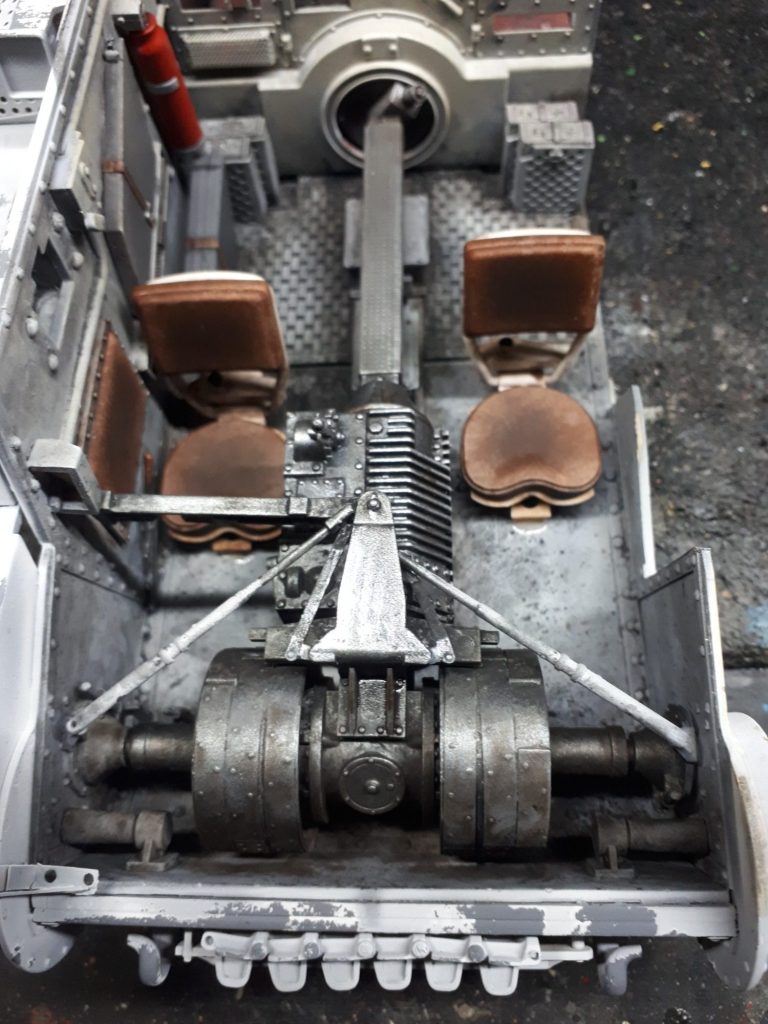
Photos #25 and #26, with the seats in place, and it’s definitely coming together with the addition of the seats.
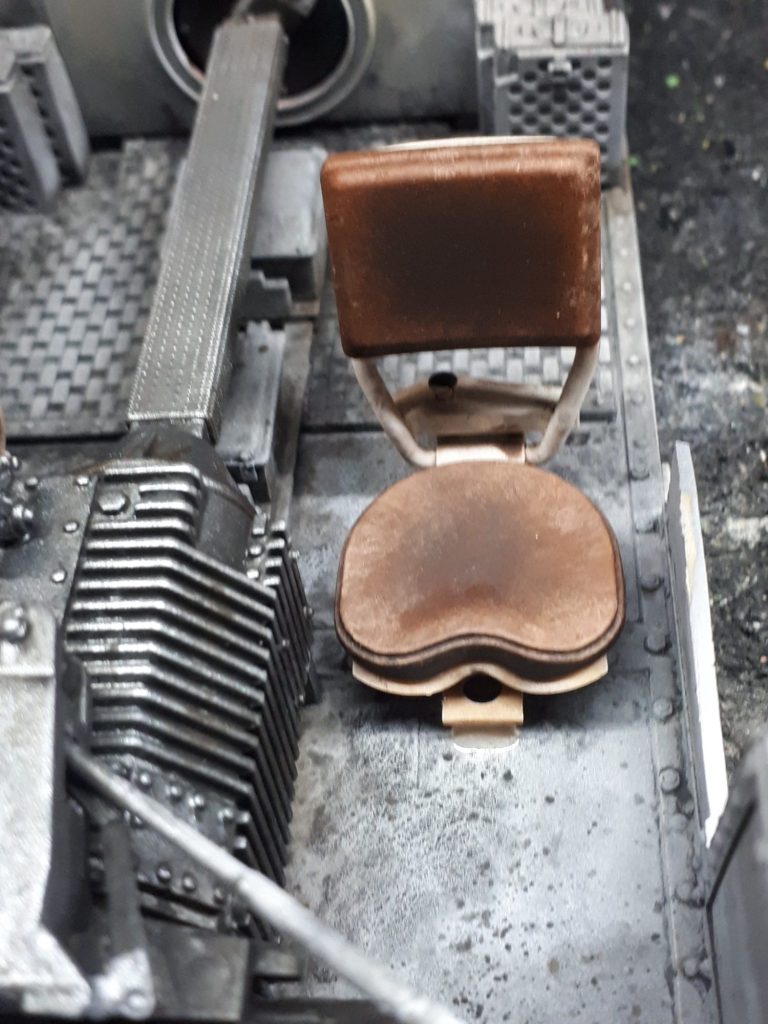
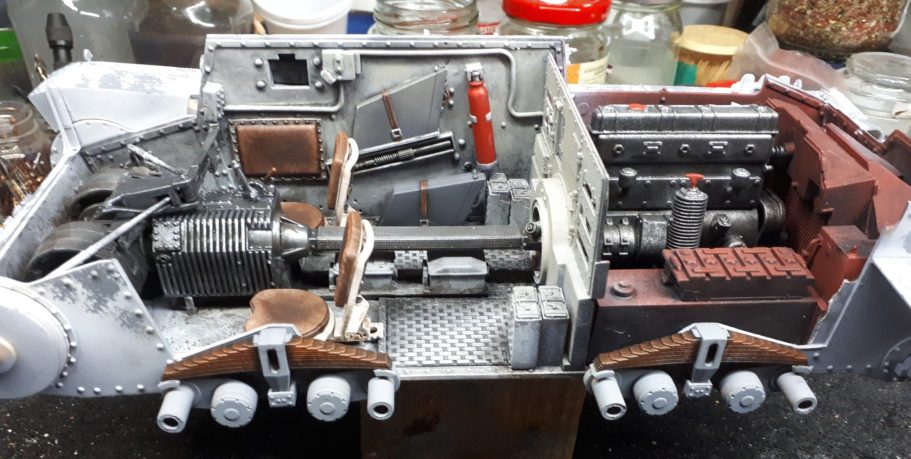
Photo #27 shows a side view at this point. Busy and whilst colourful, it still looks functional and “well used”
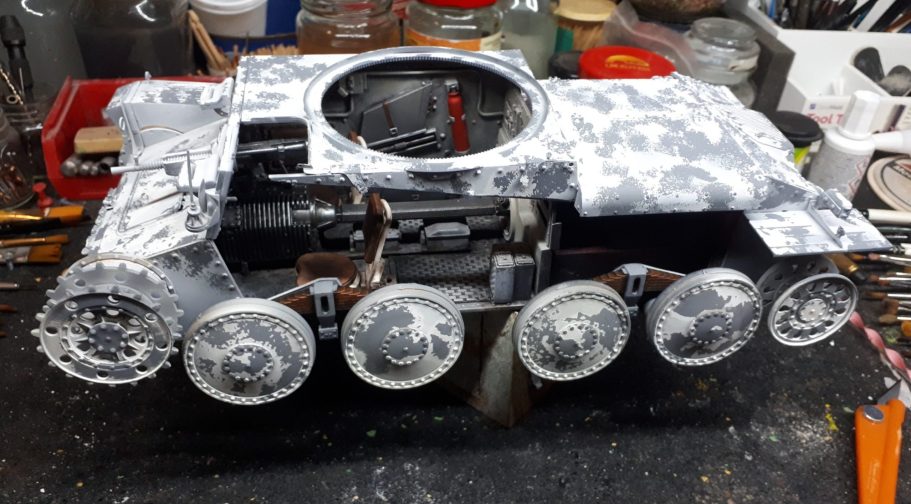
Photo #28 and the child in me – impatient and enthusiastic – just has to see what it all looks like when put together.
In this picture the hull plates are only balanced in place and the wheels temporarily pushed onto their location pins.
Whilst the camouflage looks very clean at this point, that will all change soon, but I have to admit to being happy with the show so far.
The engine hatch on the far side will be open, again allowing the viewer to see inside the vehicle.
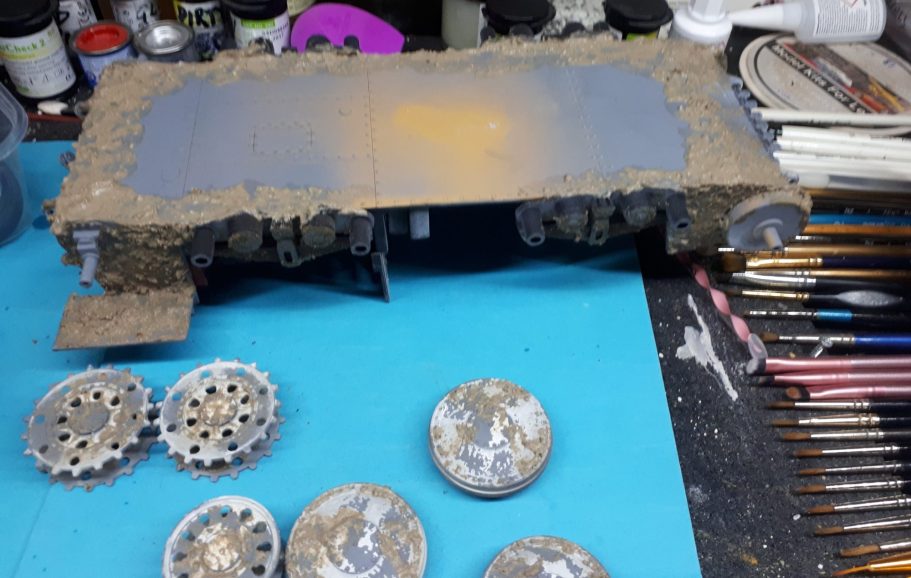
Photo #29 – mud and muck !
Weathering is not my strong point I have to admit. In the back of my mind it hides detail that I’ve spent ages assembling and painting, so this here is a bit of a downturn in the modelling process.
I mixed up fine sand, white glue, some acrylic paint and a little water into a gloopy mess and used an old hogs-hair brush to slap it onto the applicable areas of the tank and wheels.
Photo #30 is he beginnings of sculpting a jacket sculpted from Magic Sculpt, that might, just might end up on the model. It depends how it turns out.

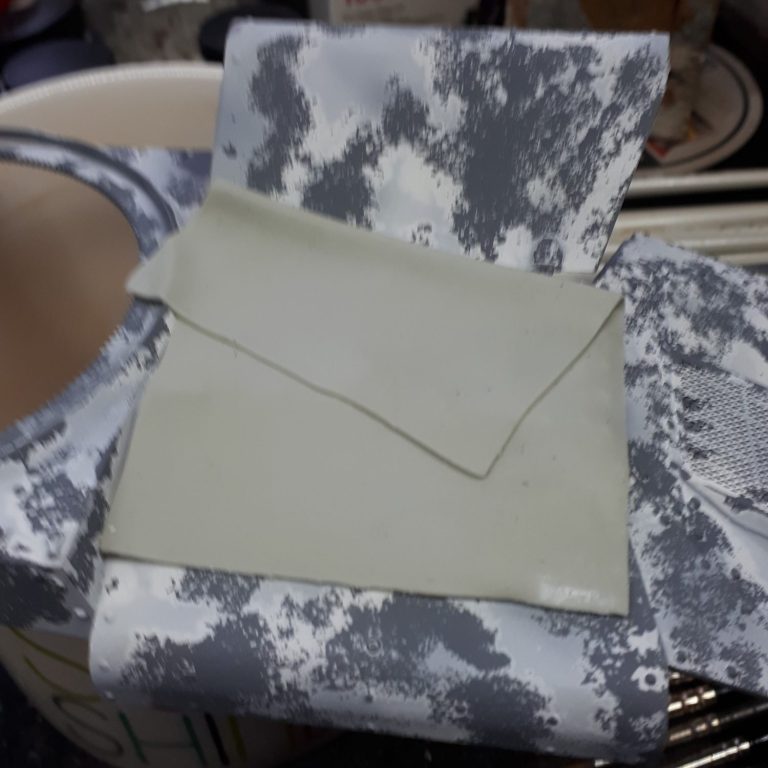
Photo #31, the jacket being the left-over putty used to make an air-recognition flag to go on the rear deck.
The epoxy putty is mixed and then rolled out on a flat tile that has had a little French Chalk sprinkled onto it. The chalk ( or talcum powder ) prevents the putty from sticking to anything.
Given an hour to cure a little bit, the rolled out putty can be trimmed to size and folded onto the desired area of the tank and left to cure.
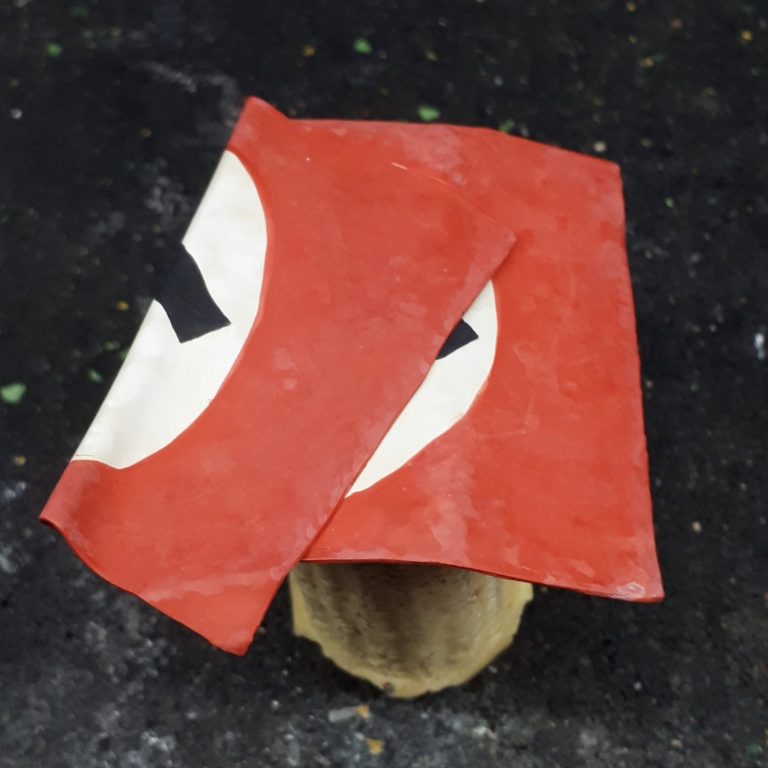
Photo #32 and possibly one of contention, the painting of the air recognition flag.
I’d purposely folded this so that a full swastika would not be shown, because I know that for some people the sigil is upsetting, denoting the horrors of WWII.
To further the distance, whilst on first glance it is a double sided flag with the swastika on it, further examination will show that actually the design does not work. It’s offset, the white circle does not match centrally both sides, and the black does nothing more than form two small squared-off patches.
The red was painted to look faded, although now that the acrylic paints have had time to dry, they possibly need another wash of the red to blend the weathering in a bit more.
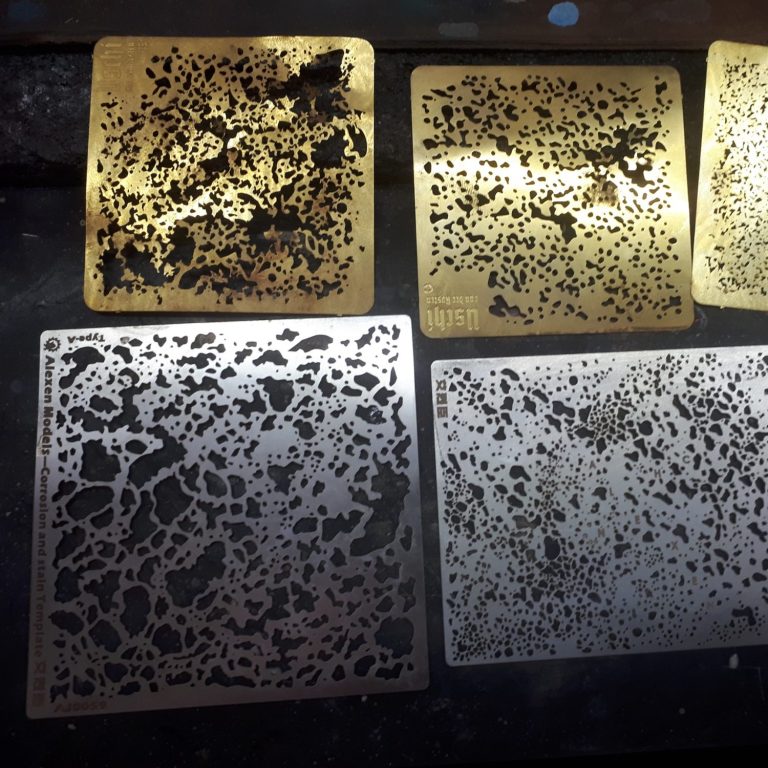
Weathering masks, as shown in photo #33 are something I discovered some time back, there are paper versions, but I prefer these steel and brass ones, which if you’re careful can be cleaned and reused….. well, I guess for a long time.
The idea being that either with an airbrush or perhaps a sponge lightly charged with some paint, the weathering colours can be applied to the surface of a vehicle.
Regularly moving the masks, changing the colour of paint being used and working from the more open pattern to the finer ones gives a build up “layered” effect to the weathering.
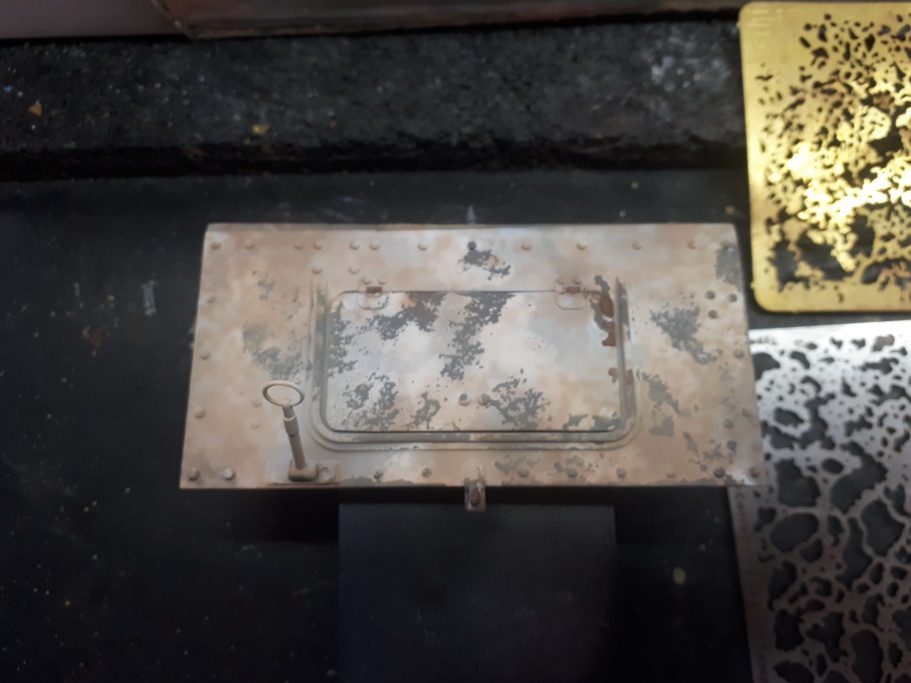
The ones shown here were used to weather the outer surfaces of the tank, and the result can be seen on the engine hatch in photo #34.
The paint has been applied in two layers at this stage, and concentrating more towards the left and right hand edges. More colours will be added, but this shot shows the cloud-like effect beginning to build up.
The only problem I’ve encountered with these masks is that because they’re metal, it’s difficult to work around raised detail or right into corners.
The way to get around this is to blend the weathered areas into the “unreachable” areas afterwards with careful airbrushing of similar colours and maybe an oil wash or two.
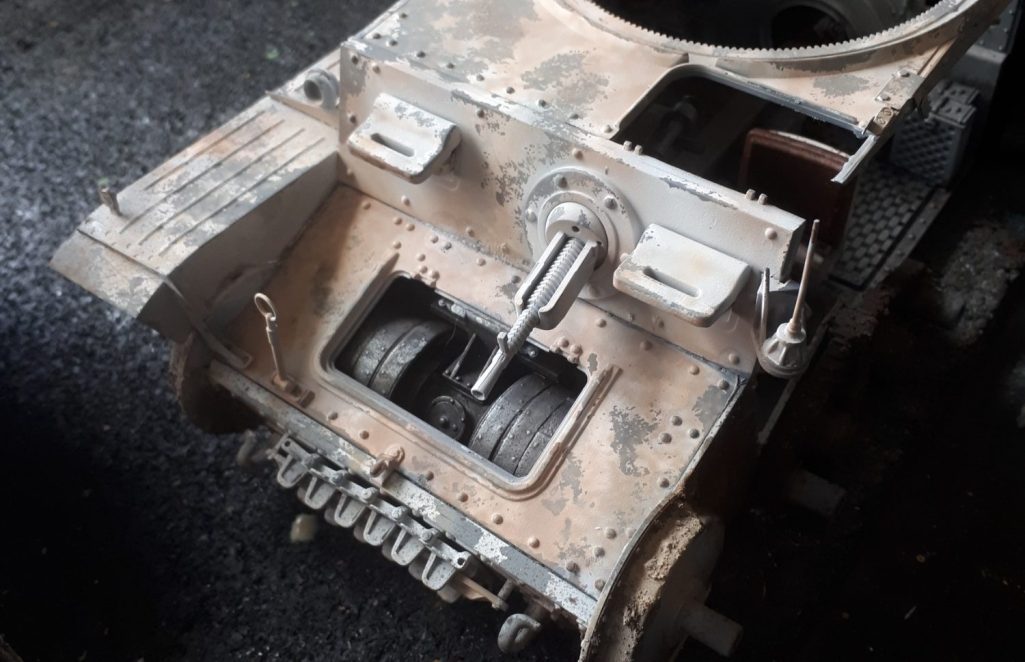
Photo #35 shows the rest of the front of the 38t with the same two layers of weathering added. I filled the interior of the tank with kitchen roll to stop the weathering colours getting in there.
Whilst some dust and dirt would get inside the vehicle, I preferred to control that in a separate application of paint, rather than try dealing with blending in any overspray from painting the outside areas.
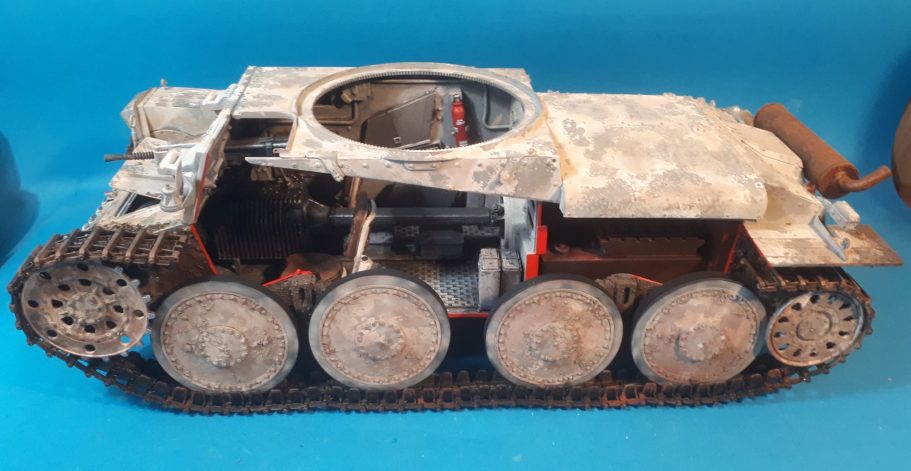
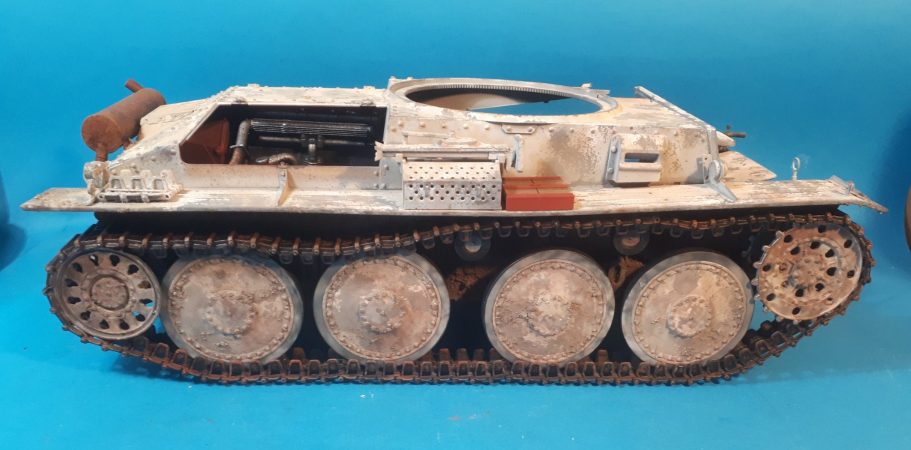
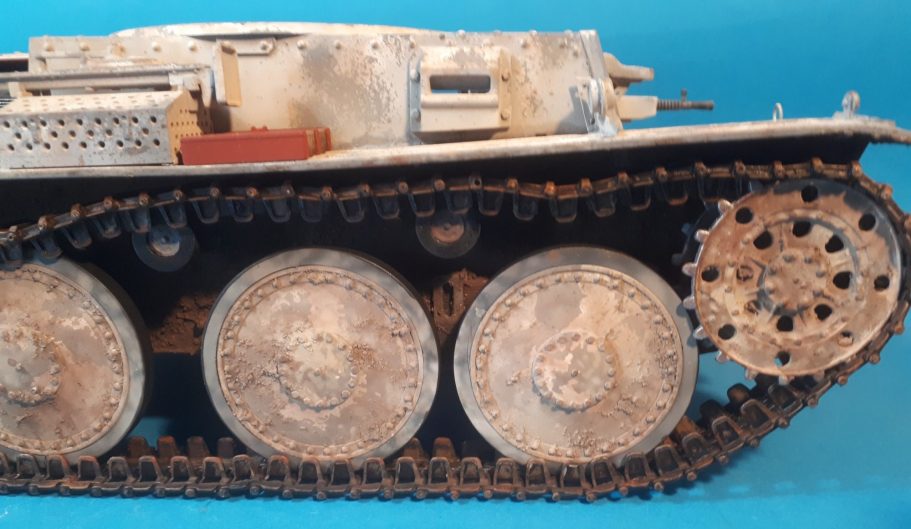
Photo #36 shows a better, brighter shot of the side of the 38t, the dusty look of the weathering working well to calm down the white of the old winter camouflage that’s wearing off a lot.
A close up in photo #37 shows the many layers of paint that have built up from the initial primer and grey to now having several layers of weathering colours added.
The interior at this point has had some Vandyke Brown oil paint washes added to make things look worn and grubby, and the “cut-away” edges were given a couple of coats of white acrylic, then a coat of Bright Red from the MP range of paints.
Why paint the edges white first ?
Well, the red, any red, or yellow paint for that matter, tend not to be terribly strong pigments. Getting a bright, solid colour can be difficult or need many, many payers of paint, and even then, darker paint underneath can still affect the quality or brightness of the colour.
Painting a couple of coats of white on – enough to get a solid white - ensures that the red is bright and unadulterated.
I’ve concentrated on the “opened up” side of the 38t quite a lot in the last few pictures, so here in photo #38 is a look at the other side. It’s weathering looks ok, but its’ a bit bland. Possibly because of the lack of tools etc, but some oil washes are needed to add depth.
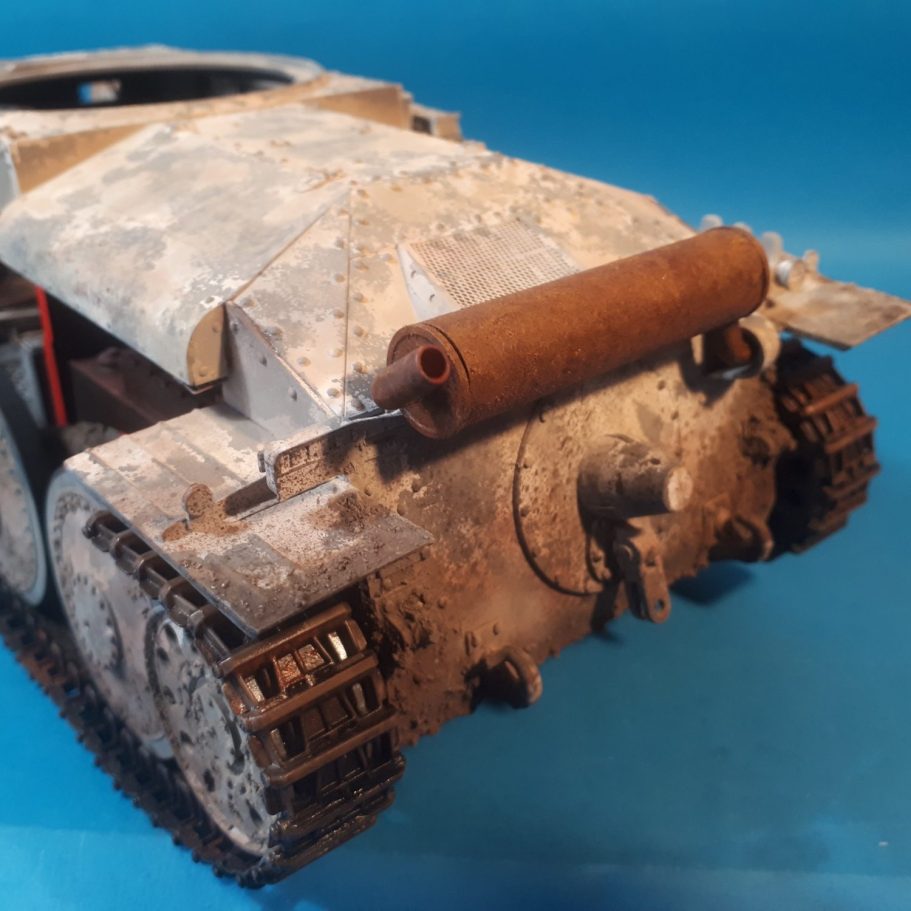
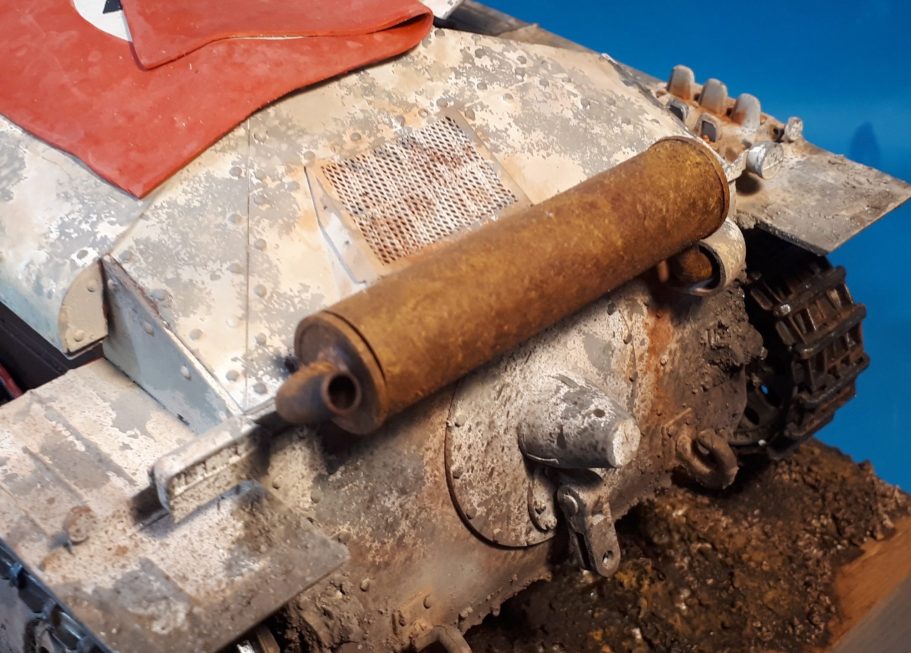
Photo #39 - Have I mentioned the exhaust pipe ?
I don’t think so.
I’m really pleased with how this turned out, and it was pretty simple too.
Painted with three or four layers of sand coloured acrylic mixed with Mr Hobby Matt Medium over the sprayed on primer, then, once fully dry I added a coat of Burnt Umber oil paint, stippling this with a large, soft brush to get an even texture and remove any brush marks.
Onto this I then added some Mars Brown Oils, again stippling the paint on to blend it slightly with the Burnt Umber.
After that, some Venetian Red oils, and then a small amount of Mars Yellow, both stippled on, and reducing the area that the paint covers so that highlights build up and allowing the darker colours to remain in areas that would be in shadow.
The paint is quite thick, not having had any White Spirit added to it, and there’s a definite texture to the surface from the stippling action of the brush.
The exhaust was allowed to dry in a drying cabinet ( an old kitchen cu[bard with a heating mat from a reptile vivarium in it ), and a slightly greasy looking, textured effect is what emerged when dry.
A little more Burnt Umber added as pin washes to pick out the seams and add a small amount of shadowing to the underside and it could be glued in place.
Photos #40 and #41 show close-ups of the side of the 38t, and as mentioned, the dry, dusty look is working, but it’s a bit boring and monochrome. Some oil washes and runs of paint from the wheel hubs will add interest and pick out the wheel nuts a bit better.
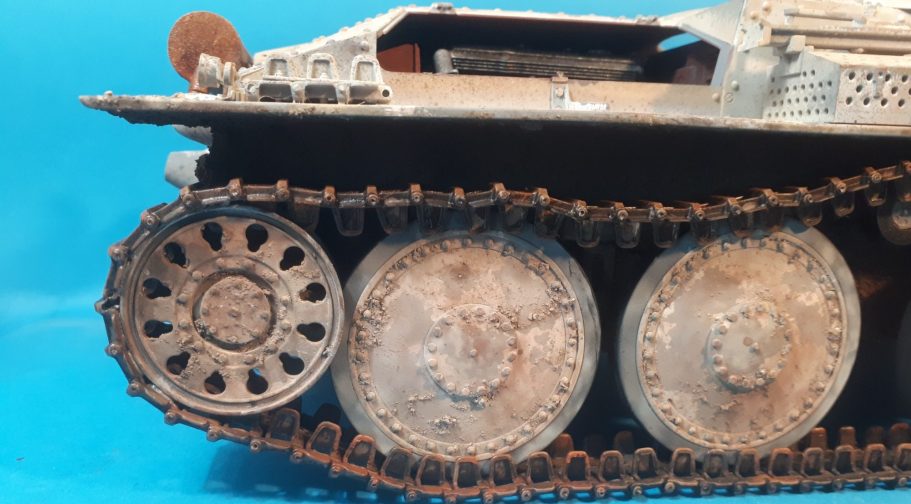
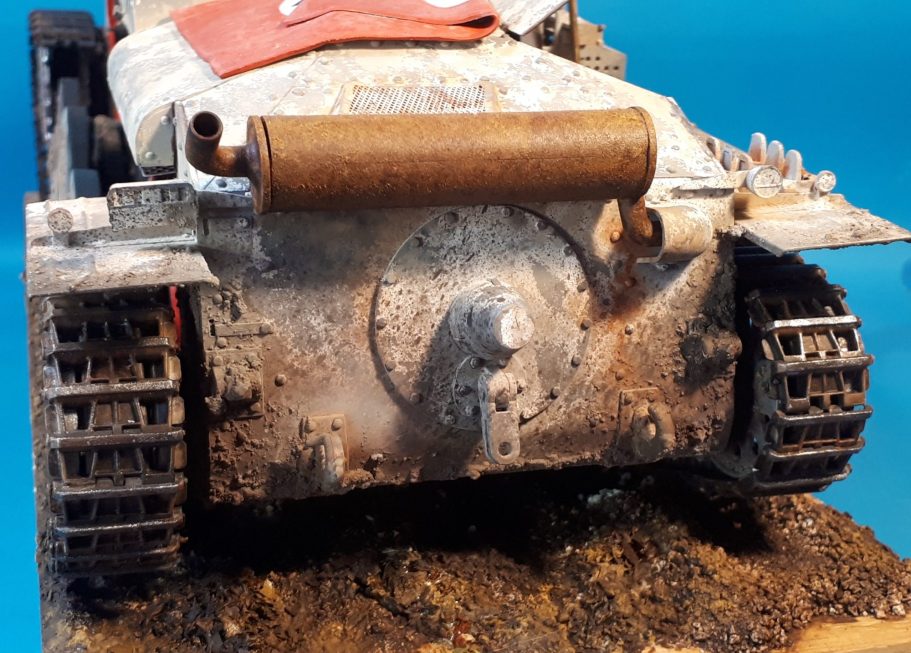
Photos #42 and #43 and we’re looking at the front of the tank, the tracks were painted prior to adding them to the vehicle, with a coat of black primer from Halfords, followed by a dark Steel colour, again from Halfords rattle-can range. Over this, once fully dry, was added some Venetian Red ( for the rust ) and some Mars Brown ( darker rust ), whish was then wiped off so it remained in the recesses.
Most of this will be hidden once some pastel chalks are brushed on, but enough will remain visible for the time spent to be worthwhile.
A final touch will be to use a cheap, disposable eye make-up sponge ( don’t dis the Primark make-up dept, it’s full of stuff that’s of great use to the model maker…… Just make sure to stand in a very butch manner when perusing the racks ! ).
Anyway, the little sponge eye-shadow applicators are excellent for adding
Metallic colours to the raised portions of the tracks. Just dab them in a bit of paint, not much mind, and then dab them on the tracks. The paint will transfer to the raised track cleats, and with a bit of practice, a whole track length can be completed in no time at all.
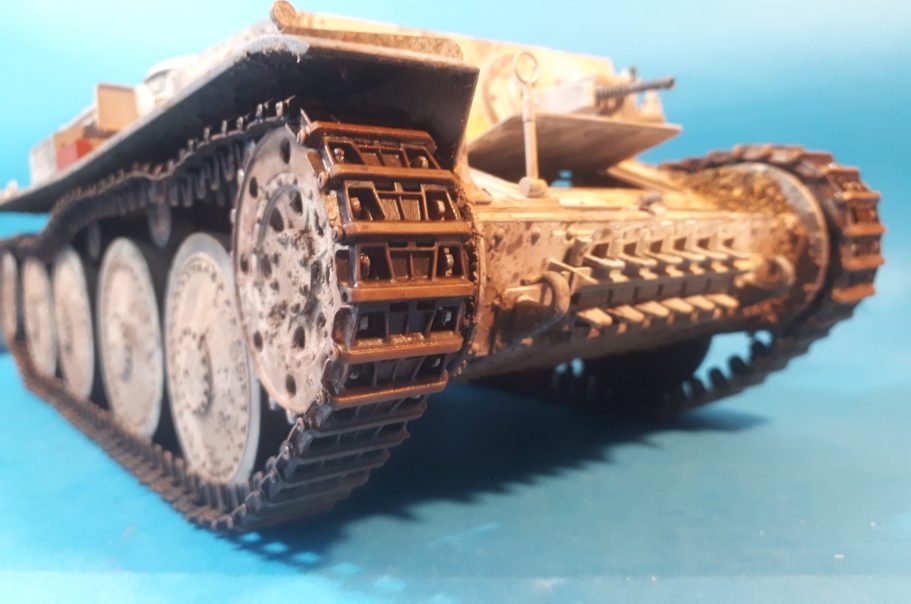
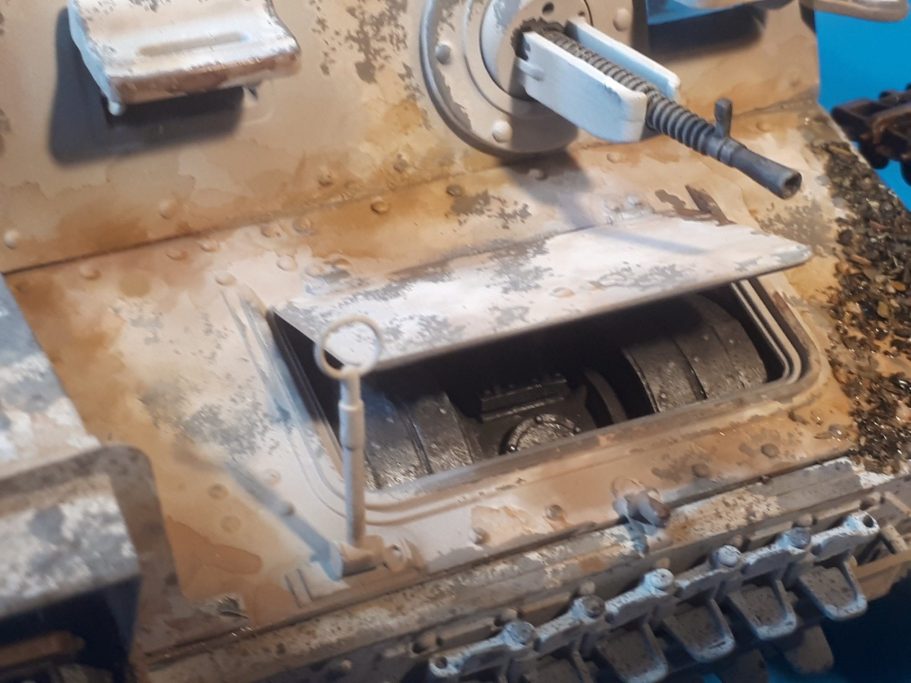
Photo #44 shows the engine lid open, I’ll have to add a “stick” to this to make it look like it’s being propped up, and before finally fastening the cover in place, I’ll add some washes of Payne’s Grey and Vandyke Brown oils to the transmission to grubby the area up.
Note the machine gun barrel guard and how clean it appears compared to the rest of the tank. This shows how it’s almost impossible to use the metal masks to weather such small areas once they’re fastened in place.
It’ll have to be done the old-fashioned way with a brush and some thinned oil paints and pastels to make it match in to the rest of the armour plates.
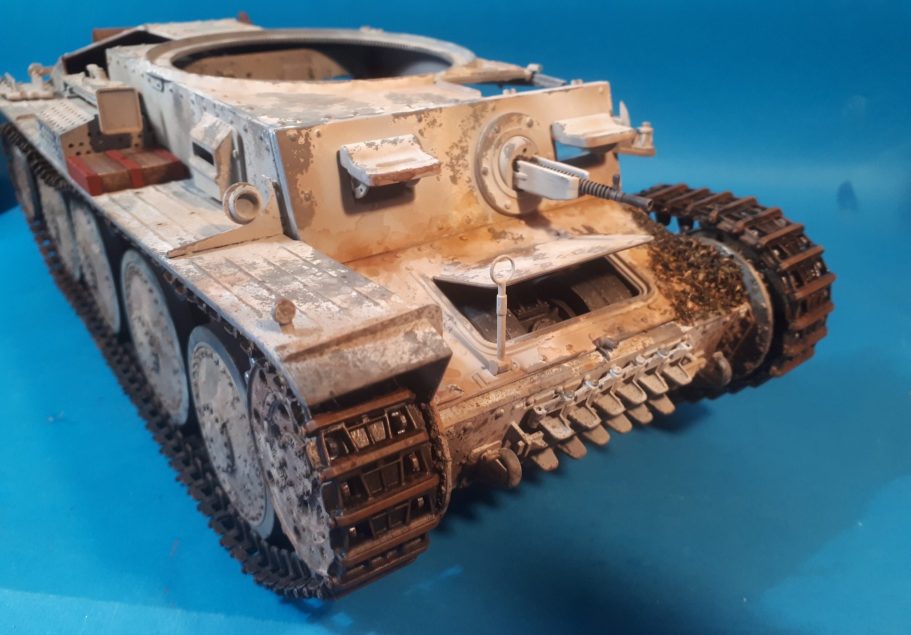
Also in this shot I’ve added some dried herbs to the left, front side of the hull. The mudguard has been lost or removed and build up of debris would be likely as the track passes the area.
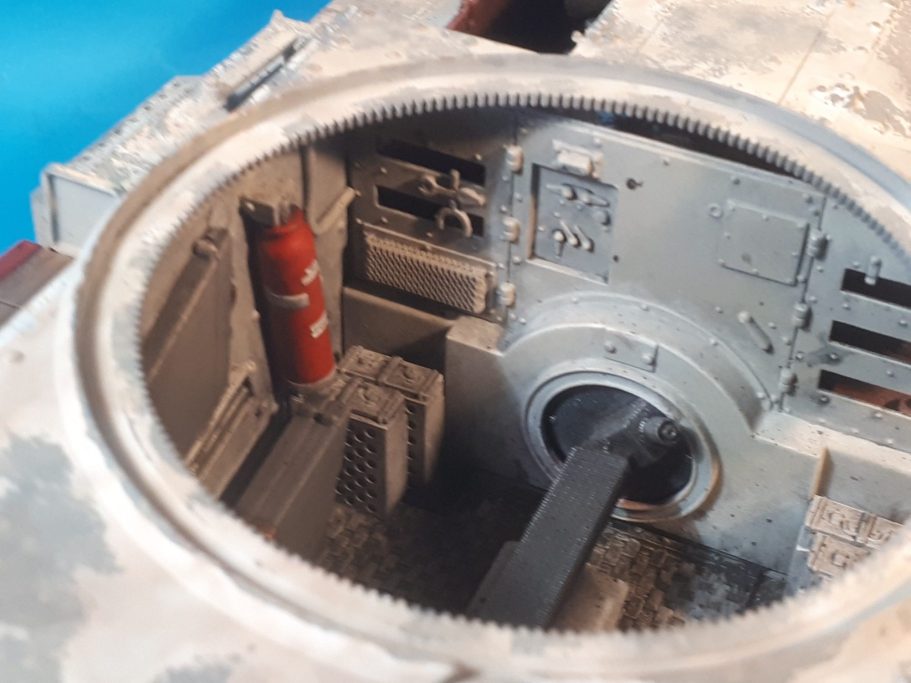
Photo #45 shows the inside of the 38t and the beginnings of the weathering process there. The white of the inner superstructure needs careful attention – too much dirt will look false, so gradually adding heavily thinned oil paint in layers and allowing it to build up slowly is the best way to go.
The advantage of such an involved build as this is that to allow a section to dry fully before proceeding further, there’s still plenty of other areas to play about with and keep the hands from being idle……
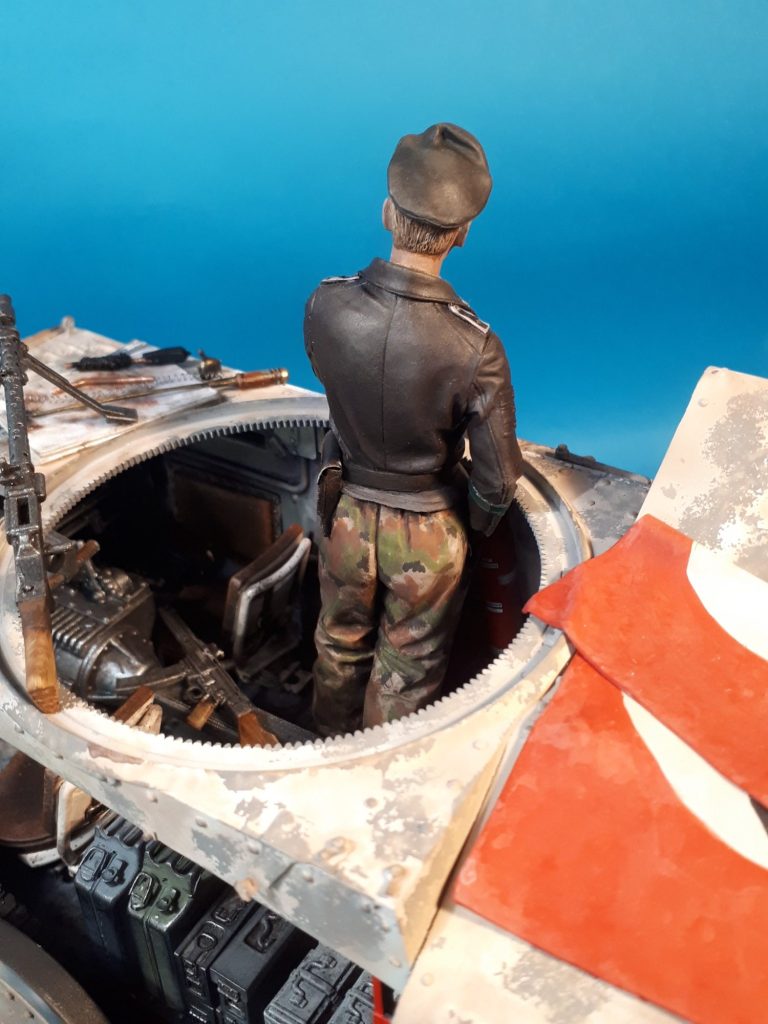
Oh, look, a figure to paint.
The 38t is a relatively small AFV and to give it some sense of scale I thought’s I’d add a figure…… I am, after all, primarily a figure painter really, so it’d be wrong if I didn’t add one, wouldn’t it ?
Photo #46. In this case, and I’ve been waiting for a reason to paint his one for years, it’s the excellent Alpine Tank Commander from the skilled hands of Taesung Harmms. It’s a lovely figure in 120mm ( 1/16th ) scale and fits right in with the vehicle.
I’ve several of this range on the shelf, although the modeller has to be careful if adding more than one as sizes differ slightly, and although all humans aren’t the same height, one or two of them ( like in the Verlinden range ) just look odd when posed together.
However, this one’s going to be on his own, his co-driver’s off somewhere doing who knows what.
Beginning with the trousers, I painted them with a sand coloured acrylic, adding a little shading and highlighting, but not spending ages doing it. And in this photo I’ve also added some random Red Brown patches of colour to begin building up a camouflage pattern.


Photo #47 and I’ve used a fine brush to add some green and some black to the trousers, again in small random splotches.
One thing I’ve discovered with practice painting camo patterns, is to add a little of the base colour - in this case the sand acrylic –to the other colours being used. It only takes a spot of the sand colour added to the red-brown, the green and the black, but it makes the colours more harmonious or “linked” to each other.
Looking at real pieces of clothing, although some items look new and rather bright, that effect would probably fade and the colours become almost blended together with repeated cleaning and the ingraining of dirt and dust.
However, in this shot the colours look way too bright, but that’ll get sorted……
As if by magic, OK, the addition of three washes of Vandyke Brown oils, and the camo colours blend together and the trousers look a lot more realistic – see photo #48.
Why three washes ?
The first wash is a mix of the brown paint and quite a lot of White Spirit. It isn’t allowed to “pool” on the figure, it’s just a case of getting a very thin layer of colour on the model.
Application of a hair dryer speeds up the drying process, although it will “blow” any puddles of paint all over the place, so a thin layer, no pooling, and allow to dry overnight in a warm place.
Second layer, using the same mix of paint to thinners, and this is applied all over again and is to build up the colour if it isn’t quite strong enough. Allowing the paint mix to flow into the details and slightly ( and I do mean slightly ) pool there.
Hair dryer on a moderate power setting, and hold the figure upside-down while drying it, allows the paint to settle UNDER the creases, rather than into them.
Think of a crease looked at from the side. It looks a little like a capital letter “C” if you’re viewing it from the right of the letter. The highlight should be formed on the lower curve of the C where most light hits the crease whereas the shadow should form under the top of the curve of the C.
So if you look at the figure from above, you should only see highlights and lighter mid-tones, Look at the figure from the bottom and it should be all shadows and darker mid tones.


Ok, so third layer, this time a little thicker paint, but still mixed with White spirit and use a good brush, one that doesn’t tend to leave brush marks.
Paint is applied to the deeper areas of shadow, the groin and between the legs in this case, and to reinforce shadows under the creases – look at the bottom of the right leg and the creases there.
Further washes can be added, it just depends how dark you want the shadows to be, or how hesitant you’ve been with the initial mixes.
But remember, it’s easier to add more washes, than it is to have to strip back and start the whole process again, so adding more thinners and allowing each layer to dry fully is OK, the end result will prove worth the caution until you’ve done this a few times.
The face photo #49 – pretty standard painting for me although I did err on the pale side, attempting to make him look cold and a little peed off.
The eyes are painted looking to one side, this always makes a face look better somehow, it loses the “thousand yard stare” that deadens a lot of figures.
Photo #50, jacket painted to look like black leather – overall Mars Black oils with highlights built up with Buff Titanium and some small amounts of Mars Brown and Venetian Red stippled along edges of seams where wear would break through the black colouration.
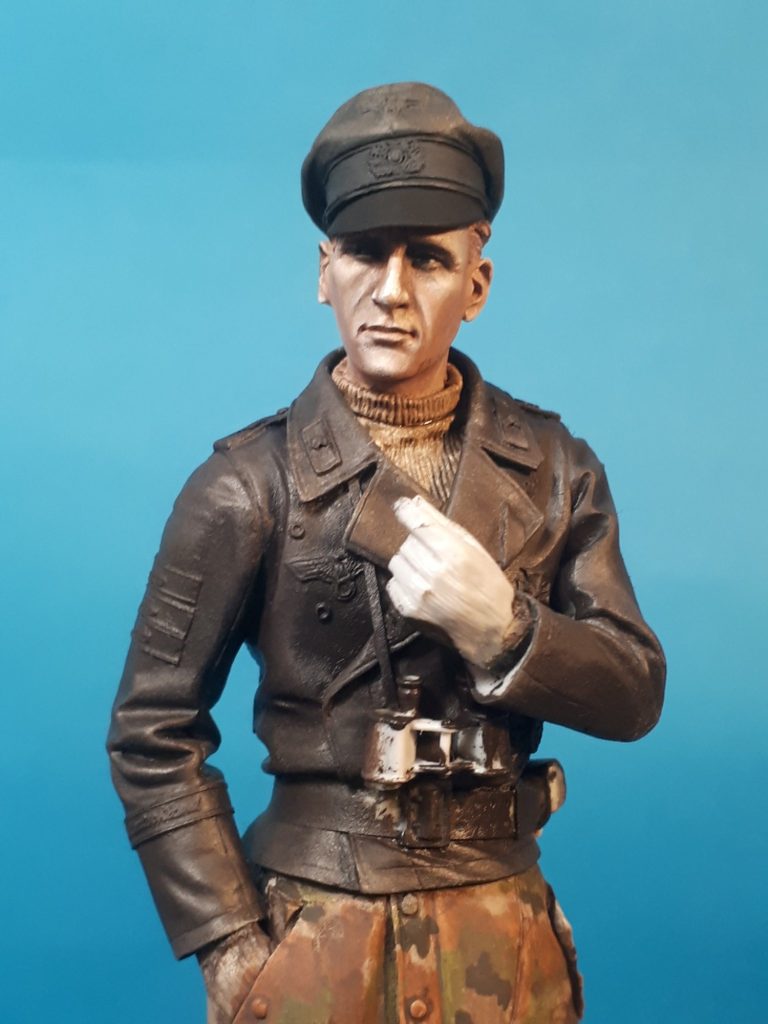
Photo #51 shows the figure finished, the gloves painted, a cigarette added and the medals and insignia all painted up.
It’s at this point ( Yes, I know, I should have done this earlier, but, you know, best laid plans of mice and modellers ), that I tried putting him with the 38t.
Problem was where to put him. I’d got and off-cut of Butcher’s Block kitchen worktop that would do as an excellent plinth, but it wasn’t wide enough to have him standing by the side of the tank, nor was it long enough really to have him standing at the front…..
Inside then. That’s OK, but a lot of the painting would be hidden…. Bugger !
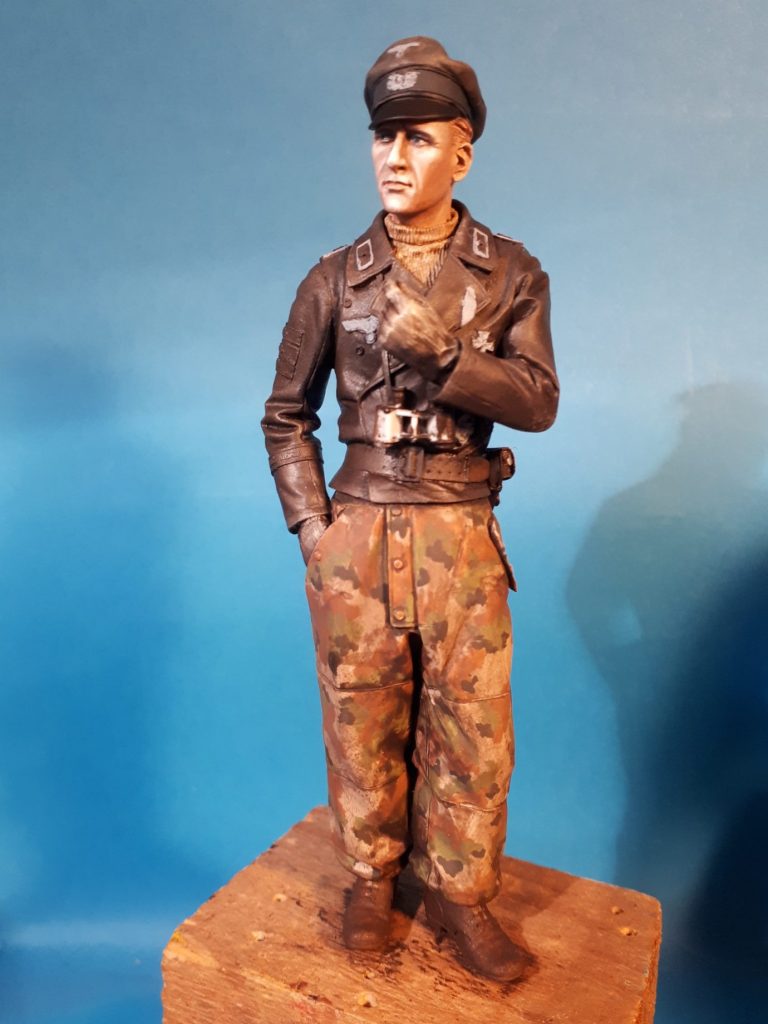
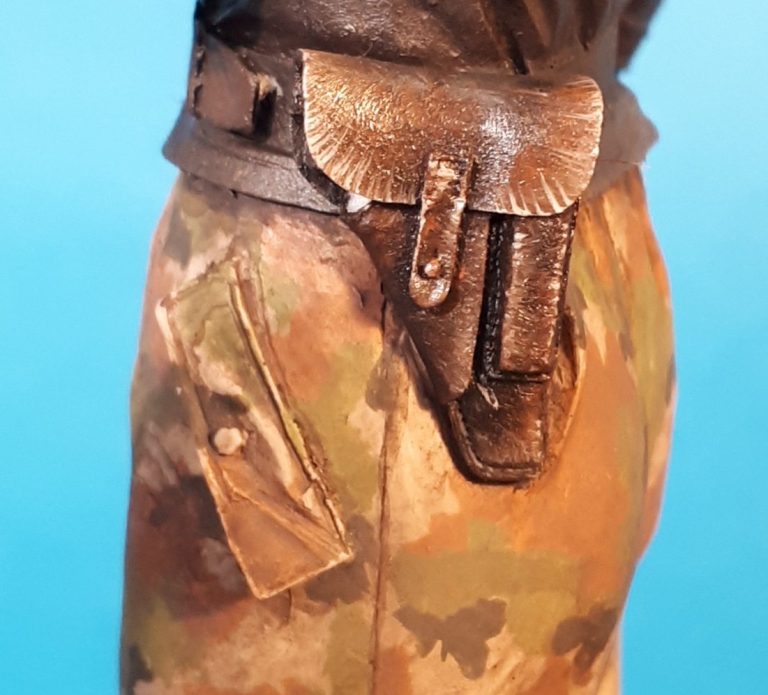
Photo #52, and I’d spend so much time on that pistol holster and the belt, not to mention the camo on the trousers…… Oh dear, how sad; never mind.

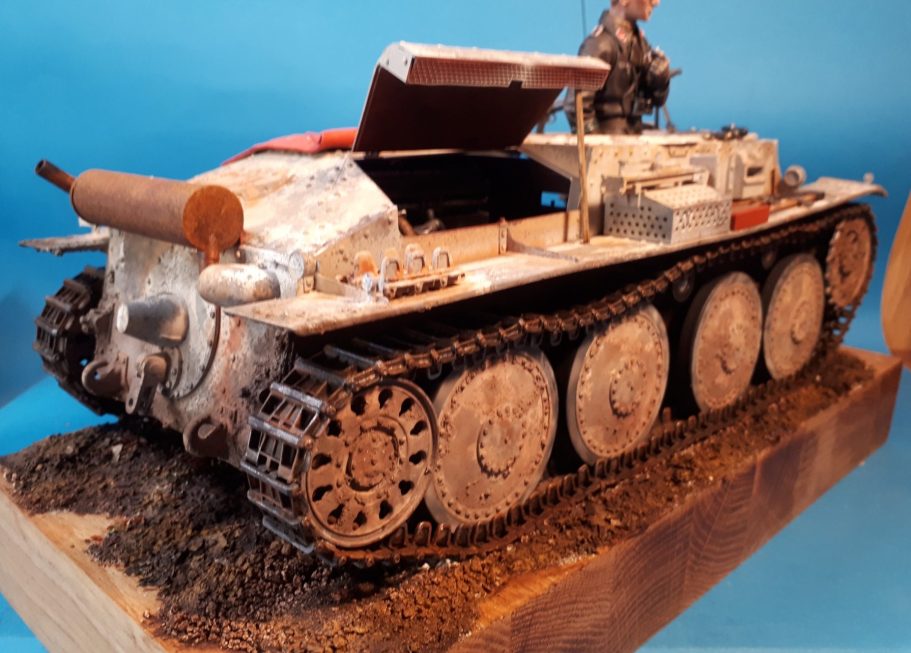
Photo #53 and the 38t on said butcher’s block plinth.
The groundwork was built up with a mix of Chinchilla Bathing Sand and Cat Litter, using superglue to fasten it in place – fast and very effective.
It also helps secure the tank to the base, along with a long screw that is fastened through the plinth and into the underside of the 38t in the engine compartment.
The tank has been placed close to this edge, as I felt that the cut-away side didn’t need any groundwork to show.
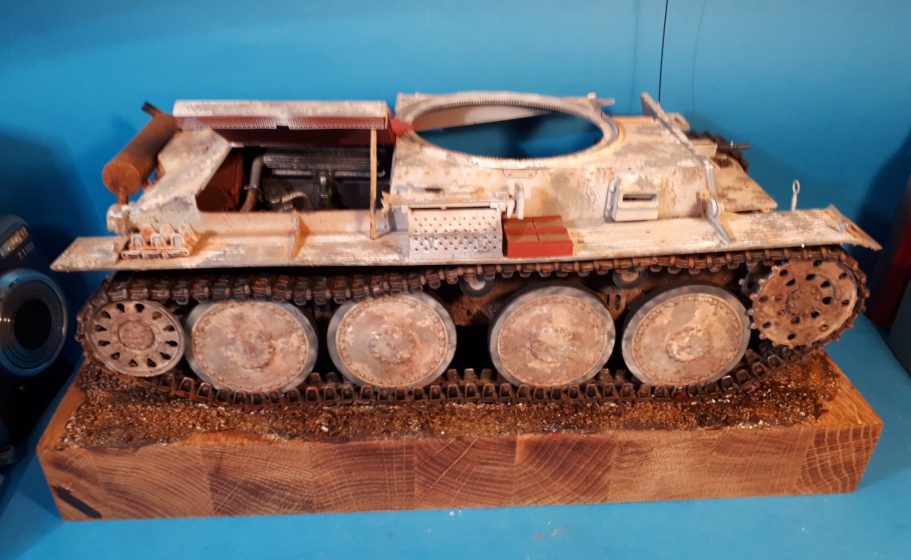
Photo #54, the other side, although as you can see, there’s no space for a figure to stand outside the vehicle.

Photo #55 the air recognition flag and the open engine cover were glued in place, and I used part of a cocktail stick to act as a prop to hold the engine cover open. The same was used for the transmission hatch at the front of the 38t.
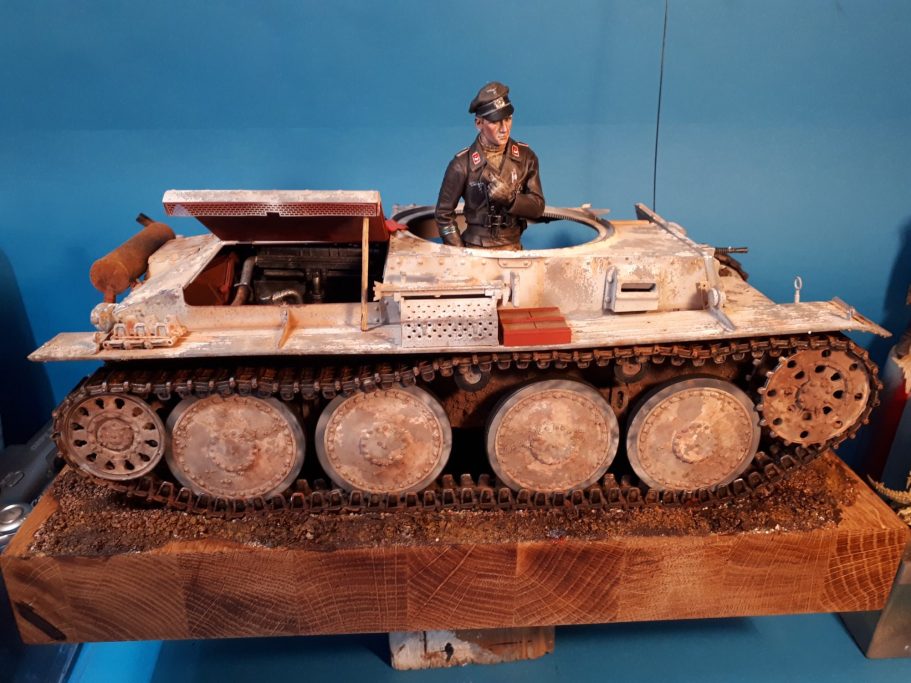
Photo #56, and the figure is in position, having a quick smoke….. but still looking a little lost as to what he’d been doing.
Photo #57 showing just how little of the lower part of the figure is visible when viewing the model from the “front”. The turret ring is pretty wide though, and with the cut-away portion at the back, there’s still quite a bit of the figure still visible fortunately.
Of note here, I painted the collar and cap insignia, but the band on the right forearm and the eagle on his right chest are decals. A highly useful sheet of 1/35th and 1/16th scale decals for rank badges etc and it only cost about a tenner off eBay.

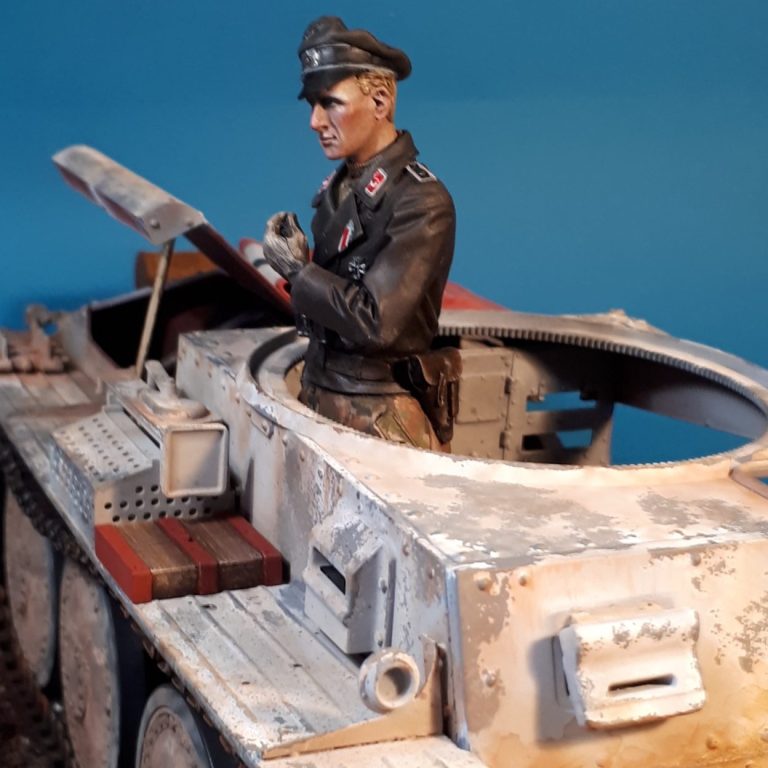
Photo #58 got me thinking that there’s a little bit of space over the top of the drivers position, maybe I could put something there for him to be taking a break from…..
Photo #59. Whilst I was having a think, I’ll mention the lack of visibility of the cigarette. If you’re a smoker, or have been around them when they smoke outside, it’s often a case in windy conditions to shield the lit end in the cupped palm of the hand, and this is exactly what our fella’s doing here, so the only part of the cigarette visible would be the very tip held between thumb and index finger.
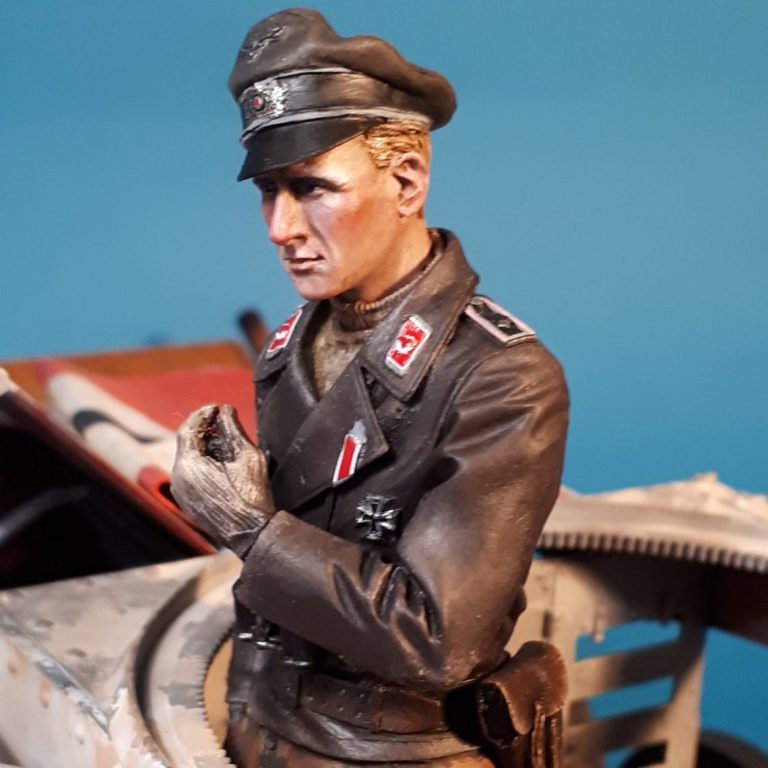
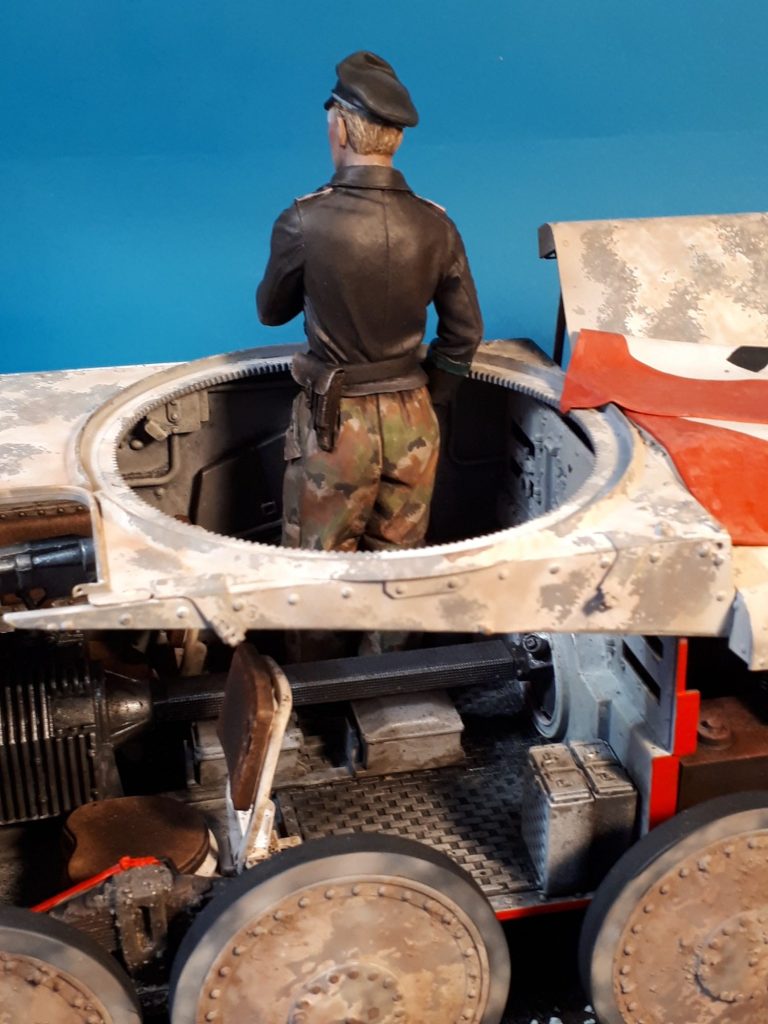
Photo #60 ( I’m still thinking, y’know ), shows the other side of the 38t with the open side that allows more of the figure to be seen – phew, not all effort was wasted.
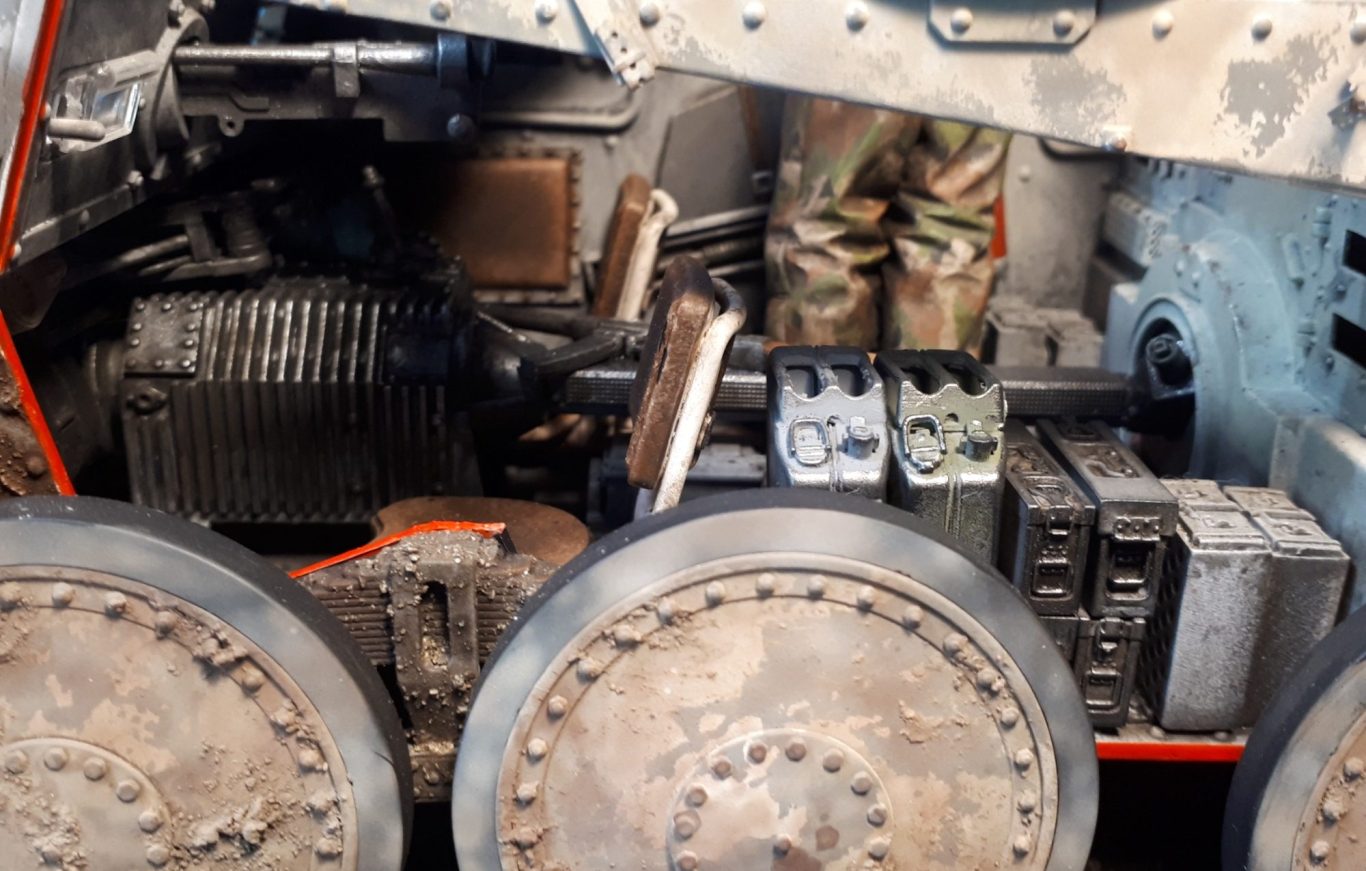
There’s a lot of great sellers on eBay, some sell kits, others 3D accessories, and one such is Ringoresin, a company that print a lot of weapons etc in 1/35th, 1/24th and of course 1/16th scale. I ordered a couple of things from them, an Mg34 and a few small arms as well, and it occurred to me that I could perhaps scratch build a cleaning kit for the MG 34, the beginnings of which are shown in photo #61.
Here we have the necessary cloth to put all the parts on so they don’t get lost – no carpet monsters on the Eastern Front, but I’ll bet there’s an equivalent wild variety out on the Russian Steppes.
On top of the cloth is a tool for getting a cleaning rag down the length of the barrel, and this will be joined by further things in the next shot….
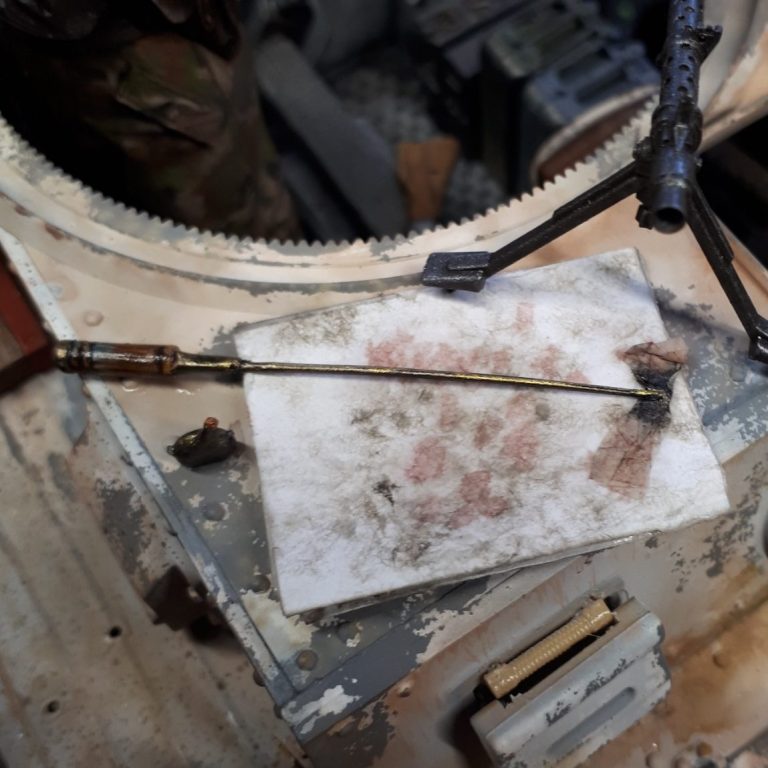

Photo #62 and we now have a full set of cleaning kit ( I looked it up on t’internet ). There’s a wire brush, a small oil bottle a long coiled wire spring and a threaded rod with a kink in it.
Usually there’s a leather satchel to keep all this kit in, but that’s been put away safely in the hull somewhere.
Oh, and there’s the MG 34 in this shot too.

Of the small arms, I decided to use the STG 44 shown in photo #63. The printing of all these items is very good, although the barrels are very fine even in this larger scale, and could break easily – so be careful.

Once painted, it really looks the part, although it’s pretty well hidden on top of the drive-shaft cover as shown in photo #64.
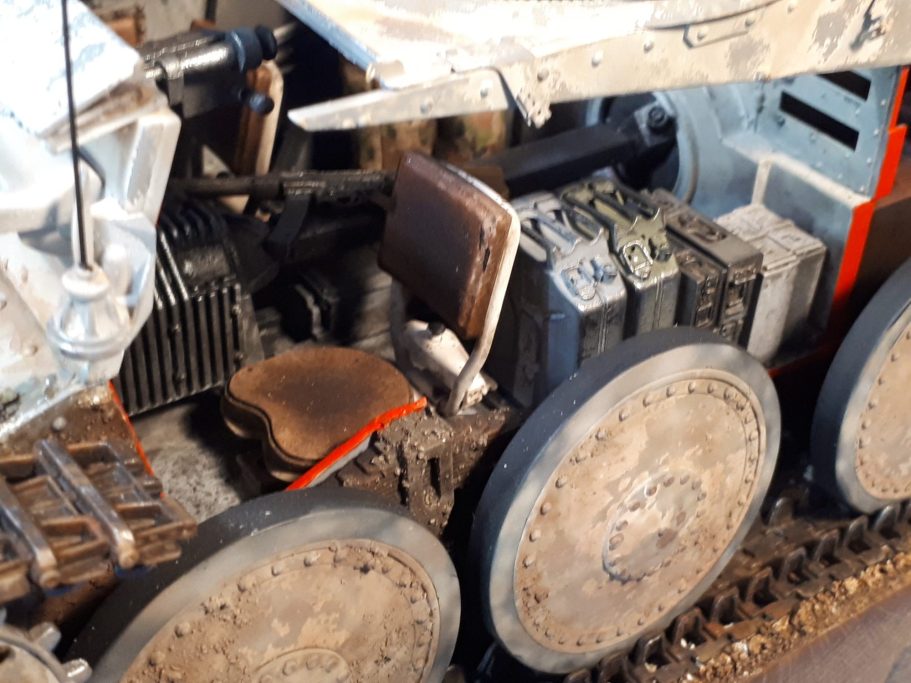
As this is supposed to be an ammunitions tractor, I’ve added a few boxes of MG34 ammunition and some jerry cans – one fuel and one water, see photo #65 - inside the hull. The 38t would normally be towing a trailer with a mass of supplies in it, because there’s not a lot of space for stowage inside the vehicle, and precious little chance of fastening much to the engine deck either.

One of the final additions were the tools shown in photo #66.
These were painted with oils for the wood handles and Darkstar acrylics for the metal areas, and I have yet to remove the jacking block to paint some chipped winter camo onto the brackets holding the wood blocks together.
Whilst not completely finished, the rest of the shots show the model in the state I’ve got it to so far.

I need to add some threads for tie-downs for the air recognition flag, and a few other minor details as well – the light lenses for example and a towing hawser….. there’s a few bits to add, y’see.
As it is, it’s OK, but “the devil’s in the details” as they say, and whilst it has been out to one show just to garner a few comments about things I’ve missed or that I’ve become blind to, overall people were very positive.
The rest of the shots show a “walk round” of the model, although some as I say will have minor details missing.
Final thoughts.
It’s a bloomin’ steal chaps !
Honestly, it’s such a good kit, with a lot of the details already there for the modeller, it’d be rude not to get one.
Granted prices have begun rising since I bought this – I think I paid about £60 for it on eBay, but now, at the time of writing ( November 2024 ) the cost of the kit is creeping up towards £90, and in some cases slightly more.
However, compare it to the Hobbyboss Tiger I, which although substantially larger, has no interior, some of the Tiger details are rather soft as it’s the de-motorised Heng Long model, and which is still more than £80, I think the 38t is very good value.
This kit is quite involved, what with all the interior detail, and I would urge you to think of ways in which to show off the interior if possible.
I had thought of replicating the hull of the tank, minus one side, with plasticard, so that the interior could be displayed alongside a closed up completed model, but then thought of the cut-away option and went for that.
The turret I plan to use as a static “training” piece, as these were used to train crews, the turrets being fixed to a box-like structure on a firing range.
We need your consent to load the translations
We use a third-party service to translate the website content that may collect data about your activity. Please review the details in the privacy policy and accept the service to view the translations.