German Tank Officer
1/35th scale resin kit from Alpine Miniatures
Article in Military Modelling magazine in 2006
Alpine models have been kicking around the hobby now for quite some time, and as I’ve got quite a few mates who make AFV’s, not to mention seeing them used as single figures, I though I’d have a go at one.
The other issue was that I’d bought several of these – you know the score,” kid in a sweet-shop” scenario – where I liked the figure, thought they were cheap, and would definitely get painted next.
Admittedly, the last comment is said for every figure I get; it’s probably the only time you’ll catch me blatantly telling a lie too !
Having decided to paint one, it was simply a case of picking one off the shelf to have a go at – I’d got five I think at this stage.
The one I chose was part of a pair of German Panzer Crewmen, for the simple reason that I liked the pose, liked the uniform colours and thought that it was high time I tried a bit of camouflage ( which I avoid painting at all costs usually – looking at these shots, you’ll probably see why ! ).
On first getting the components out of the box, I was struck by their diminutive size. I’m much more used to the giants supplied by Andrea and Pegaso that are set to a 54mm scale and measure up closer to 60 – 65mm in height. This guy was tiny !
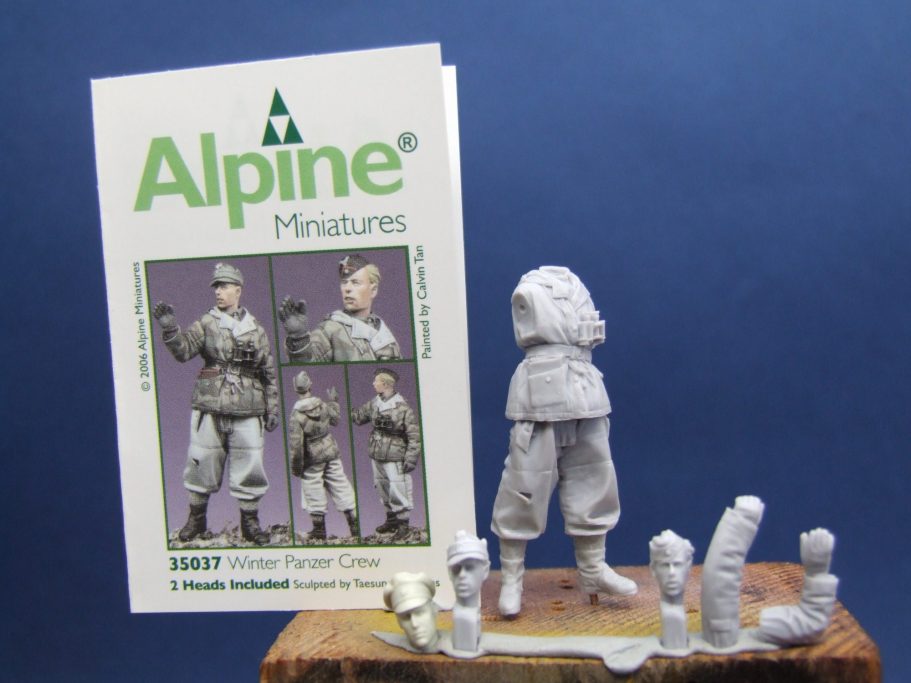
I took a shot of him and the box art, the parts separate for you to see exactly how they are sent to you, and as you can see, they’re all moulded in a light grey resin.
There is some clean-up necessary – a mould part line down one leg, and some fillets of resin around some of the finer detail on the hand. But it’s nothing to catch the seasoned modeller, and certainly nothing like the mould lines seen on plastic offerings in the same scale that the AFV guys have to put up with.
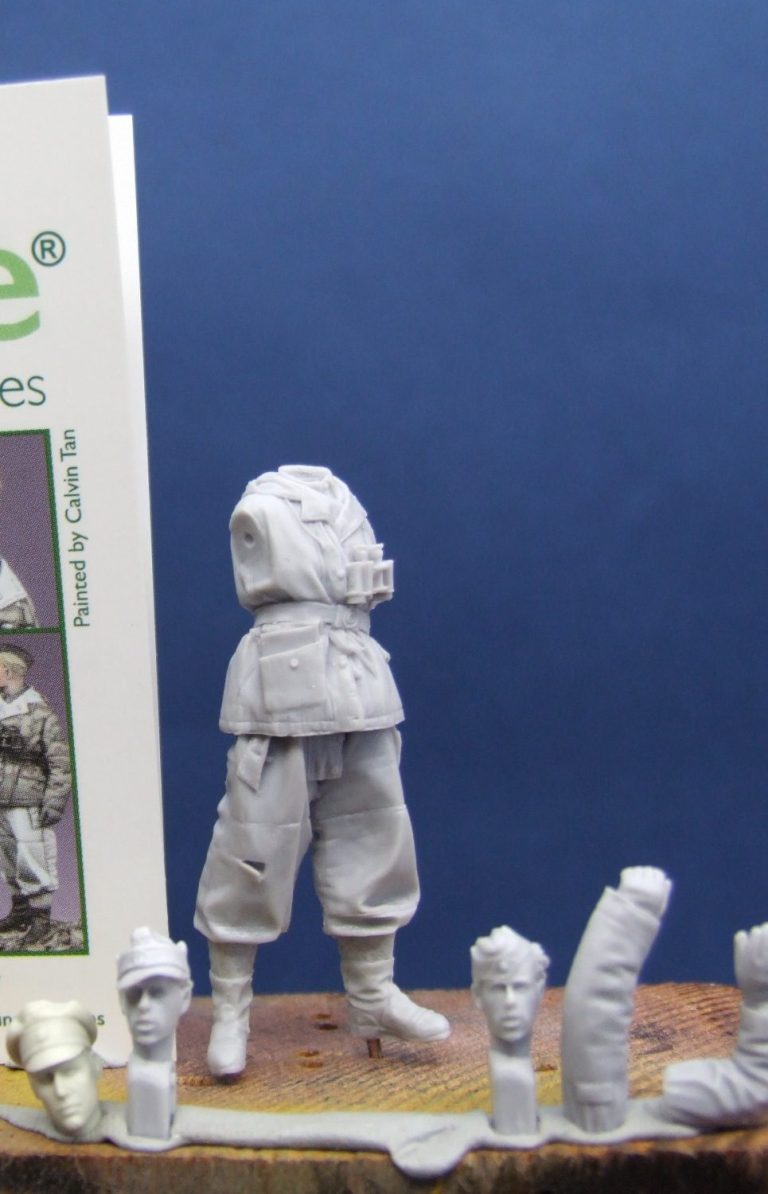
You get two heads with each of the Alpine kits – those are the two that are placed centre and on the right with the large resin blocks still attached. There’s nothing wrong with these heads at all, although I personally think that the cheekbones are a little bit flat. The sculpting of them is excellent, and they are certainly good enough to allow the modeller a good chance of painting a lifelike model.
So go one then, why did I change the head ?
Well, as you can see, there is a third head, and this one is from Roger Saunders, the famed sculptor who makes the Hornet range of heads.
I decided to change the head for three reasons. First, I wanted to paint a Hornet head and have it sitting on a figure, because the ones I’d got looked good, and I keep hearing so much about them.
Second, I again have accumulated a sizeable range of these heads, with no idea of what I was going to do with them, other than “they’ll come in for something, sometime.” Possibly not the best reason for buying a lot of something, I admit.
Third, and probably largest of the reasons – and my apologies to both sculptors here for my shallowness of character – the Hornet head is just a tiny bit bigger, and would therefore ( theoretically ) be ever so slightly easier to paint……..See, told you it was a shallow reason !
So, there’s the parts, I’d better get painting.
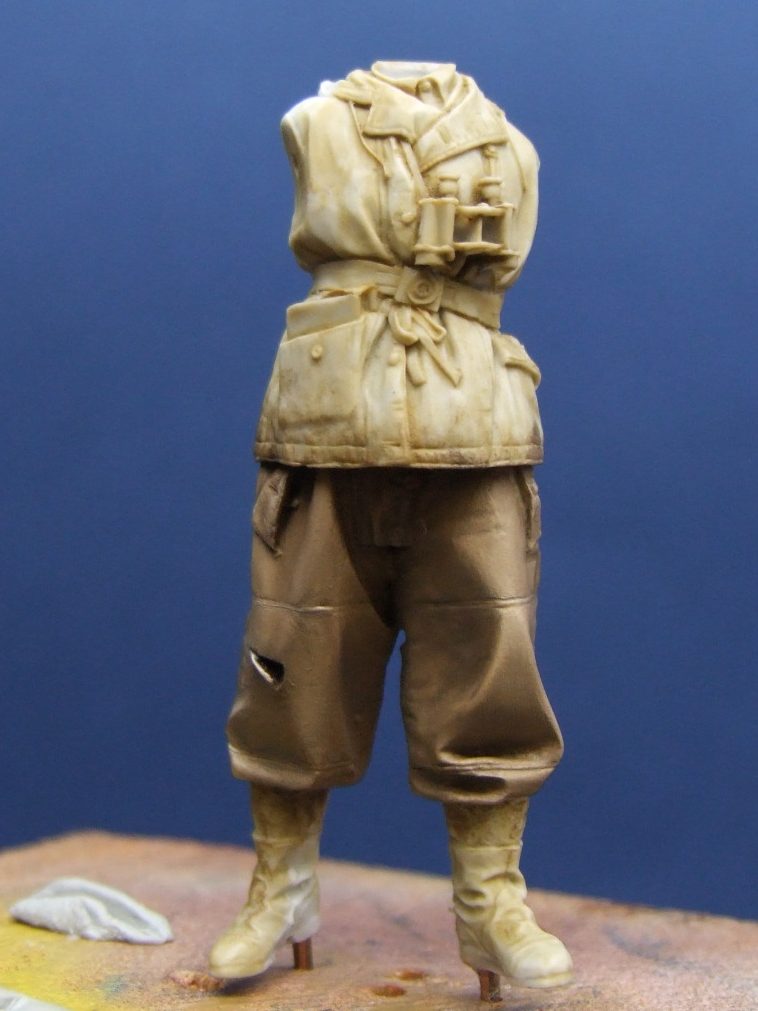
Although the picture on the box art shows the trousers in winter white, and the jacket as a camo pattern, I decided to change this around, thinking that the trousers might just be a little bit easier to paint with a complex pattern, being that there are fewer sections of cloth making up the garment.
The whole figure was primed with a single coat of acrylic paint, thinned heavily with Isopropyl Alcohol. Once this had dried, I began with a pale brown colour on the trousers, using acrylics here rather than oils, as I prefer painting pale colours with acrylics these days.
I began with GW Kommando Khaki ( look, I don’t make these names up ! ). I darkened this in the deepest shadow areas – like the overhang of the jacket and around the crotch – with small additions of Chaos Black ( GW ). Once I’d established the shadows I worked some more on the mid-tones, and then began adding Skull White to the Khaki colour to build up the highlights.
So, the main background colour was all there, it only remained to putt in all the squiggly bits for the camouflage……..Oh, easy !
Now I’d recently got an excellent book – second hand – from that accomplished sculptor Rendall Patton. It gave absolutely brilliant shots of real uniforms being worn by re-enactors in studio conditions. The book is named in the reference section at the end of the article.
The pictures in the book actually include a man in this uniform, and as there are several shots of the clothing, it’s incredibly good for the painter to be able to follow the pattern. I began by adding in the darker brown colour.
I mixed a red brown acrylic with a little of the Kommando Khaki, this would help the brown match in with the lighter coloured areas of the trousers.
using a fine brush, I painted on angular parches of the red / brown colour, adding it as randomly as possible ( which I find difficult to be honest ).
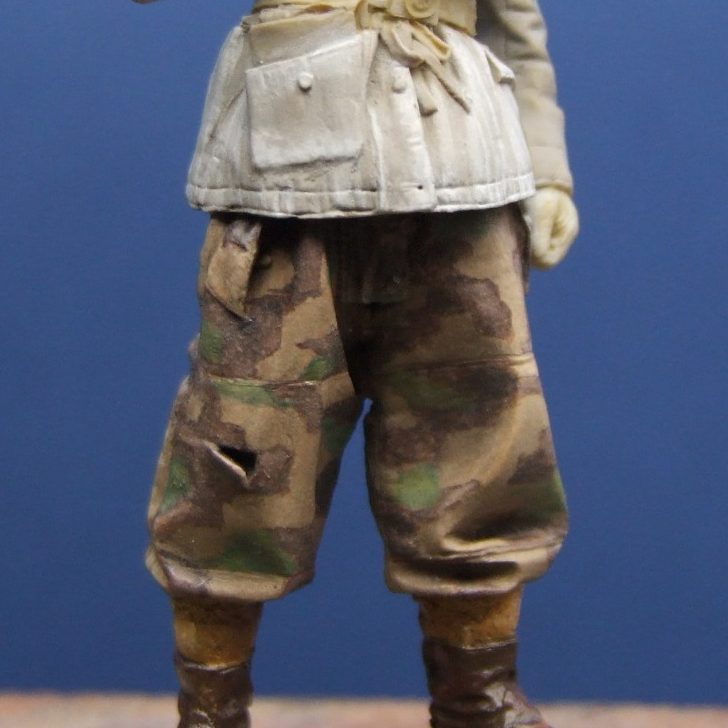
Once this first layer of the camouflage had dried, I used an olive green colour, again with a little of the Kommando Khaki added to paint on more angular shapes. The result can be seen in Photo #3
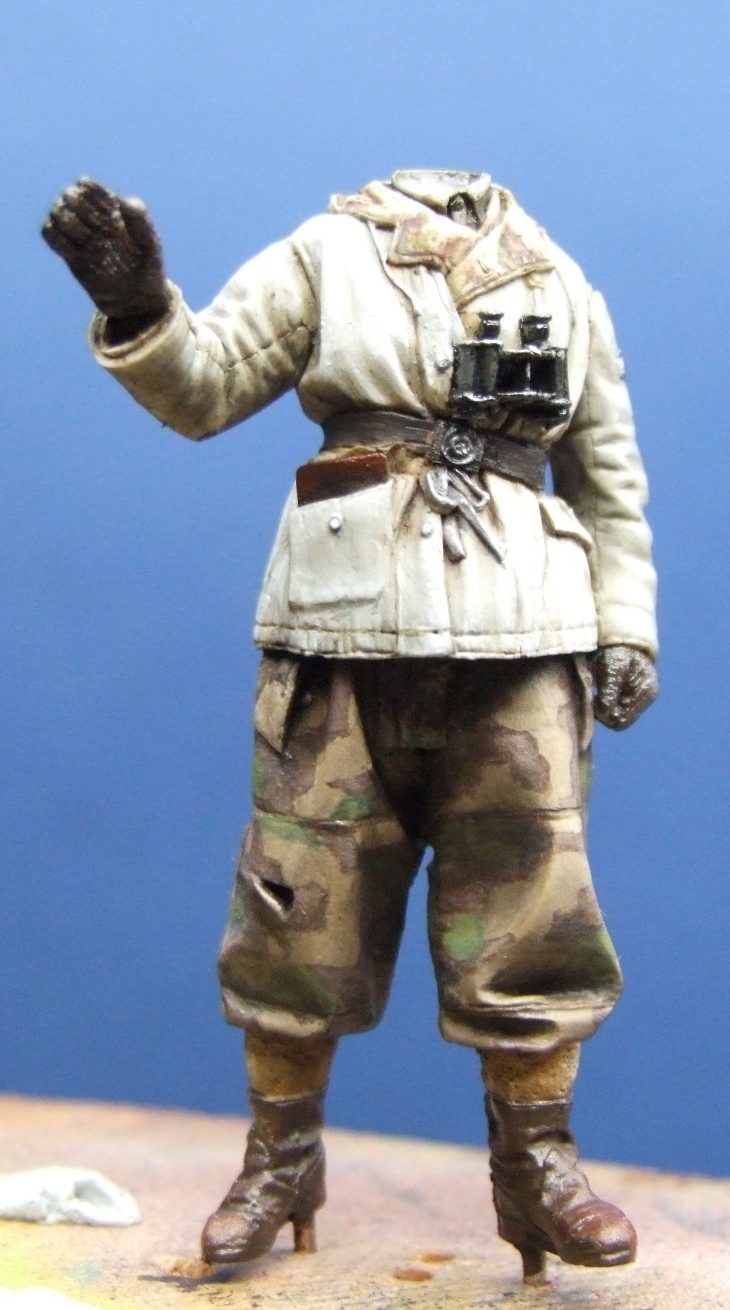
Photo #4 and the body is coming together nicely, the jacket has been painted with initial coats of the Kommando khaki, but then lightened gradually by adding Skull White acrylic to the Khaki colour, and thinning with water to gradually build up mid-tones and highlights.
Also in this shot I’ve painted in the belt using oil colours, and added the map book in his pocket, his gloves and the binoculars.
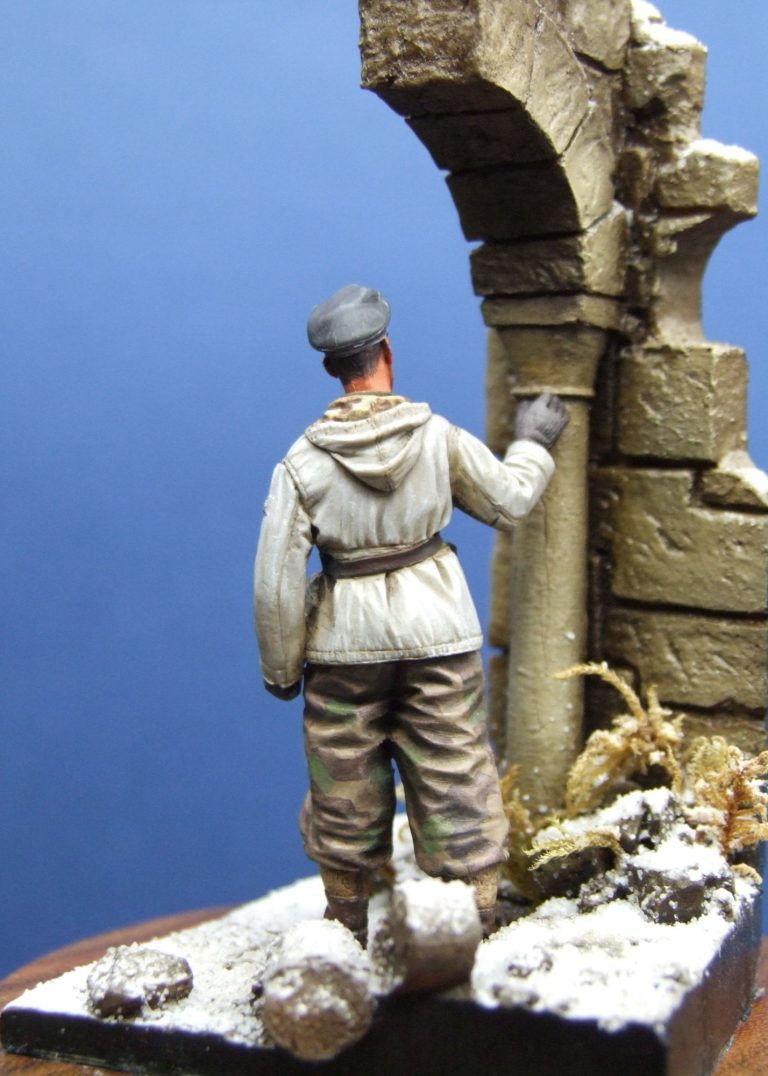
Photo #5 shows the back of the figure at this stage, the boots have been painted to represent a brown leather, with the tops of them painted a lot lighter to represent a woollen or suede material.
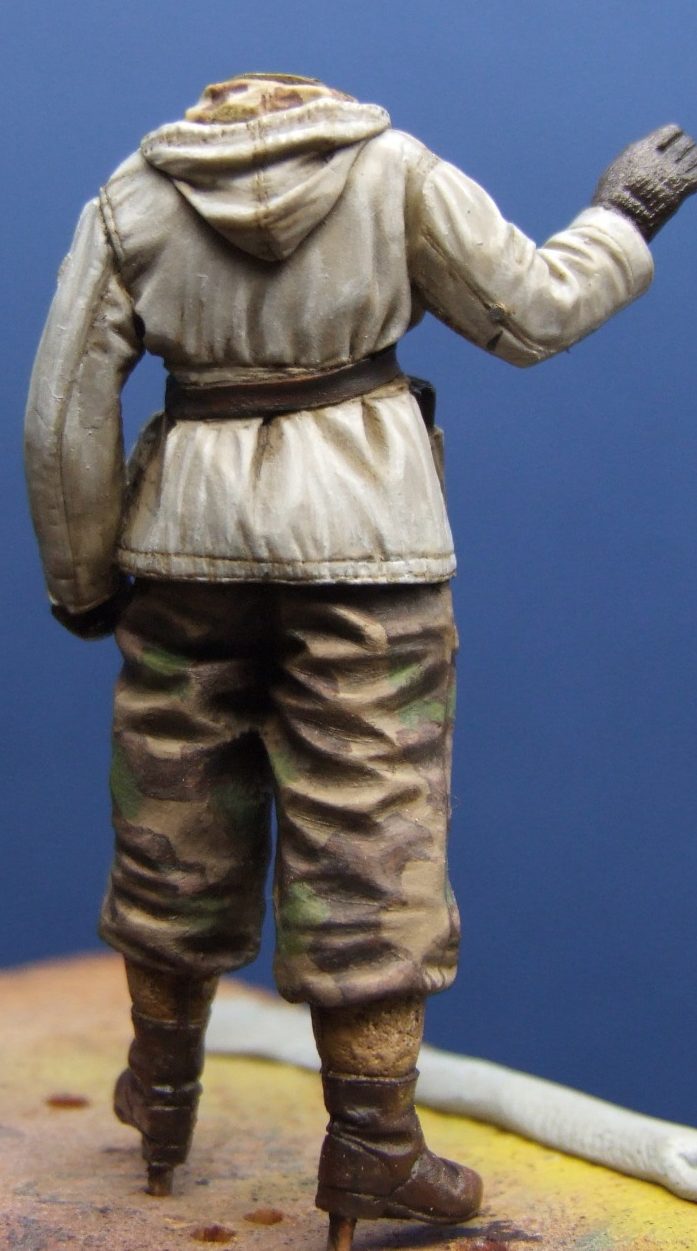
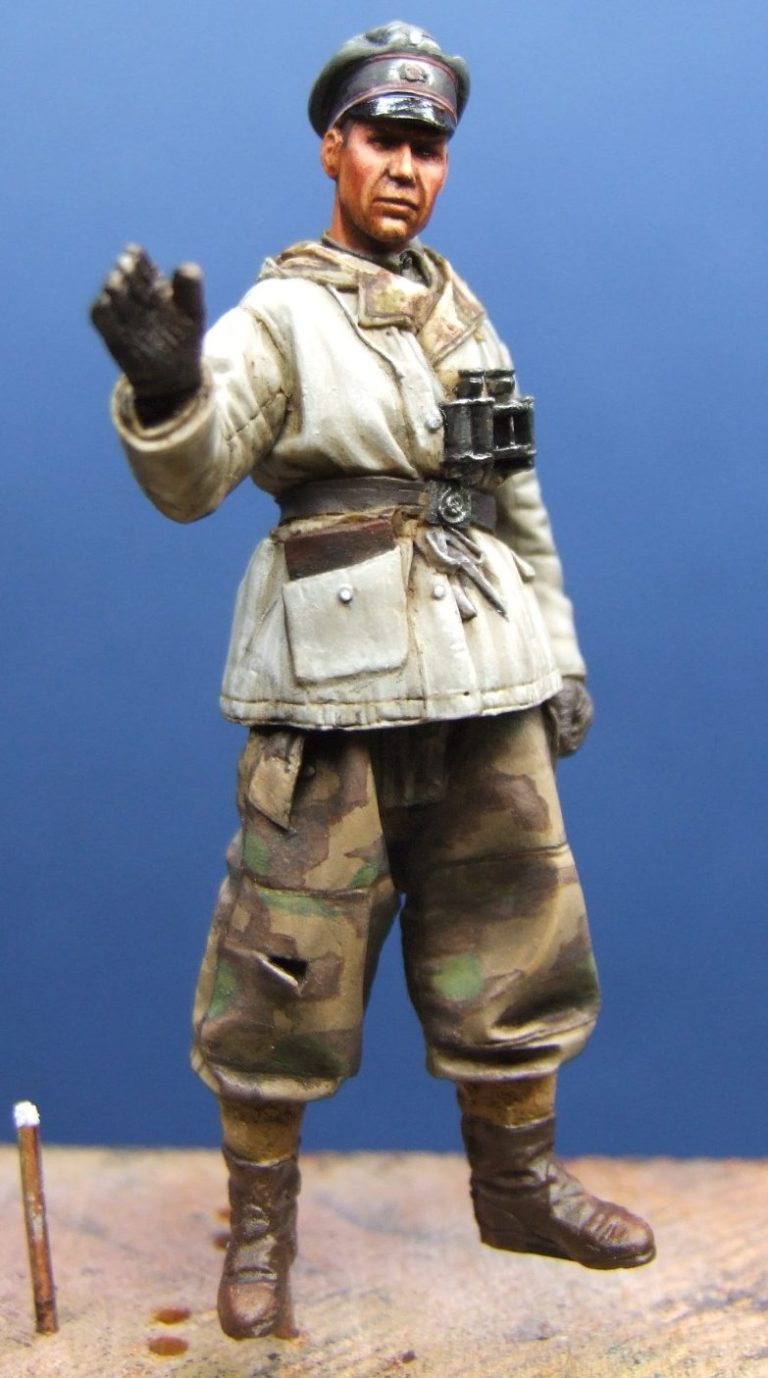
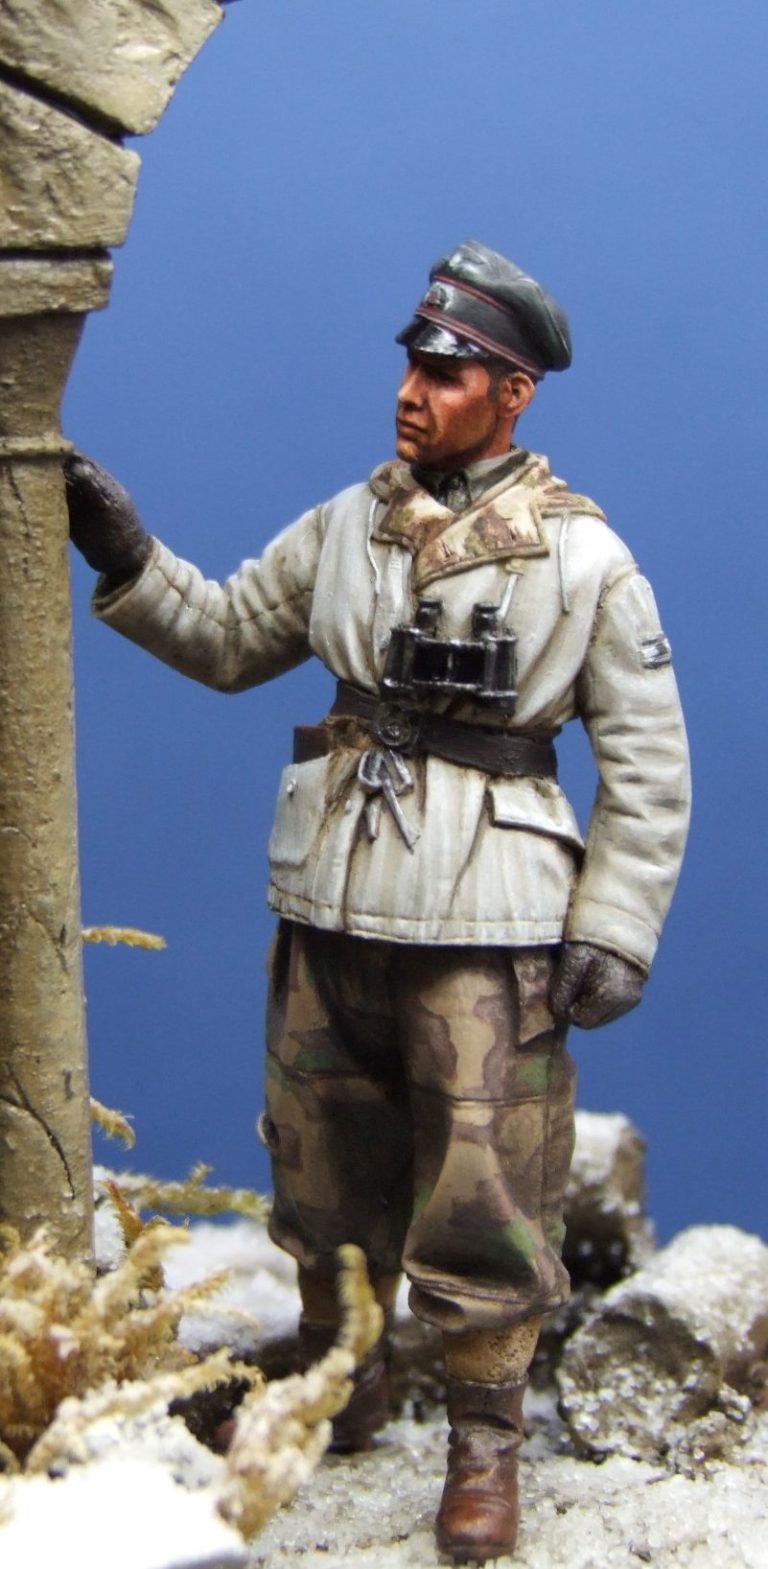
Photo #6, and with the face and cap painted, and added to the figure he’s looking a lot nearer completion. I’ve added a small camo pattern to the collar of the jacket, as it’s likely a reversible item that could be used when there isn’t snow on the ground.
Instead of adding the figure to a vehicle, I thought I’d make a small scene using one of Andrea Miniatures small scenic accessories, in this case their “Romanic Ruined Arch”, the resin parts and box art shown in photo #7.

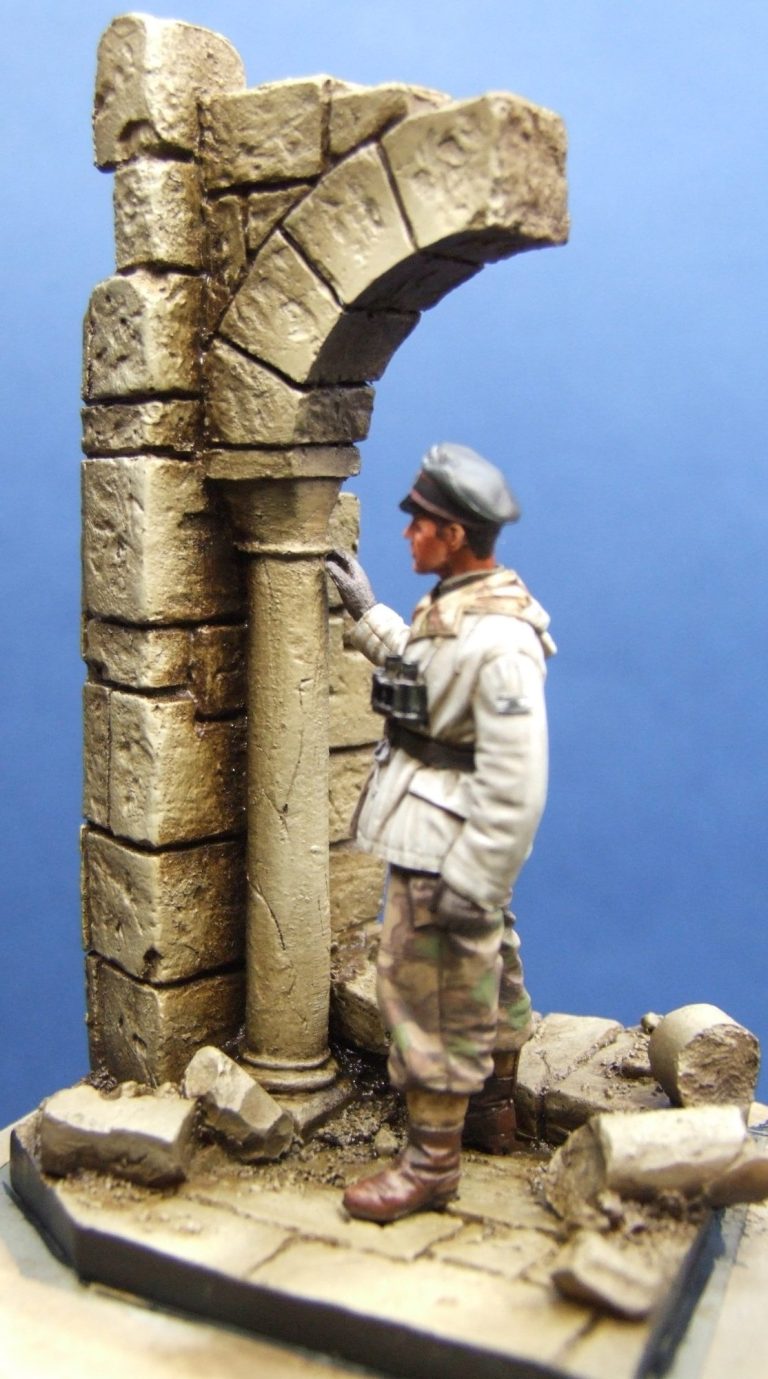
It’s simple to use and requires very little clean-up, and with a little paint added – see photos #8 and #9 – it looks quite effective.
In these shots I’ve cleaned up the minimal mould part lines, glued the upright pillar section to the base and added a couple of pins through the underside of the base into the pillar to holed it securely.
After priming I added a couple of coats of a sand coloured acrylic, allowing these time to dry fully, then painted over a coat of Burnt Umber oils that had just enough White Spirit added to it to make it easy to get the paint into the details.
Giving the oils about ten minutes to settle and dry slightly, I then used a soft cloth to remove most of the dark brown paint and tested the figure for how he’d fit into the scene.

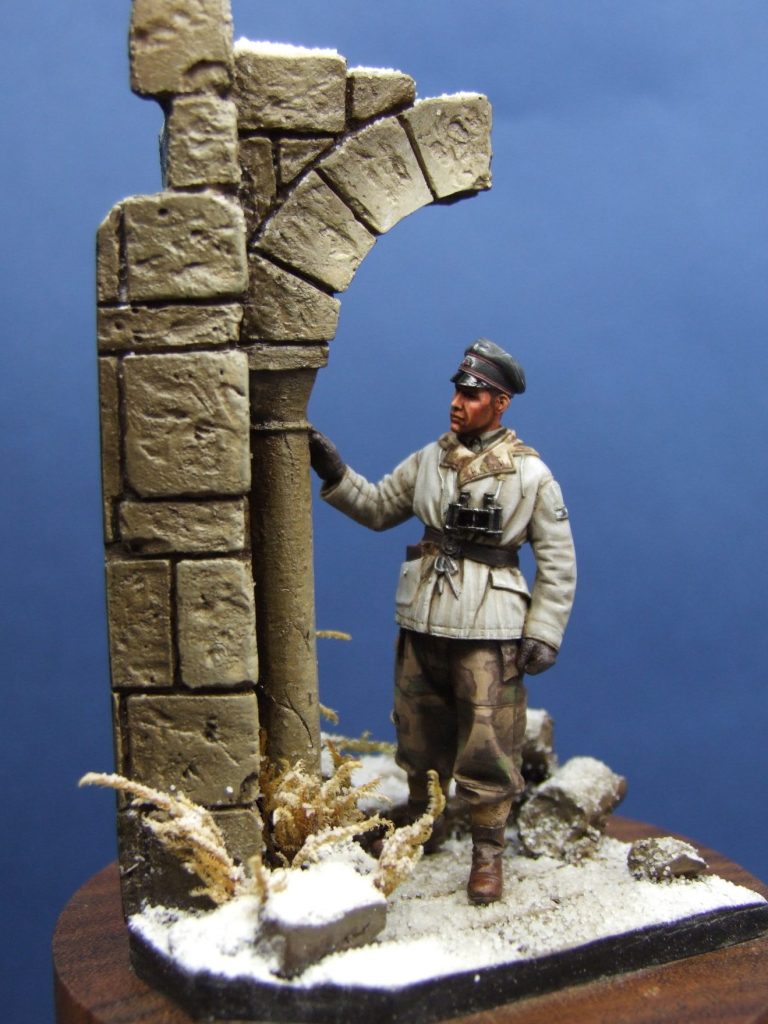
Although there doesn’t seem to be much difference in photo #10, I removed the figure and then added some small sprigs of fern-like moss around the base of the pillar and coated the base with some artificial snow.
to fasten the snow in place I used a light coating of hairspray on the base, sprinkled the snow on where I though it would look most effective, then applied more hairspray to hold it in place.
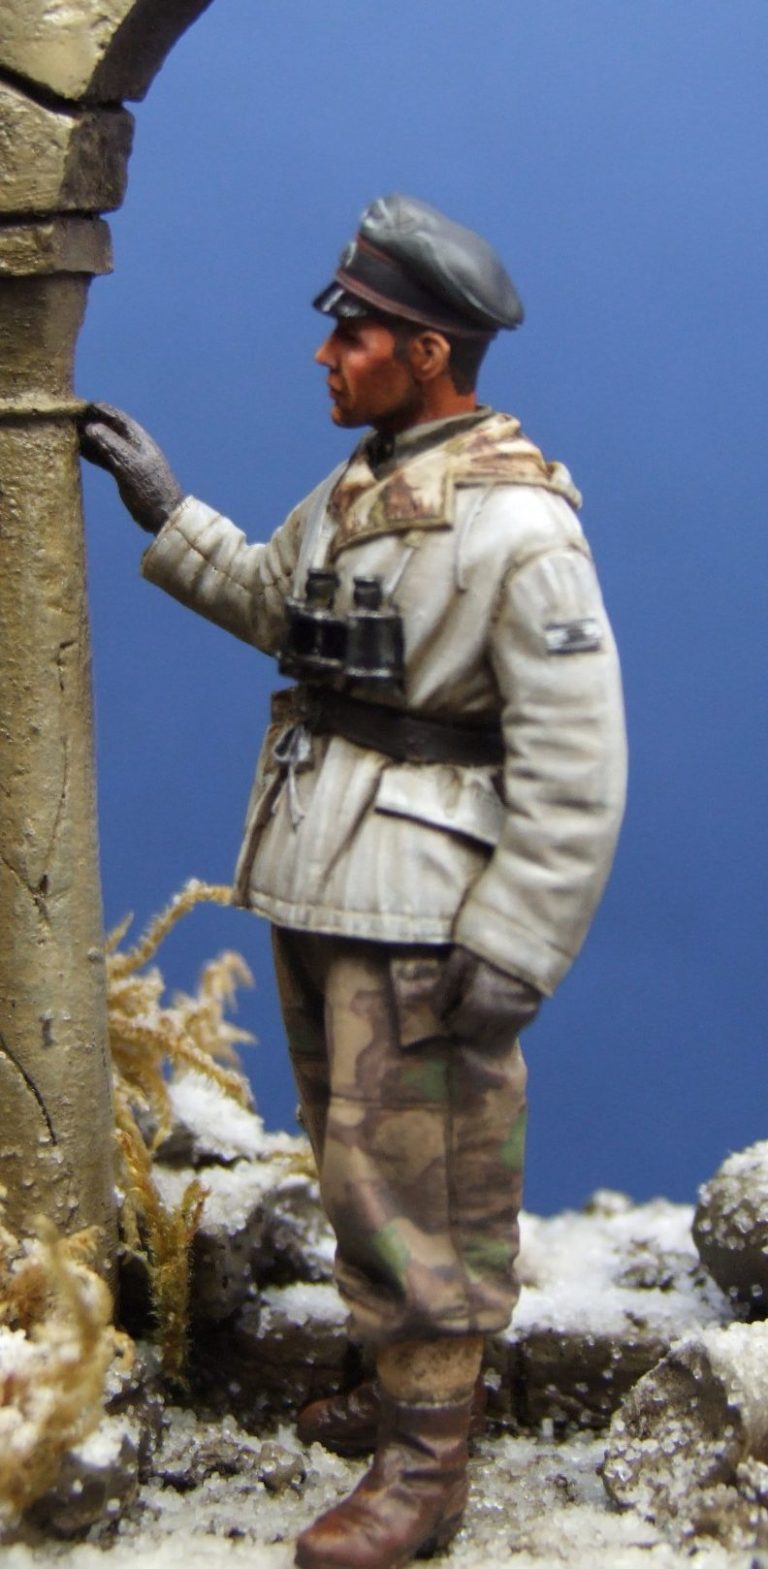
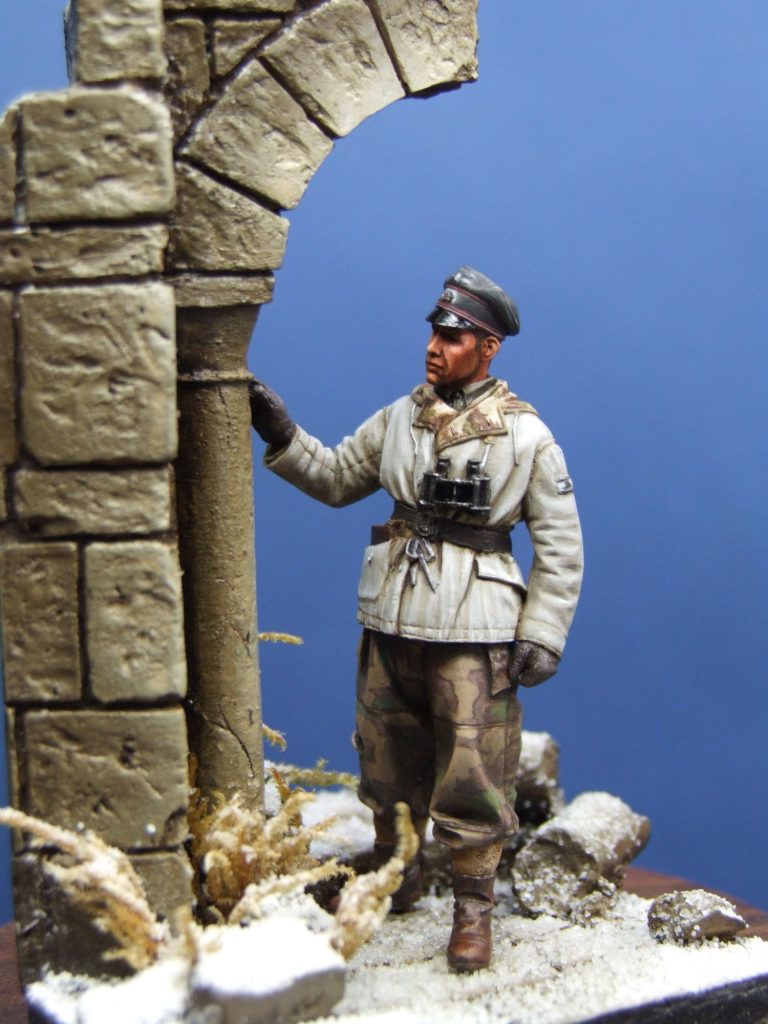
The final shots give an all round view of the figure and the archway, which I think work together quite well. The setting is kept to a minimal amount of space, and the raised right hand of the figure, resting lightly on the pillar seems to give a pensive or watchful appearance to the model, as though expecting the appearance of an enemy.
Final thoughts.
Alpine figures supply a vast range of 1/35th scale subjects, with an additional series that are 1/16th scale to go with either larger vehicles from the Hobbyboss or Trumpeter range, or simply be used on their own.

We need your consent to load the translations
We use a third-party service to translate the website content that may collect data about your activity. Please review the details in the privacy policy and accept the service to view the translations.