Phil the Pirate
75mm White Metal figure from Alexandros Miniatures.
Painted in 2025
I’ve painted one or two pirate figures over the years -I should do more - because there’s some stunning sculptures out there. This in fact is one such, an absolutely gorgeous study by Allan Carrasco, and whilst it’s a relatively simple “straight up and down” figure, there’s a certain amount of character just oozing from it.
I picked this up many years ago, and like a few that I’ve noted as being finished early on in 2025, it’s another one that had been started probably at the back end of 2023 and put to one side as commissions and other projects took priority.
I think Alexandros as a company are sometimes a little overlooked, Companies such as Pegaso and Andrea used to have a lot of releases and so they garnered a lot of publicity from advertising and reviews, and now there are so many small companies within the figure market, many of whom have quality wares to purchase, and Alexandros seem to quietly release kits to little fanfare – it seems a little unfair.
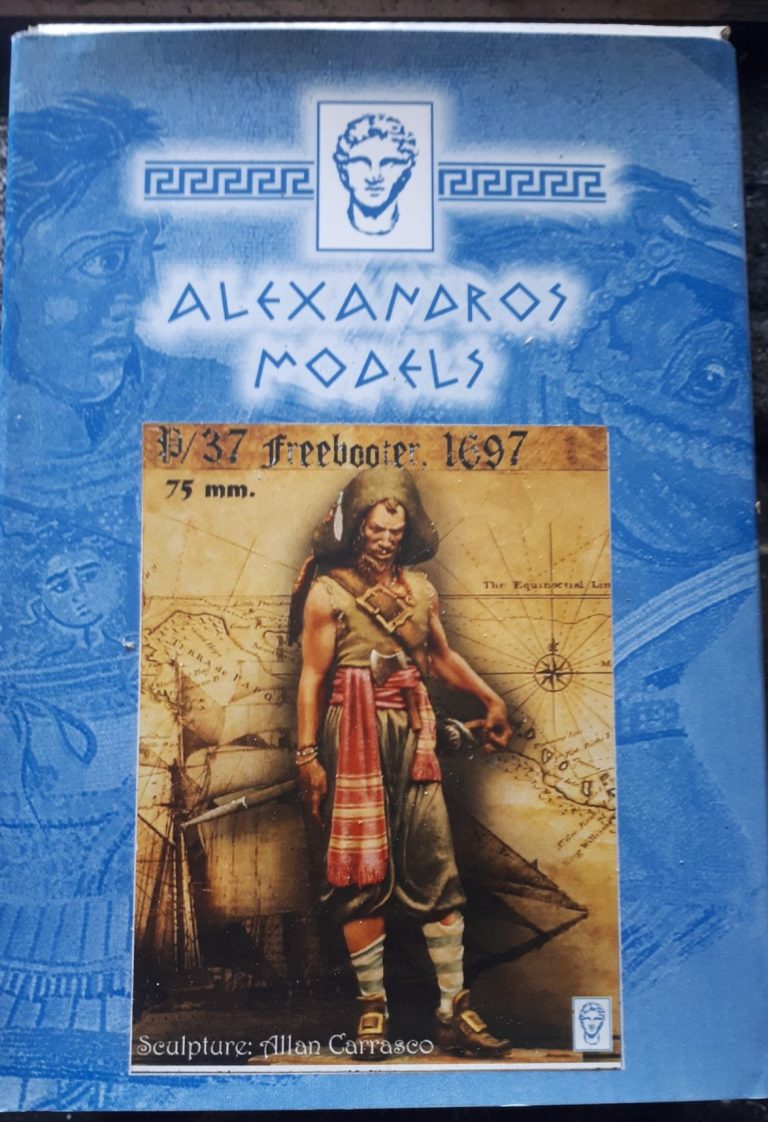
The box art is shown in photos #1 and #2 with a very nicely painted example pictured. In fact the packaging mirrors that of Andrea offerings to some extent with a slip-case covering a sturdy box, which contains the white metal components.
There’s the expected mould part lines that need a small amount of clean-up, they’re very restrained and to be honest, easily missed unless you really look for them, and the metal is relatively soft, so cleaning the ones you do come across is quick and fairly easy.
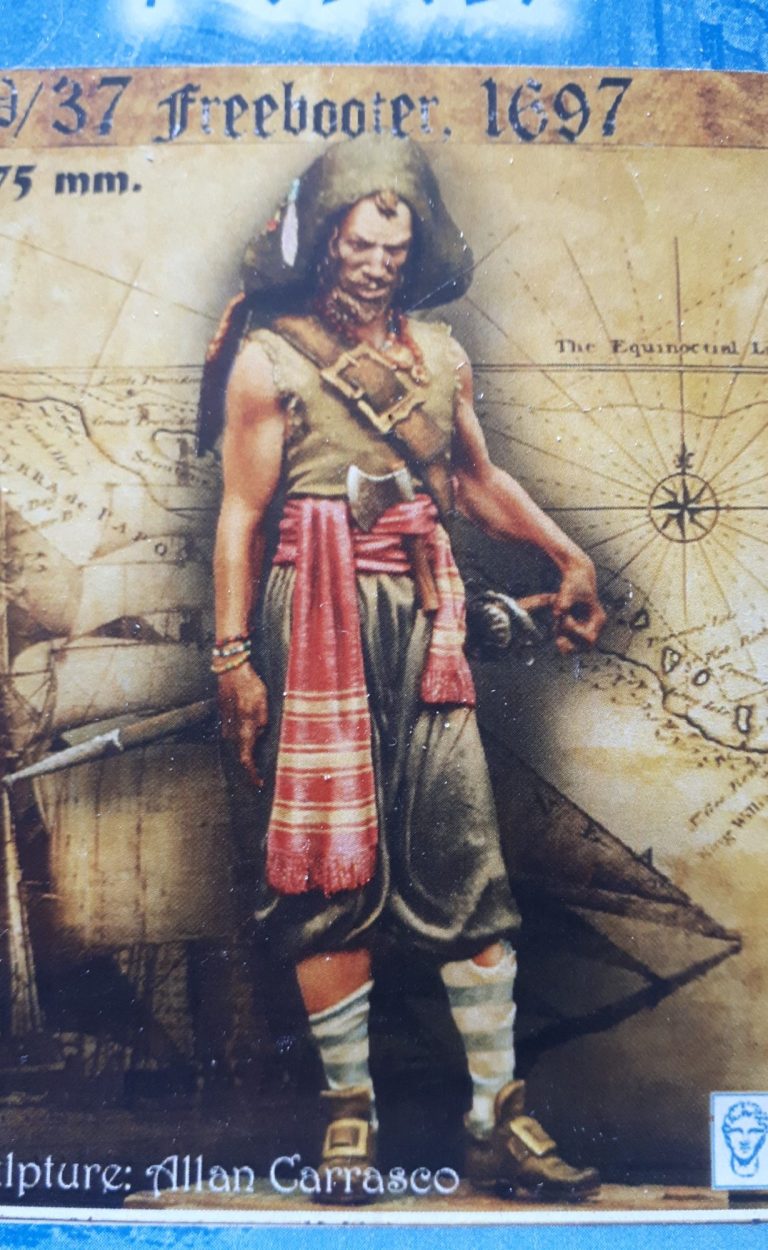
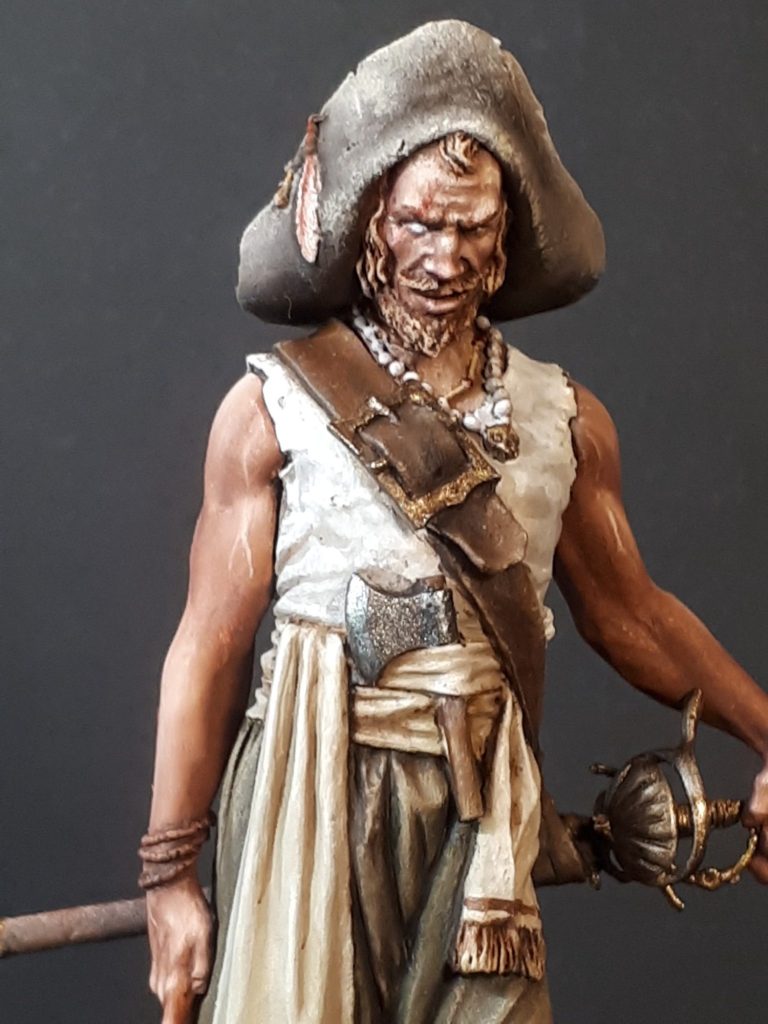
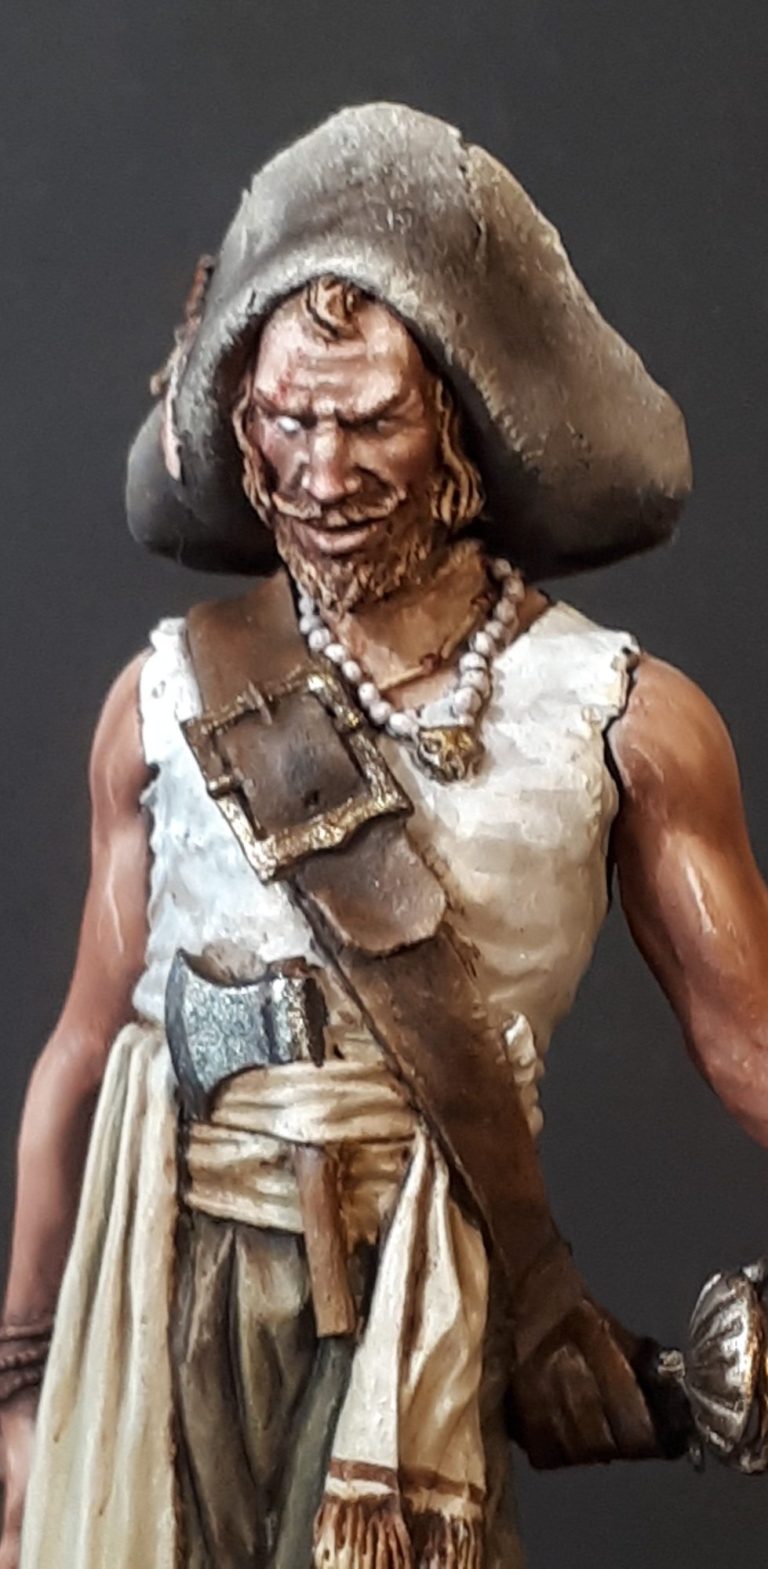
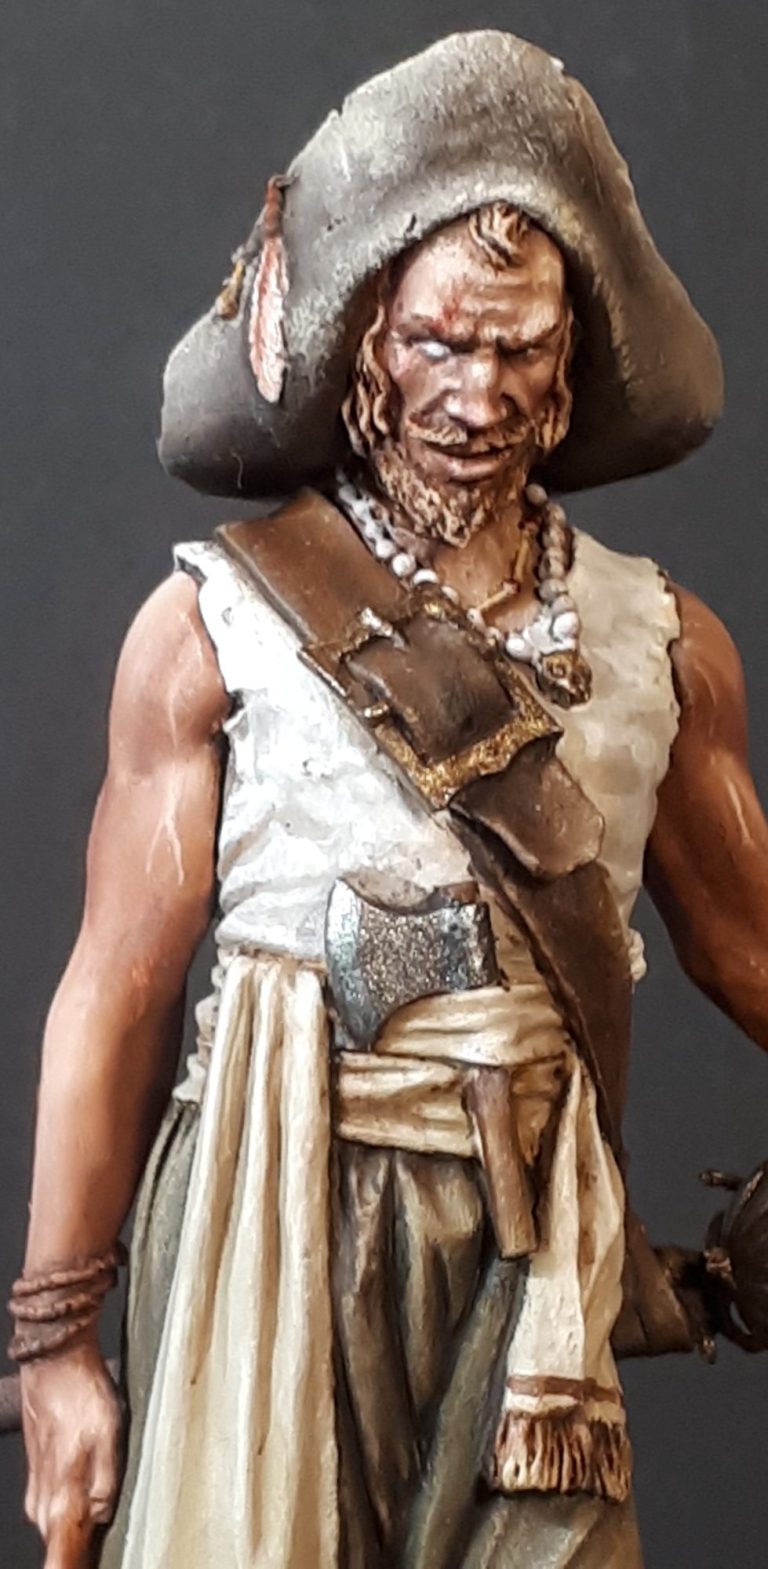
Photo #3 shows the head and hat with the paint almost done. There’s a lot of detail in the face, some wrinkles on the forehead that pay dividends if brought to life with shadows and highlights, and I did the flesh with the usual Mars Brown / Titanium White blend, making for a relatively pale complexion.
I actually painted the hat first, utilising a fine sponge to get the worn and salt-stained appearance to the leather. It’s a bit of a messy method, hence painting the face afterwards, but it does create a very worn appearance.
A fine piece of sponge from the kit’s packaging is torn off and held in a set of locking forceps, which is then used to apply the paint. It doesn’t matter whether acrylics or oils are used, but replacing the sponge after each colour helps to stop colour contamination if using oils.
The darkest colours are applied first, working gradually lighter and lighter until almost pure white is being added.
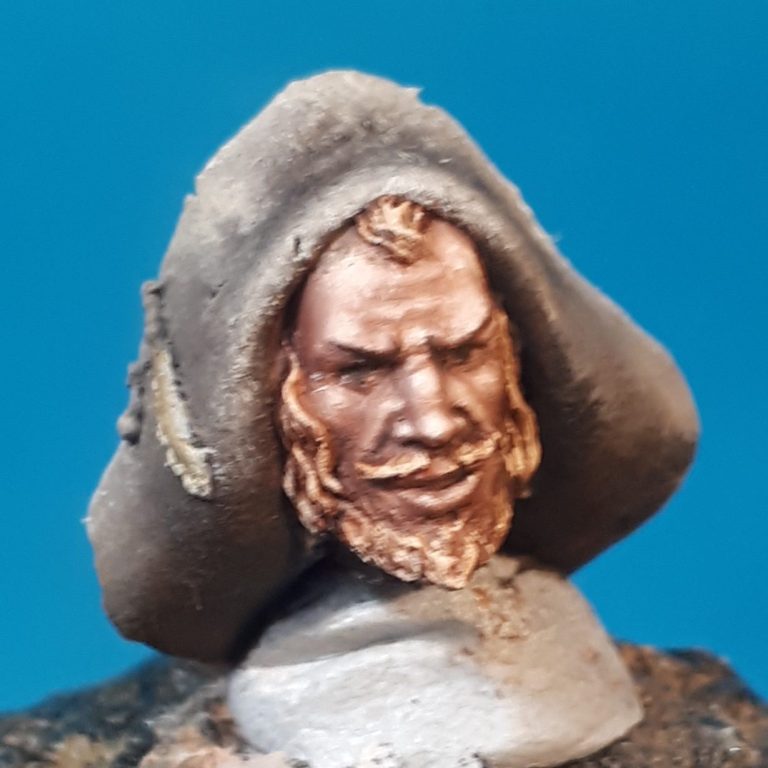
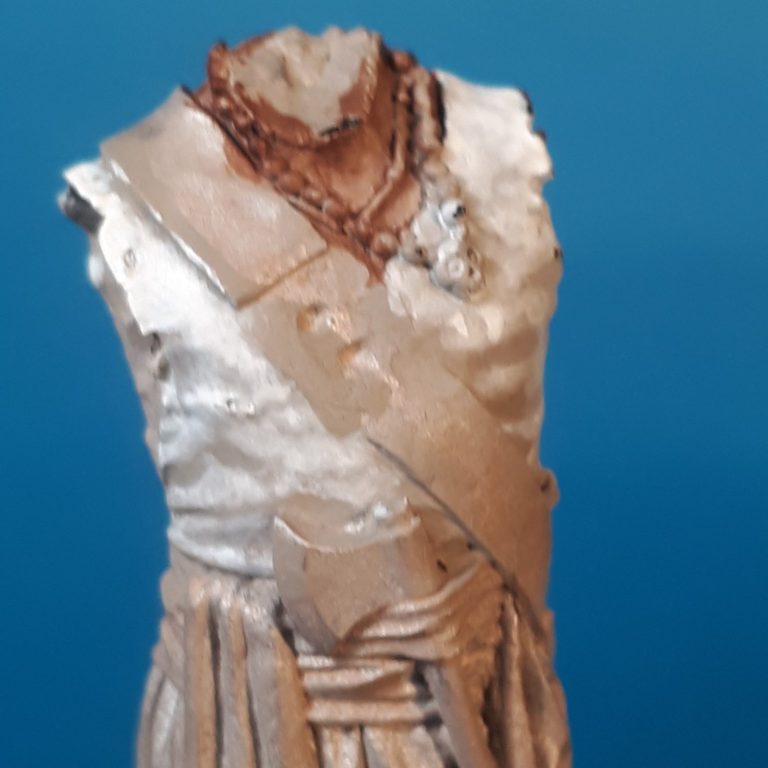
Photo #4 and I’ve painted the shirt with acrylics, starting off with a dark cream colour, which was added in three layers so that a solid ground colour was established, then that mix was gradually lightened and heavily thinned with water so that a brush dampened with the mix could be used to bring out the raised creases.
By adding small amounts of white to the mix, plus water to retain the consistency, the contrast could be gradually built up, working on smaller and smaller areas to final highlights.
It can be a little tedious, and as many as fifty layers might be necessary, but the paint is added in such thin layers that by the time you’ve worked all the way around the figure, the part where you started should be dry.
Whilst photo #4 showed a close-up, photo #5 pulls back and the gradual colour changes can be seen more realistically.
As I was painting the face, I also did the small patches of flesh on the legs and the arms – which aren’t shown yet.

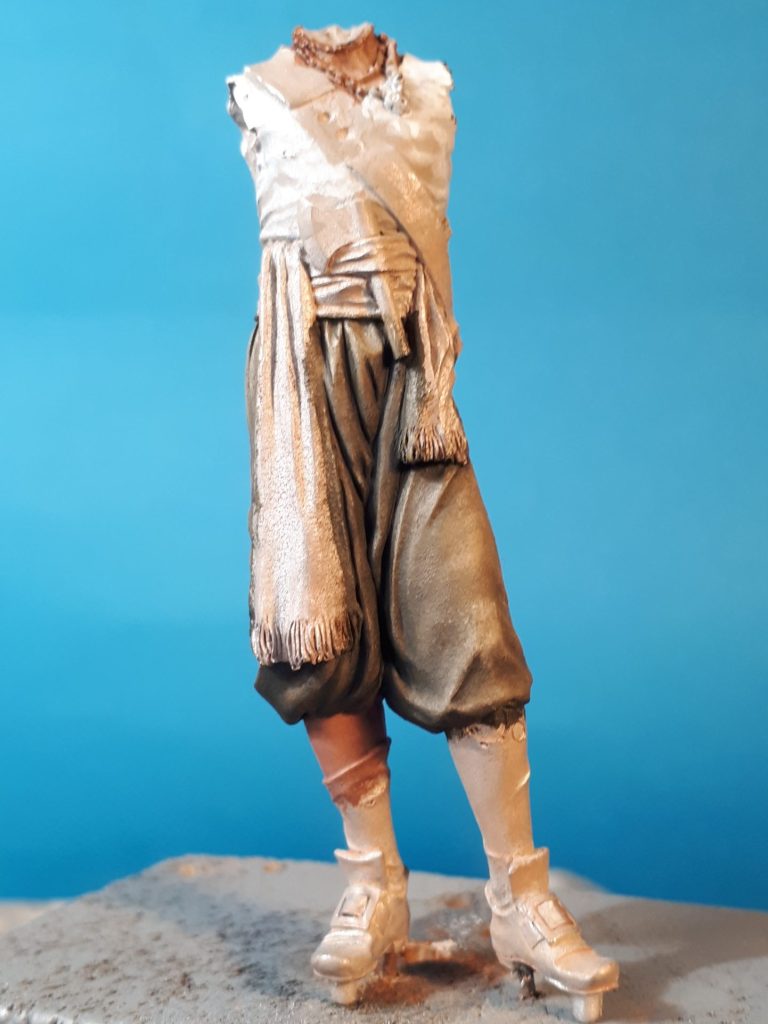
Photo #6 shows the trousers having been painted. I used an undercoat of MP Olive Green acrylics, and then added Winsor and Newton Olive Green oils over the top of that.
Buff Titanium oils were blended in to bring up the mid-tones and highlights and once dry, deeper shadows were added with some Mars Black.
A note for if oils give you a gloss finish when dry – put the oil paint out onto a piece of paper for half an hour, this soaks up a lot of the excess carrier oil. Also add a spot or two of Tamiya’s Flat Base to the acrylic colour being used as an undercoat. Don’t worry if the colour dries with some white patches either, the oils will cover that up, it’s just an excess of the flat base messing with the acrylic.
The point is to have a very matt finish to the acrylic, which will help absorb some of the oils.
Lastly, try and find a warm place to put the model to dry. I used to use a metal plate on top of a double radiator covered with a tall Tupperware box to keep the dust off. Now I use an old kitchen cupboard ( from a DIY renovation ) with a heating mat from a reptile vivarium as a heat source.
And at that point the model stalled. About a year went past without really doing anything barring pick the different parts up on their temporary wood holders for a quick look, possibly pop them in a box for when I went to painting days, and then to get ignored……

Now to New Year 2025 and a little bit of a quiet resolution to “get some things finished Adrian !”
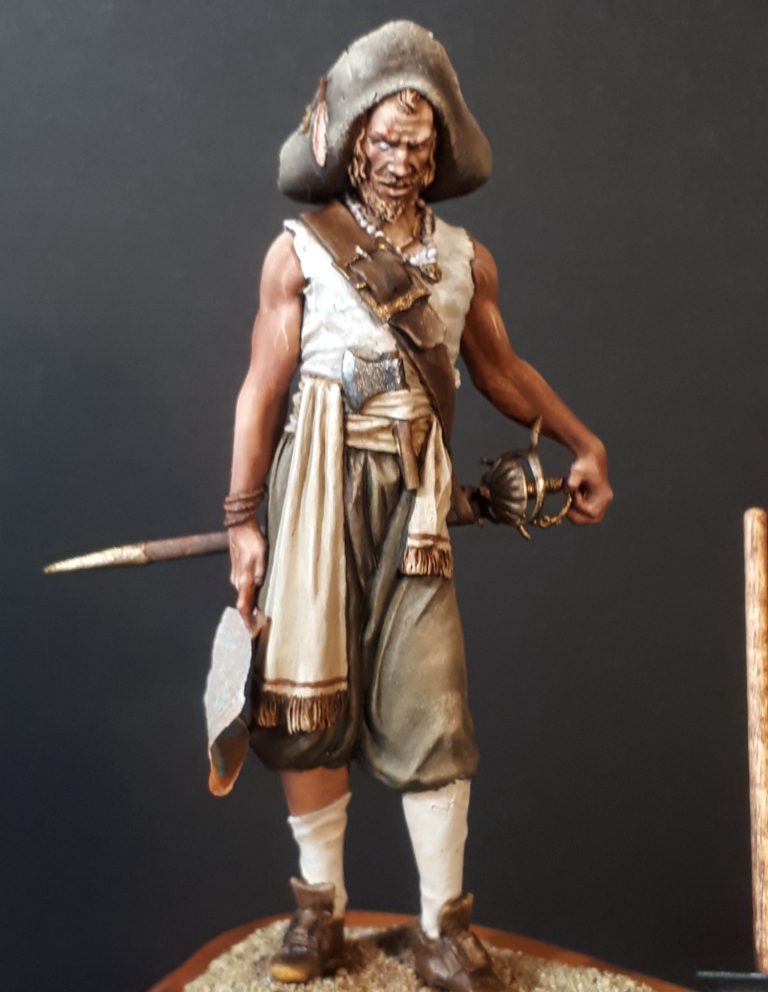
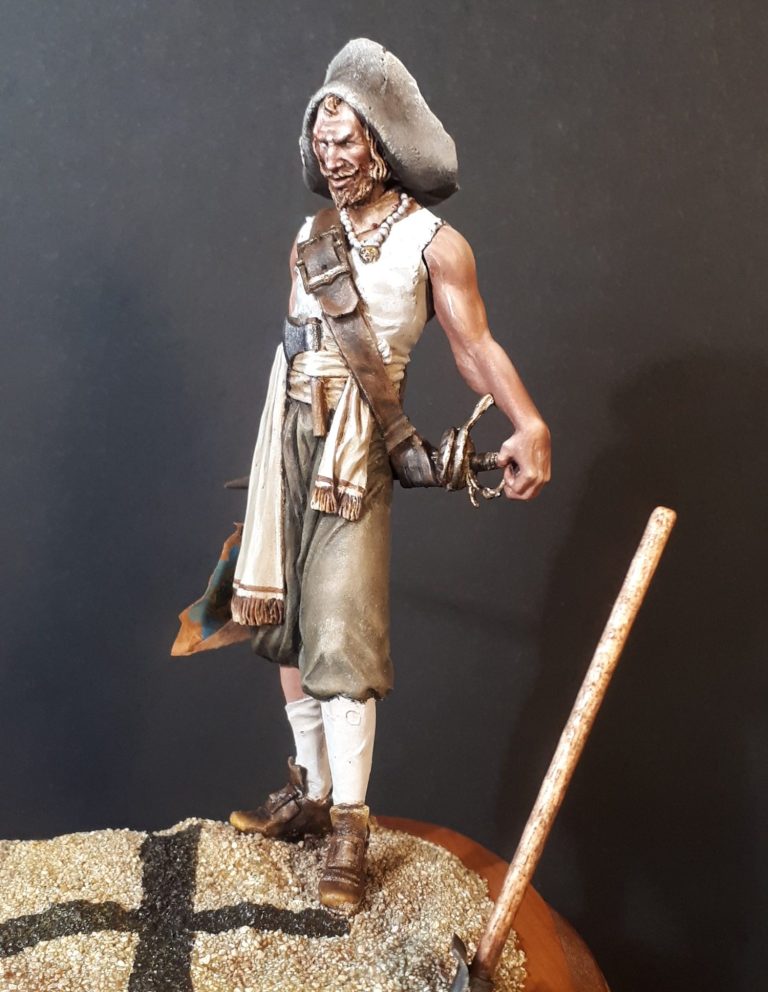
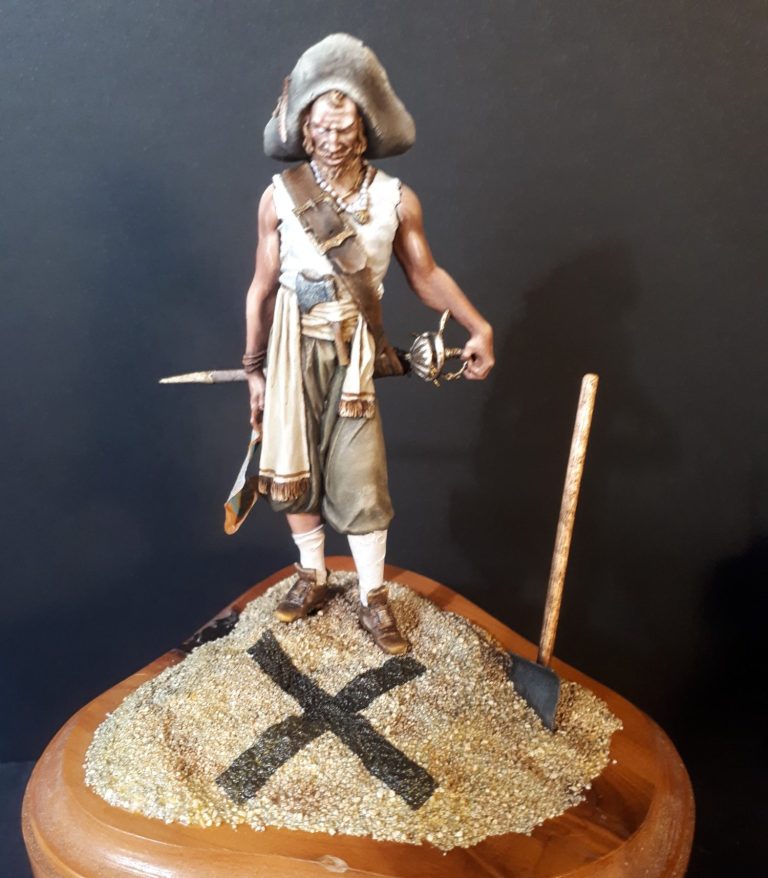
This being one such and photo #8 is here to prove it.
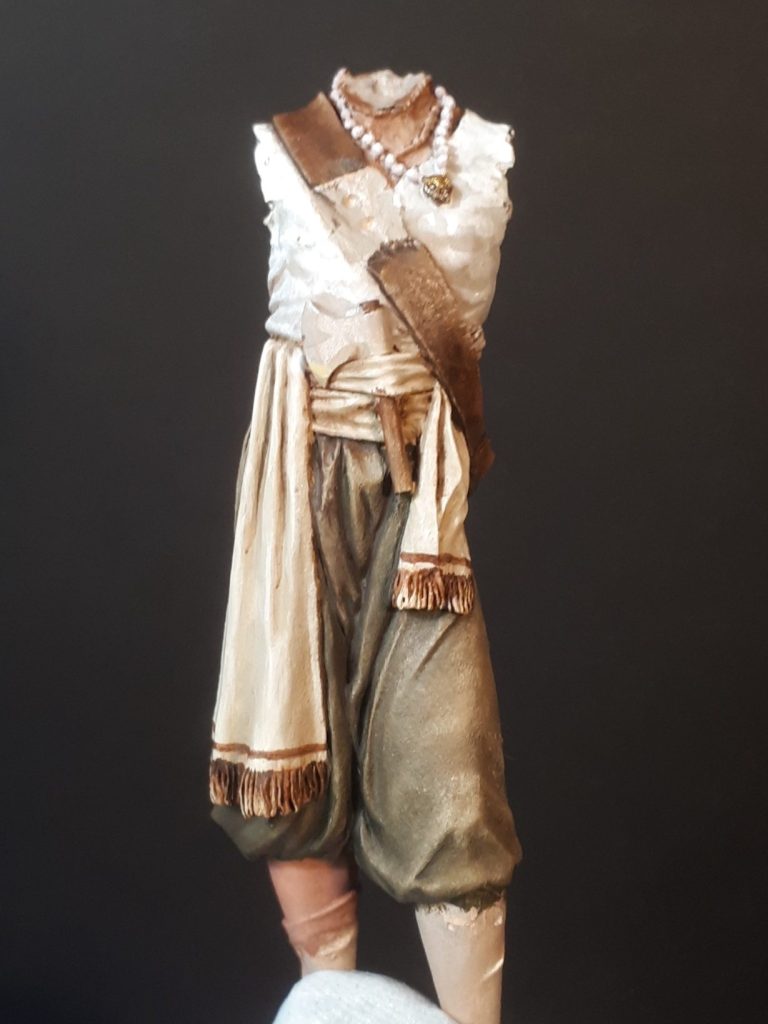
The cross belt is nice and wide and allows for a lot of painted detail to be added if the modeller so desires. I began with Vandyke Brown oils over a mid-brown acrylic undercoat, adding Mars Brown to most of the visible areas, and blending that in to the darker Vandyke Brown with a small, soft brush.
Venetian Red, then Yellow Ochre are then used to build up highlights along the edges, and then a fine brush is used to add the scratches and broken edge effect to the belt along the outer edges.
The sash was painted in colours similar to the shirt, but with a little more yellow added, and the fringe and an edging band painted on with Mars Brown and some highlights of Buff Titanium.
Photo #9 shows the model almost completed. The sword and scabbard have been painted - the sword itself is a particularly nice addition with a separate part for the fist guard and some very fine detail on the hilt.
The arms have been added, again a lot of detail to get the painted enthused, with vein detail that can be picked out and very good sculpting of the hands and fingers.
The cross-belt buckle is another separate part, and fits very well in the space on the chest, again quite an ornate piece and benefits from a little attention from the painter.
There is a small clay pipe and a feather moulded into the side of the hat – all these little points adding so much character to the figure.

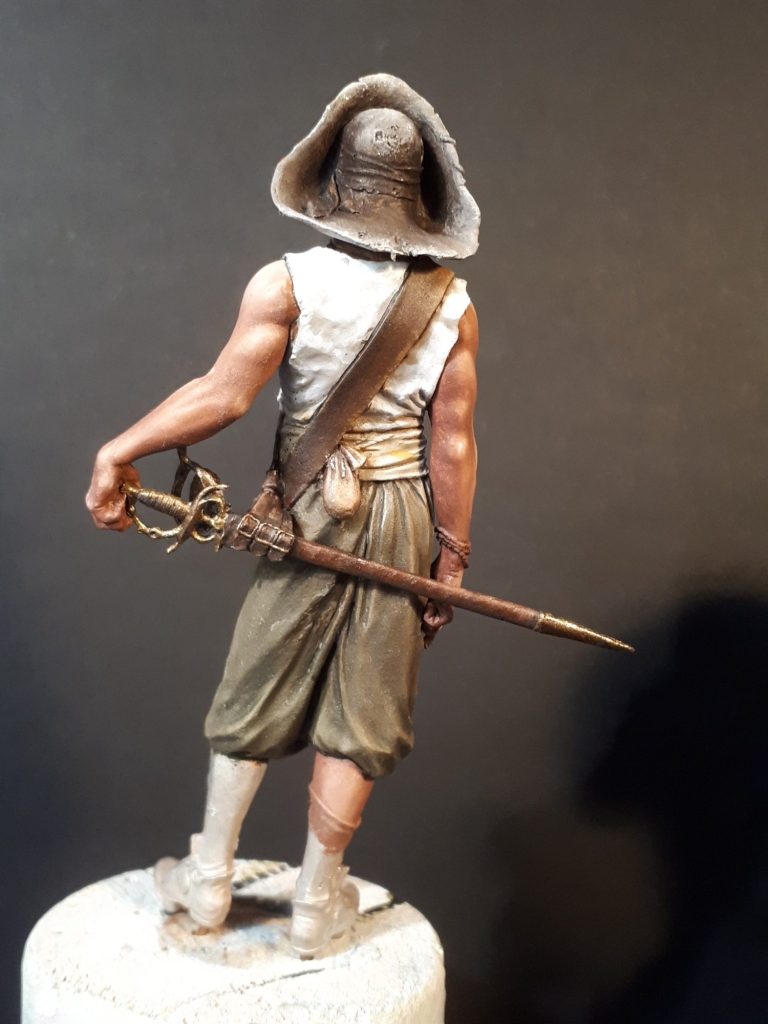
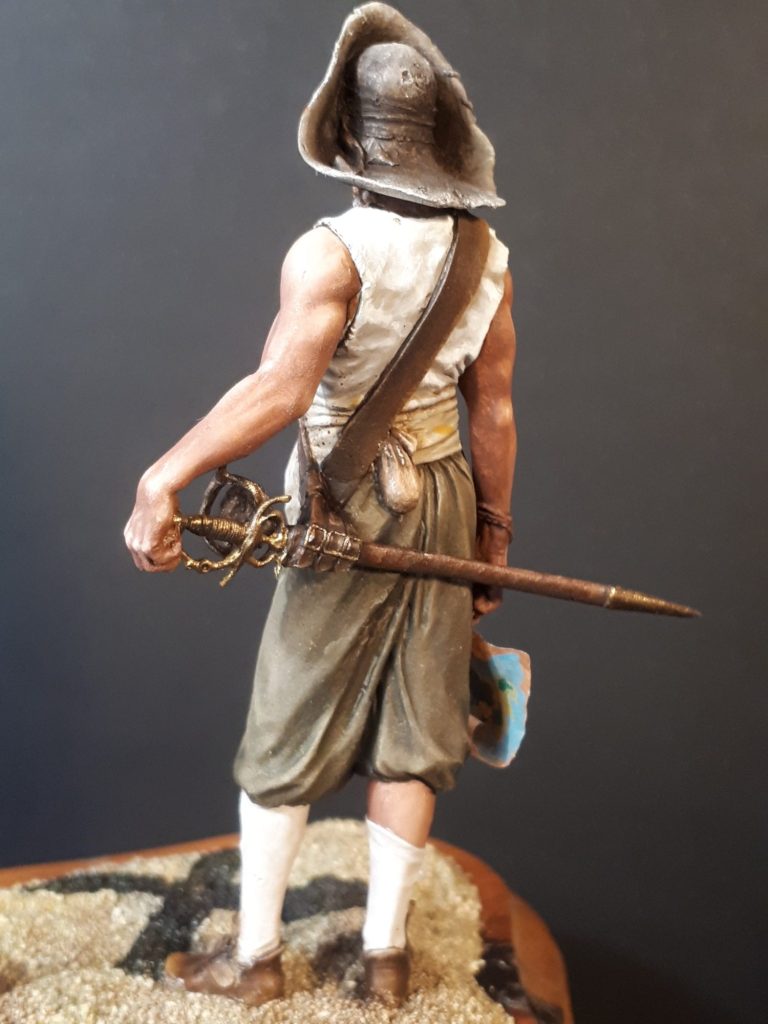
Photo #10 shows the back of the figure at this stage, and the sword and belt buckles are just a joy to paint.
There’s not as much wear to the back of the cross-belt, hinting that the seawater splashes would be more to the front because he’s facing forward most of the time as the ship travels, plus any damage from fighting or perhaps pushing through dense forest ( when burying loot ) would all be caused to the front of the belt….. Well, that’s my thinking.
Along with that thinking was how to have him based.
Tempting to build the deco of a ship with the wheel and a portion of the rail…… Not ! But maybe something quite simple like the buried treasure idea…..
He’d need a shovel !
So photo #11 shows a simple shovel under construction. A length of cocktail stick and some thin plasticard to begin with, but it didn’t look quite right somehow, it was going to be shoved in the sand, so it didn’t need the pointy end doing, but it still seemed wrong.
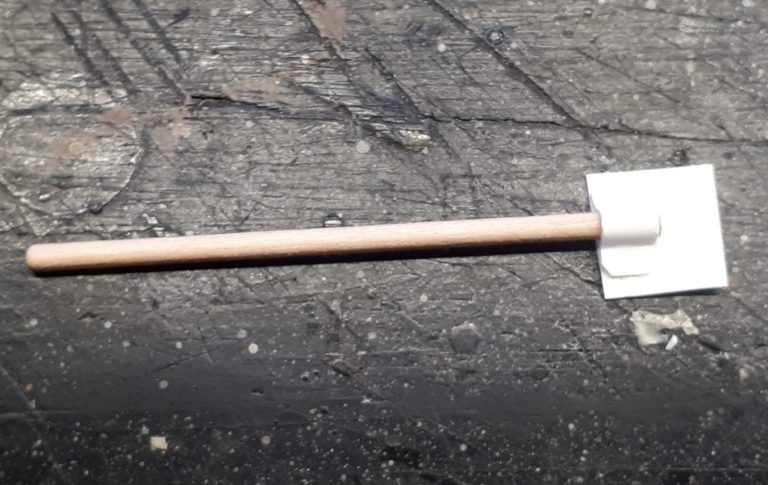
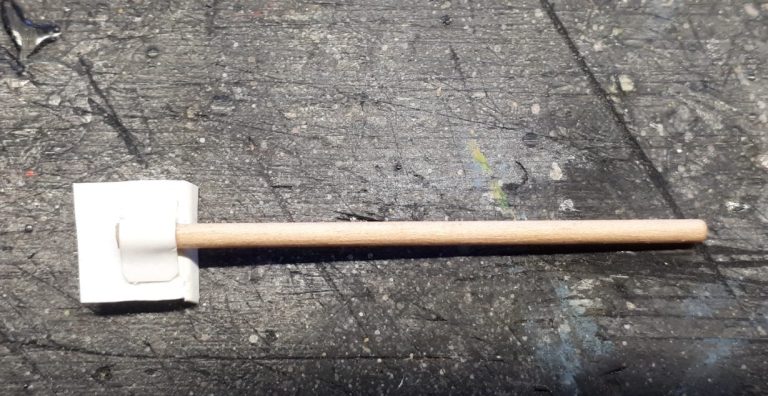
Photo #12 doesn’t look much different, but I’ve used a new section of plasticard for the shovel blade, and curved the top edge to provide a better ledge to place the foot on when digging.
Photo #13 and a map, he’d need a map to remember where the treasure’s buried. A small section of cigarette paper, stained with some Mid-brown acrylic paint and some terrain painted on the side that’s held against his leg. Once fully dry, crinkle it up a bit and form a curl in it so it looks like dried parchment that will be stored in a tube.
In this shot the painted shovel can be seen too, it ‘s been buried in the sand a little as I intended, along with fastening the figure to the wood plinth and building up the sand – Chinchilla Bathing sand, fixed with thin liquid superglue.
The sand has been stained with a mix of Golden Ochre and a fair amount of White Spirit to allow it to flow into the sand texture and darken the whole of the sand a little.

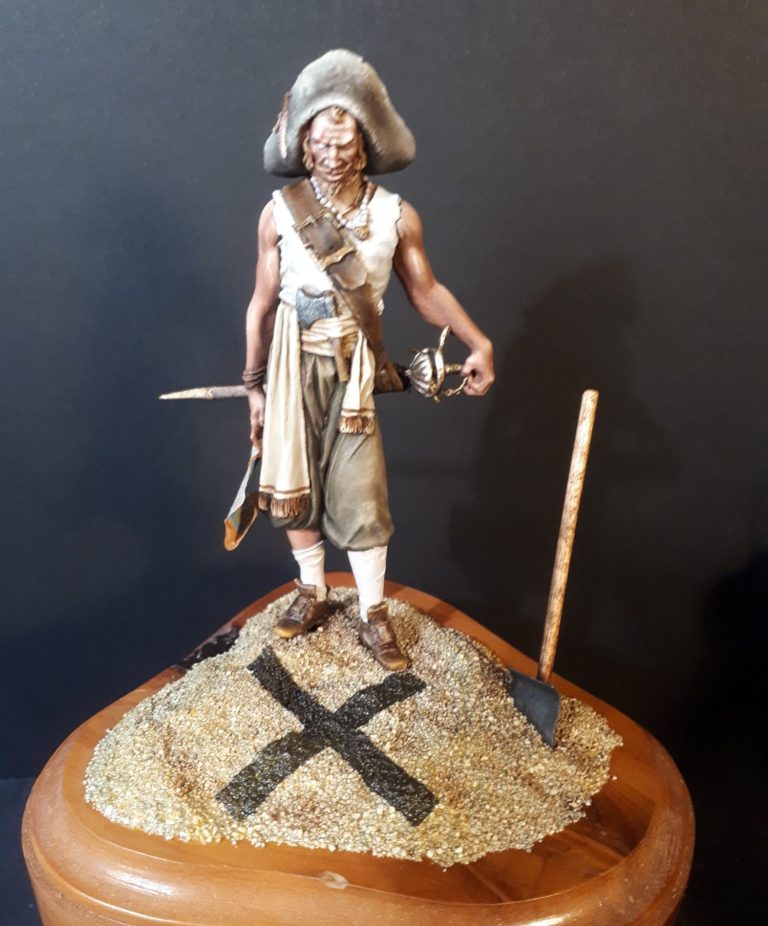
Now our Pirate Captain Phil, wasn’t the most successful of chaps, his crew, like a lot of Pirates, was only small, and I was tempted to have the foot and lower leg of a dead colleague on the edge of the base – the body being off to one side and hence unseen – but decided against that idea.
Simply put, Phil’s a bit dim, so when someone said “X marks the spot” he took it a bit literally and got a bag of black volcanic sand from somewhere to, well… you can see what he’s done.
In fairness, he’s remembered to mark the location on the map, but is probably daft enough to make several copies and hand them out to the rest of the crew – wouldn’t want to lose the map and then not remember where the loot is, eh ?
So, Captain Phil, never the richest Pirate, there always seemed to be someone finding his treasure and digging it up before he got back to it, and his crew….. Well they always seemed to be better dressed and have nice homes in the desirable parts of town……
Final thoughts
A lovely kit, very well sculpted, nicely moulded and to be honest, doesn’t fight the painting process at all.
I know I’ve made it into a slightly comic character, but that’s partly to make him different and perhaps less bloodthirsty, and because he was fun to paint.
Looking through the Alexandros catalogue, I do think there’s some superb offerings. Alexandros seem to use a lot of different sculptors though, so there is an amount of variance in quality I think.
Obviously your preference for subject matter will colour your choices, but I’ll admit to having done the Napoleon and the Rommel busts and I still have a couple of figures – Zeus and Brunhilde - on the Grey Army shelves that deserve a bit of paint.
So, I think I’ll give this model, and many of the range a “highly recommended” advisory.