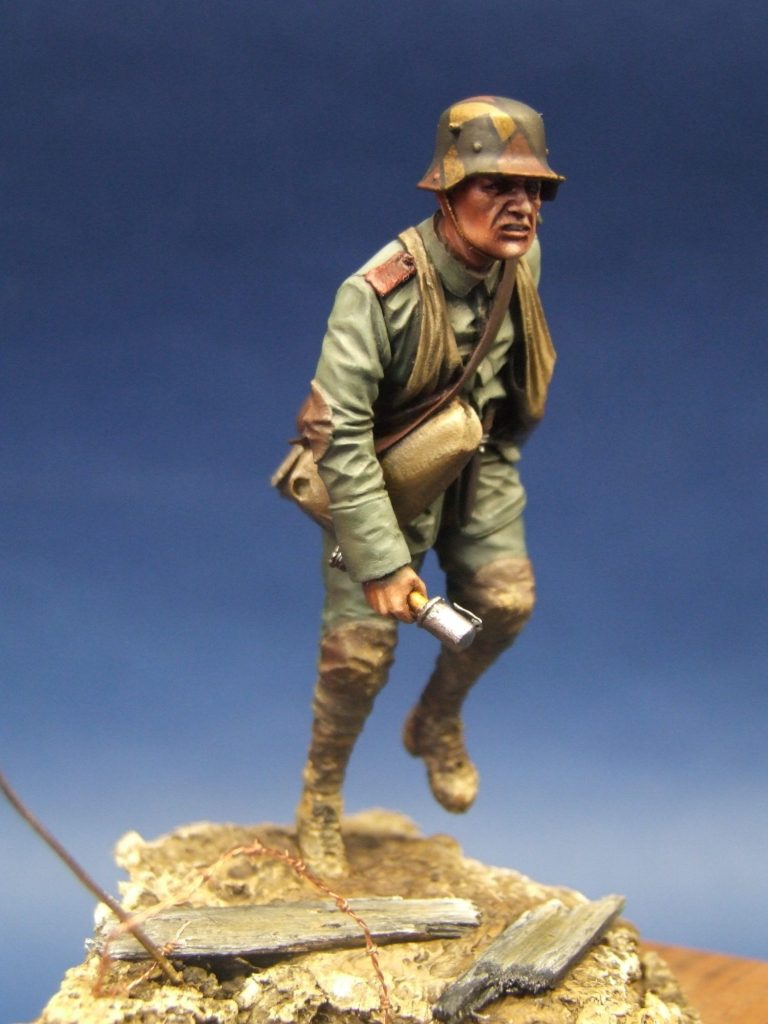
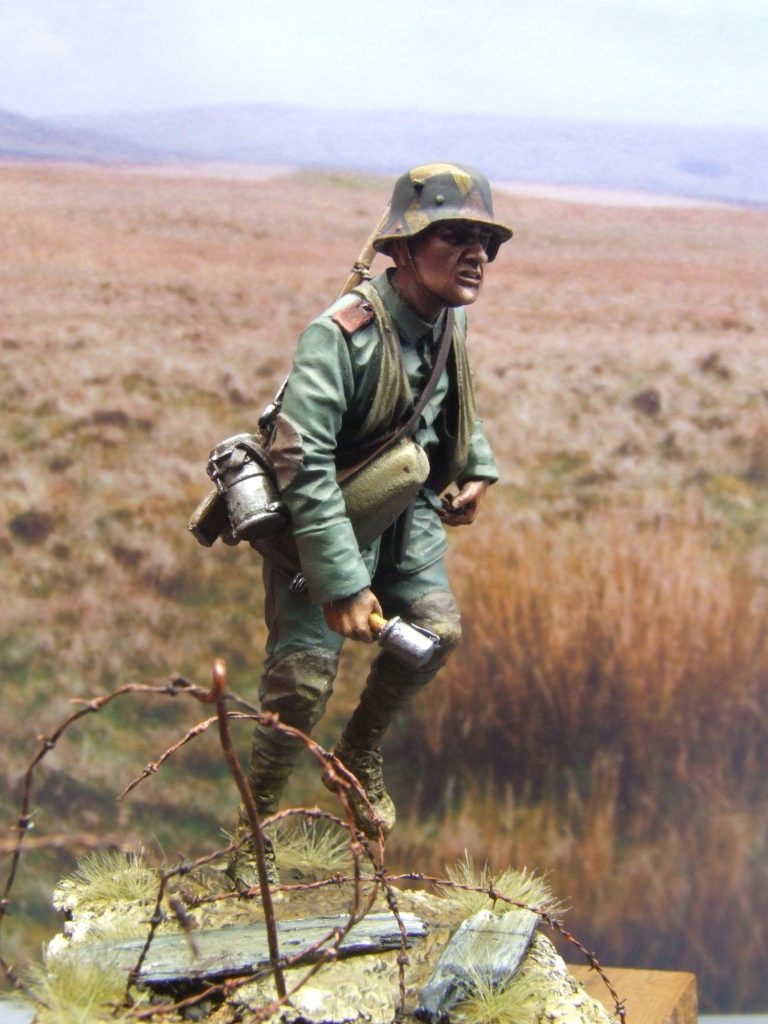
WWI German Stormtrooper
65mm resin figure from JMD Miniatures
Article in Military Modelling magazine in 2007
History.
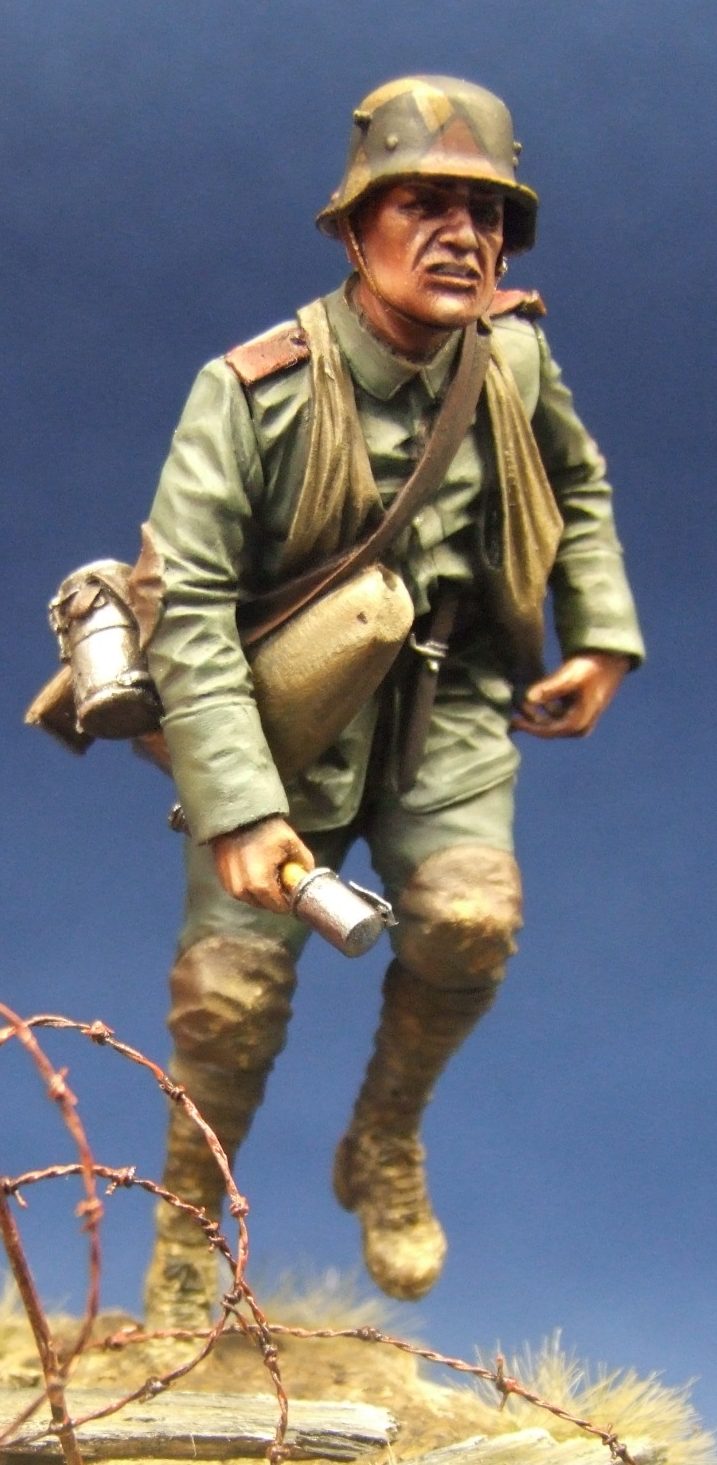
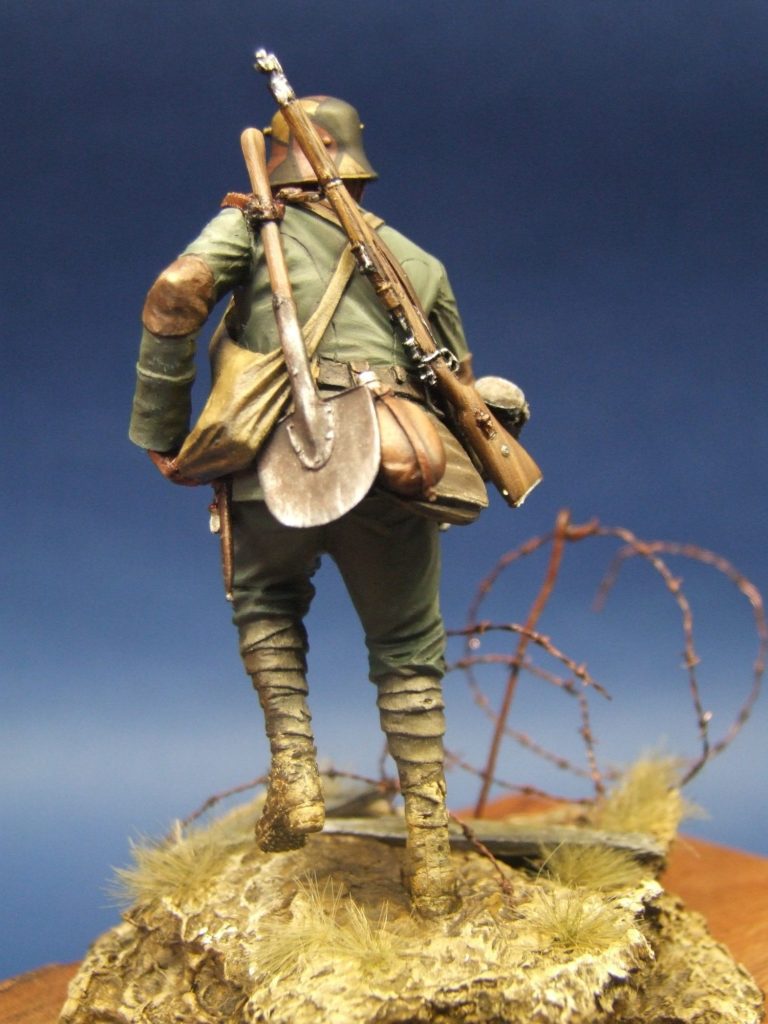
Depicted here is a running German Stormtrooper, one of the brave, perhaps some might say unhinged, specialist soldiers that developed ( on both sides ) during the trench warfare in the First World War.
Whilst grenades ( the word is thought to be a derivation of the French for “pomegranate” because of size and shape of early versions ) had actually been used since the fifteenth century, it was only during the Napoleonic wars that they became regarded for wider use during siege operations.
During the First World War, the grenade really came into it’s own as a weapon for the attacker, and the Germans certainly made to capitalize on this by developing several different types for their troops to use.
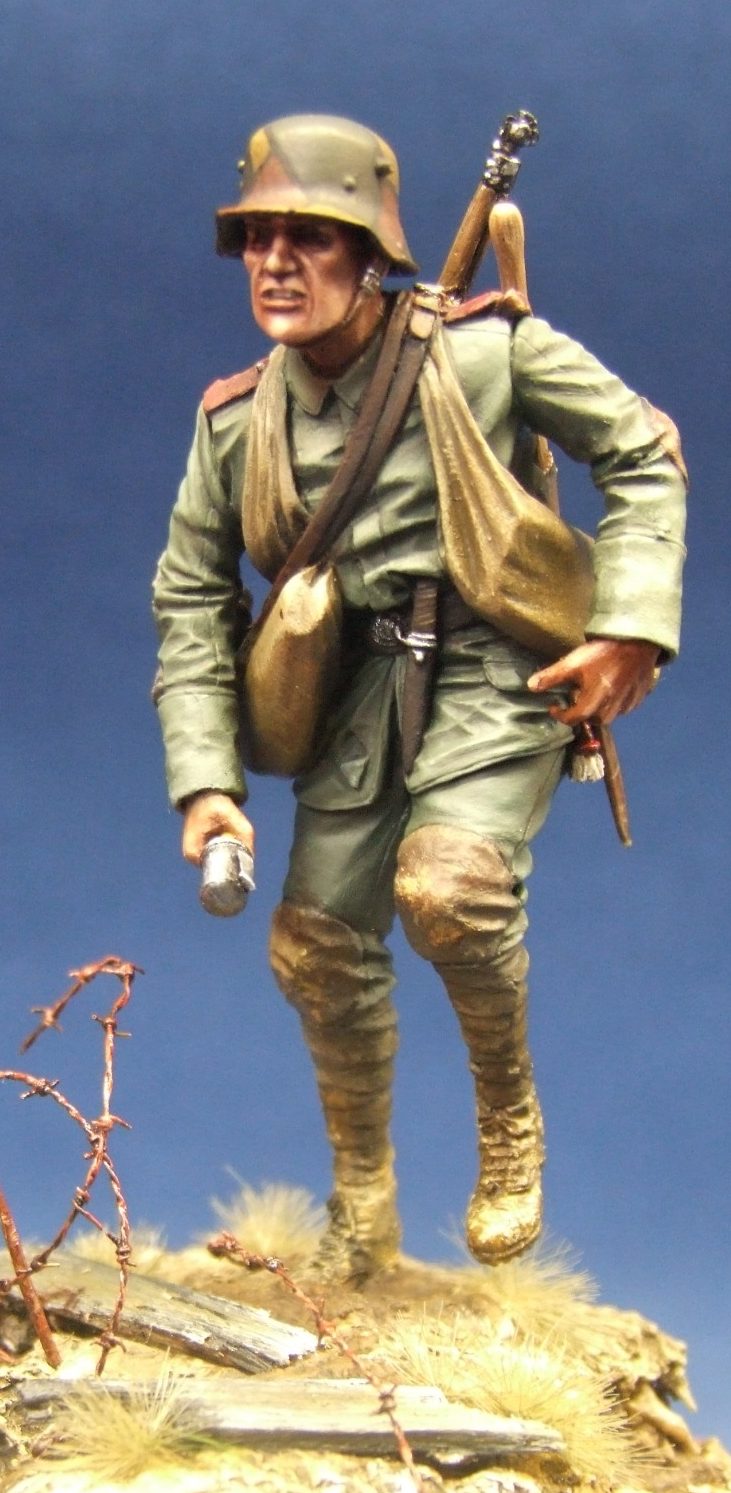
Probably the most widely recognised, because of its distinctive shape, is the stick grenade being made use of by the model depicted here. There were several different types though, some detonated on impact – but these were not so popular with the troops, because they were almost as much a danger to the thrower as they were the enemy troops. After all, there are many chances for the trooper to knock these deadly weapons whilst moving about the enclosed confines of a trench prior to the next attack.
Far more preferable were the timed fuse devices, where the thrower had a known detonation time, and this could be anything from seven seconds down to a mere two.
Whilst the most preferable were between five to seven seconds, allowing the grenade to be thrown, our chap here probably carries some two second delay charges, to be used as he runs down an enemy trench, throwing grenades into dugouts as he passes, the short fuse allowing for no escape or chance for the defenders to throw the grenade back outside.
The Stormtroopers were initially formed in May 1915, when a unit known as Sturmabteilung Calsow (Calsow's Storm Unit) was formed. This initail troop became vastly expanded over the remaining years of the war from it’s initial two combat engineer companies, with their 37mm gun, flamethrowers and trench mortar troop, to include men with grenades.
The usual tactics were for an initial artillery bombardment of conventional explosive shell along with poisonous gas to be laid down, and with the troops then to attack as close behind this at predetermined weak points along the enemy line.
Areas that appeared particularly strong were bypassed, leaving these open then to attack from the side, by following troops. The idea being to get as deep into enemy lines as possible, taking prisoners, but more often just killing enemy troops as quickly and efficiently as possible, so that the strong points that had been left alone, could then be attacked from three fronts, by the following battalions of troops.
This tactic actually worked quite well, although it did rely heavily on the troop commanders being given a rough idea of the direction of the attack, but being left to make the finer details up on their own as the resistance of the enemy was tested and broken.
Our little figure here depicts one such man, running forward over heavily shelled ground, hoping to get to the first trench of his enemy before some British soldier recovers from the barrage of the heavy guns enough to look out over the top of his trench and see him coming.
He’s got one grenade ready to throw, a short fuse to knock out and kill quickly, and two bags at his side with which he can deal more death and destruction as he makes his way down the tunnel-like trenches.
The mud is slippery beneath his boots, the barbed wire snagging and clinging to his clothing, trying it’s best to impede his headlong rush !
Not far to go. But will he make it ?
The kit.
I saw these kits first in the Attenshun section of Military Modelling, and this one piqued my interest.
Admittedly, I’m not known for my interest in the First World War, but occasionally a figure like this comes along and I want to have a go at it.
Ken Jones was kind enough to send this along to me ( thanks Ken ) and because of a change in what I do for a job, it sat on a shelf for a couple of months ( Sorry Ken ). But eventually – well it seems like it took me a long time – I got around to doing it.
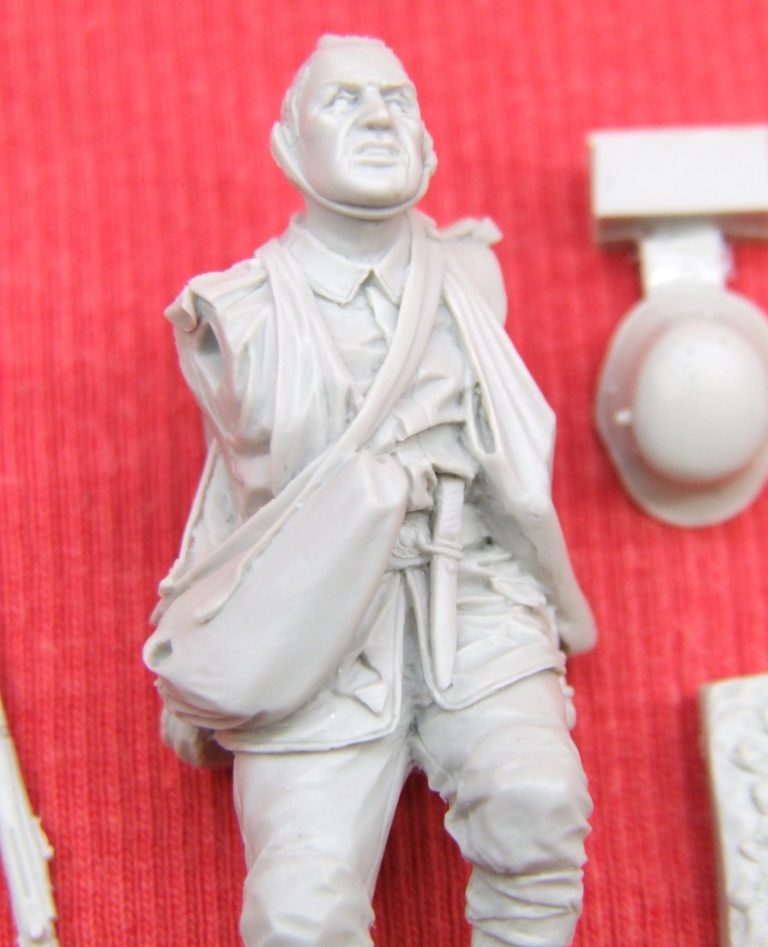
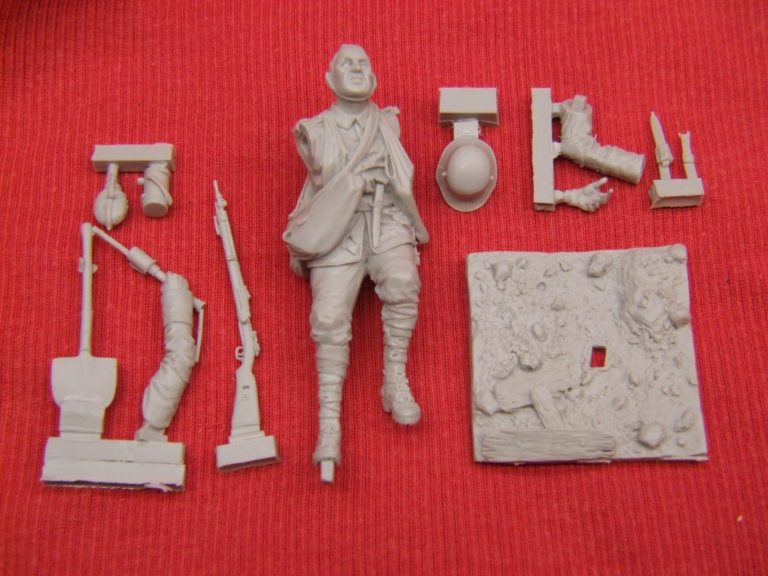
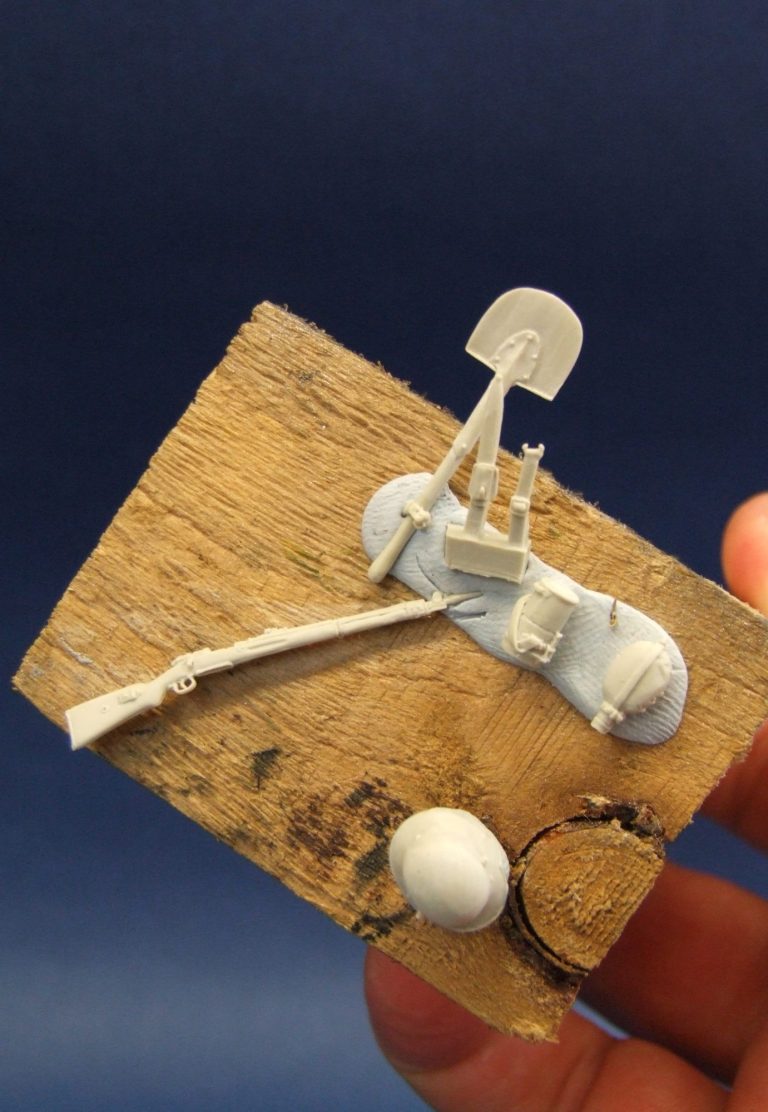
I’ve shown a couple of shots of the raw resin ( photos #1 and #2 ), and I think it’s easy to see the very high level of detail that is on the components. They’re pretty well cast too, and there’s little clean-up to do, except for on the lower legs where there’s a bit of a mould separation line. It’s no trouble to clean up though, and the mould blocks are easy to cut away, so really there’s no problem to catch the unwary.

The only real concern is shown in photo #3, and that’s how to make sure that the small point of contact that the figure is going to have with the groundwork is absolutely secure.
Now in fairness, the kit is relatively small, and made from a very light resin, so really, there shouldn’t be anything to worry about, but hey, I’m just a bit cautious. So I drilled into the bottom of the resin block that is attached to the foot at the angle shown to allow me to put a wire into the hole which would be as long as was possible.
Otherwise, I was pleased with the kit. The way parts attach is not just very positive and should lack the need of filler, but some of the engineering – like for the shovel and it’s fastening belt – are so well done, it’s very pleasing to see and work with.
The thought that has gone into this kit is evident in little touches like this – together with such things as the helmet being a separate item that allows the face to be painted easily.
There was a small amount of warp in the rifle, but don’t worry about this, as once it’s fastened in place, the strap that links it to the shoulder ( again a separate resin part ) straightens any such problem out.
Photos #4 shows the box art – with a well-painted example of an assembled kit.
There’s a view taken from the back of the model too contained in the box, and which gives all the colour reference that you need, together with the instruction sheet that is also included with the model.

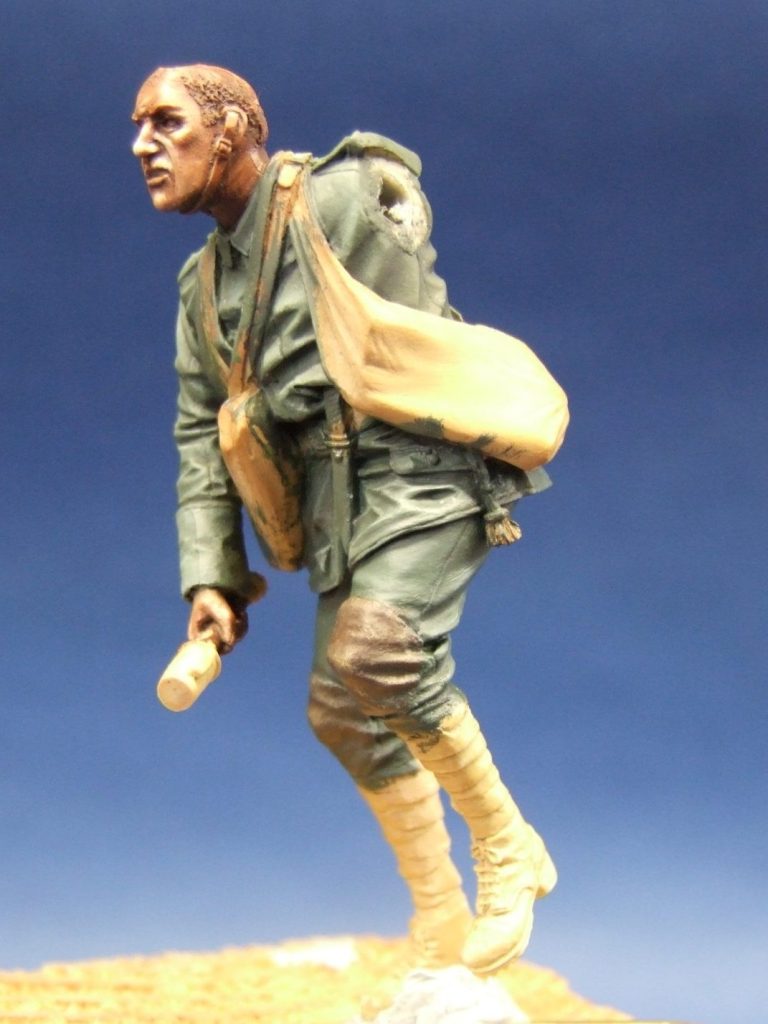
So, being happy with the kit, I could start painting, and photo #5 and #6 shows this beginning. In fact I got a fair bit done on the first two sessions – the main parts of the uniform are basically the same colour – although I did vary them somewhat between the separate items of clothing – and the face is done as you see him here.
I was having fun with the skin tones, simply because I’d bought some new paints ( just to replace the old ones ) and had cracked them open to see what they were like. This also allows me to decant off most of the oil which has floated to the top of the tube whilst they’ve been stored upright for some time in the shop.
Needless to say, they were different in pigment strength to the old oil colours I have been using, so I had to fiddle around with the ratios of these new paints to get anywhere near what I wanted, which was a dark, grubby look of a man who’s been out in the field for some amount of time.
So it’s not much use me telling you the ratios of paint, because of all the additions and fine adjustments I had to make…….So…….Moving on.
The tunic and trousers were matched as closely as I could get to the colours of an actual tunic that I’d had the chance to photograph in the Cinquantiere Museum in Brussels. I used a mix of Mars Yellow and Mars Black, which gave an olive green colour, and then added some small amounts of Prussian Blue and Titanium White to the mix to refine the colour.
Again, there was a lot of fine adjustment made to the colour, and so exact measurements of each of the colours are pretty hard to guess at.

I used more Mars Black to paint in the shadow areas, and a pale yellow mix ( Mars Yellow and Titanium white in roughly even amounts ) to build up the highlights.
I added more Prussian Blue and some of the Mars Yellow for the trousers, making these slightly more green, but it’s pretty hard to distinguish any difference in the photos, as the amounts added to difference the colours are only very small.
The leather pads at knee and elbow were done whilst the tunic and trousers were still wet, the reasoning behind this being that any transfer of the greenish paint would make the leather areas look grubby, and thus aid in making the clothing look worn and unwashed.
I used my usual leather colours for these areas – Burnt Umber to begin with, and then Mars Brown as a main mid-tone, then some touches of Mars Yellow and Titanium White to add highlights and scuffs. Once both the uniform and the leather areas had dried fully, I used a very dark mix of Mars Brown and Mars Black to outline each pad, this lifts the leather area away from the cloth, and makes it look more like the leather is sewn on over the top of the clothing.
Also please note the very nice grenade head moulded in place here. Not long after this shot was taken, I managed to drop the figure, and he landed on the grenade. Whilst it didn’t explode ( ha ha ) it did disappear off into the black hole that is the floor of my work room. This part of the model is due to be found at about the time I finish typing this article, having completed the model the week previous.
Either that, or you might hear a particularly loud ( if far away scream of frustration ) as you actually read this. If you do, it’s probably that I found the grenade head………obviously a little late to be pertinent to this figure anymore.
Ah, the frustrations of our hobby !
So that’d need a new bit scratchbuilding. I knew I should’ve left the arm off !
Photo #7 shows what I do to hold the smaller parts in place so that I can paint them. Beginners ask me about such things quite often, so I thought it worth including. It’s just an old block of wood, although any solid and disposable object would do, and some blobs of Blu-tac are used to hold each part in place until the paint it dry. In the case of the water bottle and the gas mask canister, I’ll paint some Chaos Black acrylic onto the backs of each part, just leaving the location pip unpainted, and let them dry – the black paint will cover all of the rest of the back, and come around each piece to the front. This will automatically form the dark shadow that would be present behind each part once it’s fastened in place, and allows me then to add paint to the visible portions without worrying about bare resin being visible, or having to touch in dark paint once it’s glued in place.
Because the rifle will be visible on both sides – apart from a small section in the middle on one side which sits against his back, I will actually Blu-tac this piece across a corner of the wood block so that I can get at both sides whist I’m painting it.
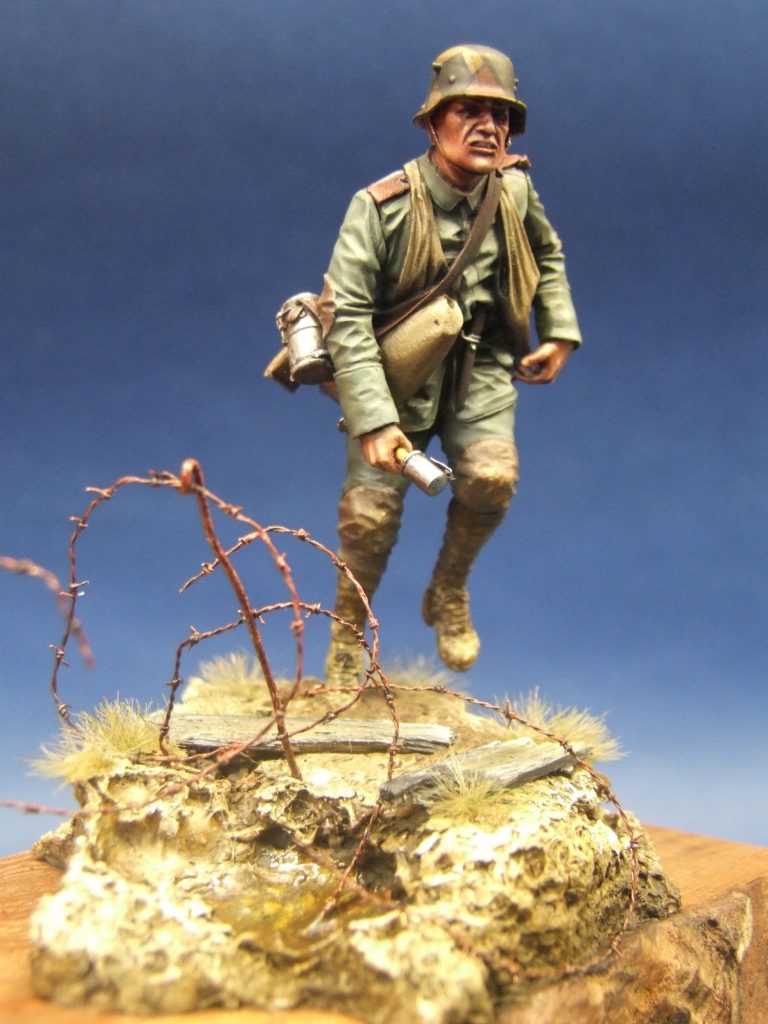
Normally, I’d leave thoughts of building groundwork right up until the model is nearly finished, but because so much mud and dirt is associated with WWI field operations, even though at some point it must have dried out, because there were several summers involved whilst the war took place, it is commoner to see lots of mud, rather than baked mud. I say this in regard to most films, photographs as well as models.
Not wanting to buck the trend though, well only a little bit, I decided that groundwork would be integral to the figure – so far as not even bothering painting the boots – what’s the point, they’re going to be mud colour !
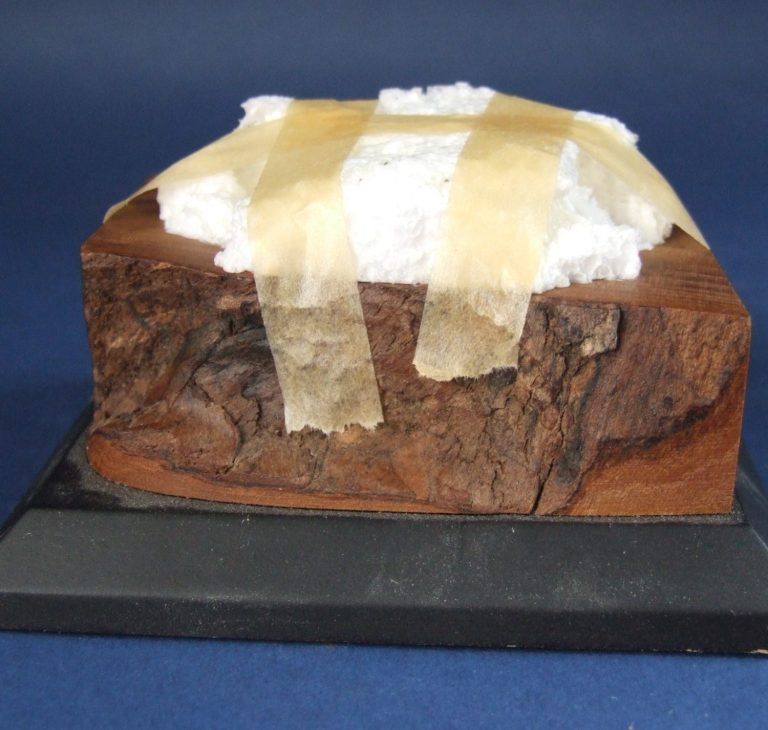
So, photo #8 shows that I’ve gotten an old bit of polystyrene packaging, and pulled random bits of it away to create a random, broken ground effect. I did use – very irresponsibly I might add, and if you decide to do this, then do take care and go outside and do it, so there’s plenty of ventilation, and a lack of varnished dinner tables that might get damaged – I used some MEK ( Liquid Poly glue basically ) to dissolve some of the polystyrene, and make a shell crater on one side of the groundwork.
I then used wood glue to fasten the polystyrene in place on the Armstrong Bases wood plinth, and photo #8 is the result, with tape holding the white block of textured polystyrene in place whilst the glue dries.
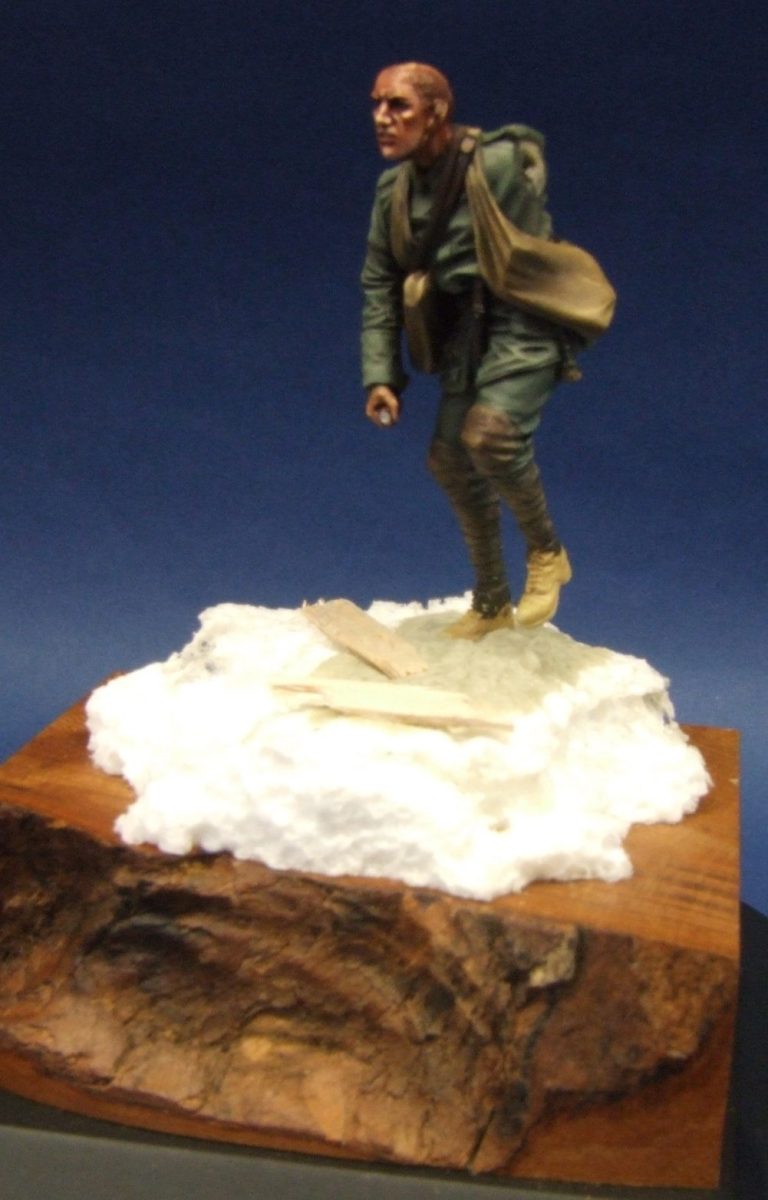
Photo #9 shows the model glued in place on the base. I’ve extended the wire in his foot so that it goes through the polystyrene and into the wood plinth, and I’ve dug out the polystyrene around the wire and backfilled with Magic Sculpt. I’ve also blended the putty into the top of the groundwork, and textured it with the top of the groundwork square that is provided with the model.
There’s a couple of pieces of balsa wood been added too. These have been broken to look……well………broken, and will be painted to look like they’ve been burnt and shattered ( see, different use of a word instead of broken…….um ).
Also in this shot I’ve painted the grenade bags. I used some Mars Yellow with a very small amount of Mars Black for the shadows, and Titanium White for the highlights. I yet again regretted fastening that right arm in place, because it really got in my way when painting the right hand grenade bag. The missing grenade head is noticeable in this shot too.
The belts have also been treated to a coat of paint, sticking with the colours used for the elbow and knee pads, but keeping it slightly cleaner looking, although I did add cracked and worn edges to them with some Mars Yellow and Titanium White.
The easiest way to do this is whilst the darker leather colours are still wet, fan a small brush out with some unthinned oil colour – in this case some of the light yellow as mentioned, and just touch the fanned tip of the brush to the edges of the belt, working along each belt gradually, and wiping the brush clean of any dark paint it’s picked up after touching in each section of light paint ( actually wiping the brush on a cloth after each time it’s touched the model is probably best ).
Barbed Wire !
Another thing that is associated with the First World War.
Now whilst there is the easy option of the brass-etched offerings, I’ve always thought that they looked flat and unrealistic. Far easier, and cheaper ( because I’m tight ) to build some oneself.
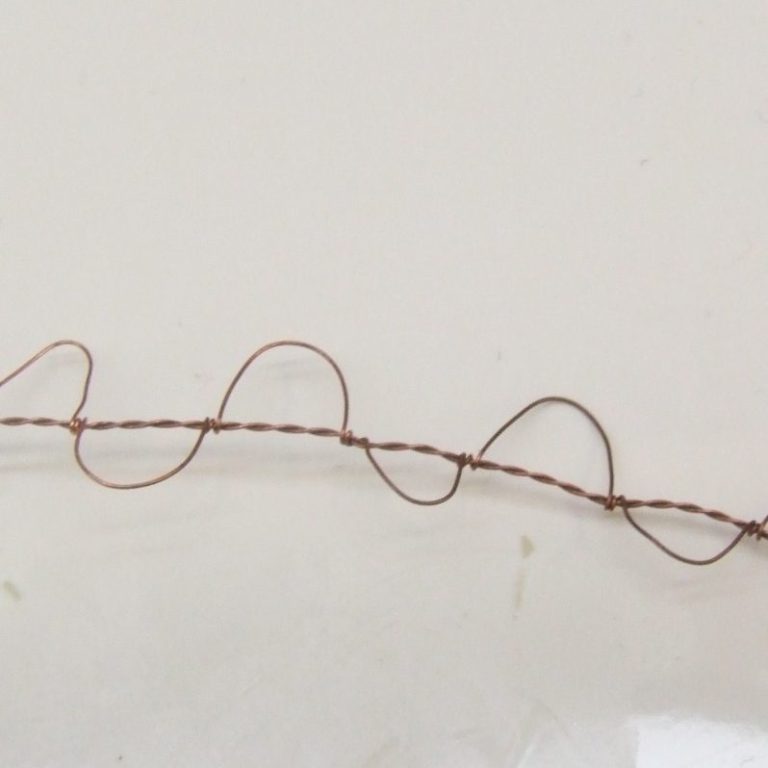
It is easy too; all that’s needed is some wire of the correct gauge, and just three pieces of it in fact.
Photo #10 shows some that’s nearly complete, and to make it is simplicity itself.
Take two of the lengths of wire, and twist them together – use a hand drill or some such device to make this easier and quicker if you’re making lots. Then use the third piece of wire to make two and a half tight twists close together on the twisted wires, then a loop, and two and a half more twists around the wire, then a loop, and then two and a half more twists……and carry on down the length of twisted wire until it looks like photo #10.
At this point I add tiny spots of the very thin, almost water-like consistency to each of the little twists, so that they will hold in place, then simply cut of the “U” shaped loops so that a little barb is left in place on the wire.
One thing though. This is actually miniature Barbed Wire. It acts just like it’s larger scaled, real counterpart, and you’ll quickly find out how bleedin’ ( and I do mean bleeding, because that’s what you’ll be doing a lot of if you’re not careful with this stuff ) sharp it is.
Making the hoops of wire that it’s traditionally shaped into for use on battlefields can be a little bit painful, if you’re not careful – I know you’re laughing, thinking nah, it’s not that bad, but believe me, it’s sharp, so watch it !
I used some thicker gauge wire to make one of the looped hanger posts that were sometimes seen too, and poked that into the groundwork.
Photo #11 shows the bespoke hand-grenade head that I made. Just a short length of plastic shielded, heavy duty electrical wire – 22 amps I think from memory, when the new oven was being wired in – and a small blob of Magic sculpt to give a slight rounded end, plus fill in the hole as the copper wire itself was used as part of the handle of the “stick”. I used a short length of the barbed wire gauge wire to make a lip around the bottom end of the grenade head – the copped coloured ring in the picture, then flattened some soft lead wire out to make the clip that a lot of these grenades had on them.
To be honest, this did me a favour, as the clip on the original kit grenade is moulded as a solid block, because of how very small it is and moulding capabilities, so I’d been intending to change this bit anyway. It was easier to do with the grenade head off and away from the hand, so having to rebuild the whole head, wasn’t too much of a chore.
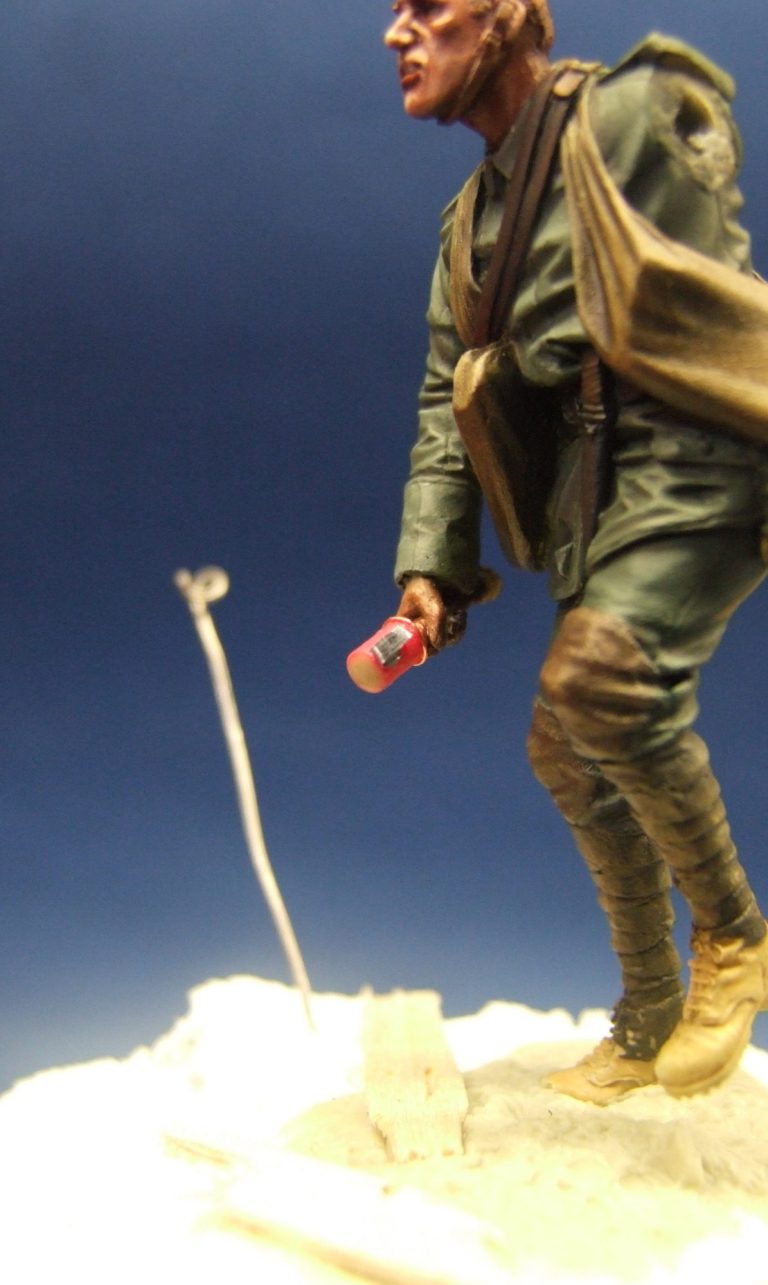
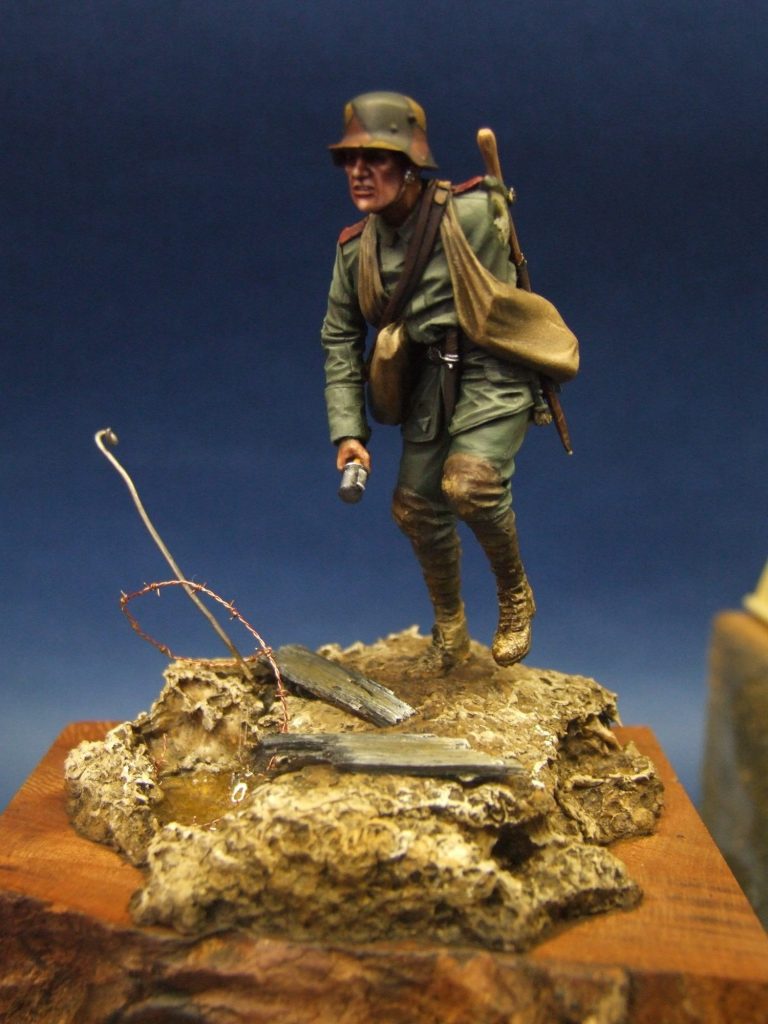
Photo #12 shows the model progressing now, the left arm is still separate, but the grenade head is painted, and the helmet with that distinctive camouflage pattern is also fastened in place. I’ve added a couple of reference shots here ( with my apologies for the poor quality – they required glass between me and the objects at the museum – can’t say I blame them, I’d only be touching otherwise ).
These are on display in the already mentioned Cinquantiere Museum in Brussels. There is a huge hall with First World War paraphernalia in it, along with good displays for both Napoleonic and World War II periods – put it this way, there’s a British Rhomboid, a British Whippet and one of those German boxlike tanks ( the ones that were just a couple of numbers and letters for a name ), plus artillery pieces ( about a dozen of these if not more ) and more helmets and uniforms than you could shake a stick at – and it’s free to get in, and that’s just one small ( relative to the whole place ) hall. There’s loads of other stuff on display.
This museum is DEFINITELY worth a visit if you’re in Brussels, although you’ll probably prefer to go down the road a few miles to see Waterloo ( also excellent, but believe me, it’s worth doing both, because you’ll get far more reference shots in the Cinquantiere ! ).
Back to the model though.
The shattered wood planks have been painted, and a small pool of varnish used to create a puddle of water with some of the barbed wire disappearing into it.
To paint the groundwork, I used Burnt Umber oils as a base, then added Mars Yellow and some titanium White for mid tones and highlights.
If you’ve ever been to the area in France that saw most of the fighting, you’ll note that the ground – once the very thin surface topsoil is disturbed – has a very high clay content. In fact it’s a horrible yellow ochre colour and looks like it’d cling to just about anything once it’s wet.
Hence my use of the colours stated, to try and depict this horrible, cloggy, messy stuff.
To tie the model to the groundwork, I stippled the colours up part of the lower legs - hence my comments about not bothering painting the boots.
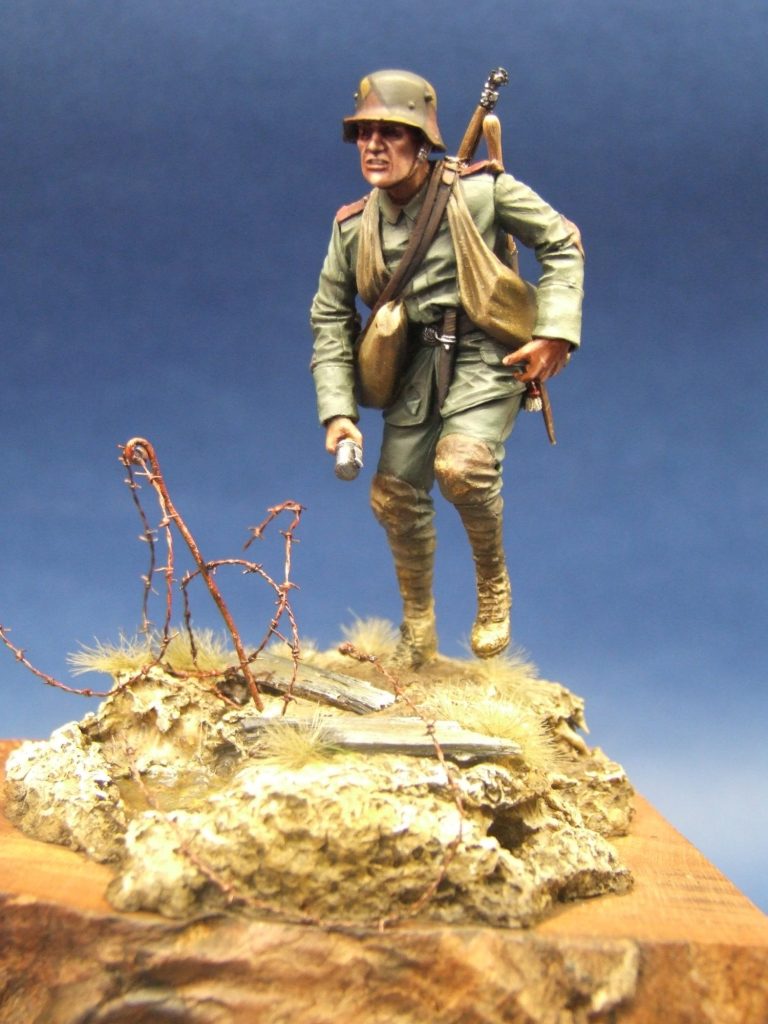
Photo #13 shows a back view, and the single loop of barbed wire is evident in this shot. There will be more added though. I’d fastened the shovel and the water bottle in place, the shovel in particular sat in place well, with the strap that it hangs by being cleverly sculpted to join onto the portion of strap that is on the model’s shoulder.
The water bottle fits less well, and I found I had to shave a small amount of resin away from the back of the component, to allow it to seat into the bread bag, and give it the look of not hovering in space.
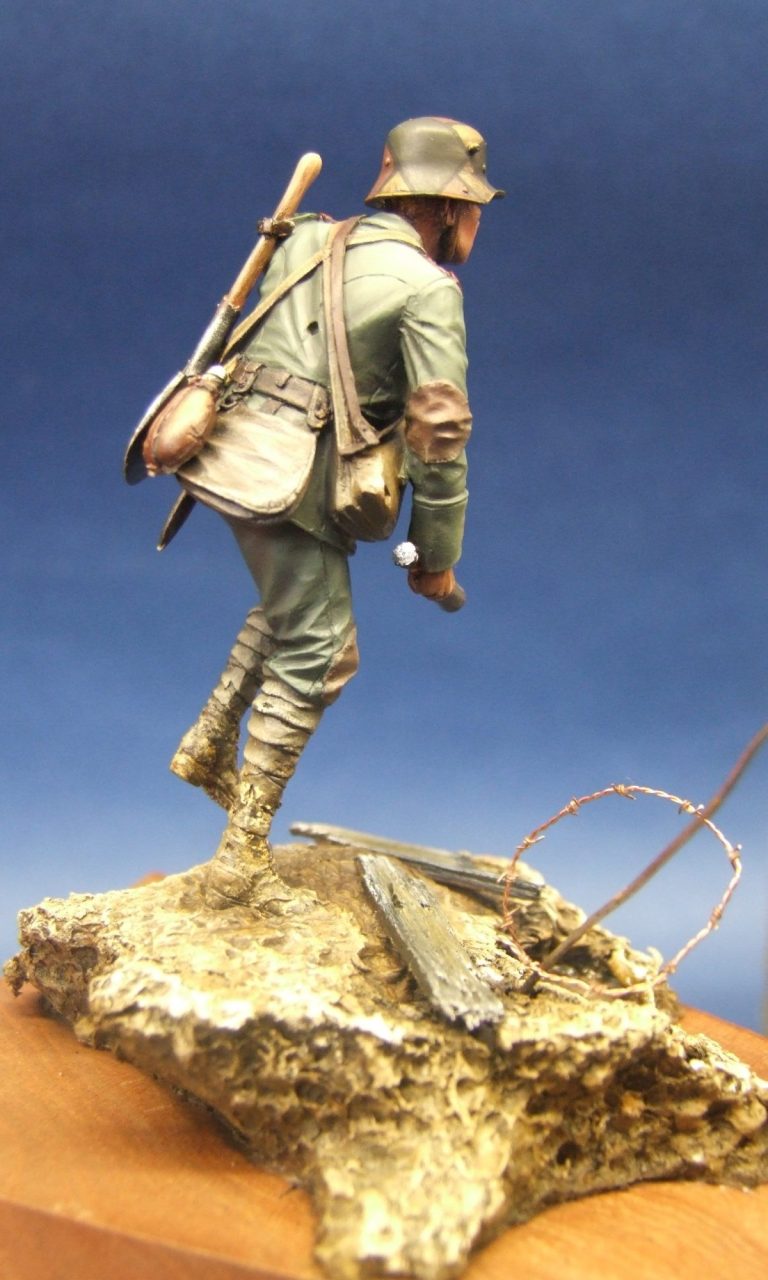
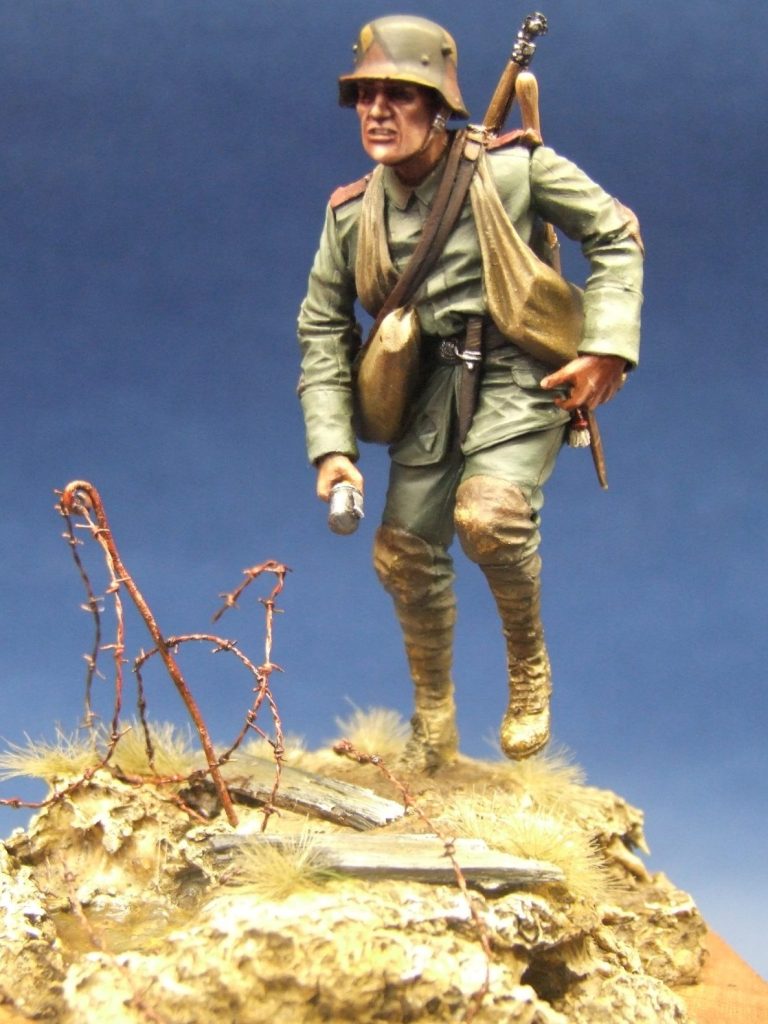
Photo #14 shows another view from the front, this time the clip on the grenade is very noticeable, and I think this small addition is well worth the trouble it took to make -although I’d really have preferred the rest of the grenade to have been there, rather than having to build it myself.
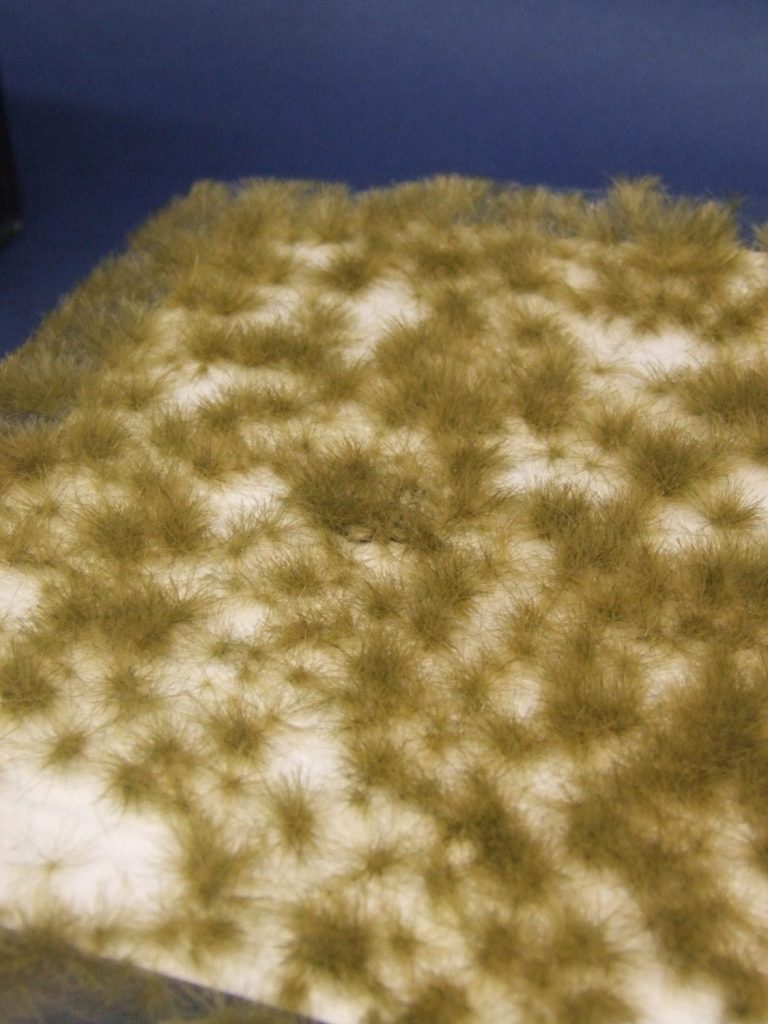
Static Grass !
Photo #15 shows something new that I picked up at the AMSS show from one of the traders. I think this is an excellent product, although in honesty I can’t remember who I got it from. It’s clumps of Static Grass on a plastic backing that you lift off with tweezers, and glue into place on the groundwork.
It’s not messy, no problem to fasten down, in fact it’s the best stuff I’ve used in a long time.
When I say I can’t remember who I got it off, I know I picked it up at the AMSS show, and from one of the German guys on one of the trade stands. Just wish I could remember, because I’d mention his name and the company name he trades under.
In photo #16 I’ve painted the barbed wire holder with rusty brown colours, and the loops of barbed wire will soon be treated to the same paints. I began with Burnt Umber and then added Light Red and then mixed some Titanium White with some Light red, and stippled that on. The effect demands the finish to be random and “blobby” hence a large brush and a stippling action are used.
After that, the right arm was added – no filler needed at all. And any refinements made – seam lines on the clothing added with a dark green, then a quick session with a camera, and that was it.
Final thoughts.
JMD have sprung up from out of nowhere. I really haven’t any idea where this sculptor has learned his skills from, but he’s good.
Some might comment about the thinness of the legs, but people at this point in the war were struggling for food, and weren’t as well nourished as we are these days in the West to begin with.
I like this figure, I like the Ulan that Ken also sent, and I liked the fantasy piece that JMD released enough to go and buy it when I was at Antwerp’s AMSS show.
Whether I get around to painting the other two soon, is of course another thing, but I am impressed with the series of models so far.
This little German is something a little different in that there’s not all that many WWI figures about, when compared to WWII counterparts, so it’s nice to see one that is a good one too.
References – mainly the photos from the Cinquantiere Museum, but some history from :-
First World War.com
http://www.firstworldwar.com/weaponry/grenades.htm
and
Wikipedia
http://en.wikipedia.org/wiki/Stormtrooper
Cetero oporteat sensibus his eu. Has ex vidisse perpetua, vis partem mollis mandamus at. Ea nam legere mentitum prodesset, no quo lucilius liberavisse, te oratio debitis omittantur eos. Sea ea iusto detracto, ut scripta sapientem suavitate cum, nam deleniti perpetua intellegam an. Ei per officiis detraxit probatus, vim at graecis tincidunt.
We need your consent to load the translations
We use a third-party service to translate the website content that may collect data about your activity. Please review the details in the privacy policy and accept the service to view the translations.