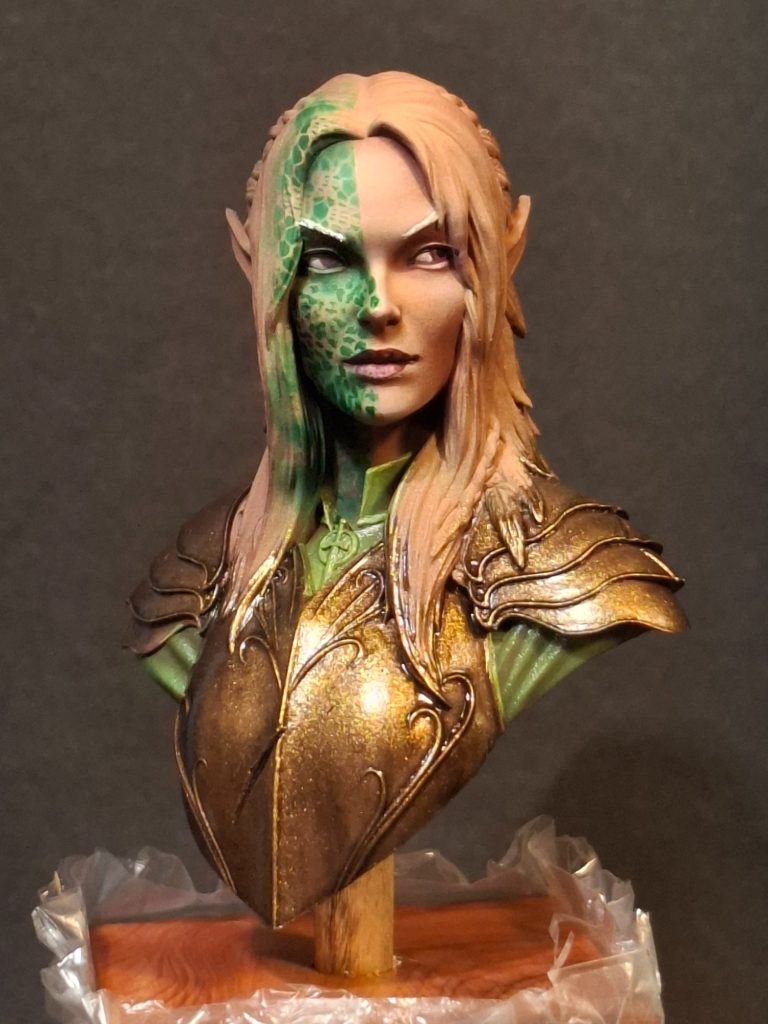
Elven Warrior Girl
1/9th scale resin bust from Stella Argentis
Painted in 2026
I feel very lucky to have quite a decent sized stock of models to paint, although I do have a kind of list of “I’ll do this one next”.
Which of course has no rhyme of reason to the kits in there, and doesn’t necessarily mean that the next kit on the bench is going to be gotten out of one of those storage boxes.
It’s wishful thinking, but it kind of makes me feel better that I have a system…..
Ha ! Yer a fool Hopwood !
Anyway, sometimes the reasoning is as simple as I’ve painted a kit from a particular company, and I notice another of theirs one a shelf on in the “to do” boxes, and this is one such case.
Having completed the female Gladiator “The Lioness” from Stella Argentis, I picked this kit out of the oblivion that is the grey army, and liking the look of it, set it up for painting next.
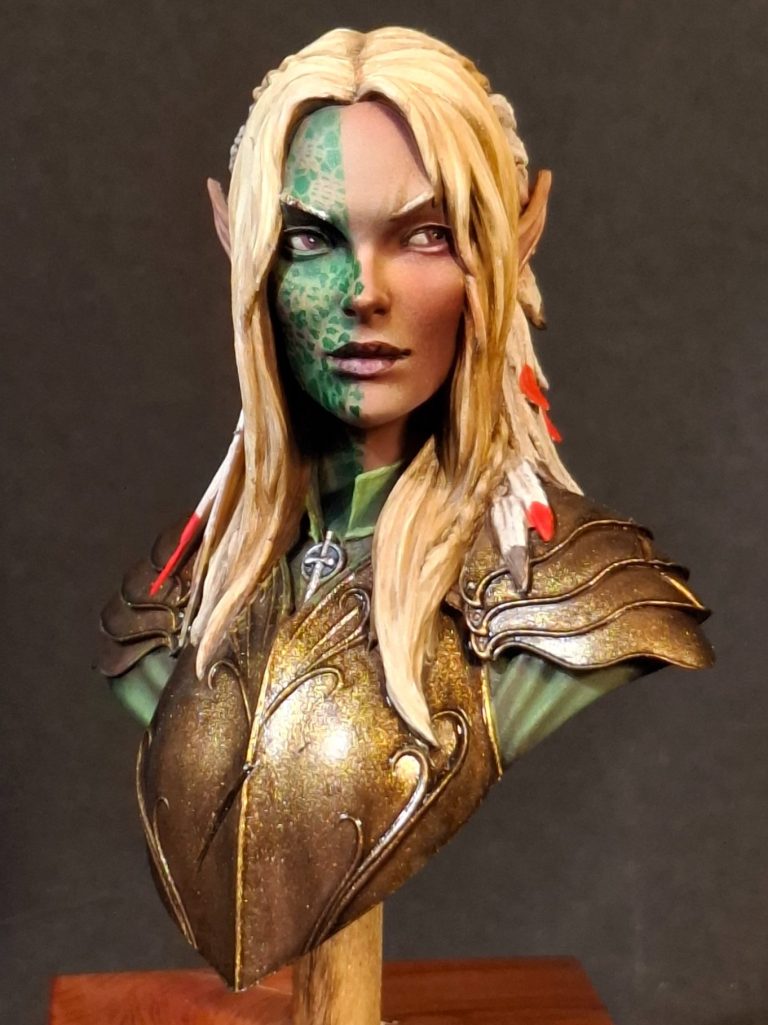
Photo #1, the box art is simple and doesn’t really tell you much about the contents, although it is a nice design on the box lid, and the contents are well packed, well formed and need very little clean-up.
Photo #2 shows the single piece casting.
I think all I need to say here is “really, really nice” because the picture speaks volumes for itself.
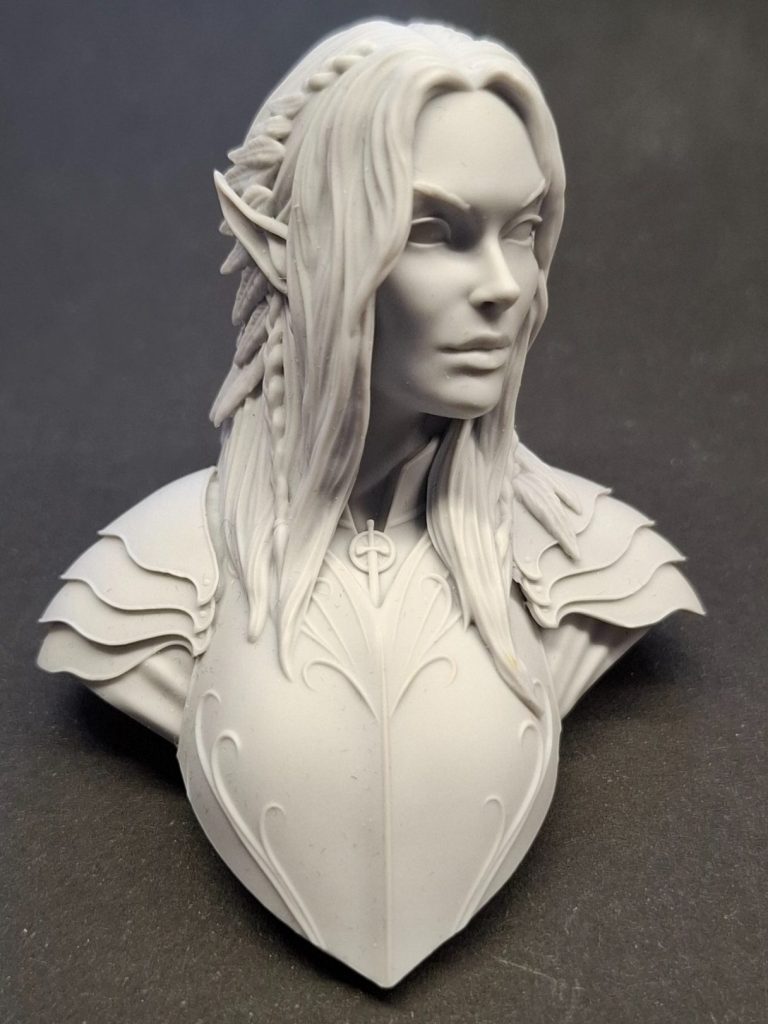
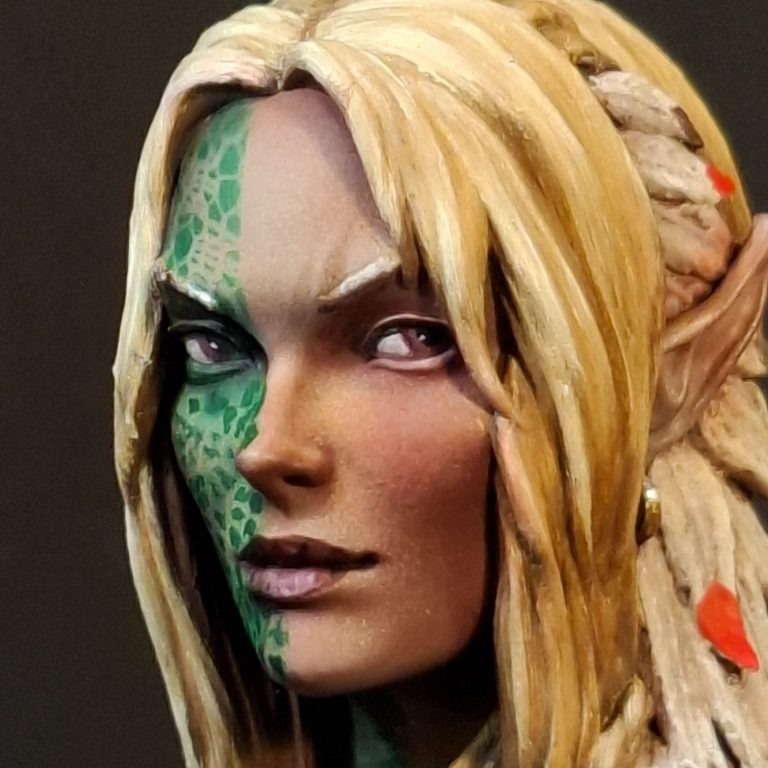
Photo #3 Recently I’ve begun airbrushing female subjects, I’m still practicing with the colour balances, and the smoothness,, but I’m getting there.
I do like the Tamiya range of paints, and currently I’ve mixed Nato Brown with an equal amount of their version of Flesh colour, using this through the airbrush and concentrating on getting this mix into all the areas that would remain in shadow, and then using the Flesh colour on it’s own to add a light, dusting coat from above, not quite at 90 degrees, but fairly close to it, to pick up the areas that would be in highlight.
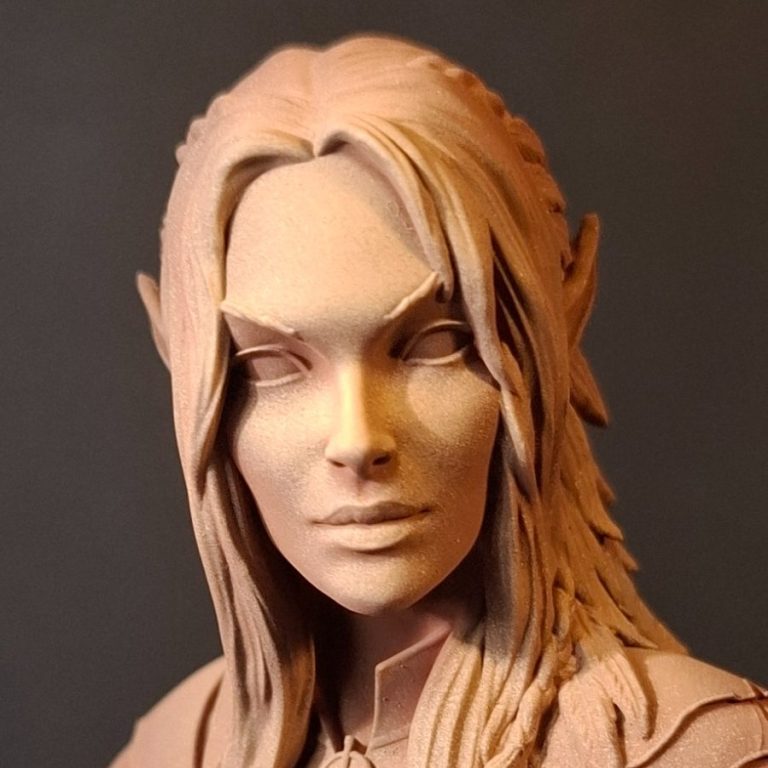
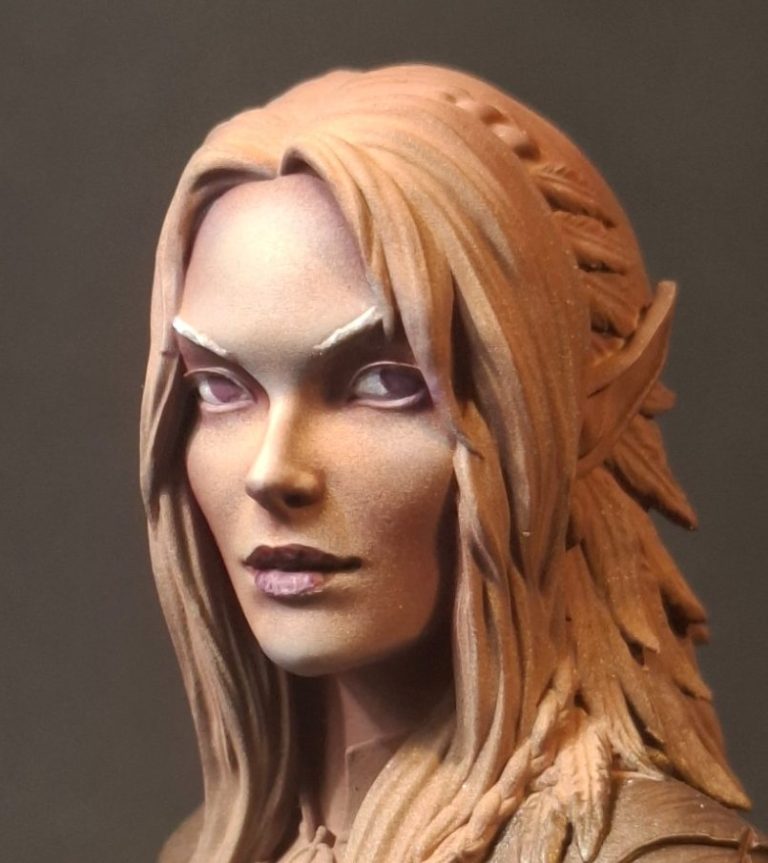
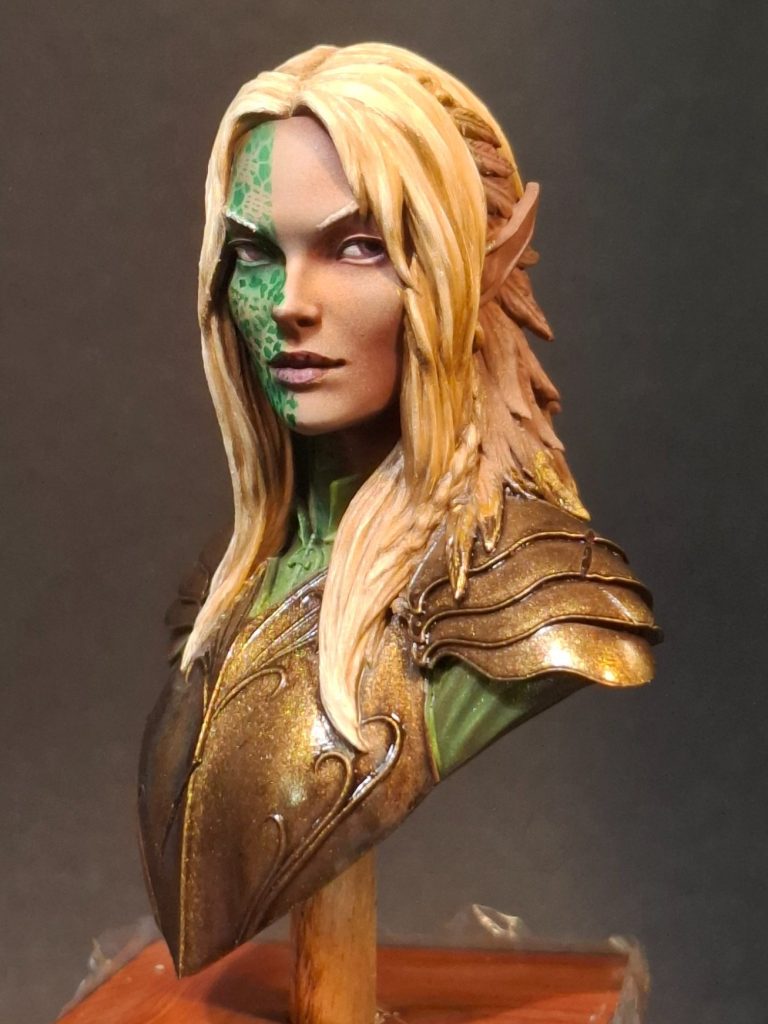
Photo #4, once the Tamiya colours are dry, I then add very small amounts of oil colour, applying these with a soft brush in the same way a woman would apply blusher when doing her make-up.
Very small amounts of paint are needed, and I tend to wipe off a lot of that onto a soft cloth before applying it to the model.
In this case I’ve used Purple Madder Alizarin rather than a red colour, adding this around the hair line on the forehead, and across and especially under the cheekbones.
A small amount of carmine is put on the nose and chin, just to warm the features a little bit.
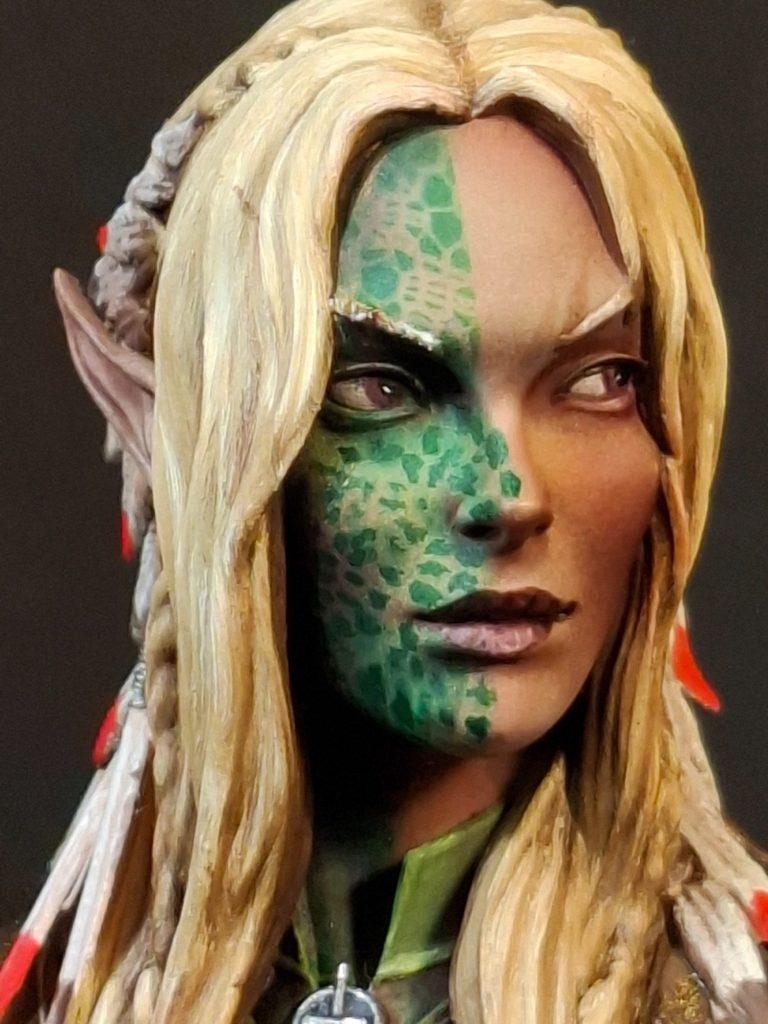
Photo #5 The face is completed with the addition of the Purple Madder Alizarin to the lips and eyes, with some white added to the purple and applied with a fine brush for highlighting on the bottom lip.
The armour has been painted with a Dark Bronze from the Darkstar range of metallic paints, then two lighter Gold colours from that range applied with a fine sponge to build up highlights and mid-tones on the armour sections.
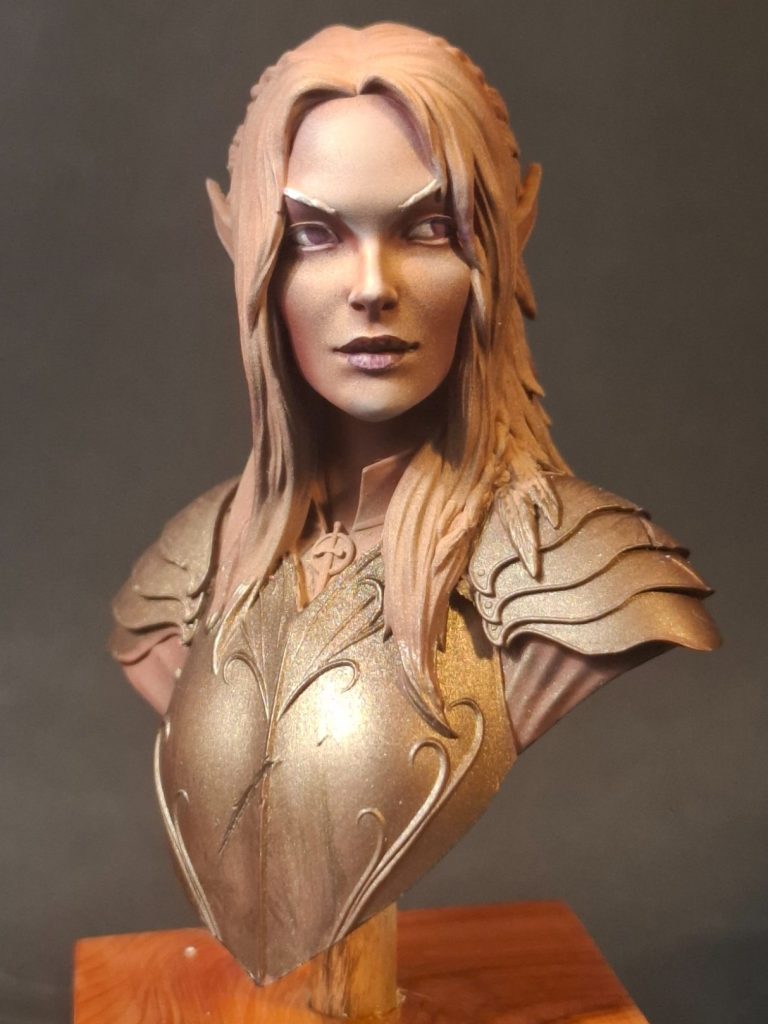
Photos #6 and #7. The armour has received several coats of Tamiya Smoke lacquer, thinned with a little water so it doesn’t attack the previous layers.
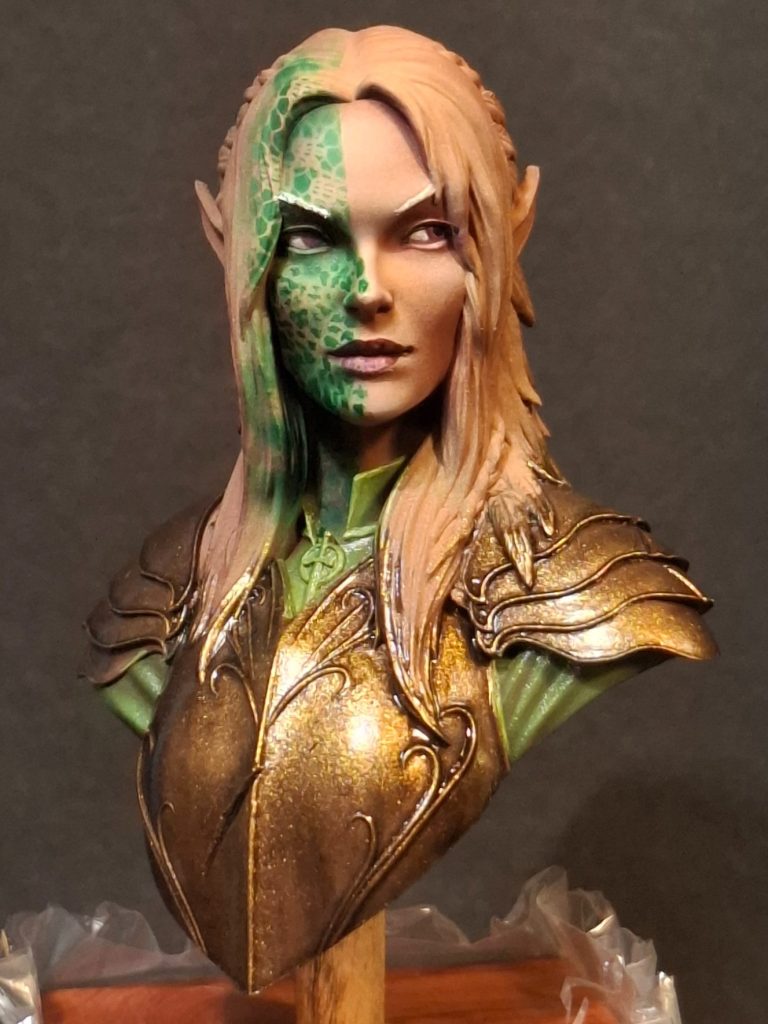
And a disaster struck.
While undercoating the blouse in green acrylic, I didn’t notice I’d got some on the jaw line just to the left of her chin
No problem, thought I’ a brush dampened with Isopropyl Alcohol will sort that.
And normally that would be true if I’d painted the face with oils…. But I’d airbrushed it, hadn’t I ?
With acrylics
And what does Isopropyl do to very thinly applied acrylic paint ?
It dissolves it……
So I was left with a lovely clean patch of undercoat.
Oh, heck – or words to that effect.
Stripping off all the paint really wasn’t an option.
So after thinking for a while, I came up with the idea of doing a little more airbrushing, and using a piece of lace as a mask to spray through.
I used some Tamiya masking tape to blank off the left side of the face and then put the lace over the right side, pushing it in to the recesses as much as I could, then sprayed a bright green colour through the lace mask.
It faded in a few places and the design needed retouching here and there, but it worked OK as can be seen in these pictures.
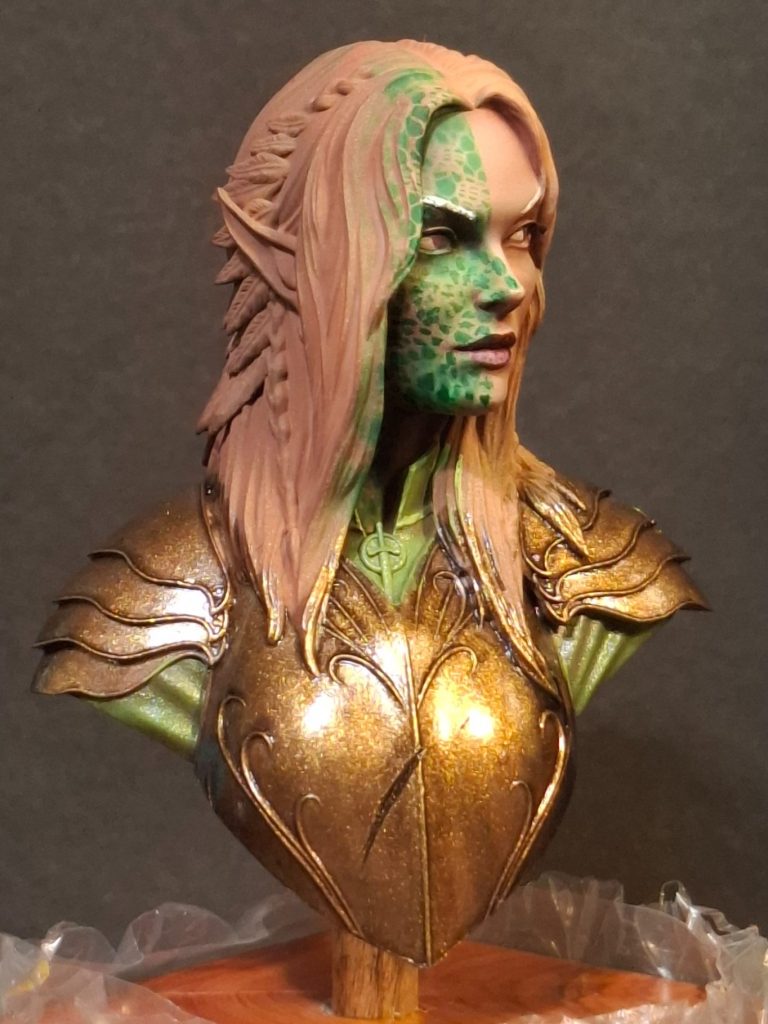
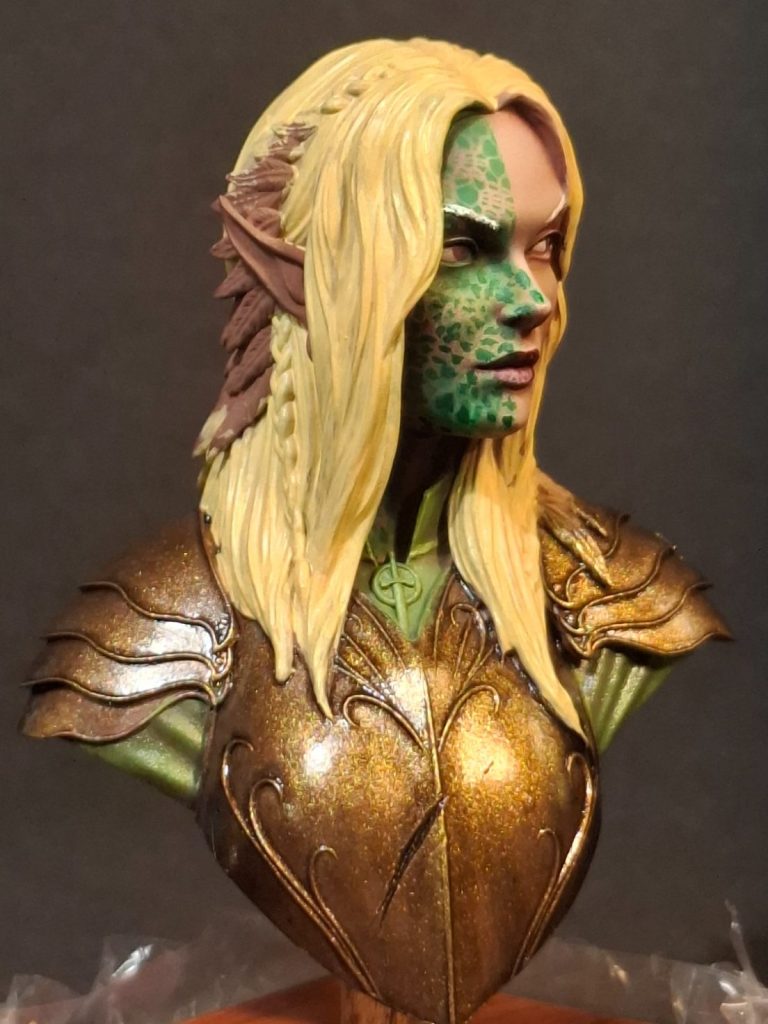
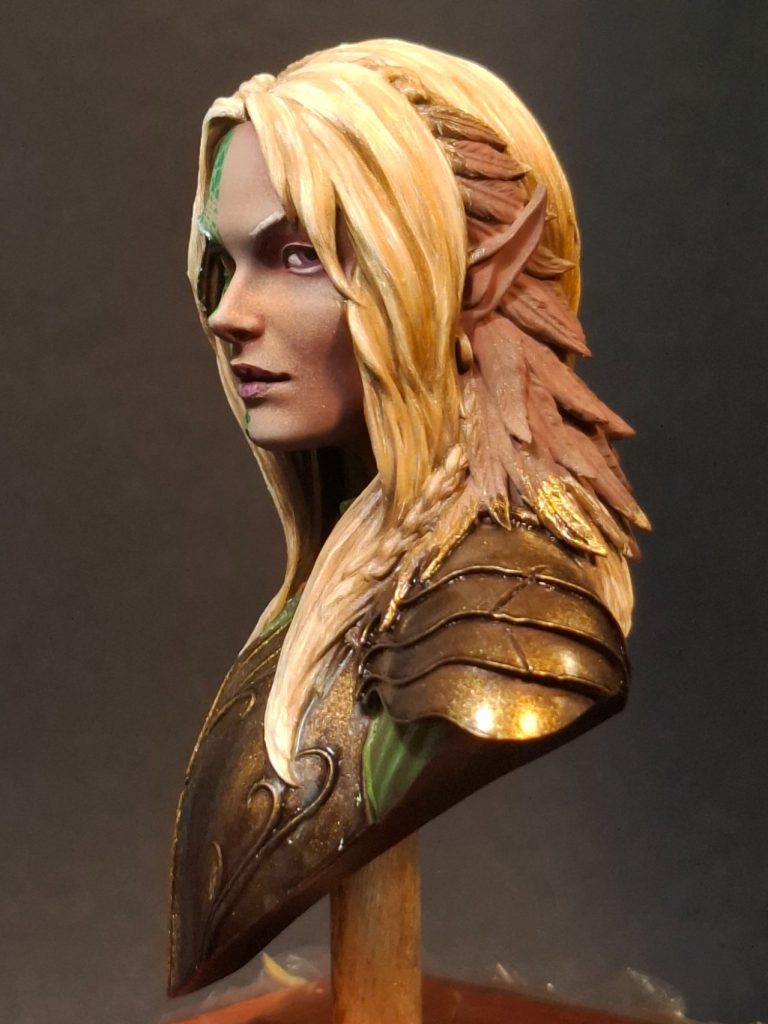
Photo #8, and so having overcome that little hitch, I moved onto painting the hair.
I undercoated with a pale yellow colour, building up several coats of acrylic, and in doing this gave the face a frame with which I could see if anything else needed adding or refining.
it all looked OK, so I could go ahead and get the oils out to paint the hair.
Photos #9 and #10.Beginning with a mix of Light Red and Mars Yellow, I coated all the hair with this colour and then began adding streaks of Mars Yellow.
Blonde hair isn’t usually just one colour, and this is the effect I was trying to get by suing a relatively small brush ( a no 1 ) to add the paint, wiping the brush on a soft cloth to clear any paint it had picked up on each pass, and gradually adding lighter and lighter colours.
Another thing to note about blonde hair is that whilst there’s highlights of lighter colour in streaks, the ends of the hair are usually lighter too, so there’s a sort of move from light colours on the top of the head, through some darker colours mid way down the sides and then back to lighter colours again at the tips of the hair.
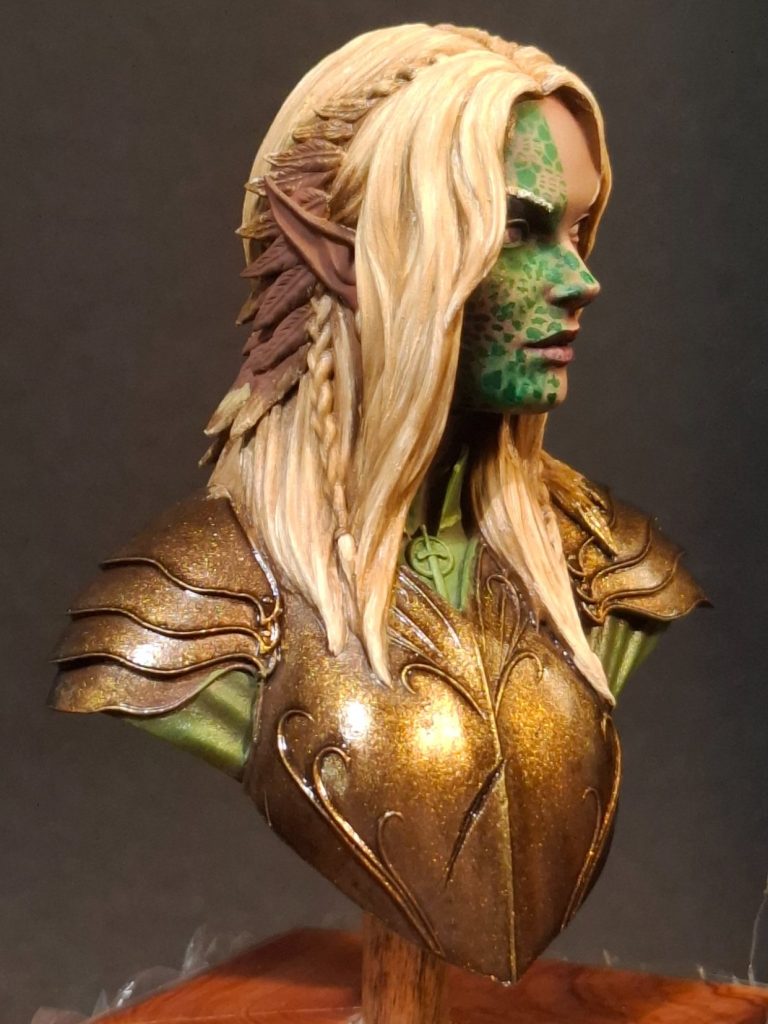
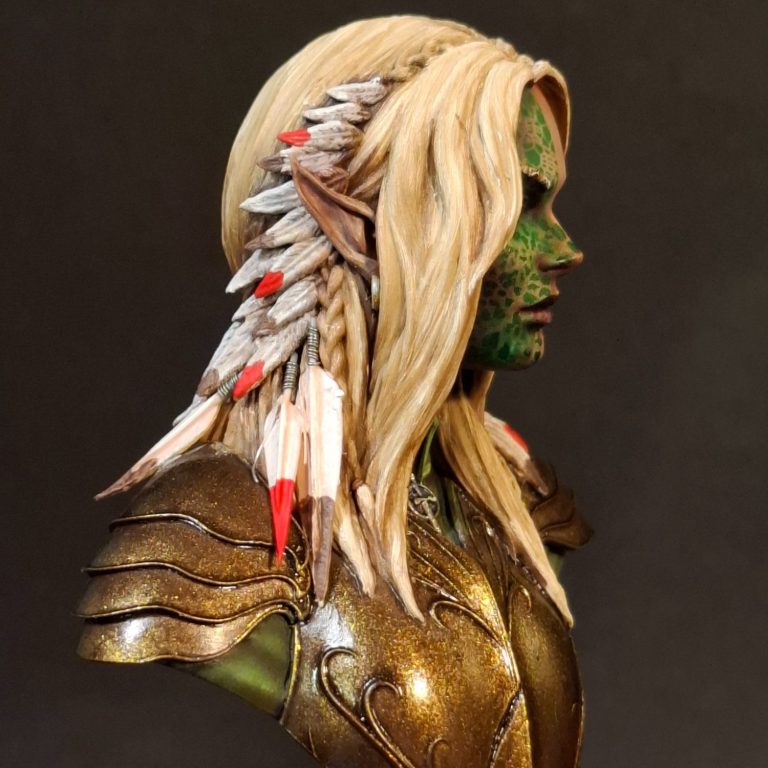
Photos #11 and #12 show a couple more views at this stage, and as I’ve said above, the colours go through that light / dark / light shift as they cascade from the crown to the ends.
On photo #12 the sponge effect is particularly noticeable on the right shoulder armour – just thought it worth pointing out.
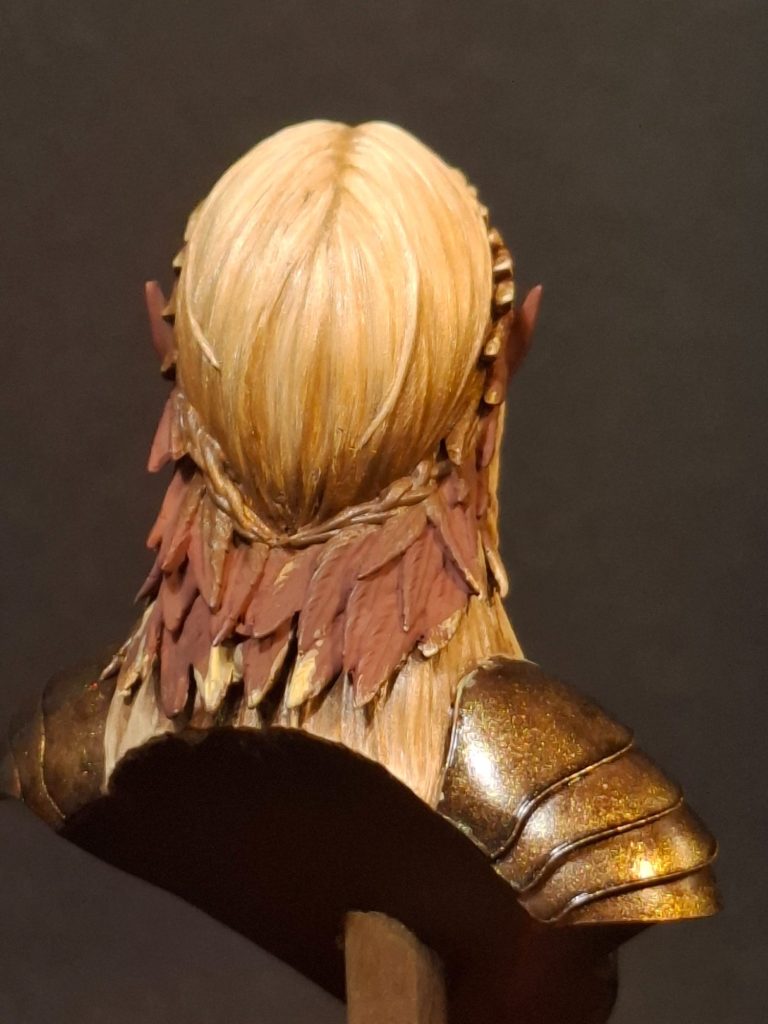
Photo #13 and I’ve undercoated the feathers with a pale flesh colour, then gone over each one with a slightly off-white acrylic.
After this had dried, a second coat of the off-white was added, and then pure white ( MP Paints ) was added to the edges of each feather and along the central spine.
After these colours had dried fully, I painted over a thin wash of warm Sepia with a lot of White Spirit added, allowing this to flow into the recesses of detail between the feathers, and to pick out the details sculpted into them.
This was allowed to dry overnight and then a second thin wash added to some areas so that the effect was slightly enhanced and gave a “difference” to the feathers in certain areas.
Again the pain was dried overnight, and then some more of the Sepia oils along with some MP paints Crimson, was used with a fine brush to pint the tips of some of the feathers.
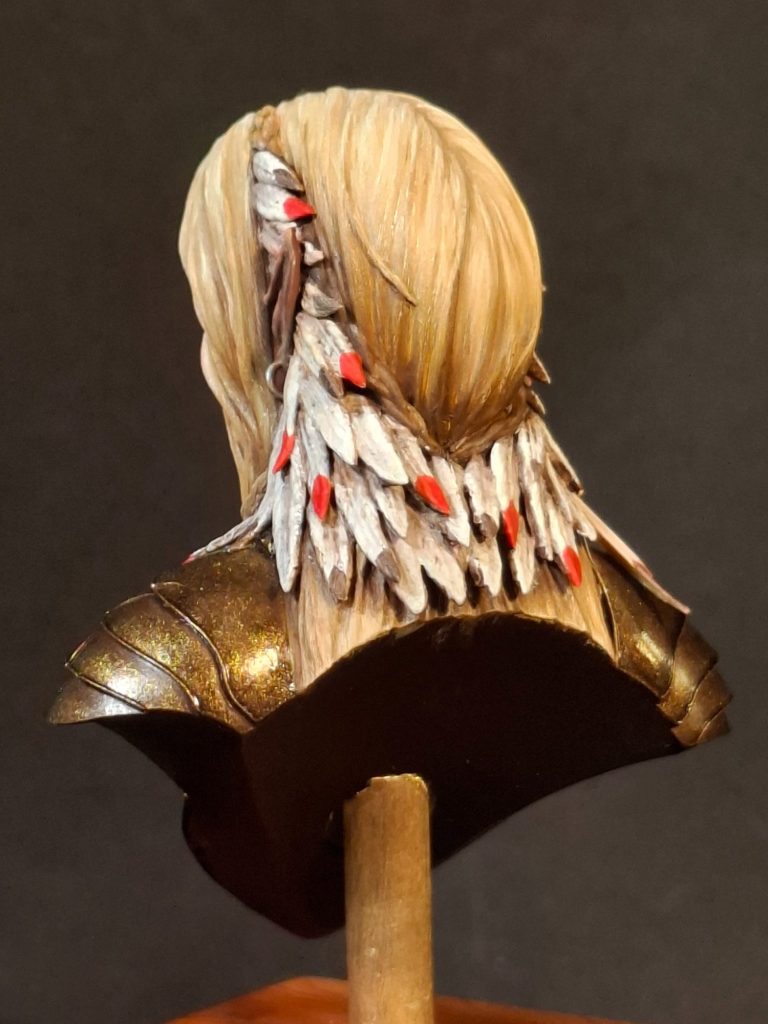
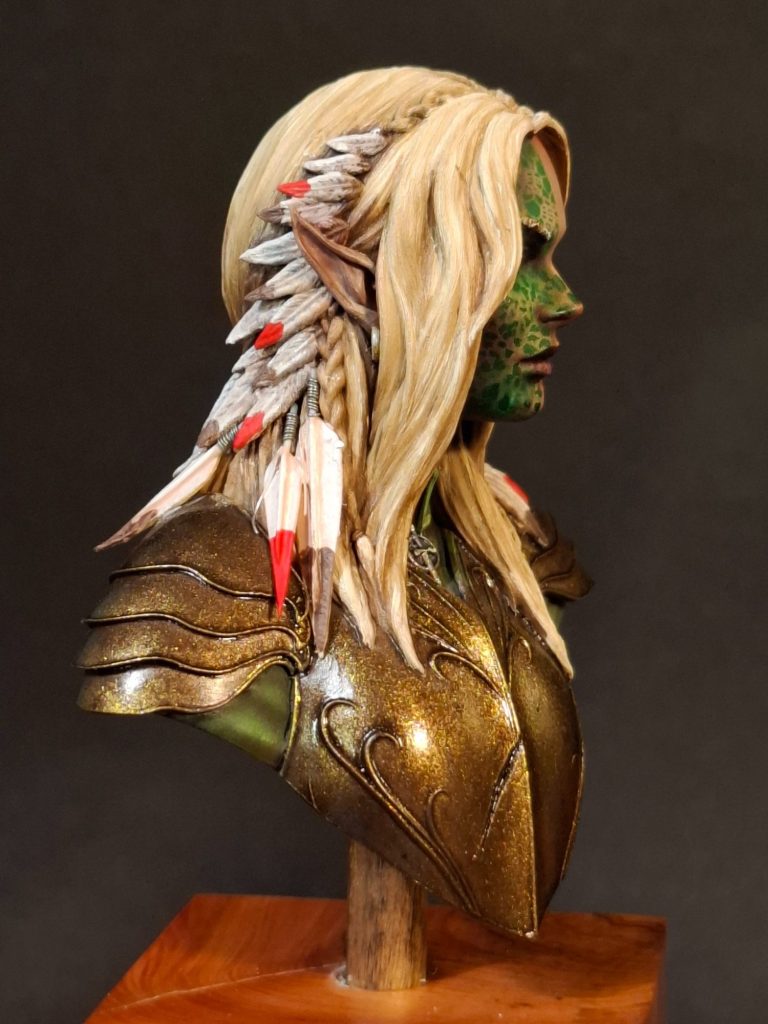
Photo #14 shows a couple additions – the first being the three larger feathers that were cut out from some thin card. I added a spine of stretched sprue to them, and coated them in Superglue to make them a little bit harder wearing – fingers and thumbs like a gorilla.
When the glue had dried, I got some very fine wire – I think it’s old telecom wire, but can’t be sure, as I keep all sorts of bits and pieces “for use later” or alternatively “this’ll come in useful”.
Anyway, the fine wire was stripped of it’s plastic shielding and the bare wire wound carefully around the shaft of the feather, and then the three feathers were glued in place.
Once secure, they were painted in a similar fashion to the other feathers.
The other addition is some paler paint to the ears.
I don’t know why, but I’d not added the paler flesh tones to these when I was airbrushing, so I very carefully drybrushed them with some pale cream acrylic, and then added a very, very small amount of carmine oils – the brush used was a knackered old thing, and was loaded with only a tiny amount of the Carmine paint, so that I was effectively adding a very subtle blush to the tips of the ears.
Final thoughts.
Another superb offering from Stella Argentis. OK, I made a mess with the chin, but recovered it well ( I think ) and that certainly isn’t the fault of the miniature, more a “wet-ware” problem in the guise of me.
The pose on this is so well executed, a subtle shift of the head to the left, and that’s enough to take this well above the average bust offering.
The range is quite varied, and well worth a look, and can be accessed on their website - Stella Argentis