Part of a Knight
Using up some "Spare" 120mm resin parts
Verlinden bits painted in 2006
As with many long-term modellers, I seem to have accumulated quite a large “bits box”. This in no small part ( sorry, had to put that pun in ! ) due to the fact that I constantly buy or beg bits from other modellers, and occasionally rummaging through cardboard boxes of old kits that are usually kept under the stalls at shows.
The problem comes when I have to move house, this being a regular occurrence because of my husband’s work, and so keeping the spares down to a reasonably sized box is sometimes a bit of a chore.
So here I was, sorting through the bits once more, trying to streamline things a little, and sort out what really will be any use for further projects, and what is just so much baggage that really should have gone in the bin long ago.
It was then that I realised that I had several almost complete models in the spares box, ones that either had a foot or an arm or something missing.
One such was this Verlinden model, part of a vignette of two 120mm knights. I have no idea where the other figure is, nor where the lower left leg of this one happens to be either, for that matter, but as the sculpting seemed to be so good, it would be a shame to leave the bits that were still there, to languish in the gloom.
As the model seems to be in such an animated pose, I didn’t want to have to make a second figure to go with him. This was a rescue mission after all, not a full project or commission.
So what to do ?
I could of course sculpt a new left lower leg and foot, using the existent right leg and foot as a template, but that would, as I’ve mentioned, leave me with a knight in a fight with no-one as an opponent.
No, that wouldn’t look right.
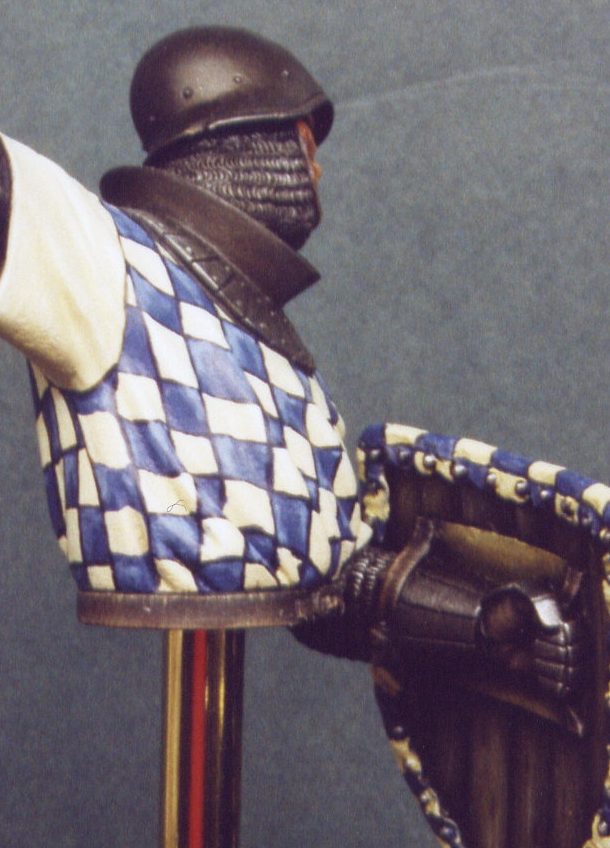
I decided then to simply leave off the lower body, and have the model as a bust, or more correctly a half figure. For interest I would add a covering to the shield because I didn’t like the embossed design already present in the resin, and the only bit that I would have to replace was the sword grip and pommel, this part being lost to the spares box – if I ever had that piece at all.

I have an interest in Spanish history, probably due to too many holidays on the Costa’s, looking around way too many museum’s and castles, and in particular, El Cid fires my imagination. Having glanced through the Osprey “Men at Arms” book on El Cid, I had even seen a colourful heraldic scheme that I fancied doing, albeit in a much simplified form.
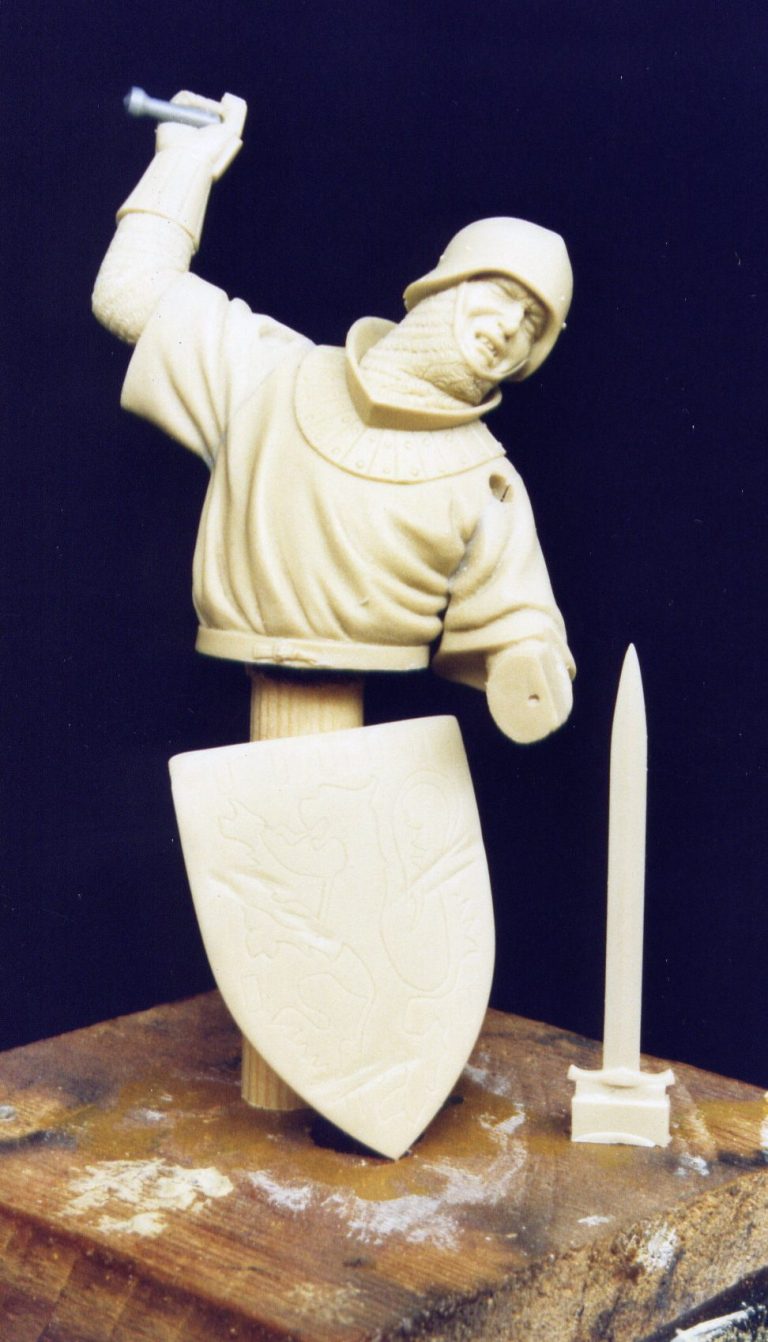
So, armed with files and emery cloth, I cleaned up the minimal over pour on the parts, glued the arms onto the torso and the right hand and sword in place, and left the shield with the left hand attached, as the only separate item - to be fastened in place once the painting was complete. This is all shown in picture #1, although the one part that I did decide to leave separate, which in this picture is actually in place, was the head. The neck guard gets in the way of painting, and it’s far easier to have the head separated to allow full access to the face. The new sword handgrip is shown up well here. I used a piece of plastic sprue for the basic shape, turning it in a minidrill slowly, and refining the profile of it with a sharp scalpel blade. This is a risky business, and I wore goggles to protect my eyes whilst I did it. I’d advise that as a must for anyone else taking on a similar job.
The holes at the shoulder are, I take it, the positioning holes for shoulder guards. These again are parts that I couldn’t find in the spares box, and so I filled these spaces in with Milliput, sanding them smooth and thus blending them in to the shirt once the putty had dried.
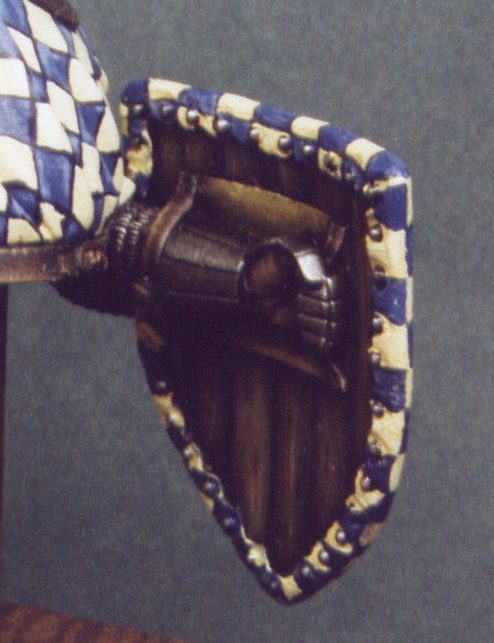
For the shield covering I used rolled out Milliput, mixing the filler as normal, then using a talcum powder dusted board and rolling pin to flatten the ball of putty out.
I’ve found that by using a couple of wires blu-tacked in place at the sides of the board, and having the rolling pin supported on them, the putty can be rolled out to an even thickness, the wires used as the support being the deciding factor in how thick the putty will eventually be.
Once rolled out, the putty was wiped gently on one side with a dampened cloth to remove any talc, and then this side offered up to the face of the shield ( As the talc stops the putty from sticking to anything, this needs to be removed from the surface of the putty before fastening it in place. The water actually softens the putty even further, and makes it stickier, so that the putty won’t eventually crack off from the front of the shield ).
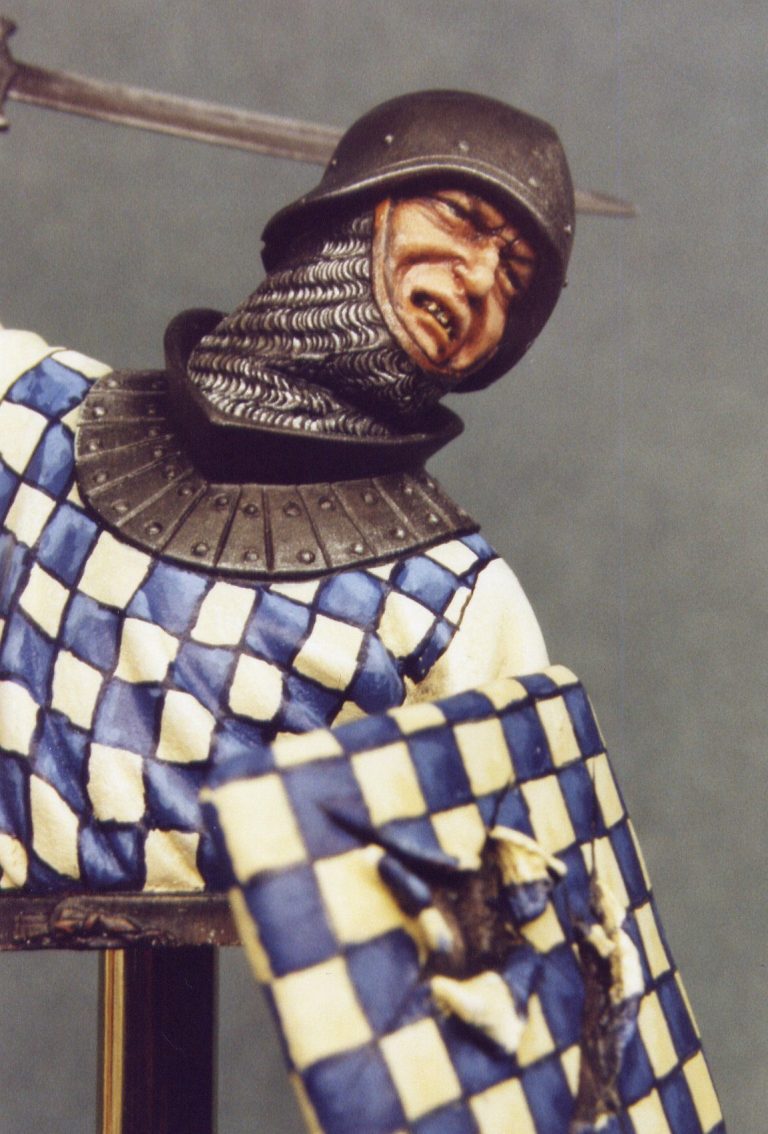
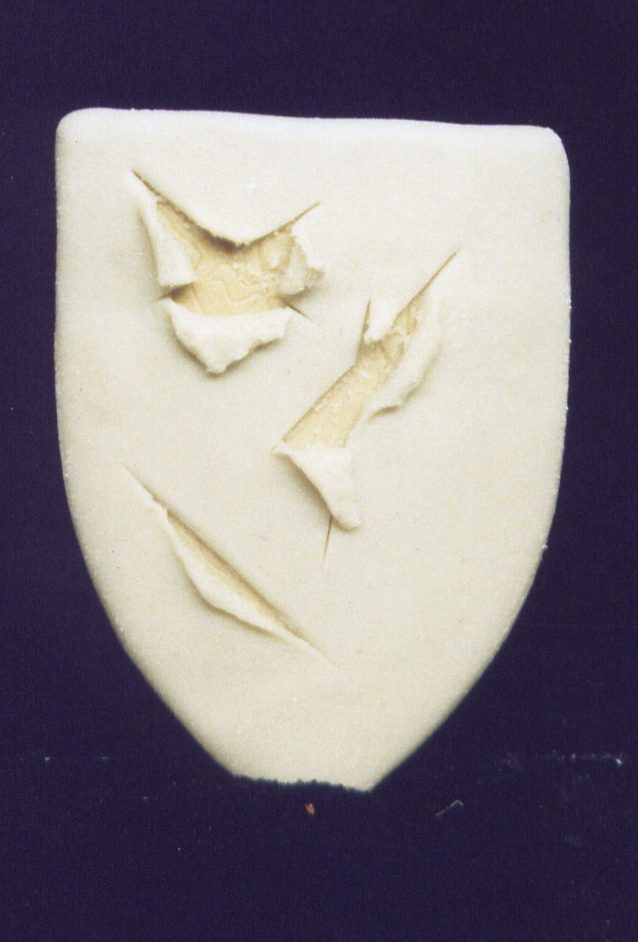
Slashes in the “cloth” covering were added for a little more interest, the Milliput being pulled back from the shield face so that it appeared to sag under it’s own weight. This would eventually make painting the heraldry a pain, but the added interest on the shield face is worth the effort.
The result of this is shown in picture #2.
One of the irritating parts of model article writing, is managing to complete a model, having added loads of bits’n’bobs, and then to have no photographic record of doing ( or having done ) the work. Such was the case with the rivets fastening the back of the shield cloth in place.
Yes, I realise that the milliput is actually what holds it in place really, but on the real object brass nails would have been used for the job.
After making the milliput form around the shield, and cutting it to shape, I used a sculpting tool to make the indentations on the rear edge of the cloth where the nails would appear to pull tight the material. Once the Milliput was dry, I then used a fine drill to put holes in the back of the shield where these indentations were, and then glued short lengths of stretched sprue into place in each of the holes ( cue here the photo #3 which for some reason doesn’t exist – foolishness can’t be ruled out ! ).
The sprue stood out of each of the holes by about 3mm and the trick here is then to use a cigarette lighter to gently apply a small amount of heat to each of these bits of sprue. By doing this, the plastic is re-heated, turning it molten for a fraction of a second or so, and it forms into a natural and perfect dome. Voila, small but perfectly formed nails studded all around the outer edge of the shield.
Painting
As I mentioned earlier. I got the inspiration form the Osprey “Men at Arms” book by David Nicolle and Angus McBride. In plate E there is a mounted knight, and this heraldry, whilst much more complex in the McBride painting ( I decided against the red diagonal lines and the blue and yellow dots inside the squares as being too fussy for my needs ), is the basic heraldic design that I adopted, of blue and white squares. The plate details the figure as a Portuguese knight, and the one I have painted may have been an earlier ancestor of the one depicted ( using the idea that as heraldic designs were combined by marriage, they became more and more complex ).

First of all though a coat of primer is needed, and I used a couple of layers of an ivory coloured acrylic. This was mixed from Games Workshop colours, using Skull White and a sandy coloured brown that the name had rubbed off.
I used this colour because it was close to the white highlight that would eventually be used to paint the shirt with, and ivory would be the basic shading colour for this area.
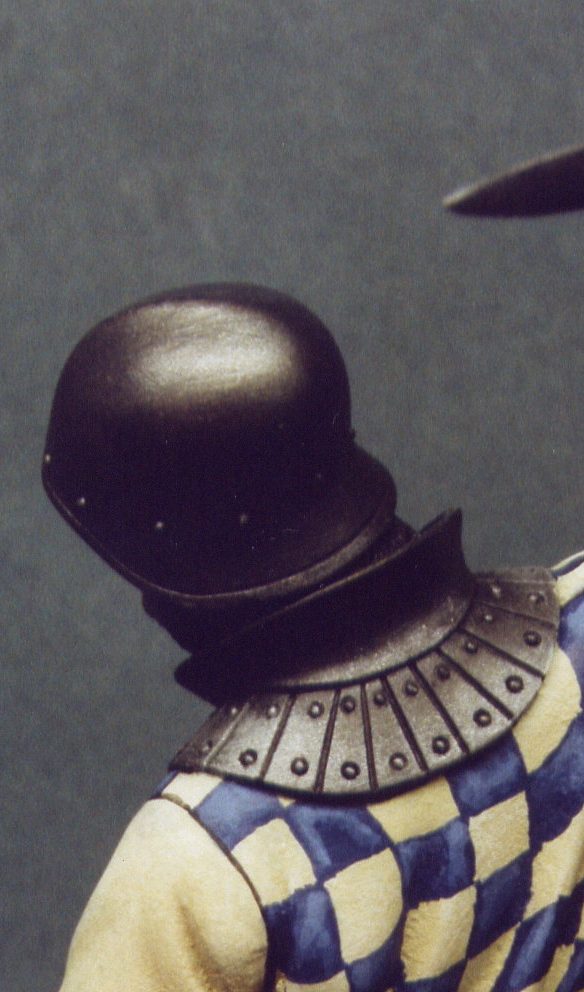
After that was dry though I added paint to the armour areas. For this I like the Games Workshop acrylics as a base, although I do add a fair amount of their “Chaos Black” to the “Chainmail” colour to get a satisfactory base coat.
Once this has dried, I add on a mix of Lamp Black and Burnt Umber oil paints, un-diluted with spirits so that the paint has to be scrubbed into all the detail with an old brush. The excess of this paint is then removed with a piece of kitchen tissue and then a large clean brush is used to dust over the armour areas to even up the effect and lose any lines that the kitchen roll has left.
Finally I add some Printers Ink – silver of course – to give the highlights. This is put on in rather a rough manner, so that a dented and bashed look is arrived at rather than a shiny, polished effect.
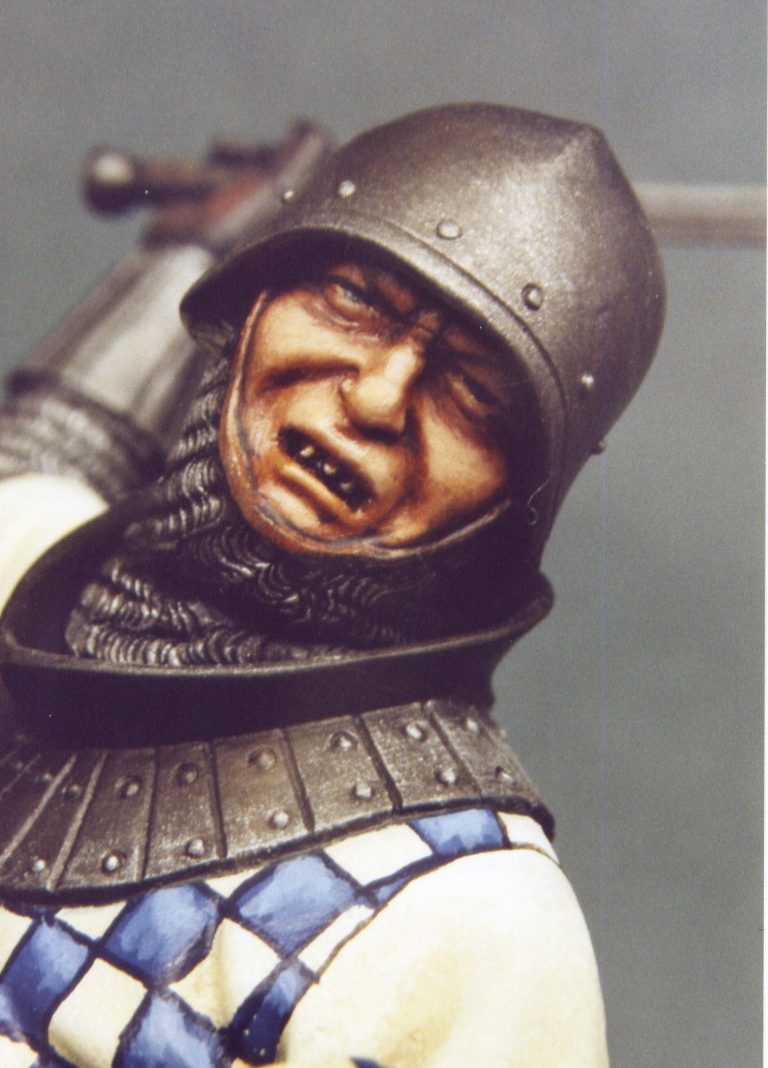
I paid particular attention in this manner to the helmet, as it’s the biggest single area of metal, and added squiggles and dots of the oil colour after the initial shading had dried so that the armour took on an aged appearance. This idea came form an article done a while back in Military in Scale by the late Derek Holmes, where he did a similar helmet on a dying English archer bust.
Once the armour had fully dried, I added some pure black oils to the really shadowed areas, such as under the chin and under the helmet. White Spirit was used to dampen a brush then, and this was used to blend in the black to the surrounding colour softening these really dark areas of shadow.
The armour on the body at least, can be seen in picture #3, and the reason why I do armour first is shown around the metallic areas. The overspill from the shading colours can be seen on the primer that I used, and this colour will have to be added again before I can begin on the shirt.
Before starting the shirt though, I like to paint in the face. This was done with an undercoat of Humbrol Flesh colour, allowing this to dry fully for a week in the airing cupboard. Over this I then added Oil paints, working from a mid-tone flesh colour from a mix of Windsor and Newton Titanium White, Yellow Ochre, and just a dash of Alizarin Crimson. I’ve found that stippling over this with a large brush helps to remove excess paint, so long as the brush is constantly wiped on a clean and dry piece of kitchen roll.

To get the shadow areas I add Mars Brown, building this up by adding very small amounts to the model and blending it in to the surrounding paint. This is a slow and tedious task, and I make sure that the children are in bed before even attempting it.
The highlights are added in a similar way, this time using just the pure Titanium White to pick out the high spots on the face.
The excess brown was used for the leather mail edging surrounding the face, highlights added to this from more of the Titanium White. The results so far can be seen in picture #4.
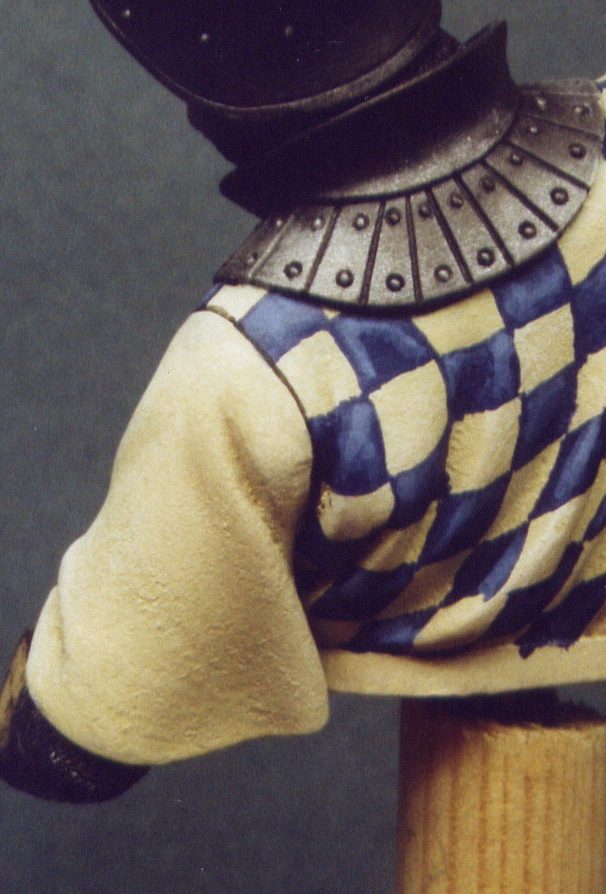
Now to the cloth shirt. The first thing to do with this was to paint on the lightest colour, that being the off-white. I began with re-applying the ivory primer/undercoat, building this up in several thin layers to hide all that overspill of black from the painting of the metallic areas.
Then I added some more Skull White to the ivory mix to lighten it, and using a stiff wide brush, and only a little of the paint, I dry brushed very light highlights onto most of the shirt.
Again, more white was added to the ivory mix, and then more dry brushing, gradually working on smaller and smaller areas to build up the highlights.
I tried to get this effect as smooth as possible, using only very small amounts of paint on the brush at any one time to build up the colour slowly, but the general effect will mostly be lost under the blue squares anyway, so some heavy-handedness was not too important an issue.
As this was acrylics, there was hardly any drying time, so once the shield and the shirt were done, I could move straight on to doing the blue squares.
Again I chose to use acrylics for this, although oils might have been a better choice if only because mistakes can more easily be rectified with White Spirit. But, acrylics it was, and I began with Games Workshop’s “Moody Blue” which is a dark blue colour.
This was heavily watered down with an equal or slightly higher ratio of boiled water ( for some reason boiled water or even melted ice cubes seem to work better than just plain tap water ). This thinned paint was used to mark out the squares freehand, taking into account the stretching of the cloth as the exaggerated positioning of the arms pulls it out of shape.
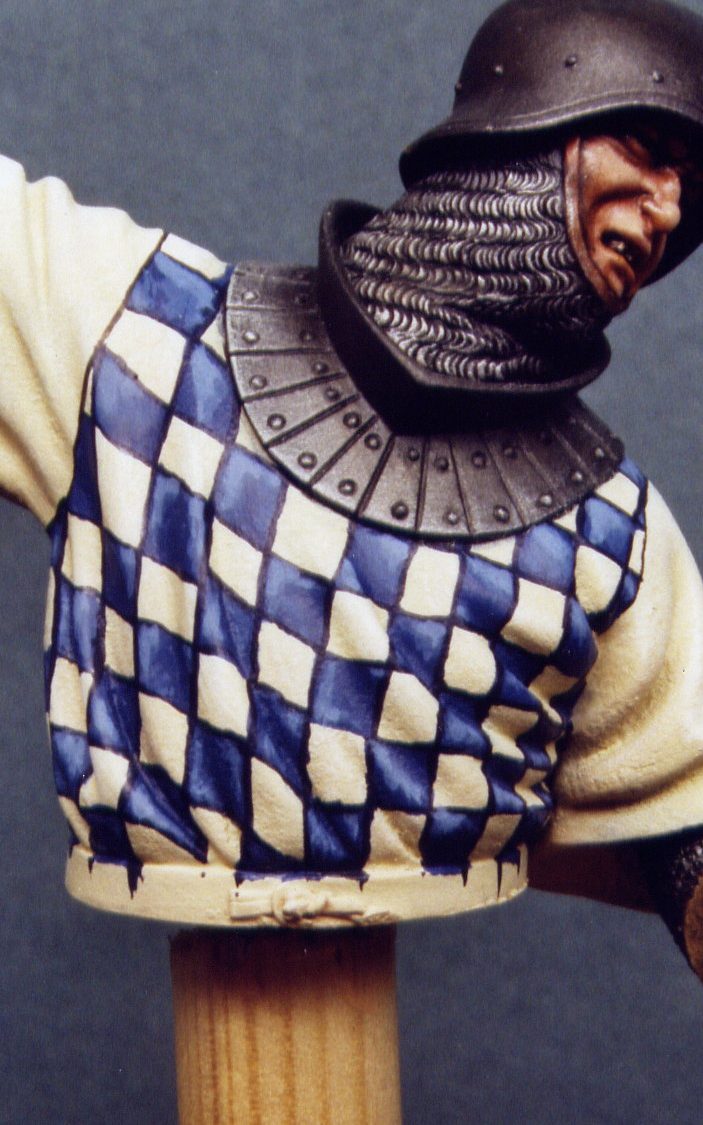
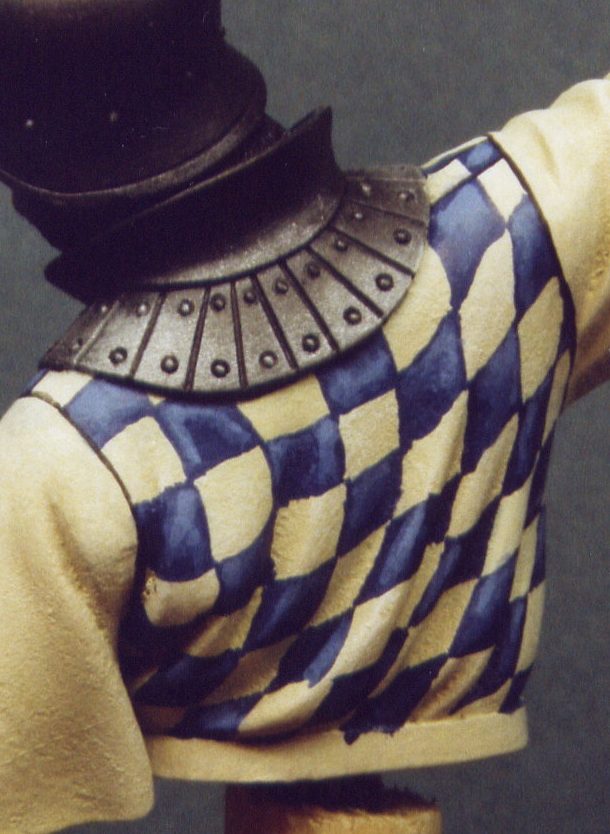
A second coat of the blue was added to deepen the colour, and then black was added to the Moody Blue so that a shadow colour could be added to necessary areas. Highlights were also added, these being a mix of the Moody Blue and Skull White, and the paint added taking into account of where the light is hitting the model. Finally, the shadow colour was re-mixed and used to outline all the squares and generally neaten the look of the heraldry.
I was going to continue the squared design onto the sleeves, but for some reason the model looked more pleasing as he was with the off-white colour on its own. So I left it that way.
Next I went on to paint the wood on the back of the shield and also all the leather straps and belts. For these I used a mix of browns and black oils. The shield being done with Lamp Black with Mars Brown to mark out the main planks, and then Titanium White added to give the grain effect and the highlighting.
The belts and gloves were basically the same, but with some Mars Yellow, Mars Red and Titanium White added in to the mix as the highlights were added. The latter two of these colours were used to pick out the cracking on the belts, using an old brush to flick across the edges of each area and create the illusion of cracked leather.
Finally I used some Chaos Black acrylic to paint in the underside of the base, and then drilled up into the model to accept a short piece of polished brass tube. The polishing can be done with various emery cloths, working down the grits to a very fine grade. I find though that there is nothing to beat T-Cut car polish to finish off this type of work, as the liquid abrasive leaves no scratches if used with a soft cloth. To keep the brass from tarnishing and other marks, a couple of coats of Tamiya’s “Smoke” acrylic do a fine job of protection.

The model was then added to a base, and a nameplate made up from some old rub-down lettering from an art shop ( Lettraset is becoming almost impossible to find these days, as I found out to my great upset recently when trying to buy some more. Apparently W.H.Smiths do some of their own type of rubdown lettering, but they’re only very small sheets, unlike the old Lettraset ones. If you use this stuff, my suggestion is to buy it when you see it ! ).
With that all done, it was time to take the final pictures. These were taken from varying angles, and hopefully the close-ups in particular work well enough to almost fool the eye into thinking that the model is in fact a real person. Well, it’d be nice if they at least made you think that way for a second or two.
Hopefully this shows that all those bits are worth sifting through either at shows or even in the existing spares box that you already have, if only to save some of the part kits that otherwise will remain unmade.
I do like converting models, especially when it’s called for in a commission work, but sometimes it’s nice just to put the parts together as they should be, even if a slightly different result is gained from that initially intended by the manufacturer.
My only complaint about this model, and most of Mr Verlinden’s range, is resin swords. On the whole, Verlinden kits are very nice indeed, whether action subjects or the more restrained “straight up and down” poses. But in cases such as this, I rarely seem to get a straight casting of a sword, and find it a real beggar of a job to straighten them out. I’ve tried dipping the resin in a cup of near boiling water, and even gentle bending, but nothing seems to work. Would the addition of Photo etch swords not be a possibility ?
But having had a little dig at one of the best model companies in the world, I will finish with complements. I didn’t get the whole of this kit to begin with, obviously someone, somewhere wanted them for some other project, but if it was as good as the bits I did get, then it will have been a very good model indeed.