Cyborg Girl
1/12th scale resin bust from Nonsense Miniatures
Painted in 2025
Another “new” company that I found selling kits at SMC this year, and what a delightfully quirky offering this is.
It appears to be a 3D print that has then been moulded, and like quite a few kits of it’s kind, some of the print support pips can still be found, particularly on the back of the piece in the hair.
It’s not much trouble to clean them off, but one does wonder why the original was left in that state for moulds to be then taken from it.
Otherwise the casting is very clean apart from a small indented line running diagonally across the back of the hair.
It isn’t really noticeable until you get paint on, and to be honest I was trying out a different painting technique, so I was treating this more as a test piece, rather than something that would be entered into a competition display.
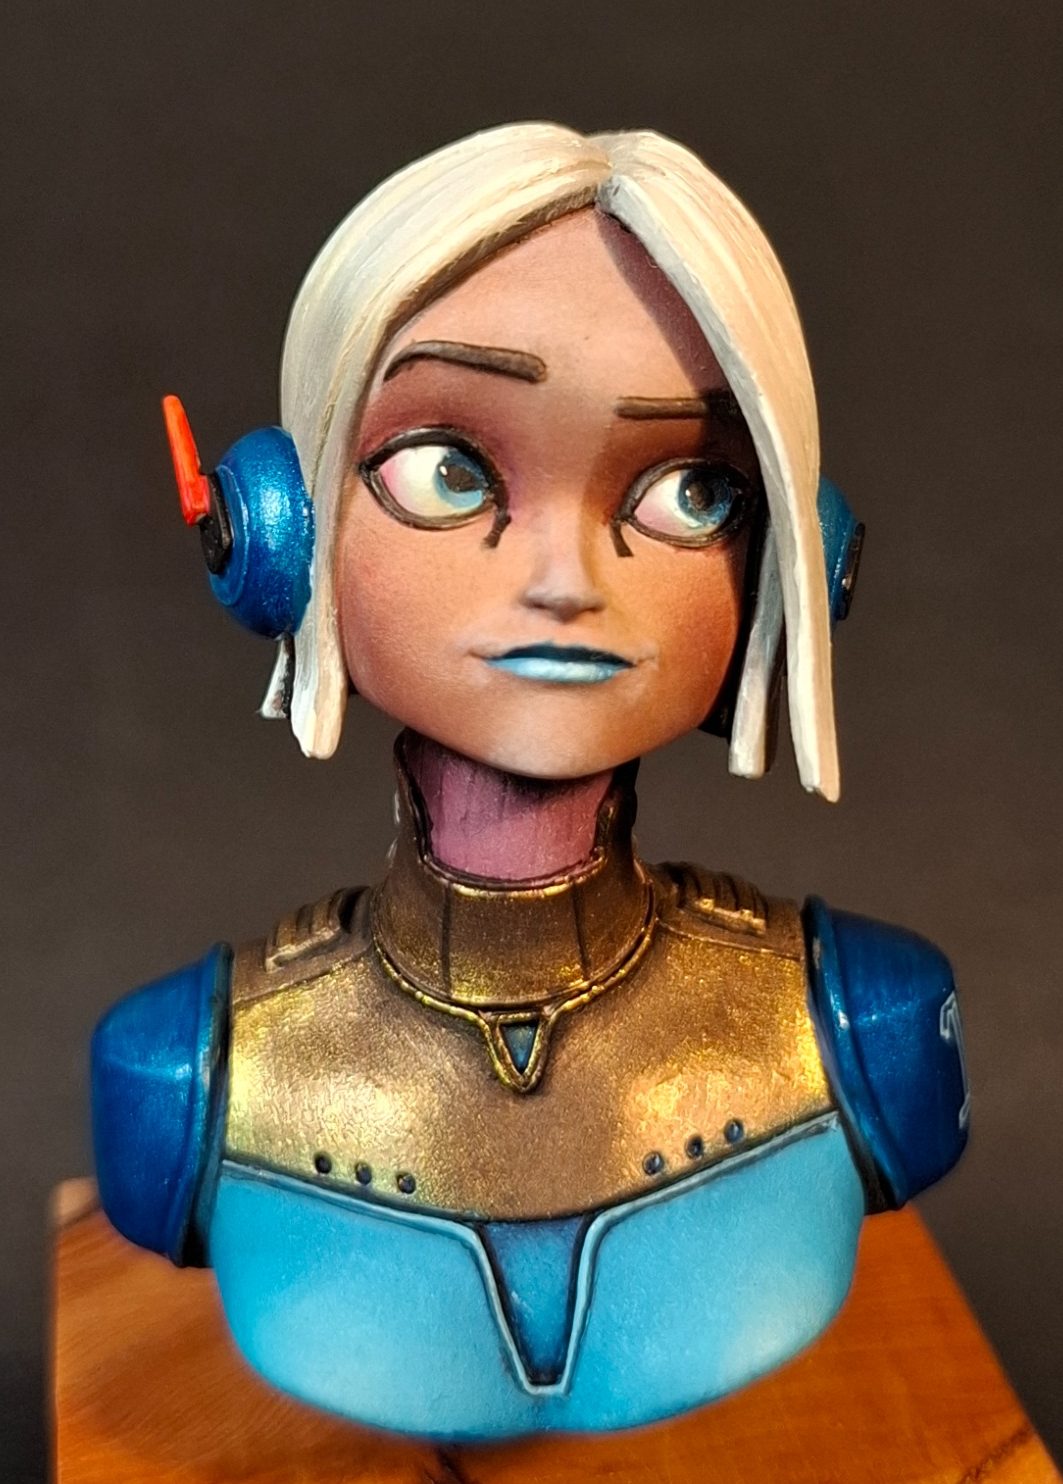
Photo #1 shows the very minimal box art, and photo #2 is the bare resin bust.
No pieces to glue on, just a single piece casting that required a couple of holes drilling in the underside to accept wires that would then attach it to a wood block that I could use as a painting handle.
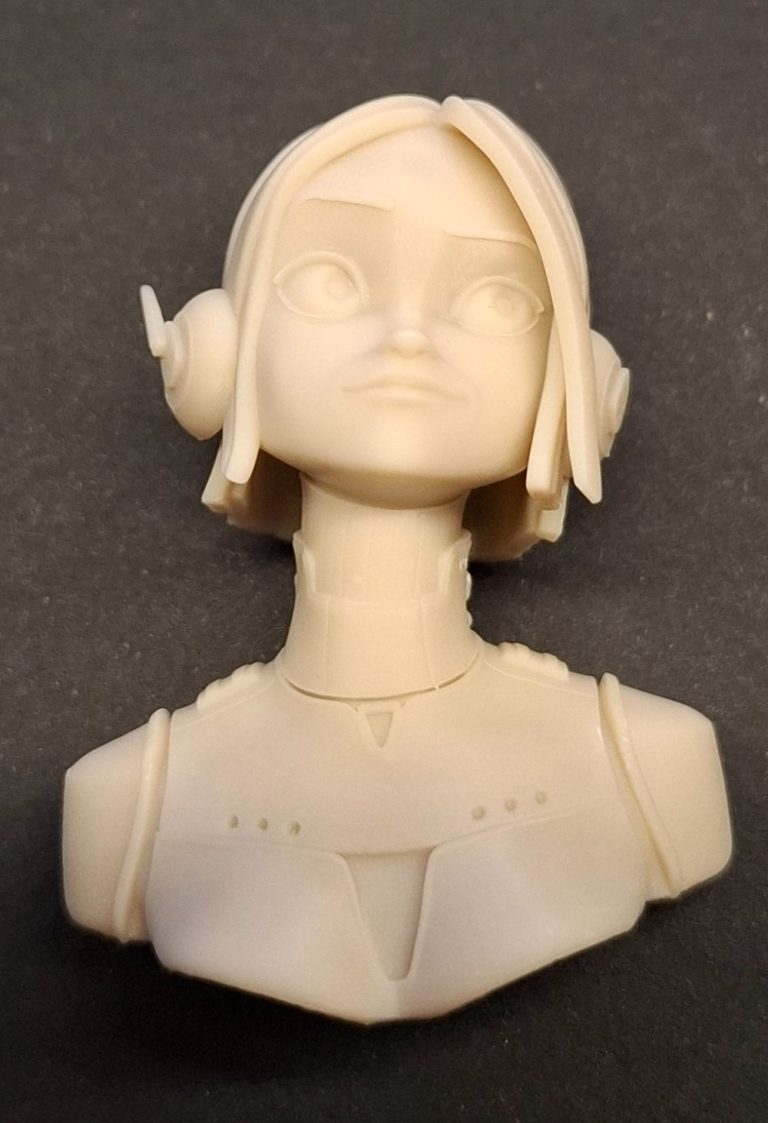
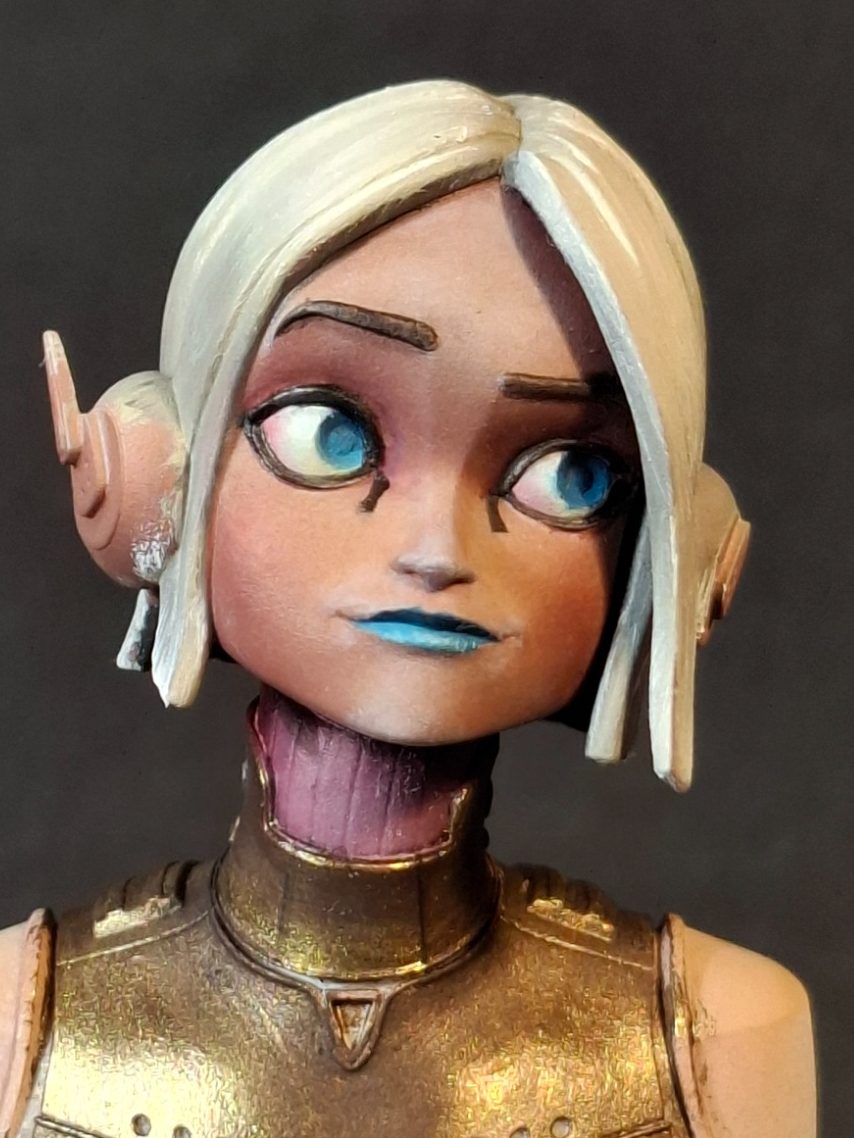
Photo #3 leaps forward a lot, and so I’ve some explaining to do.
I noticed at SMC that there was a lot of painting being done using an airbrush to get smooth skin area effects. It’s something I’ve only done a couple of times in years gone past, and I thought that this piece might see a change in how I painted ( particularly ) female skin, adopting this technique and seeing if my skills gained from using the airbrush on AFV’s helped get a smooth colour blend that was quicker to paint than using oils.
In this shot I’ve laid on two colours of paint through the airbrush, Nato Brown from Tamiya, lightened with a little Deck Tan, and sprayed at an angle from beneath the bust so that the dark colour hit the underside of the chin, nose and eye sockets – think of basically trying to spray paint up her nose.
Then a lot more Deck Tan is added to the mix, and this si sprayed at a slight angle from overhead so that the paint catches her forehead, top of the nose, cheekbones and chin.
Photo #4 The paint is left to dry for twenty four hours before beginning adding some oil colours.
The oils are added in a very similar way to which a woman will add blusher when doing her make-up. A soft brush of moderate size –say size 4 of 5 – is used with a very, very small amount of paint on it to almost scrub paint into the surface of the model in the desired areas.
In this case I used Mars Brown initially to build up colour in the shadow areas, followed by a very, very small amount of Purple Madder Alizarin added to the cheeks, nose and the eye sockets.
To build up some of the highlights I used a fresh brush with a similar method to add Titanium White to the forehead, nose, cheekbones and chin.
To check how this looks, I “framed” the face by painting in the hair, the neck collar, eyes and lips, all of which gives contrast to the flesh tones to see how they’re working.
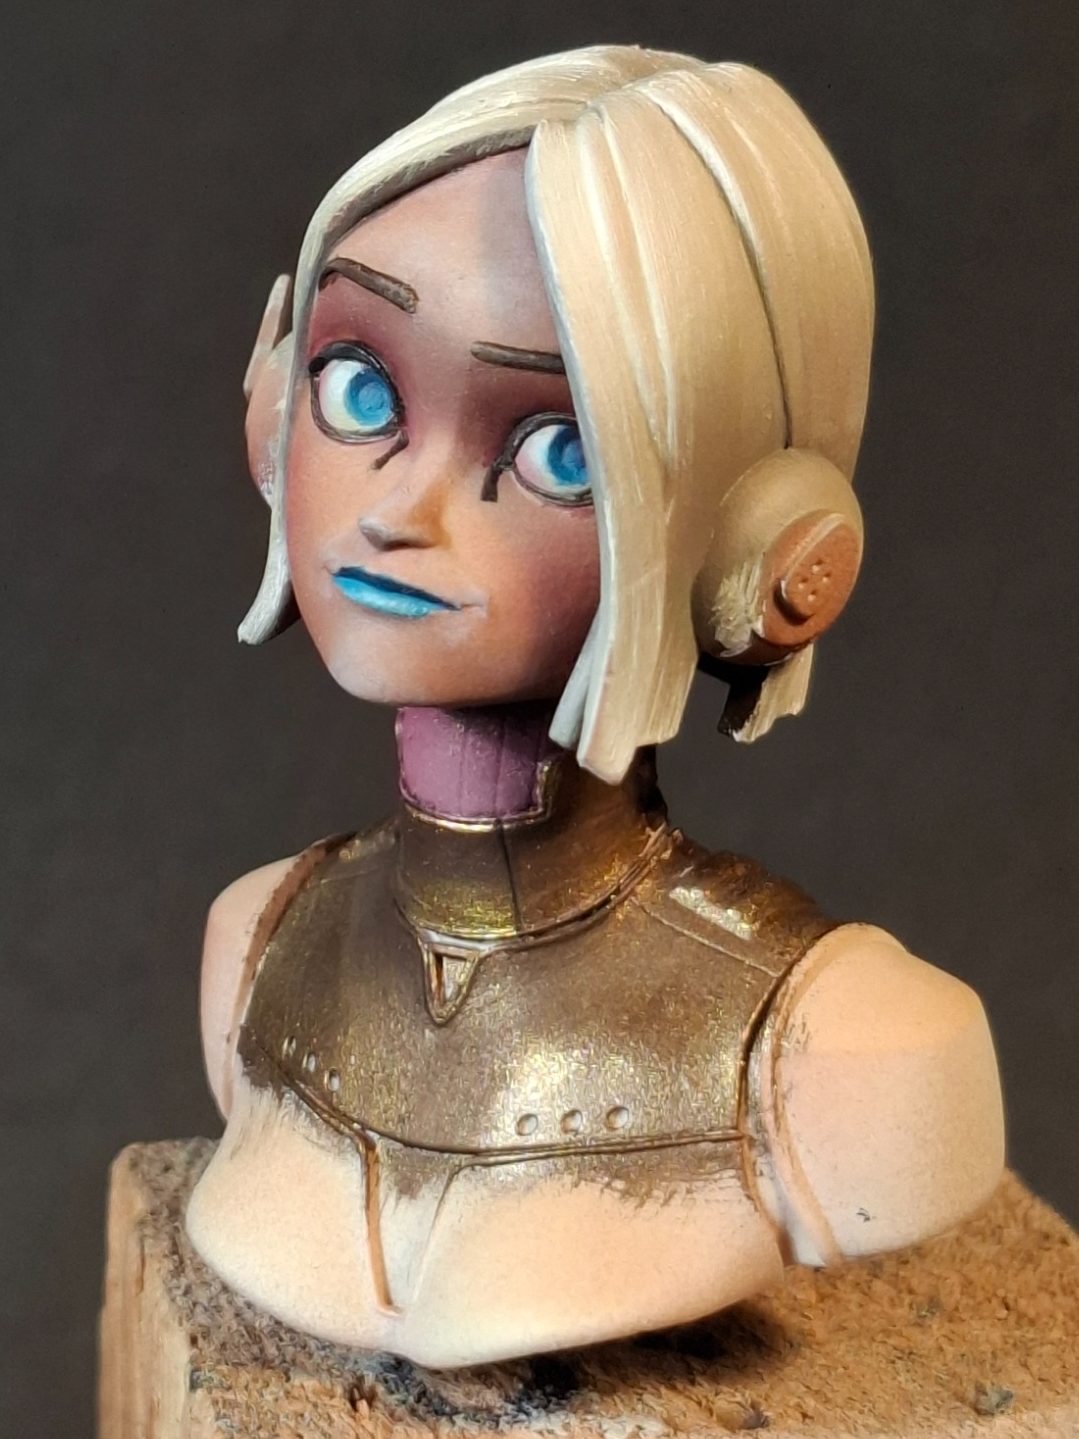
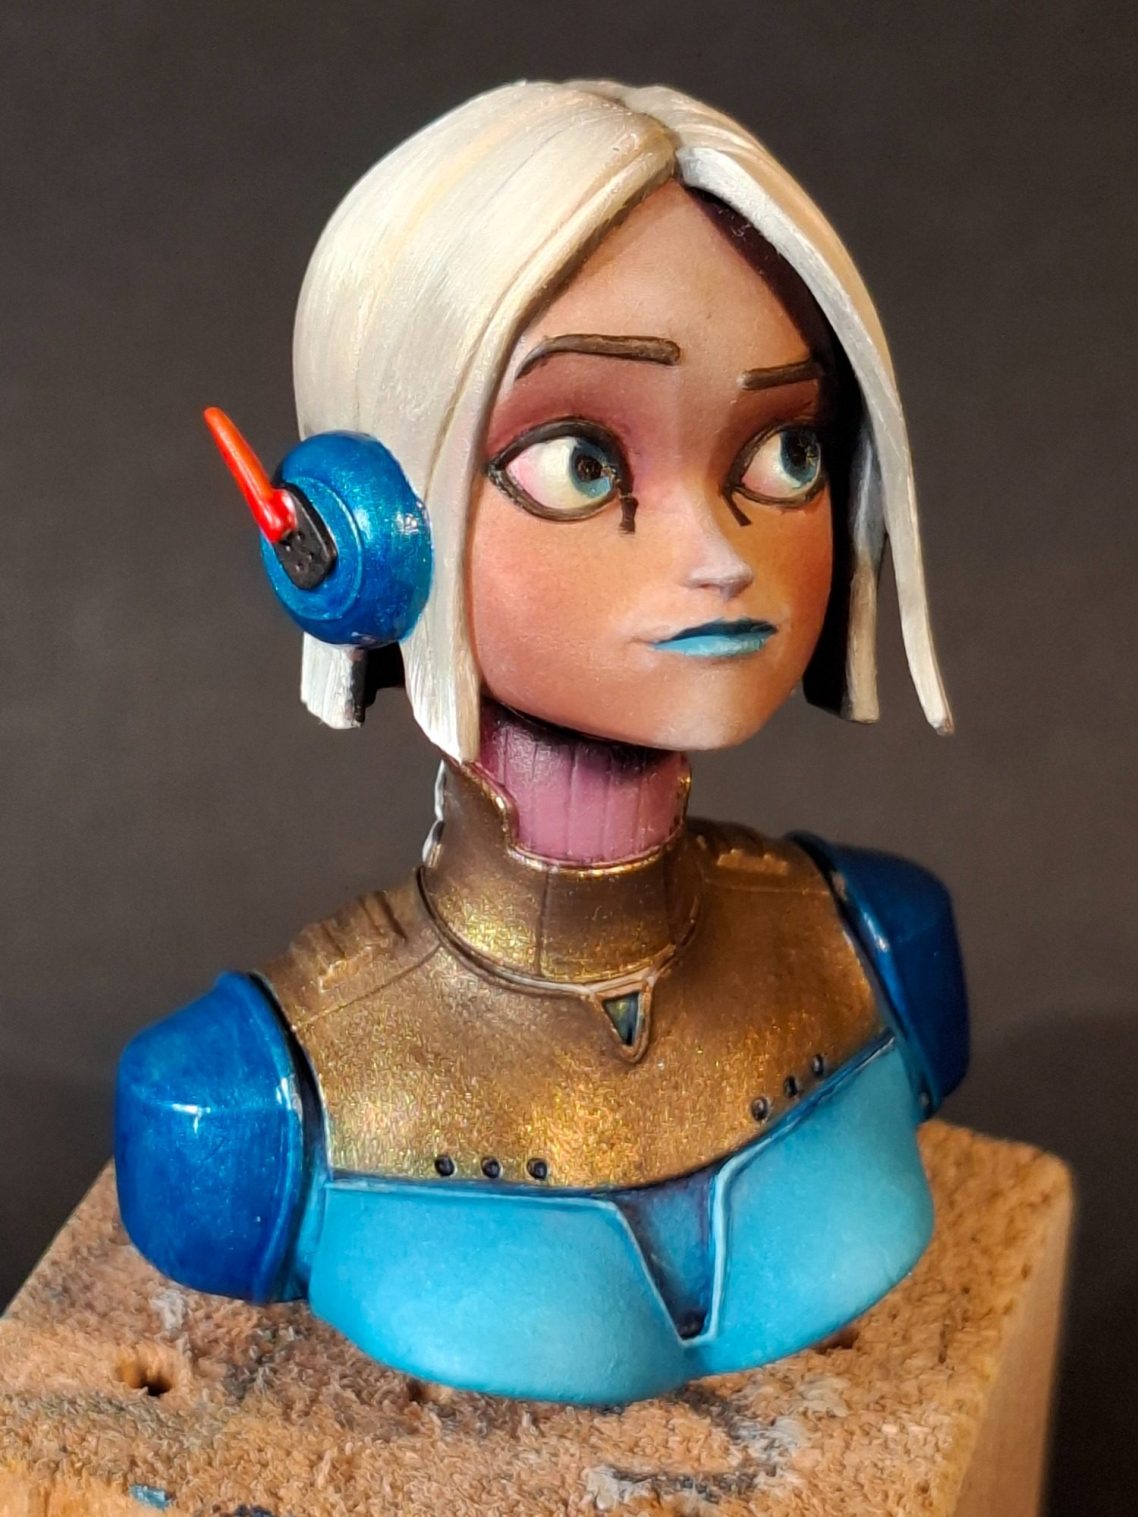
Photo #5. There was a little adjustment needed, adding more of the Purple Madder Alizarin around the eyes and under the cheekbones, but that was about it.
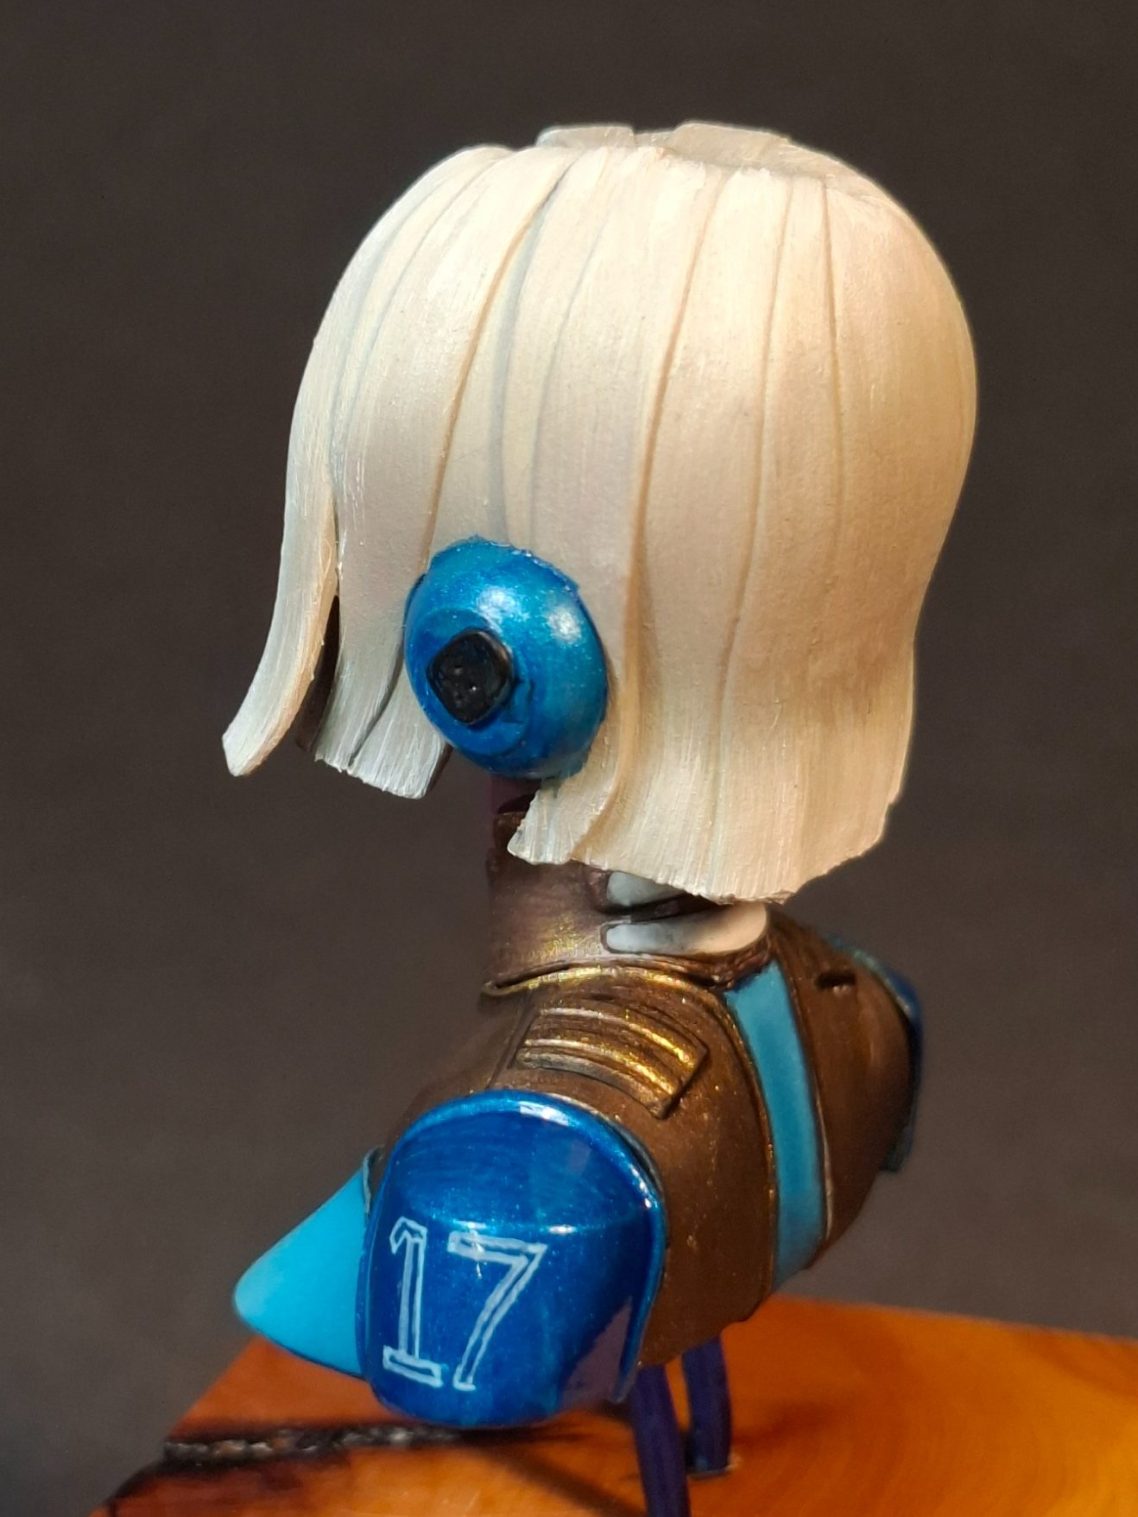
The other sections could be added – the chest / shoulder plates from Darkstar Bronze with some highlights of Antique Gold and although I began painting the recessed section at the centre of her back with a purple colour, I changed this to an undercoat of Turquoise to match her lip gloss.
This turquoise / blue theme was continued on the chest and shoulder plates, using MP paints acrylic, followed by Winsor and Newton Turquoise on the chest and adding several thin coats of Tamiya Clear Blue ( diluted with an equal amount of water ) on the shoulder plates and headphones.
Photos #6 and #7. the hair was undercoated with a very pale cream colour acrylic, a mix of MP White and Cream, and then I used W&N Buff Titanium oils to go over that, adding a little Sepia to the shadow areas – only a very small amount as the Sepia is quite a strong pigment – and Titanium White to build up the highlights.
The mould fault line can be seen running a slight diagonal across the back of the head in the shadow area in photo #7. It’s not glaringly visible, but it stands out to me.
At this point I need to clean up the edges of the blue paint that encroach on the hair from the headphones and add details to the small raised panels on the back of the neck and the shoulders.
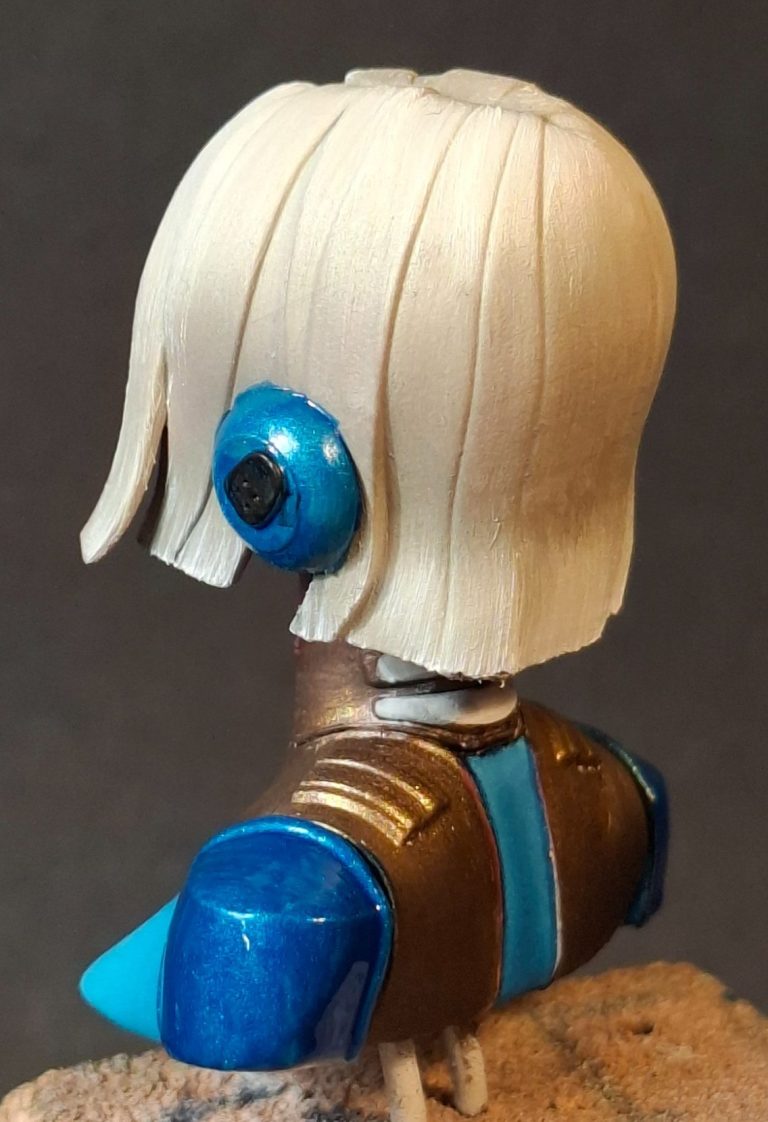
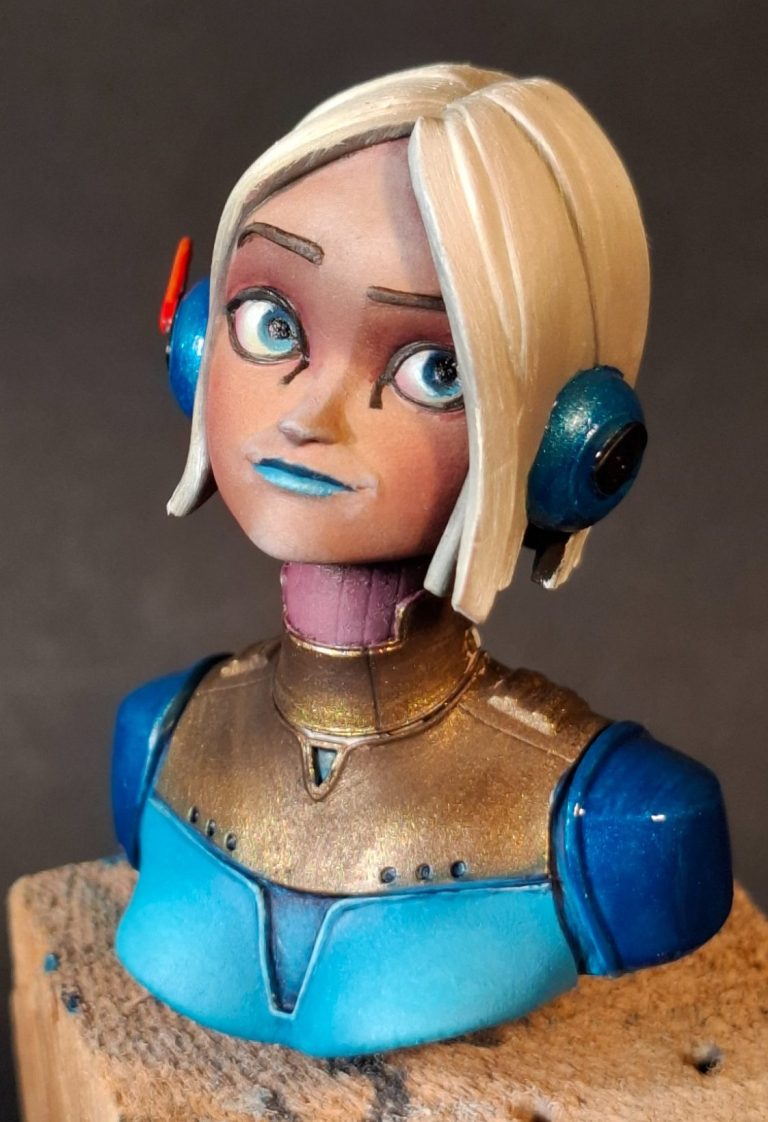
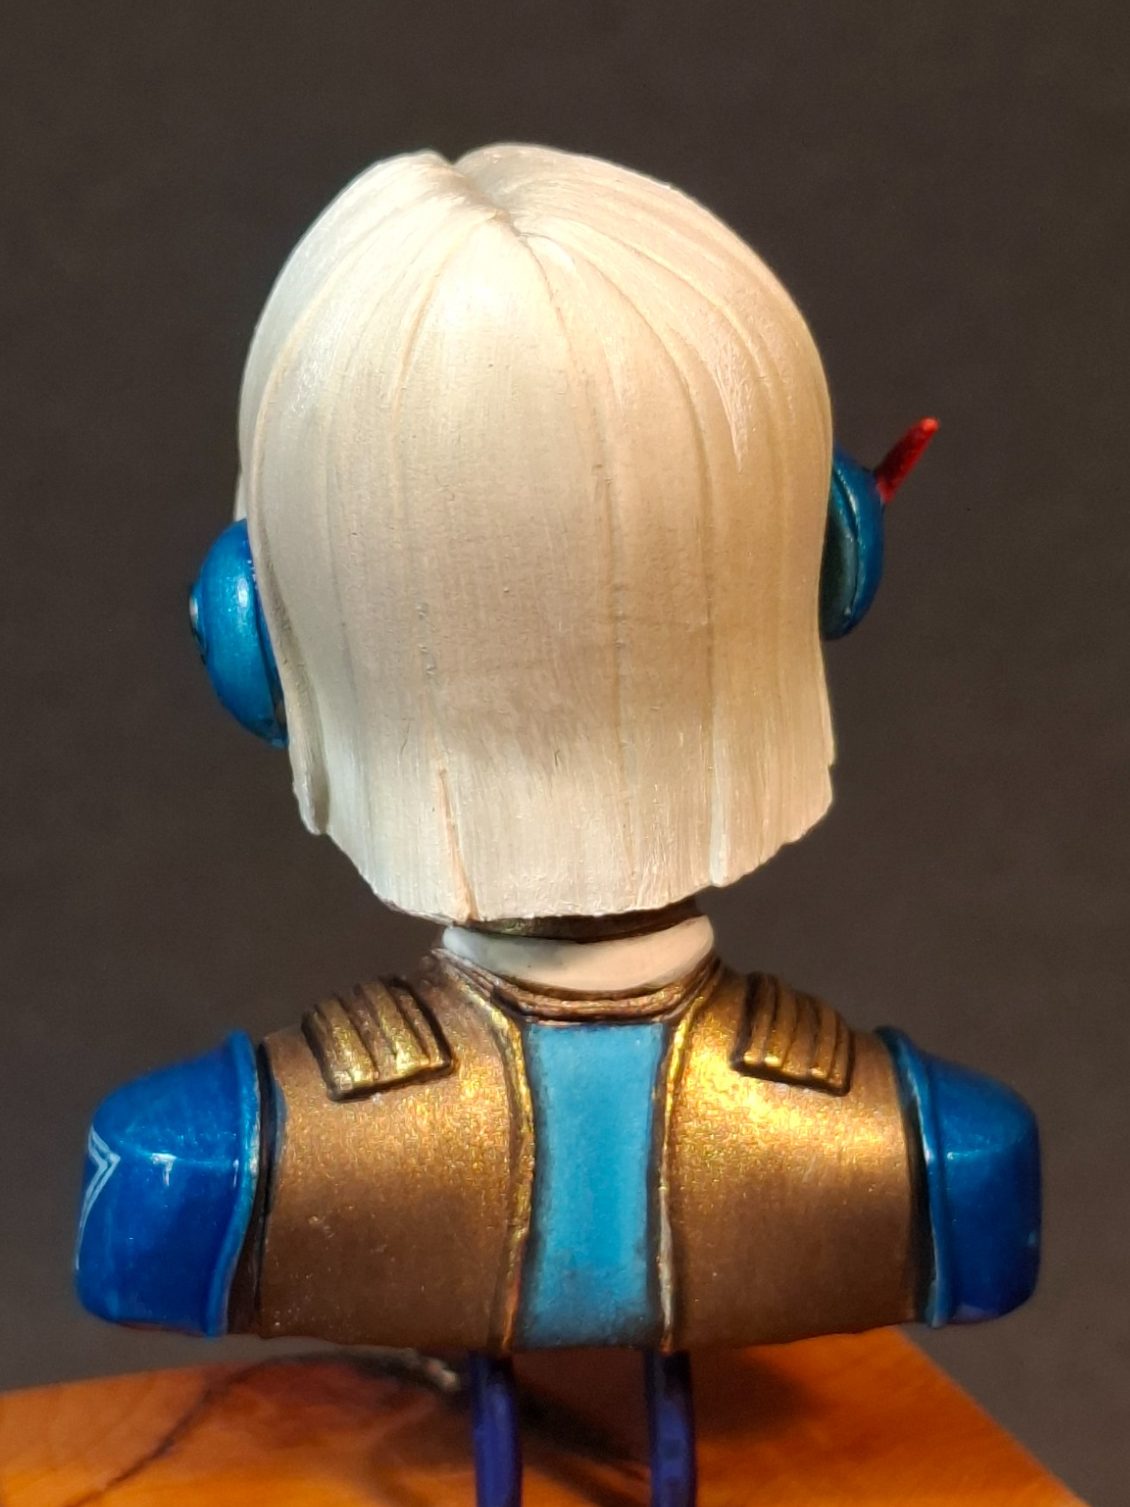
Photo #8 shows another picture at this stage, and I’m still a bit unsure about the purple colour on the neck. Should I change it to a shade of the turquoise or will that just be too much of that single colour ?
It needs consideration while I sort out the edges on the headphones and decide on a plinth to set her on.
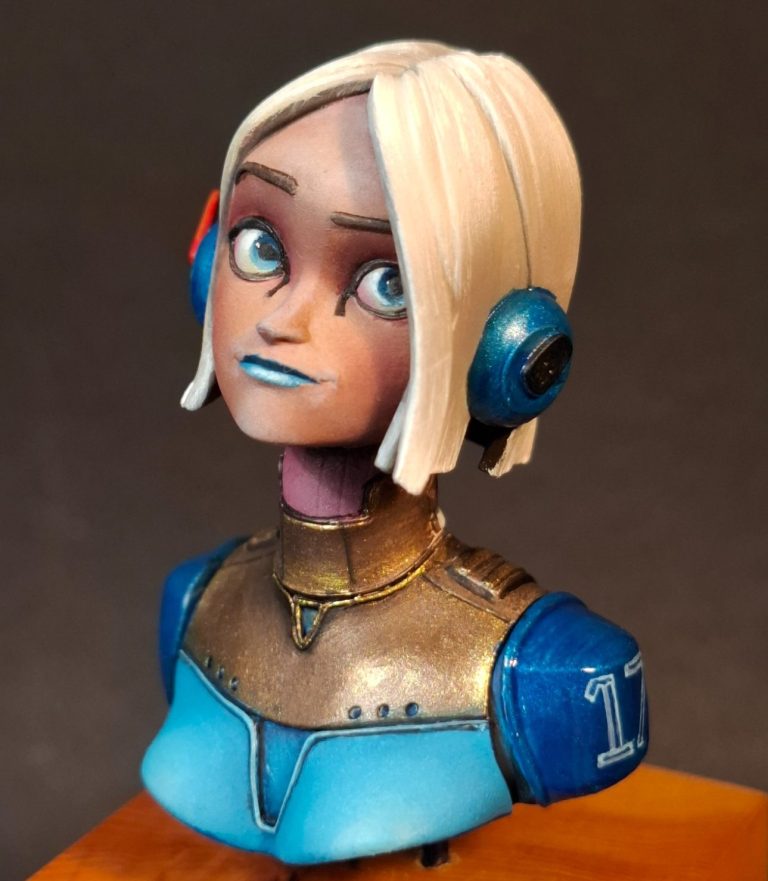
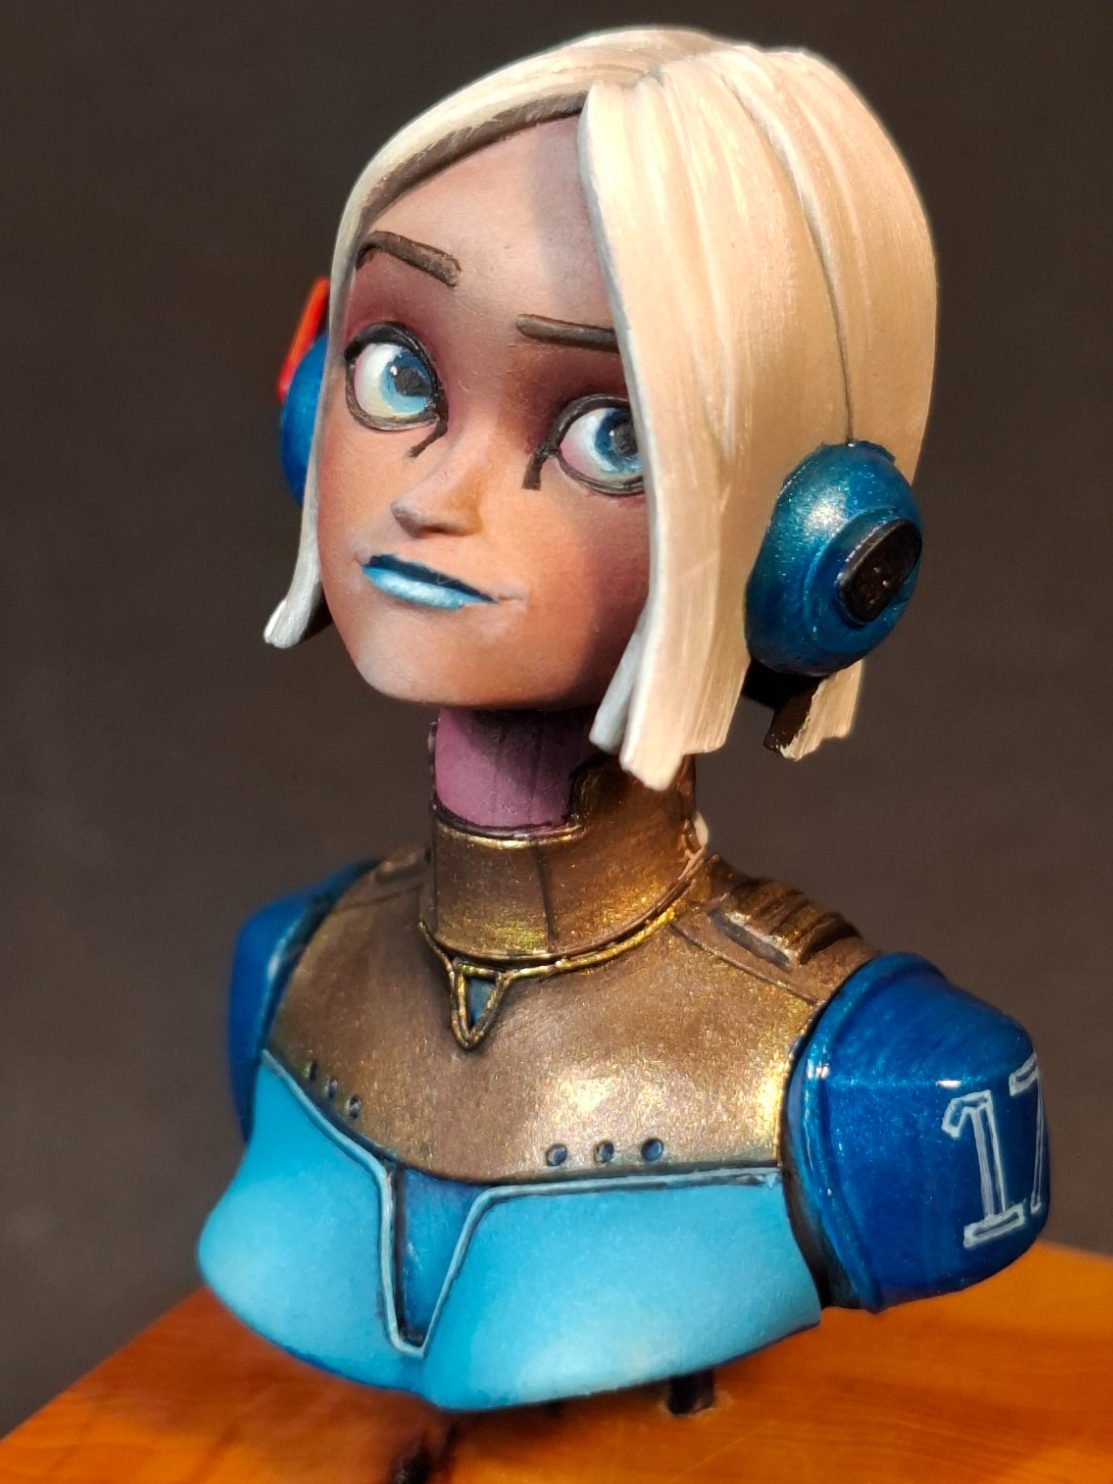
The finished shots were taken prior to sorting the edge of the headphones out, although I’d added a lot of the finer edging details to the panel lines between the different pieces of her suit.
I also added the number seventeen to her left shoulder using a fine brush and some very pale blue paint.
Why seventeen ?
Haven’t a clue, I just picked the number at random.
I’d got around a dozen small bases off Richard at Oakwood Studios some time back, all made from the same wood and all uniform in size. I thought that because I’d bought a few of these female mini-busts at SMC this year, and if the same vendors are there next year, then I’ll probably get some more, then putting them on similar plinths might make them look more of a series of bust studies…..
Another one of the many ideas I have, and in reality that I seldom get around to.
As for a title for this piece, I thought "Heaven" fit quite well.
If you grew up with music from the 1980's, you might see a connection.
Final thoughts.
This is really quite a small bust – around 35-40mm tall – but just so easy to paint.
I really enjoyed trying out a slightly different method for painting the flesh tones, and incorporating much brighter colours than I’ve been using for the last couple of years.
The purple on the neck area I’m still unsure of, should it be changed to blue or maybe even a very dark grey ?
That’s a question that’ll get answered at some point…… Or maybe I’ll just leave it as it is and move on to the next piece.
As for the model itself, very highly recommended.
Lorem ipsum dolor sit amet, consectetur adipiscing elit. Nulla euismod condimentum felis vitae efficitur. Sed vel dictum quam, at blandit leo.
Lorem ipsum dolor sit amet, consectetur adipiscing elit. Nulla euismod condimentum felis vitae efficitur. Sed vel dictum quam, at blandit leo.
Lorem ipsum dolor sit amet, consectetur adipiscing elit. Nulla euismod condimentum felis vitae efficitur. Sed vel dictum quam, at blandit leo.
Lorem ipsum dolor sit amet, consectetur adipiscing elit. Nulla euismod condimentum felis vitae efficitur. Sed vel dictum quam, at blandit leo.
Lorem ipsum dolor sit amet, consectetur adipiscing elit. Nulla euismod condimentum felis vitae efficitur. Sed vel dictum quam, at blandit leo.
Lorem ipsum dolor sit amet, consectetur adipiscing elit. Nulla euismod condimentum felis vitae efficitur. Sed vel dictum quam, at blandit leo.
Lorem ipsum dolor sit amet, consectetur adipiscing elit. Nulla euismod condimentum felis vitae efficitur. Sed vel dictum quam, at blandit leo.
Lorem ipsum dolor sit amet, consectetur adipiscing elit. Nulla euismod condimentum felis vitae efficitur. Sed vel dictum quam, at blandit leo.
Lorem ipsum dolor sit amet, consectetur adipiscing elit. Nulla euismod condimentum felis vitae efficitur. Sed vel dictum quam, at blandit leo.
Lorem ipsum dolor sit amet, consectetur adipiscing elit. Nulla euismod condimentum felis vitae efficitur. Sed vel dictum quam, at blandit leo.