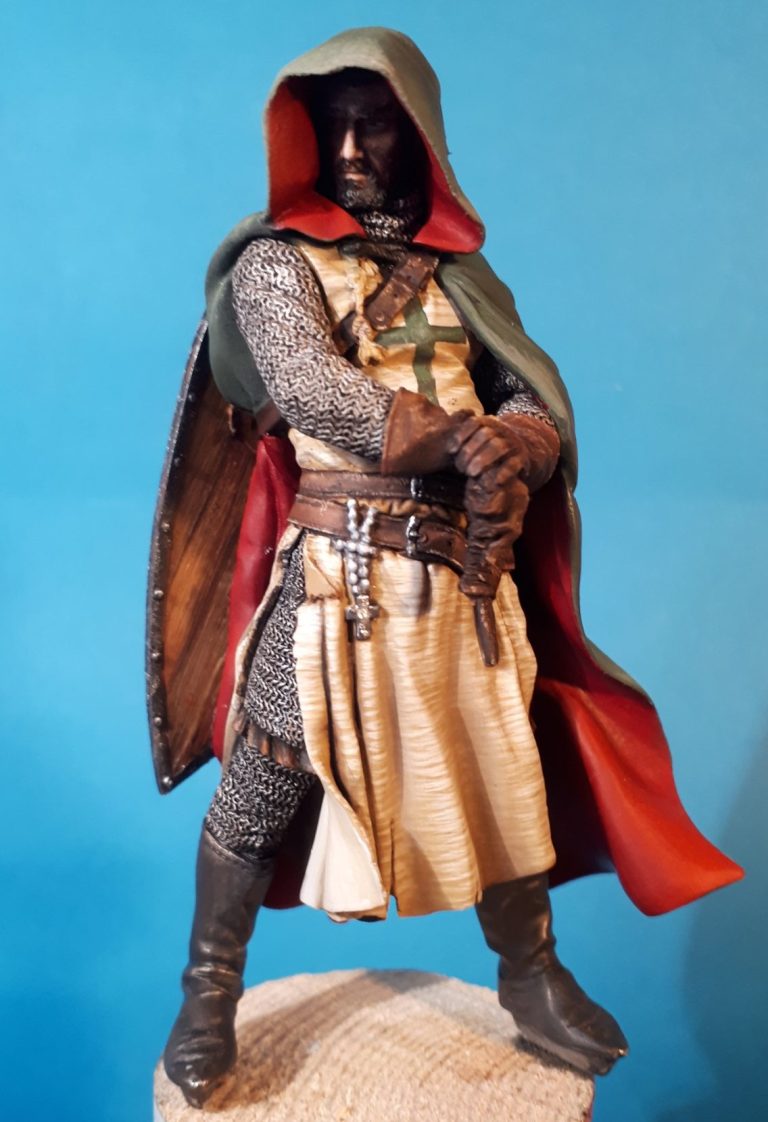
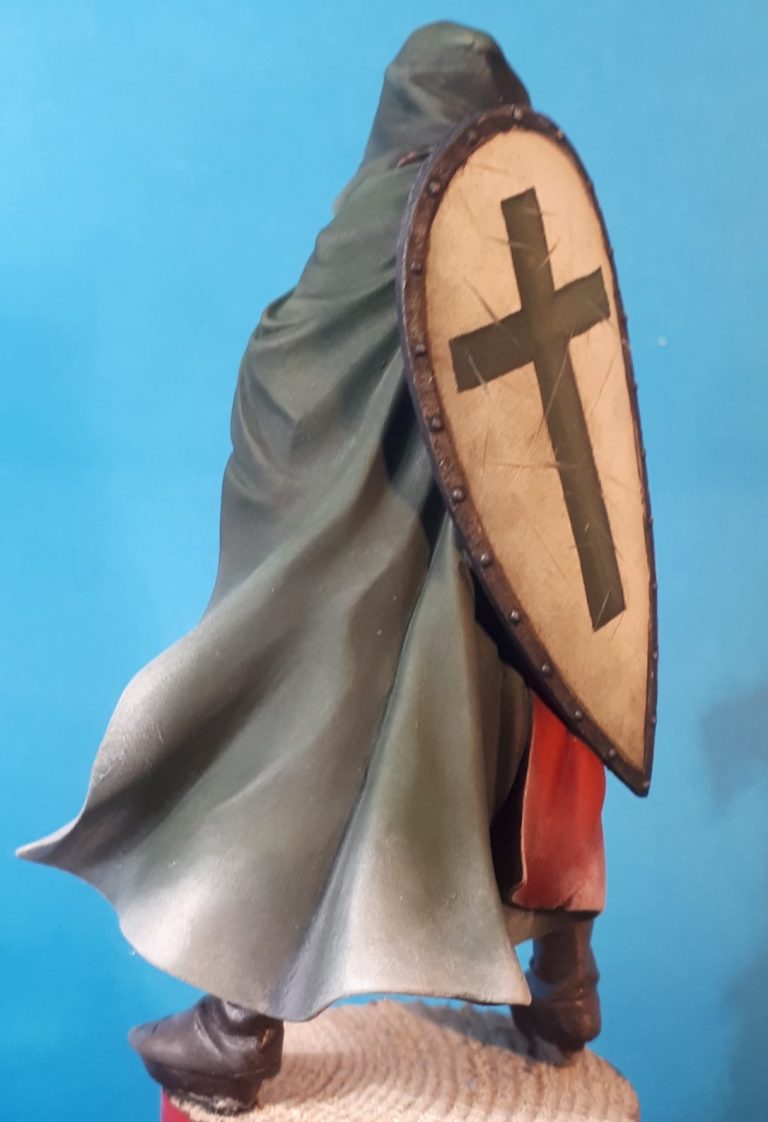
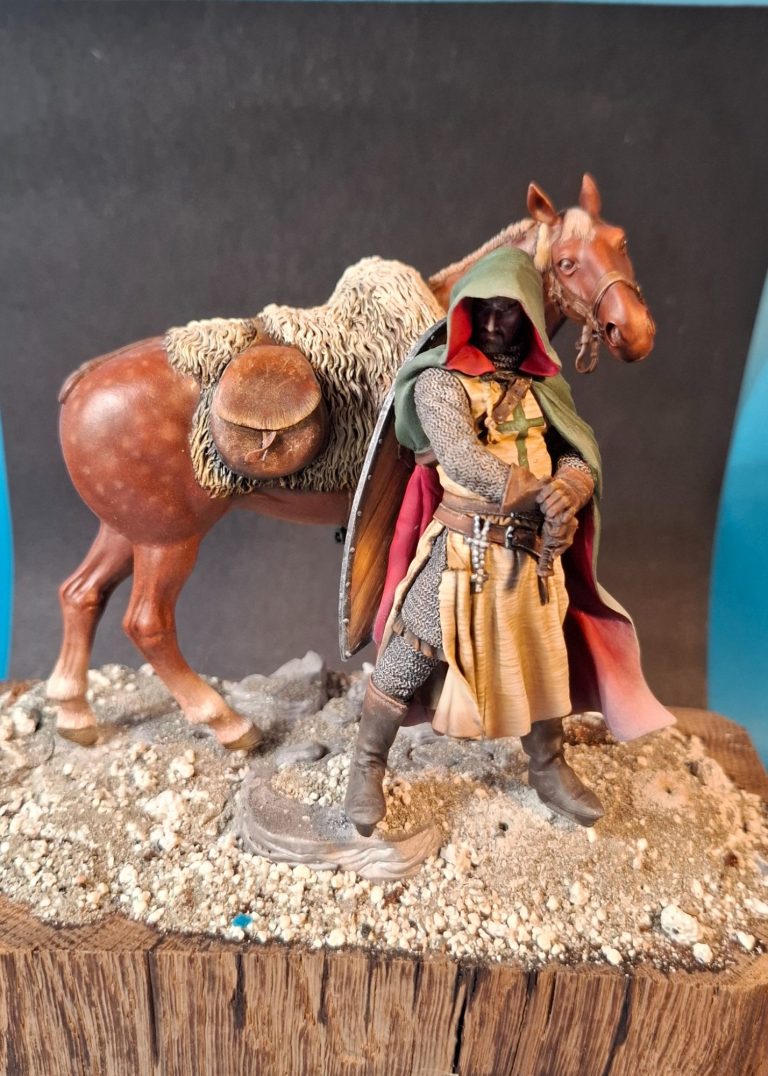
Dismounted Leper Knight
90mm Poste Militaire horse and Pegaso figure combined
Painted in 2024 -25
Poste Militaire, a company that is not longer with us, but in their time were noted for the highest quality models.
Whilst some of the figures might seem a little dated in their stance, they still stand up to anything currently on the market, and in some cases still surpass them.
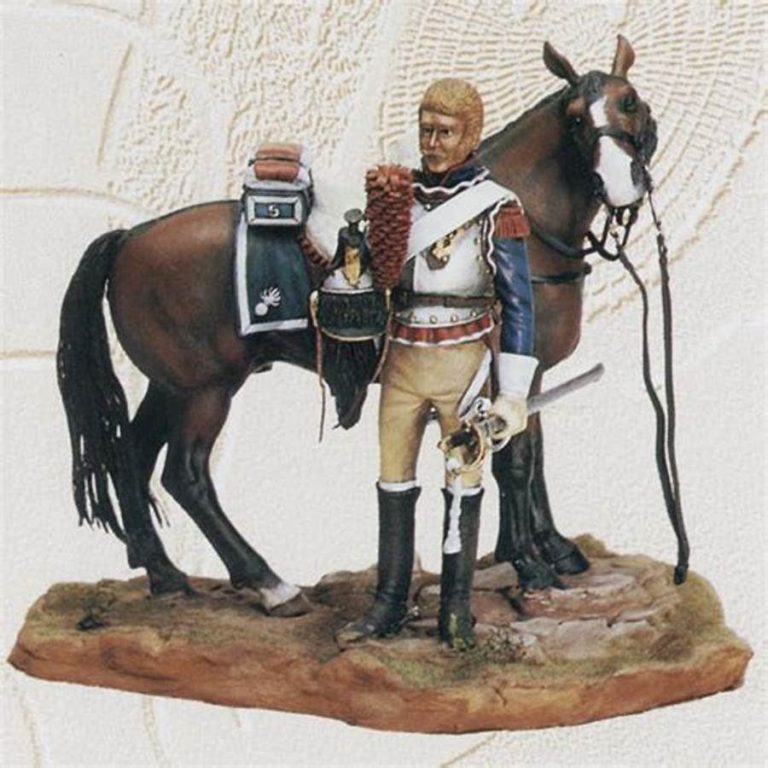
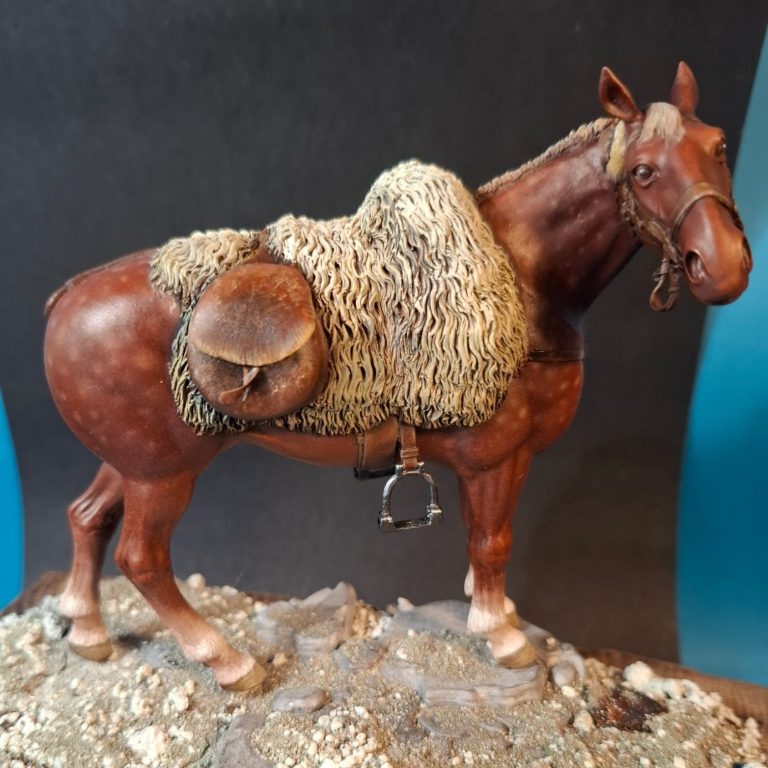
I liked the horse on this particular kit – shown in photo #1 – but wasn’t all that struck by the figure.
Somehow, the horse manages to look “alive” and the head turning to look over the figure’s shoulder seems quite natural.
Photo #2 shows the metal parts for the horse, an original casting that I sourced second-hand, and it’s a nice soft metal that is easy to clean up and the thinner parts will be easy to bend into shape. The tail seems a more solid part than that shown in photo #1 and might need some additions later.
I’ll come to the figure later, but I’d already had the idea of combining the superb offering from Pegaso with this horse some time before actually getting around to starting the project.
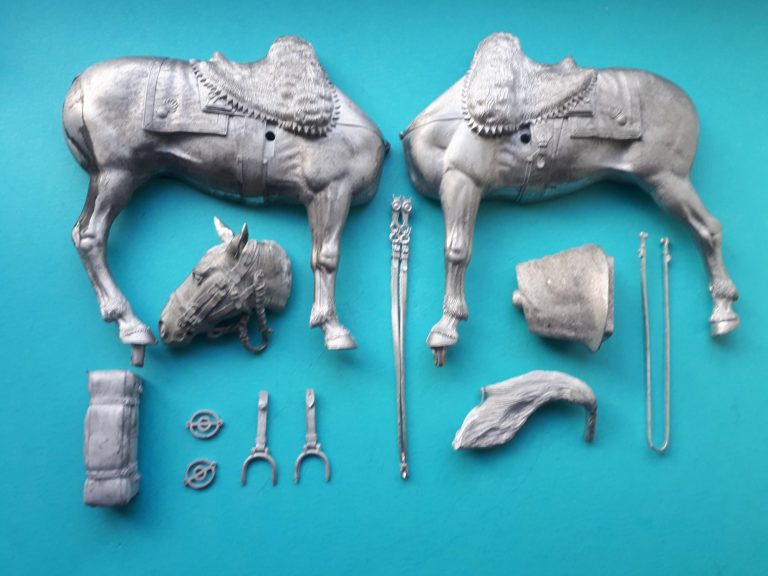
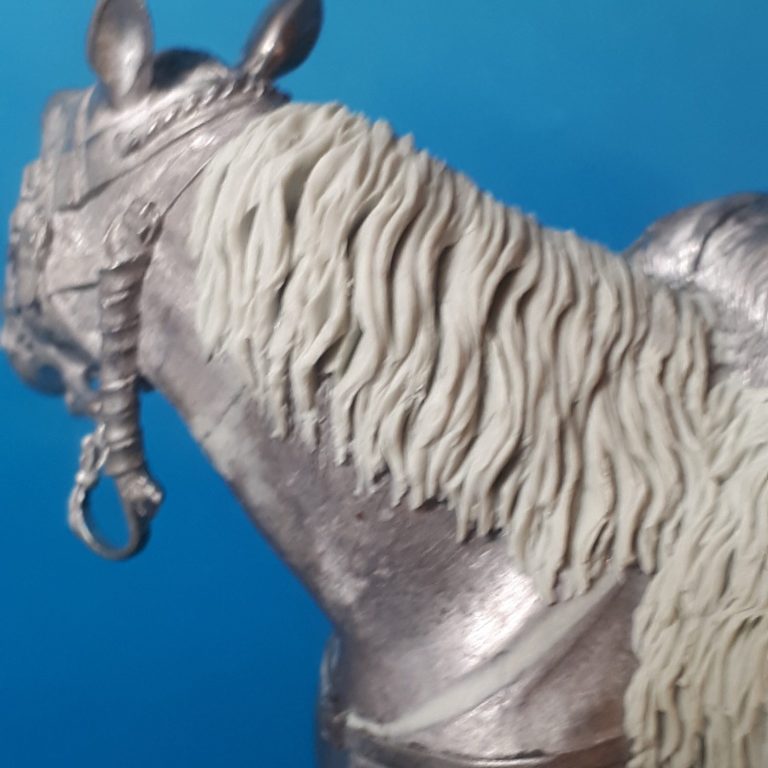
Photo #3 – changes to the horse.
Yes, lets deal with the horse first.
With using a figure from the crusades, I thought that the horse might not be quite as well manicured as one from Napoleon’s armies, so a shaggy, thicker mane was the first port of call for a change. Here I’ve added Magic Sculpt over the original mane and used a curved sculpting tool to add a wavy hair effect, and finished the finer detail at the lower “fringe” with a scalpel blade.
Photo #4 shows the other side of the horse, no alterations as yet, although there is a line of filler across the base of the neck where it fits into the body.
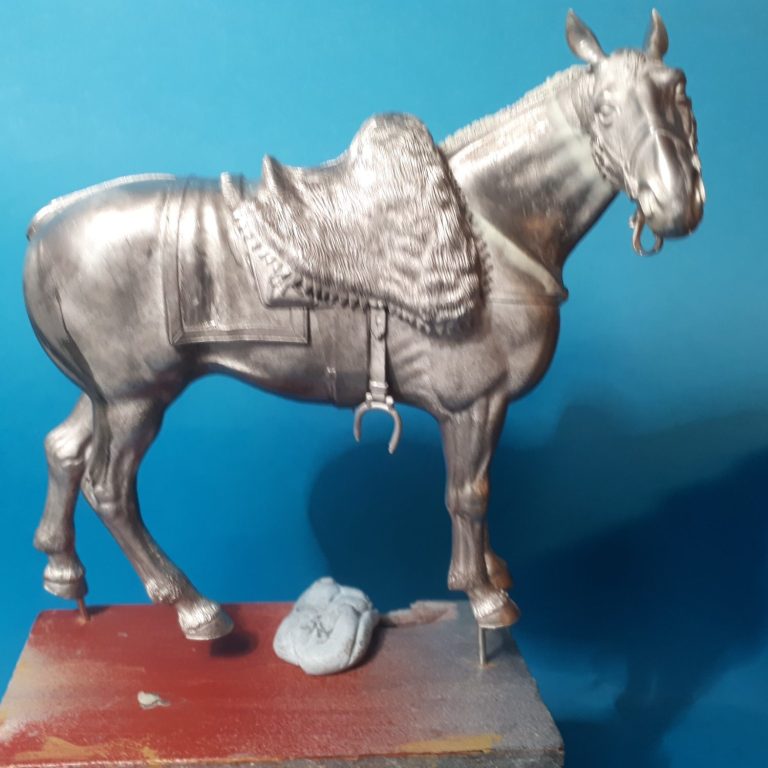
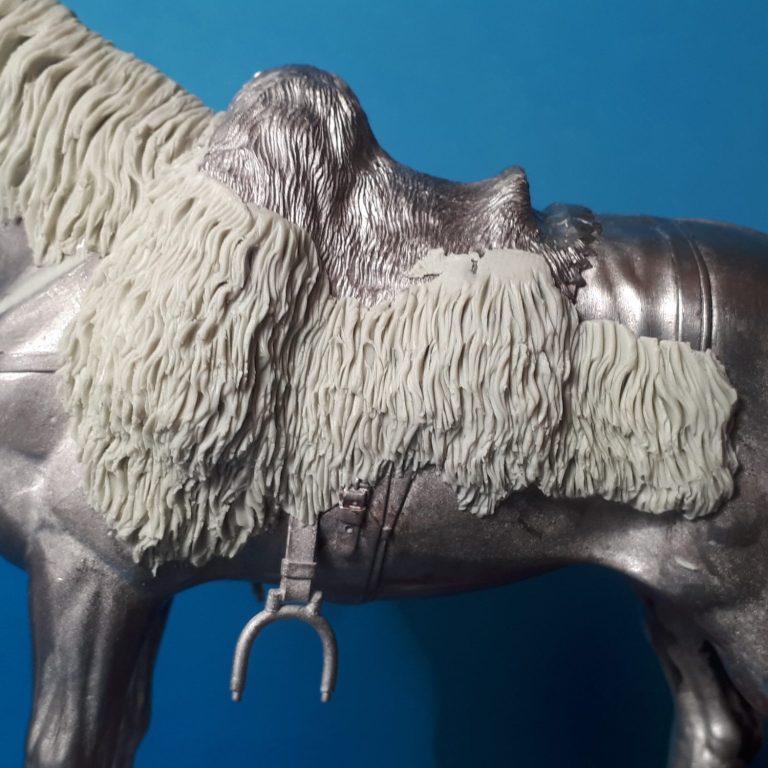
Photo #5 and the obvious change has to be the saddle.
Instead of carving / hacking the Napoleonic one off, I decided to add a thick sheep or bear skin one with the hairy side out.
Again, like the mane, magic sculpt was employed to make this, adding small inverted teardrop shapes of putty and then sculpting hair detail into them with the curved sculpting tool.
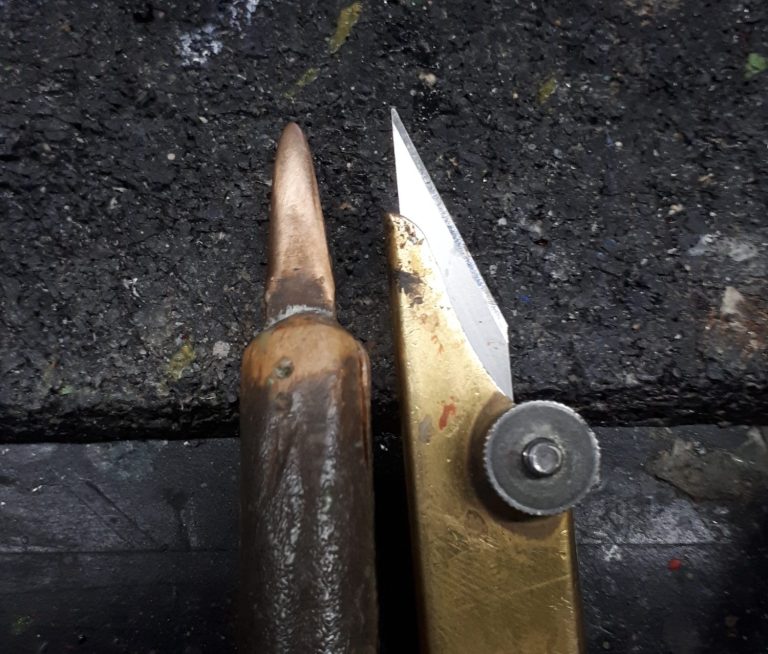
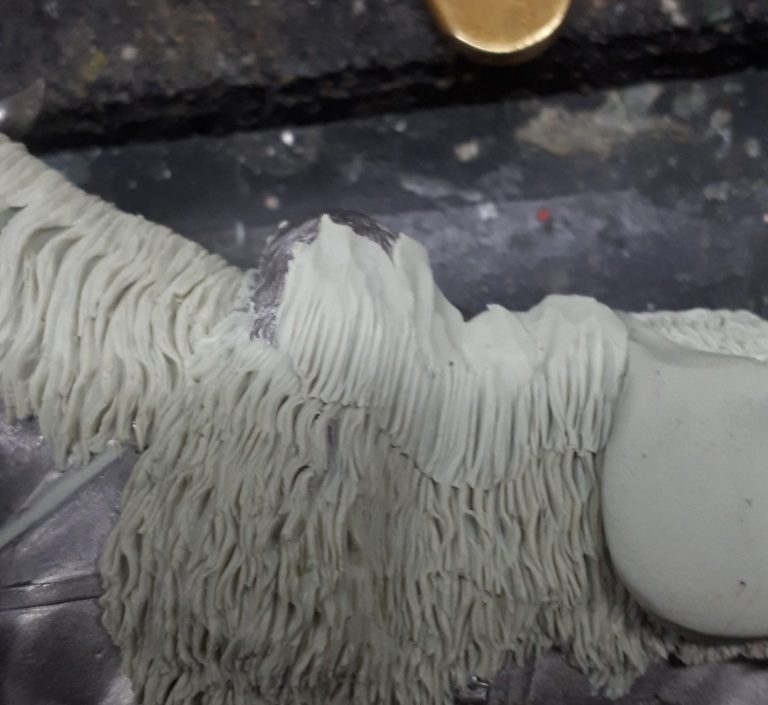
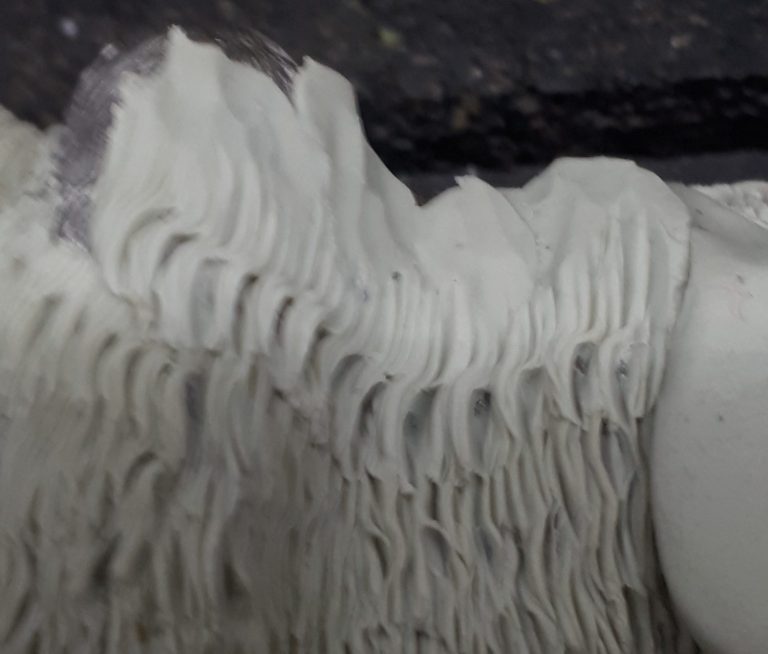
Photo #6 as I moved up the side of the saddle I began adding sausages horizontally across the model as shown here, sculpting lines into the putty as shown, and then using the curved tool to put a twist in them using the left hand tool shown in photo #7 and the effect gained shown in photo #8.
Photo #9, by adding the curve in the putty in opposing directions as each layer is added, a realistic heavy fur effect can be the result. The saddle bags were added and a strap joining them across the horse’ withers and the space filled in between them with more putty.
The supplied base for the stirrups looked a bit modern for the look I wanted, so I’d have to fabricate something a little cruder in appearance.
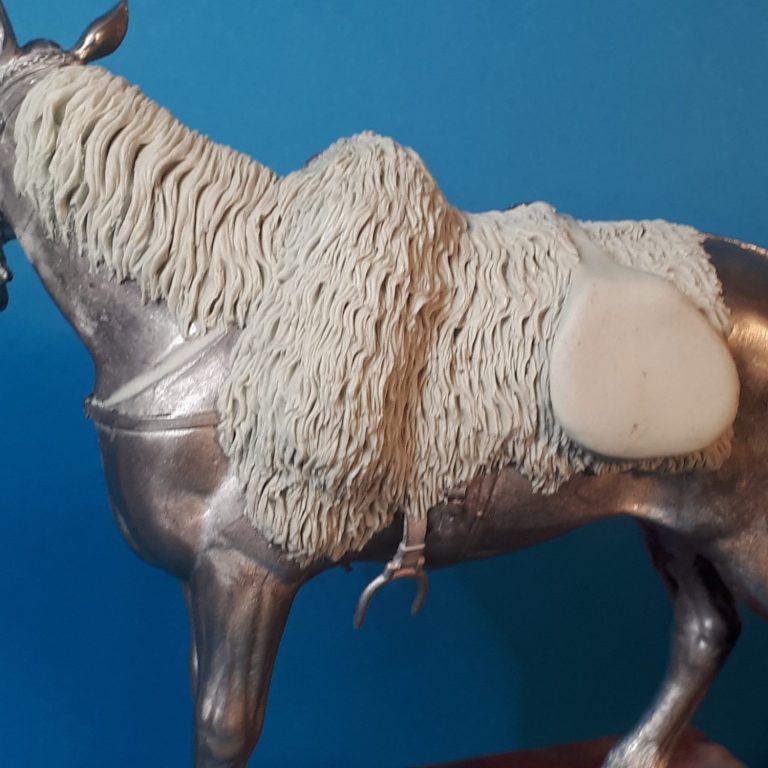
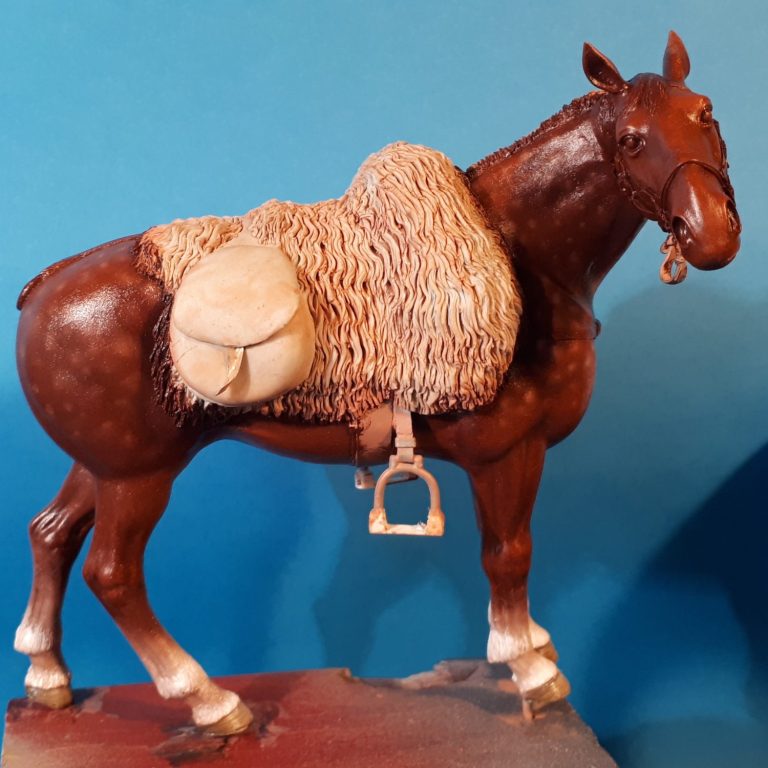
Photo #10. The base for the stirrups have been added now, some plastic strip and a couple of very short lengths of plastic box section.
Painting the horse was a pretty simple choice of a brown dapple. I used an undercoat of a sand colour acrylic, then added the oils, selecting darker areas to have Vandyke Brown, then adding the main sections in Mars Brown and blending the two oil colours together.
To build up highlights I added small amounts of Venetian Red, again blending this in, then for the dapples I used some Buff Titanium. Added in very small spots which are then very gently blended in with a soft brush, but not allowing the lighter colour to “travel” over too great an area.
Some spots are blended in more to fade them, some are left quite bright, this then makes for a more natural appearance.
While the brown paints are still wet I added the white “socks to the lower legs. This is a case of beginning with Buff Titanium and allowing the darker brown colours to mix a little on the boundary between the lighter and darker paint, and then lower down the leg, adding Titanium White and blending that in to the cream colour.
Photo #11 and I painted the saddlebags with the leather colours for some reason, before painting the saddle cloth. I have no idea why I chose to do this the wrong way round; I put it down to me being an idiot at times !
The saddle cloth has had an initial coat of Flesh coloured acrylic, and then a wash of Vandyke Brown oils to get the dark brown paint into all the recessed details. This was allowed to dry off for a couple of hours so that the White Spirit that I’d used as a thinner wasn’t quite so wet.
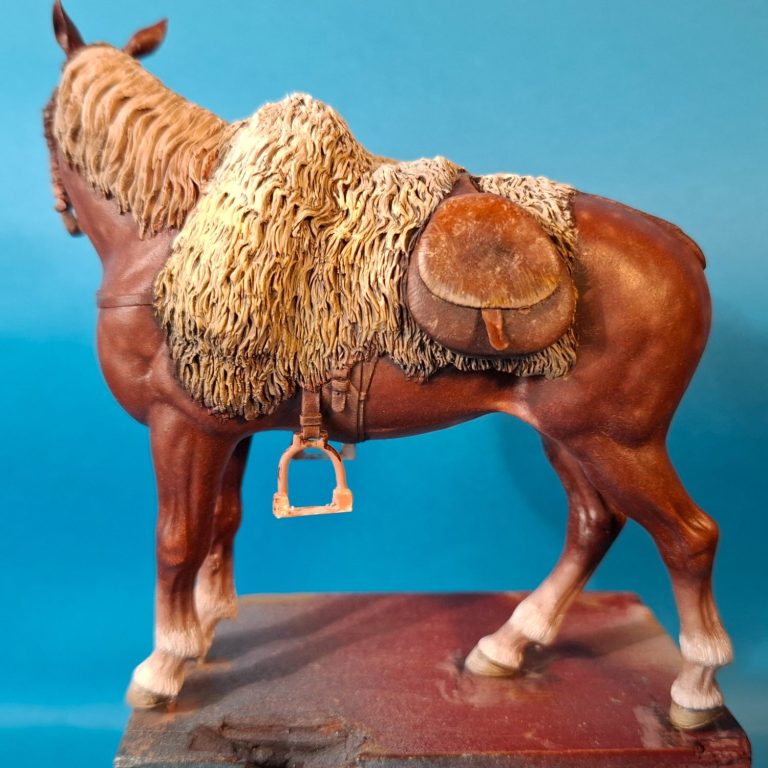
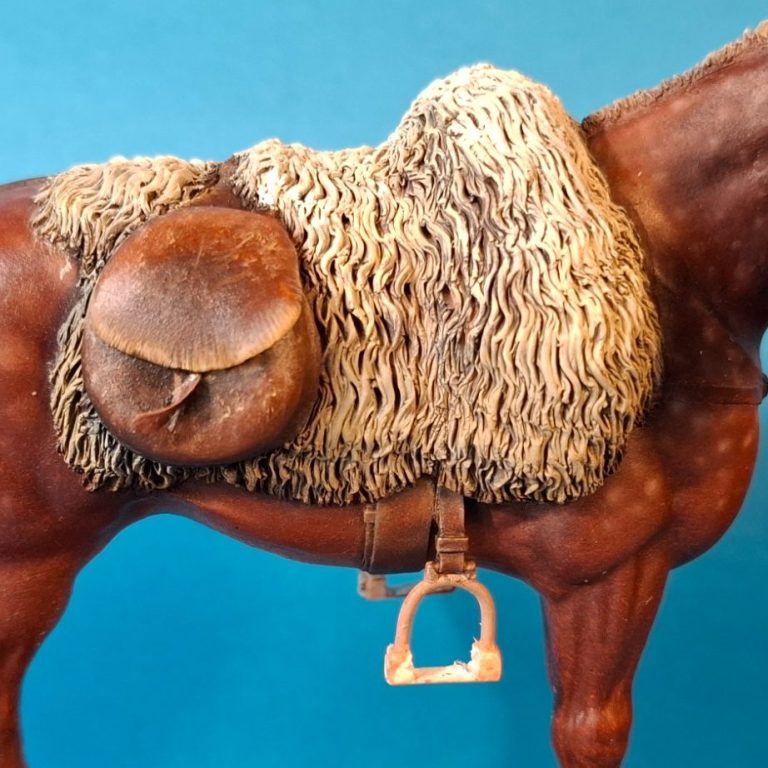
Photo #12 in this shot I’ve begun building up the lighter colours of the saddlecloth, I’ve started with a 50:50 mix of Mars Yellow and Buff Titanium, combing the colour on with a short-haired soft brush and only loading it with a minimal amount of paint – think of slightly more paint than you’d use for dry-brushing something.
After EVERY downward pass, the brush needs to be wiped on a soft cloth to remove any of the darker paint ( which, remember, is still wet ), so that to colours don’t become muddy.
Photo #13. For the top sections of the saddlecloth I began adding Buff Titanium on it’s own, using the same method as before and making sure that excess paint is wiped off the brush after each pass.
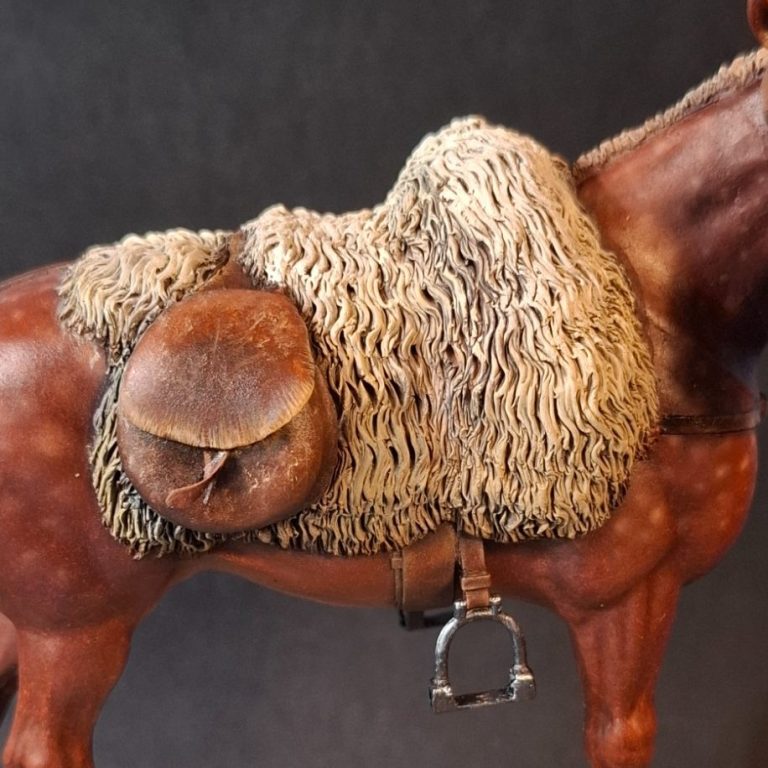
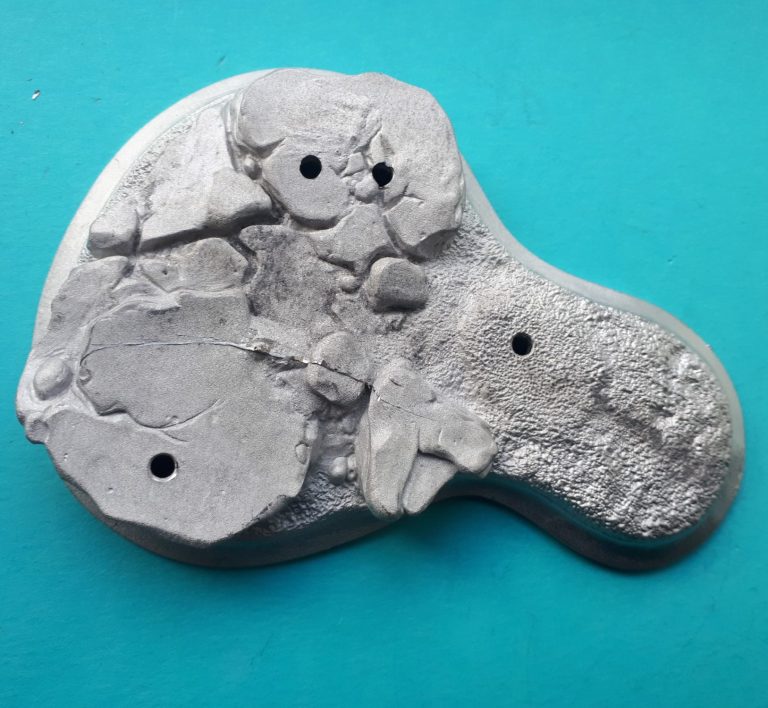
Photo #14 The saddlecloth was going to take a while to dry, so in the meantime I turned my attention to what would become the base.
This picture shows the groundwork supplied with the horse, which whilst a lot of it would be covered, could still be used as a starting point. It would need extending to accommodate the figure anyway, but I liked the flattened rocks on this and it seemed a shame to waste it.
Photo #15, here’s a particularly nice “lump” of very tough oak.
We had out chimney swept a couple of years back, and had a five foot long oak mantle above the log-burner, which the guy doing the chimney said was a fire risk.
I was doubtful, but in the interest of safety, the oak beam was removed and a replacement “fire proof” one put in it’s place.
Now what could the average modeller do with a five foot length of iron hard oak, a circular saw and a little time on his hands ????
Oh, that’s it, make some rough plinths for models – Who’d have thought ?
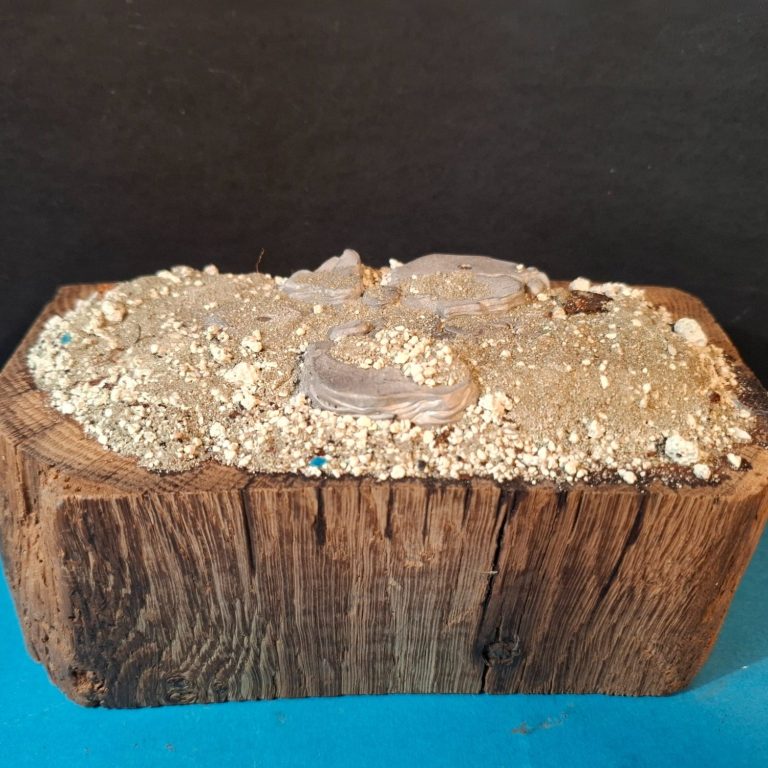
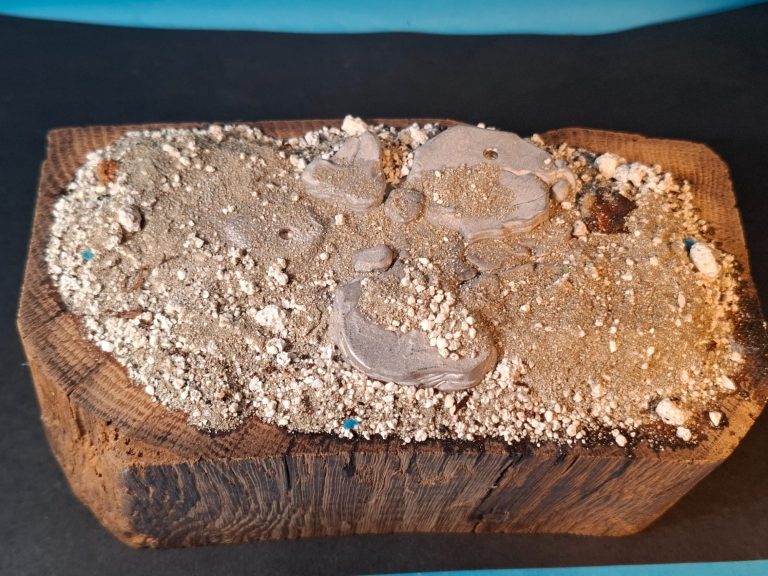
Photo #16. So this is a section of said beam, and not only is it solid, it’s going to give most competition judges a hernia when the come to lift it up.
The metal section of groundwork was added, and then Chinchilla Sand, Cat litter etc was added and fastened in place by dribbling thin superglue onto it – caution, mind the fumes if you do this.
Photo #17 and I’ve used the location holes for the horse as a guide, drilled extra holes to accommodate the wire pins I fastened into the horse’s legs and he’s loosely positioned in place as yet.
I’ve also added some of the Darkstar metallic paints to the stirrups and also painted in the leather belts and horse’s tack.
Photos #18 and #19. Let’s move on to the figure now.
So in actual fact I was painting him at the same time as the horse, but for the sake of not switching back and forth between the two, I thought I’d wait until the point that the two “almost finished” models come together.
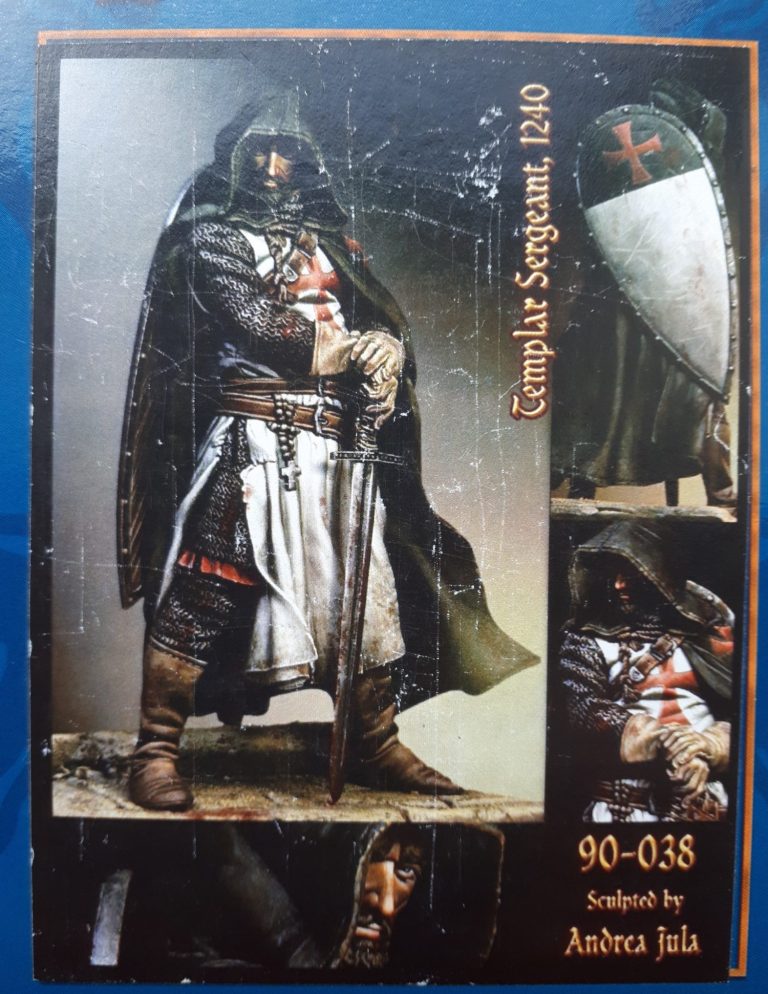
In these shots the box art is shown, superbly Painted by Diego Ruina to a very high standard and gives a good idea of what could be achieved with the kit.
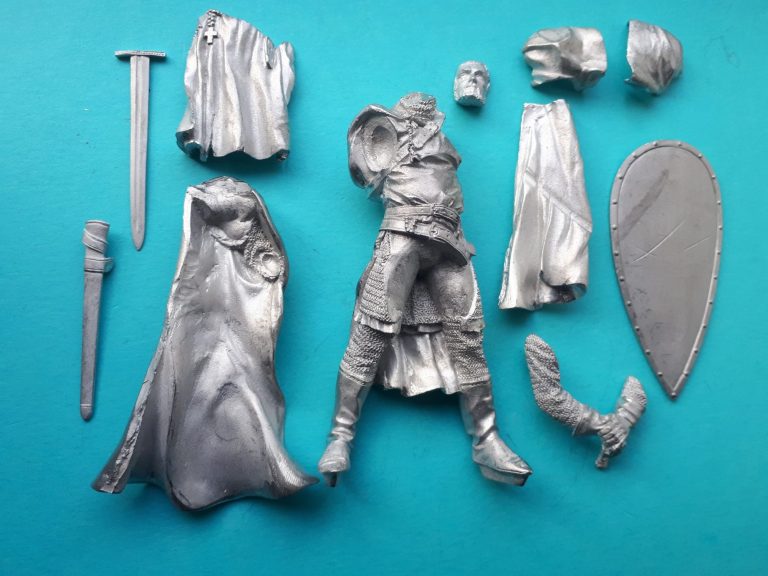
Photo #20, shows the parts for the figure, and it’s the usual very high quality metal castings from Pegaso, logical and in parts, very clever split that helps avoid the necessity for filler, not to mention decent sized location points that negate the need for strengthening pins.
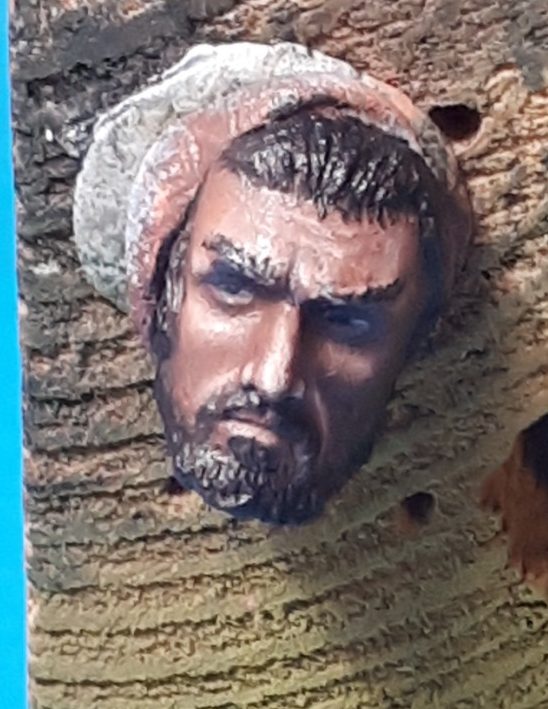
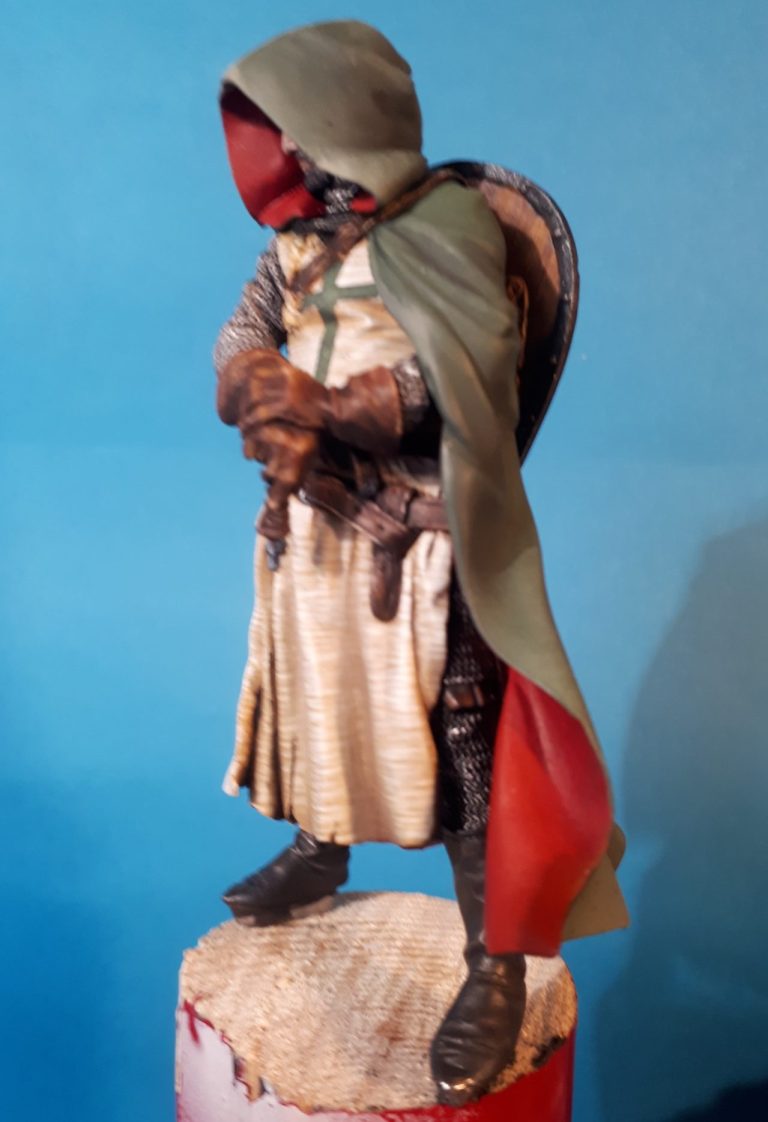
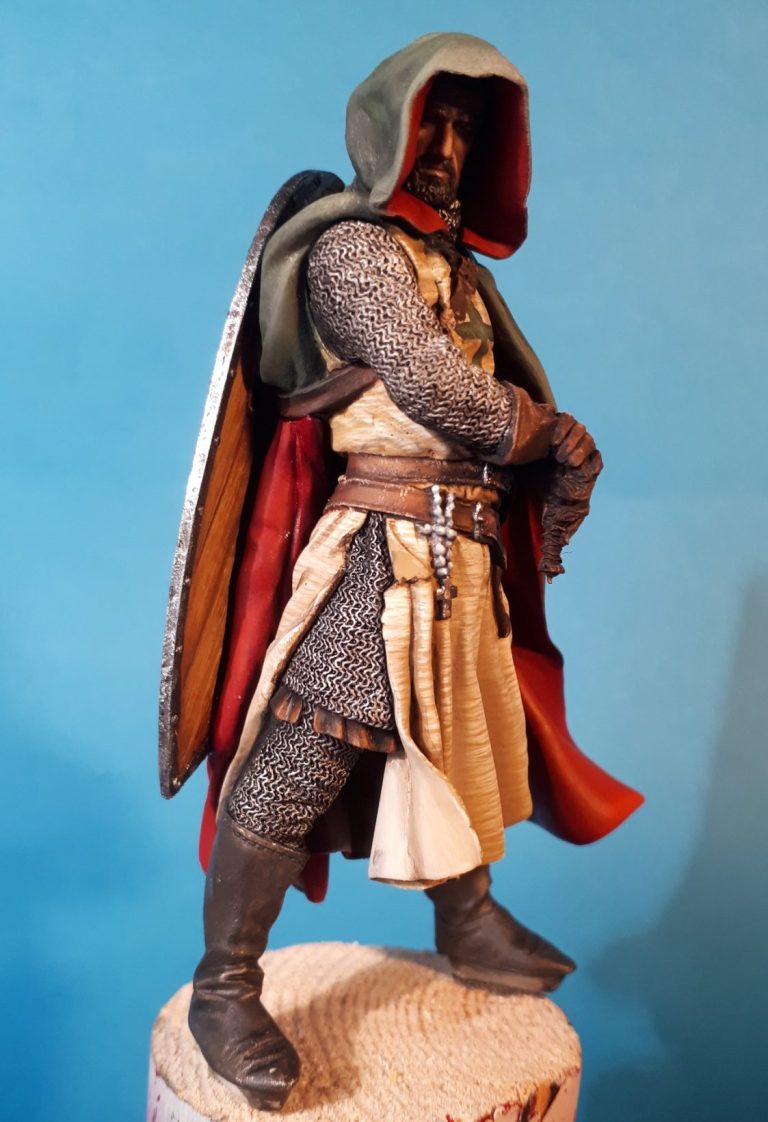
Photo #21 shows the face fully painted. The usual mix of Mars Brown and Titanium White oils over MP Flesh coloured acrylic undercoat.
I’ve added dark hair and a beard to frame the face, although once set into the cowl of the hood, the face isn’t easily seen. A shame, ‘cos it’s a nicely sculpted face.
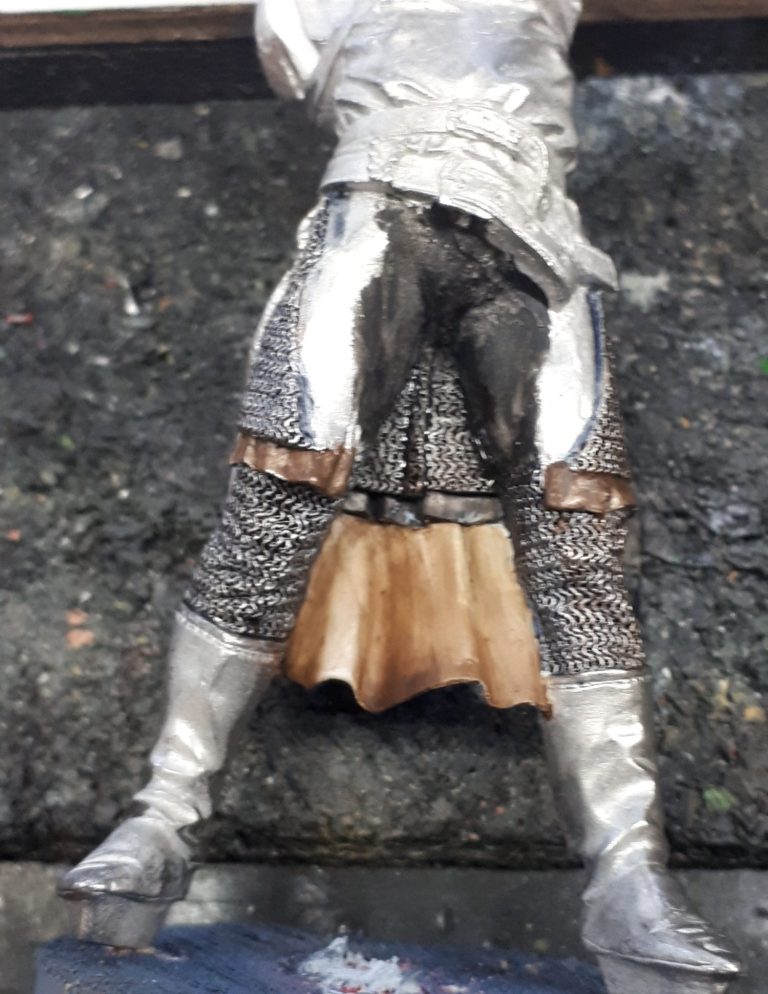
Photo #22 I’ve drilled up into the bottom of the feet and installed pins to attach the figure to a block of wood that I used as a holder whilst painting, and before adding any other parts to the figure I’ve painted the inner sections of the surcoat, the mail on the legs and the leather lining of the mail.

Photo #23. The section of surcoat that is seen here glued in place on the front of the figure, and which covers a lot of the painting that you saw in the last picture, has been primed prior to being fastened in place.
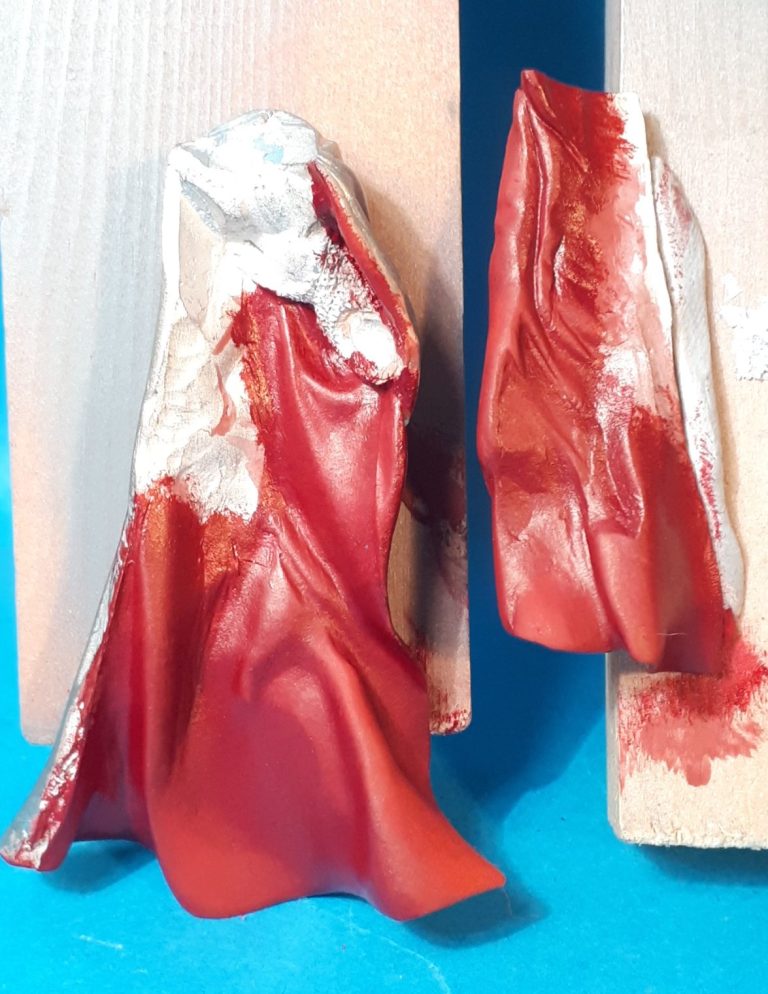
Photo #24. With the horse being mainly brown, I wanted a bright colour on some section of the figure. I thought that the lining of the cloak might be perfect for this, and so once primed, the two sections have been undercoated with a couple of coats of MP Flesh Tone, followed by two further layers of MP Crimson.
All this was allowed to dry fully overnight, then I could add the oil colour, beginning with Carmine ad the shadow colour, and then adding Scarlet to build mid-tones and highlights.
Red oils take some time to dry, even in a heated drying cabinet, so these were put to one side for a week before doing anything else with them.
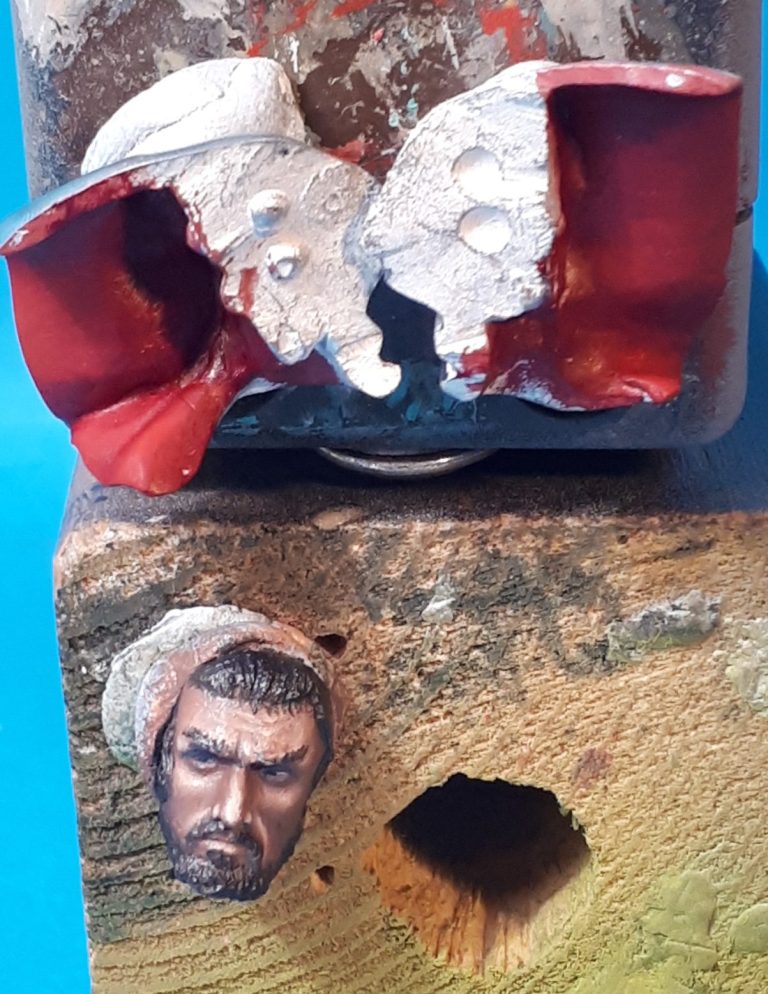
Photo #25 and whilst I was doing the two parts of the cloak shown in the previous picture, I also did the lining of the hood, as seen here.
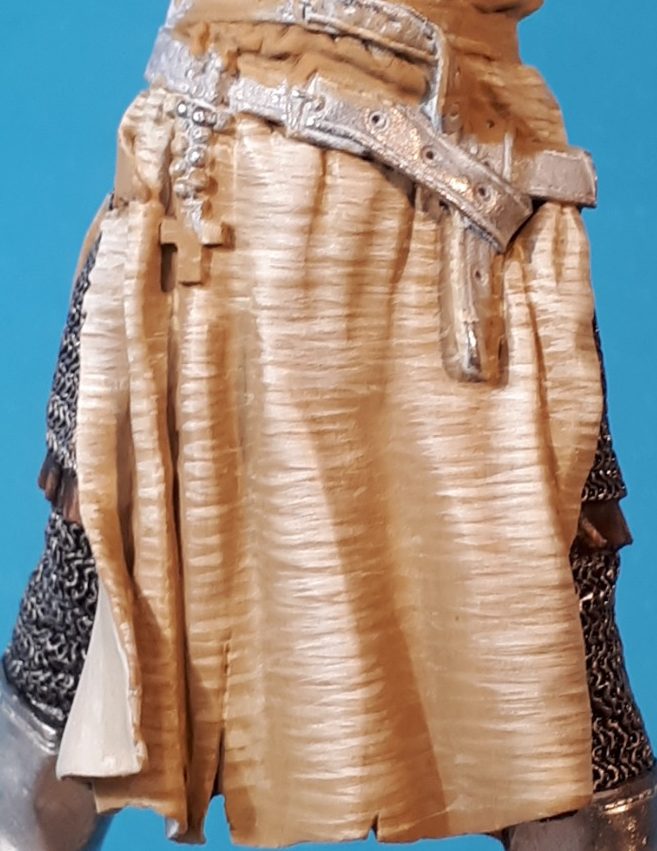
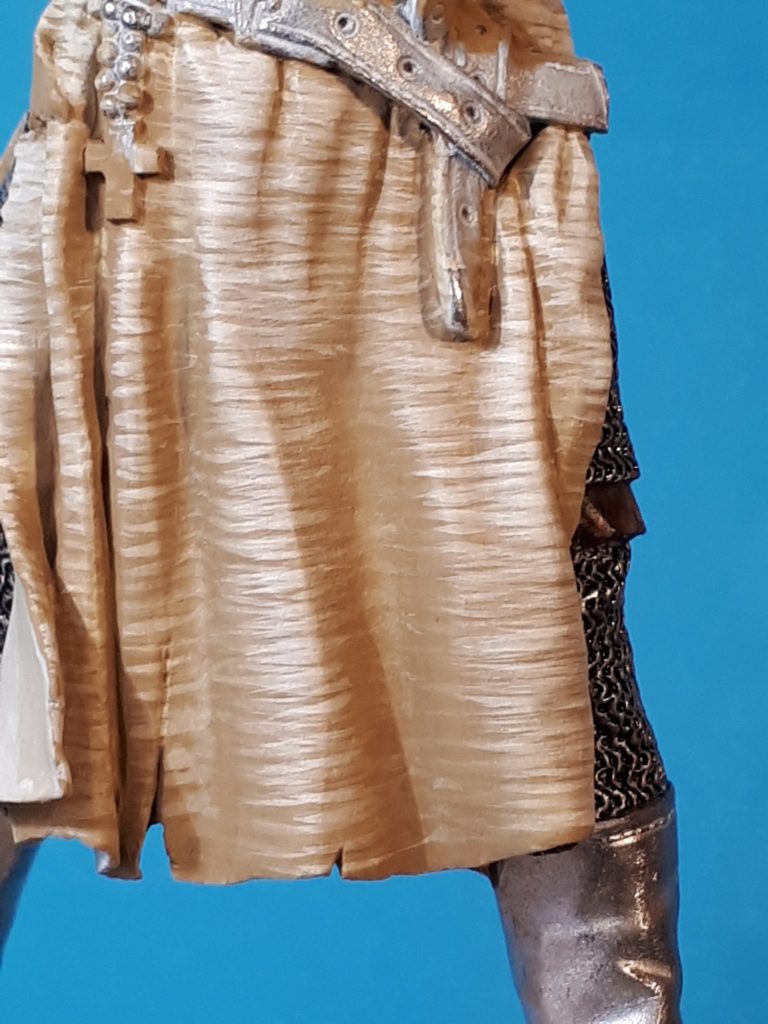
Photo #26, so whilst all that was drying I thought I’d return to the main casting of the figure and begin on the surcoat.
I liked a method that Dave Ashby came up with twenty or so years ago, and which I’ve used a few times for creating the look of rough homespun linen.
it’s a bit of tedious method, but it’s worth the effort and involves moving away from my usual oil colours and just using acrylics.
Photo #27 The method begins with using a fairly dark colour – in this case a dark cream – and establishing a good solid covering – three or four thin layers, and then gradually lightening that colour with the addition – in this case – with white.
Each mix of colour is used to add very thin lines of paint horizontally across the clothing, using four or five layers of each colour and a very fine brush.
The paint is kept thin by adding water, and although each pass is almost invisible, the colour builds up as more layers are added.
Lorem ipsum dolor sit amet, consectetur adipiscing elit. Nulla euismod condimentum felis vitae efficitur. Sed vel dictum quam, at blandit leo.
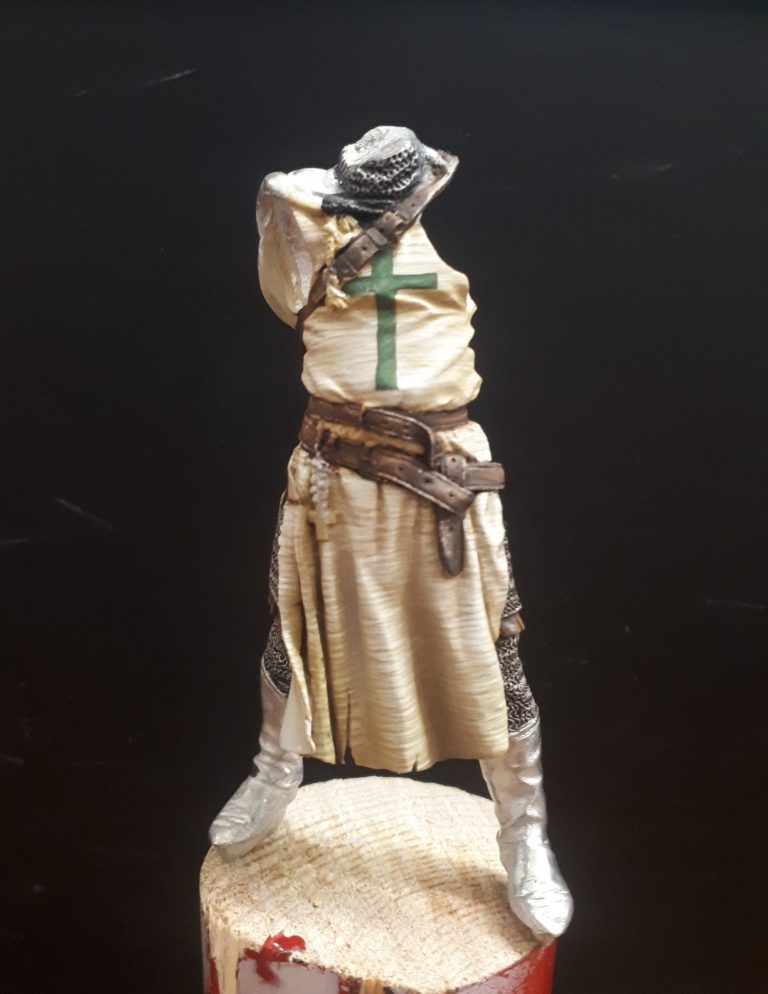
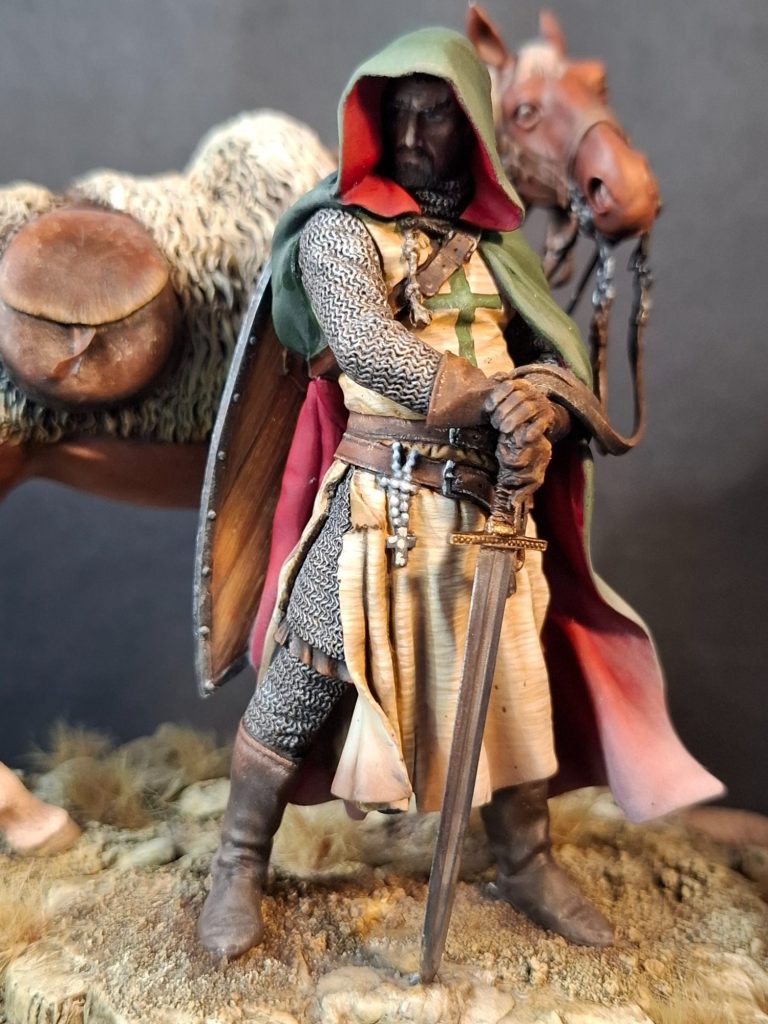
Photos #28 and #29. Here I’ve added the colour to the belts and also a green cross – the sigil of the Knights of St Lazarus.
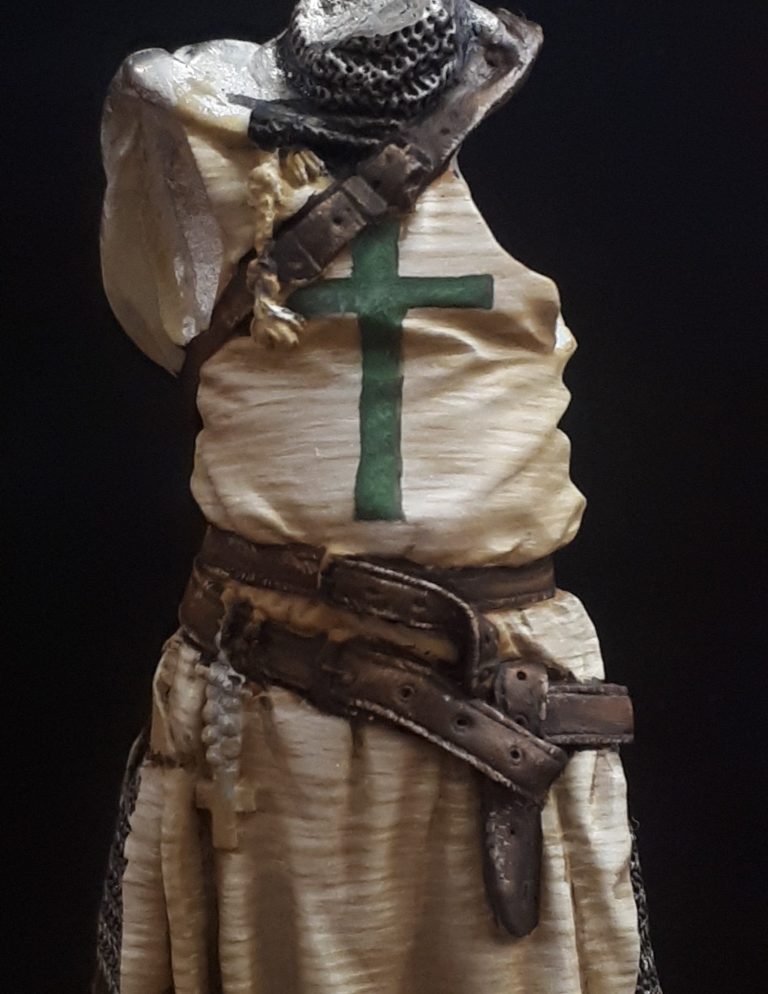
The mail at the neck has been painted in too, and whilst this was going to be a fantasy piece initially, adding the cross gives it that “maybe fantasy, maybe historical” feel.
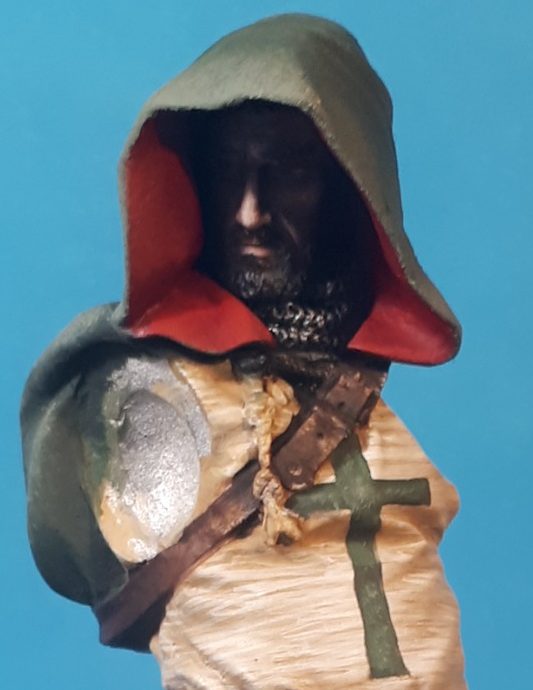
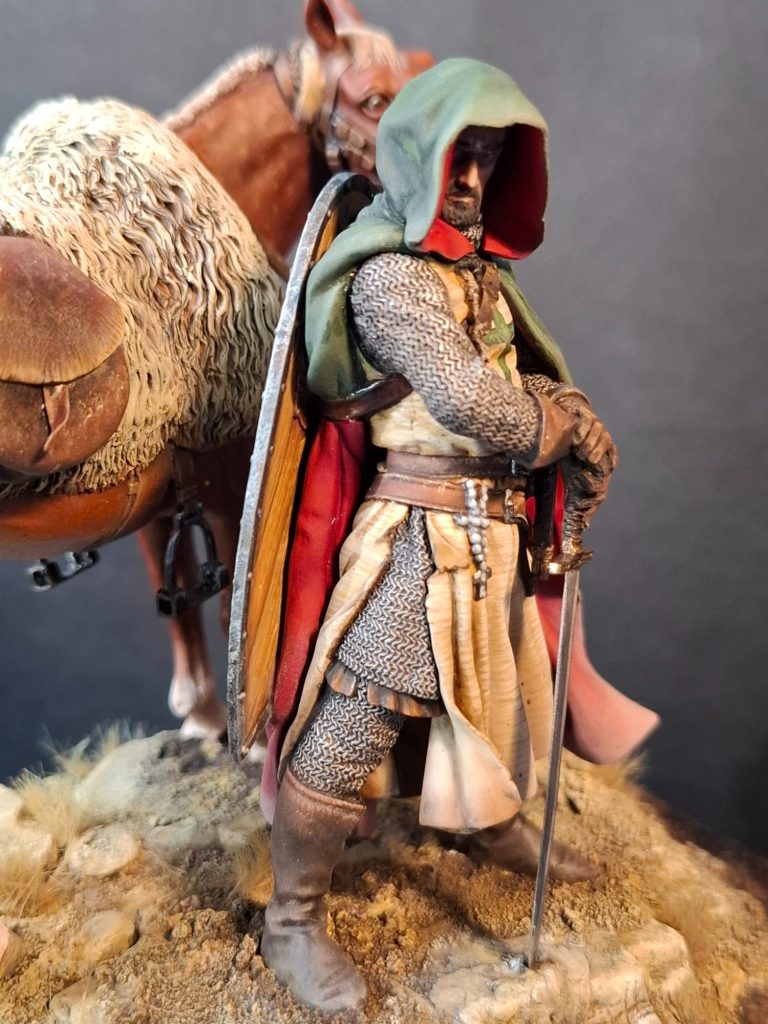
Photos #30 and #31. Here I’ve added the head and top of the cloak.
The face simply sits into the cowl of the cloak, and then that sits onto the shoulders.
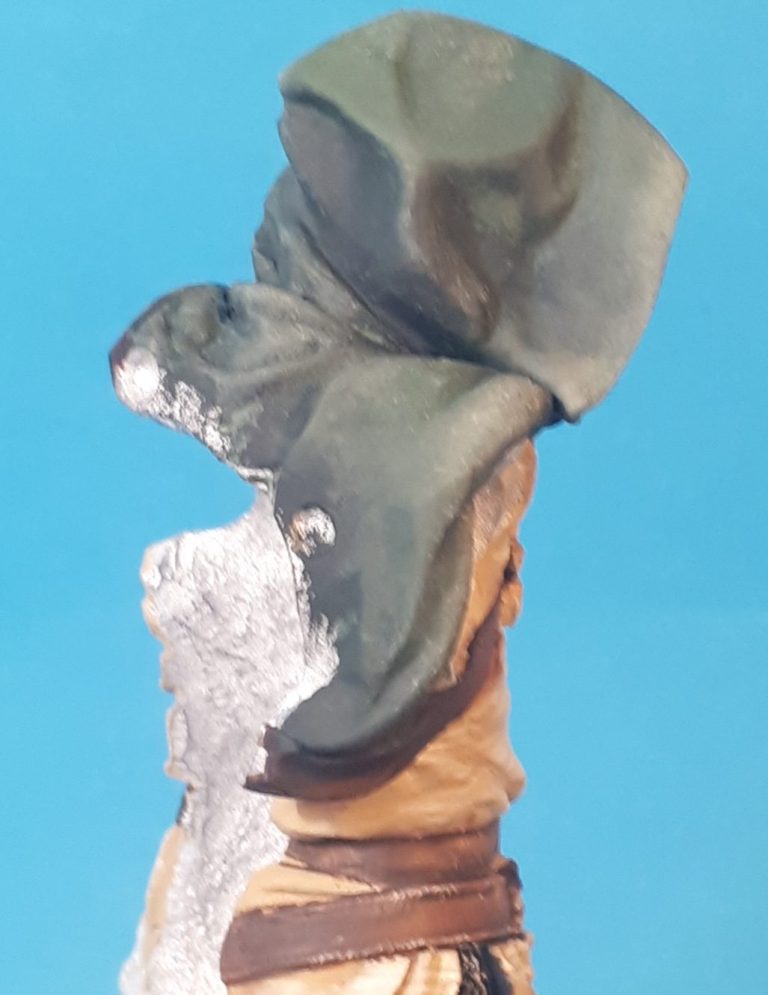
I’ve painted the outer face of the cloak to match the colour of the Cross of St Lazarus, although the main parts of the cloak have yet to be glued in place in these pictures.
Photo #32 and I’ve made inroads on the shield face.
This is the off white backing for the St Lazarus cross, and I’ve established a good solid covering of white acrylic, which I’ve then added a very pale mix of green oil colours to – Olive Green and Titanium White.
This then has more green added to what will be the lower edge when it’s fastened to the figure’s back, and some scratches also added with Vandyke Brown.

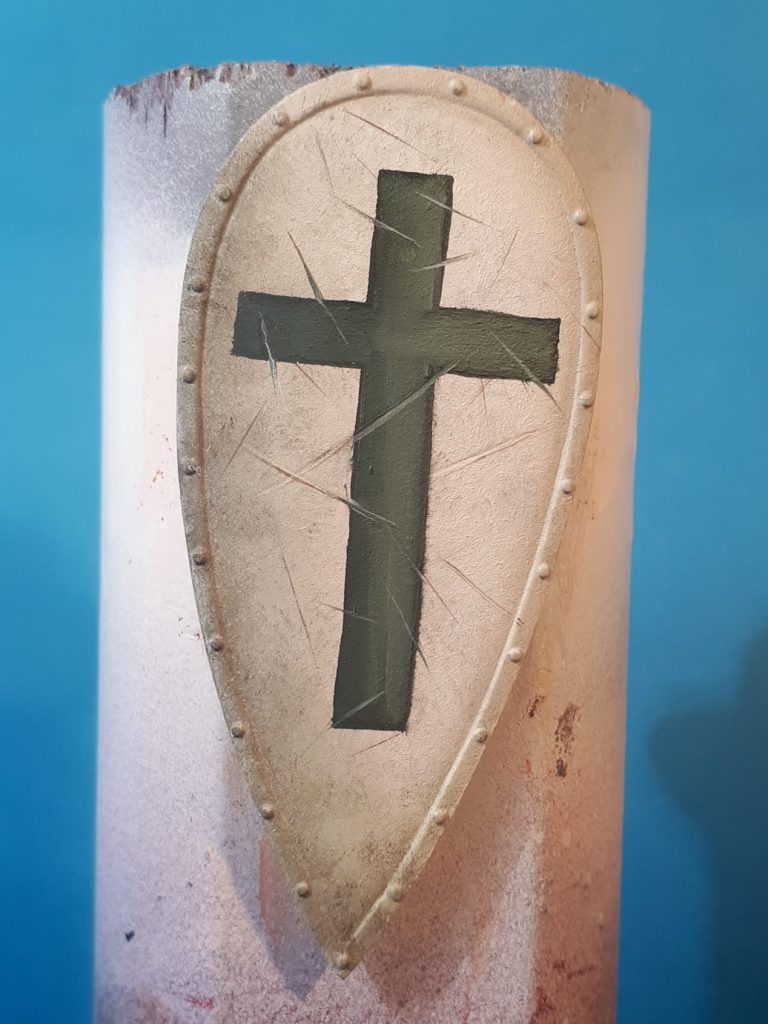
Photo #33 and the Cross of St Lazarus has been painted on, adding the scuffs and scratches that are on the white background to the green cross using paler colours so that the scratches appear to continue across the design.
Photo #34 through to #38 and the figure is nearing completion. The inner face of the shield has been painted to look like wood, the cloak, arms and the shield then added to the back and shoulders of the figure.
Once the outside green of the cloak had dried fully I added Buff Titanium with a nearly dry brush to the lower edges so that the cloak appears dusty.

Photos #39 and #40 and we’re back to the part where we left the horse, that being it loosely attached to the base and now I’ve drilled holes into the groundwork to accommodate the figure.
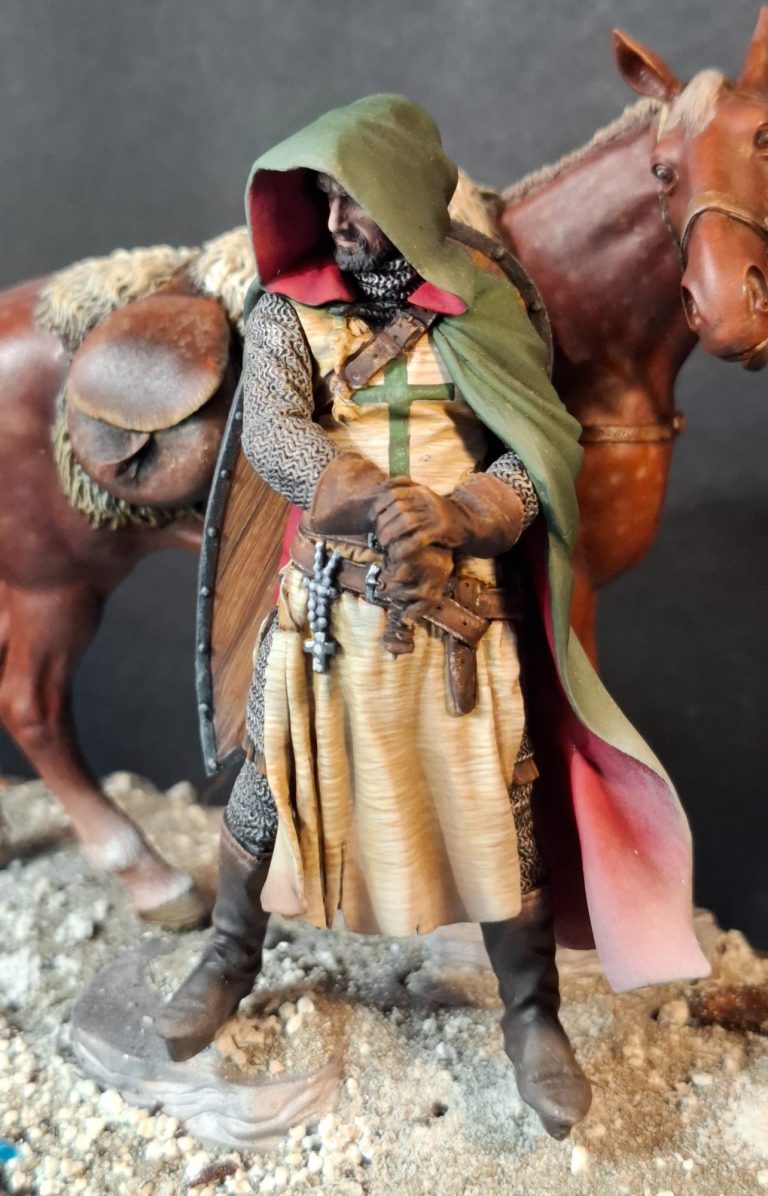
Photo #41 and in the interest of honesty, noting that not all model-making goes to plan, even for the experienced article writer, you can see the feet of the figure hover well above the groundwork due to the metal pegs that are part of the soles of the boots. These will need trimming off and then more groundwork – chinchilla sand and cat litter – added to fill any gaps around the knight’s feet and also the horse’s hooves.
onto the front of the plinth which is now long enough to accept his feet. I temporarily removed the pins in his feet so that I could cut away the plugs that were underneath the boots and that would in usual circumstances have provided locations between the figure and the base provided by Pegaso.
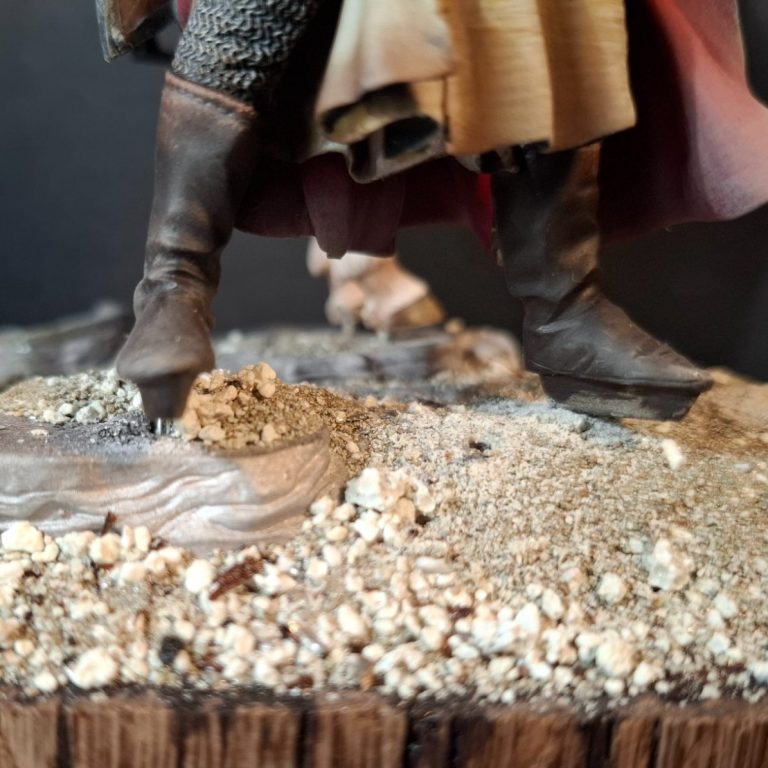
What I haven’t planed for is his sword, which needs to have it’s point “grounded” in front of the figure, so more putty will have to be added – and I’ve painted the bit I’ve added so far really well, darn !

Photo #43.At the suggestion of a friend – Paul Dobson – I’ve cut the reins and draped them over the figure’s left arm, adding the separated end under the arm.
The reins are moulded quite thickly, so I thinned them down quite lot by scraping them with a sharp scalpel. This made them look better and also a lot easier to bend into shape. The lead rein is draped over the horse’s shoulder.
At this point I’ve undercoated both sets of reins with black acrylic prior to fastening them into position, this allows for any really difficult place that might be unreachable with a brush holding the final colours once the glue has been applied.
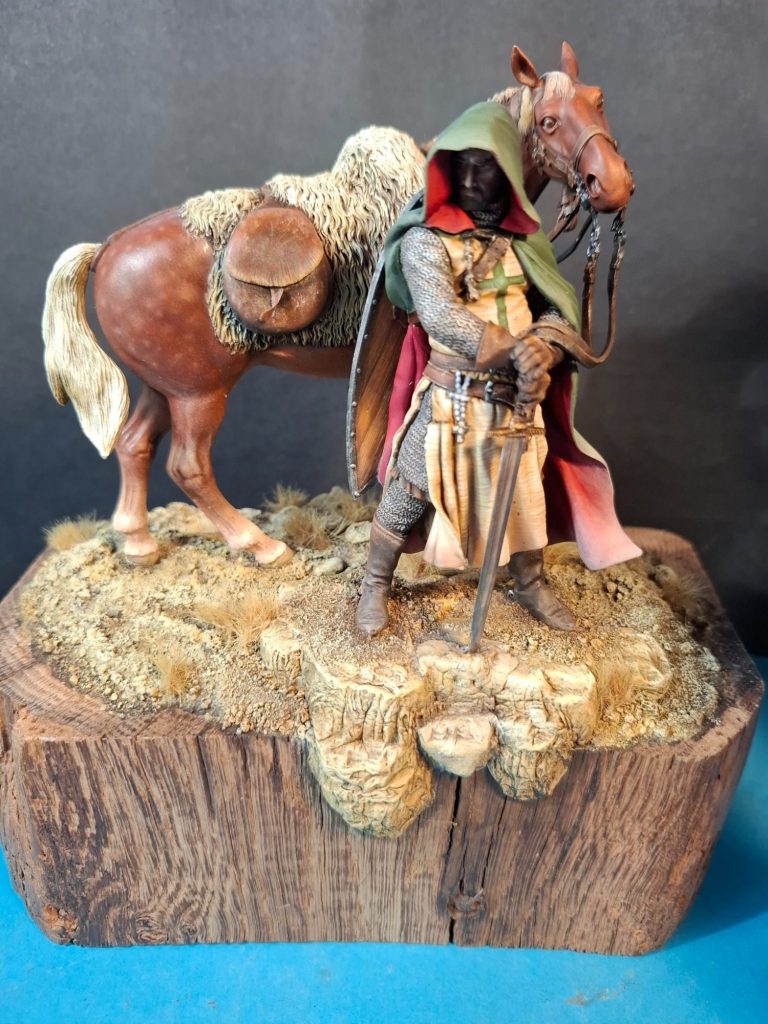
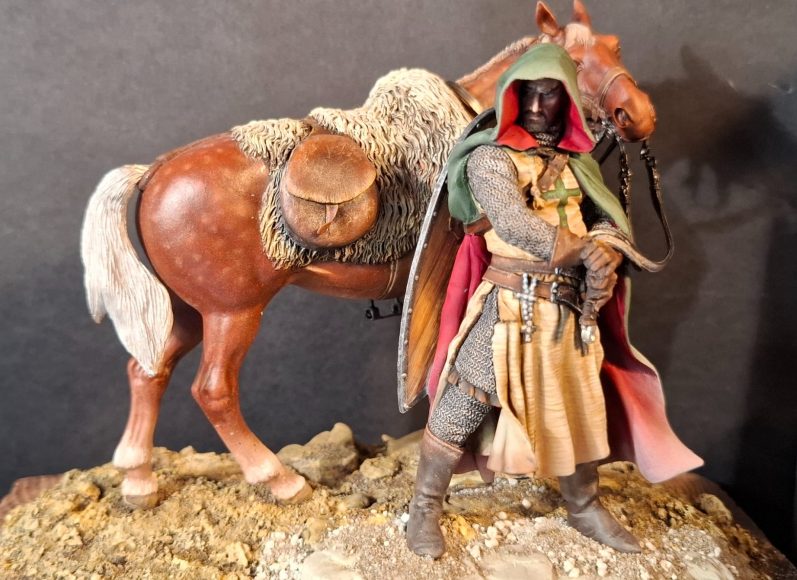
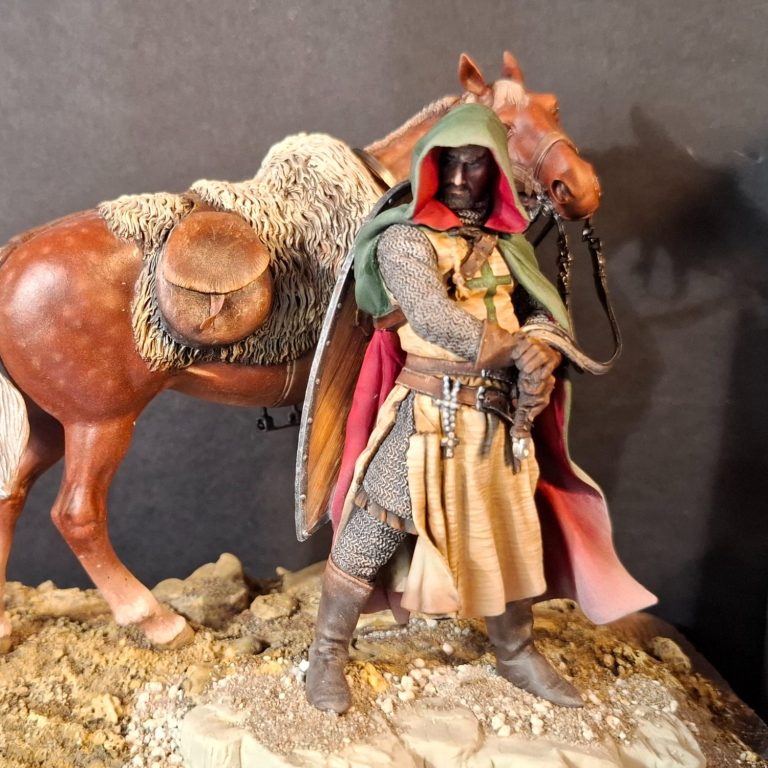
Completed shots
The sword was polished, given a couple of thin coats of Tamiya Smoke lacquer and then glued in place, then Magic Sculpt added so that it rested on the ground.
The reins were painted with leather coloured oils, and once dry I went around the horse adding Darkstar Steel acrylic, followed by their Silver, to all the buckles on the horse’s tack.
The tail was painted, although it didn’t quite match the colour of the mane, and needed a couple of washes of Yellow Ochre to bring it in to line.
This might seem a fairly simple composition, but there’s a lot of detail to check for any mistakes or missed areas, and this was done once the model had dried for a few days.
Final thoughts.
Two excellent kits from two reliable companies, but combined make a very heavy model, especially as I’ve grown used to handling resin kits that are so much lighter.
It’s heavy enough that I feel I should put a warning sign with it if it’s going on the competition bench as I don’t want someone to injure themselves picking it up, or for that matter, damaging it because they’ve underestimated what it will weigh.
Am I pleased with the overall look of the model ?
Yes, but I think I’ve been looking at this for way too long - in some ways avoiding finishing it almost - because there’s been other things that I wanted or needed to paint instead.
It’s a long while since I’ve done a mounted figure in a larger scale – about fifteen years I think, but this has made me consider getting another Pegaso, Poste Militaire or Andrea Miniatures kit out of the loft and onto the bench.