
Three heads are better that one
White metal flat, approximately 1/9th scale
Painted in 0212
I’ve never really understood why flat figures aren’t more popular, although they can be difficult to source sometimes if you’re after a particular theme, there is a fair range available, sometimes is sets that can be painted up to look very impressive indeed.
I find that I learn something new each time I paint a flat, something that I can take back to the “round” figures I normally paint, so there’s the option that you can learn something along the way because the process is different from painting a conventional figure or bust.
If you’re not familiar with the concept of a flat figure or bust, the idea is an old one taken from the days of tin soldiers that were produced as toys hundreds of years ago. The casting is about 3 or 4mm thick and the idea is to paint it so that it appears three-dimensional.
Flats are often displayed on black backgrounds in photo frames, or sometimes set into deeper “box” frames to create dioramas of vignettes.
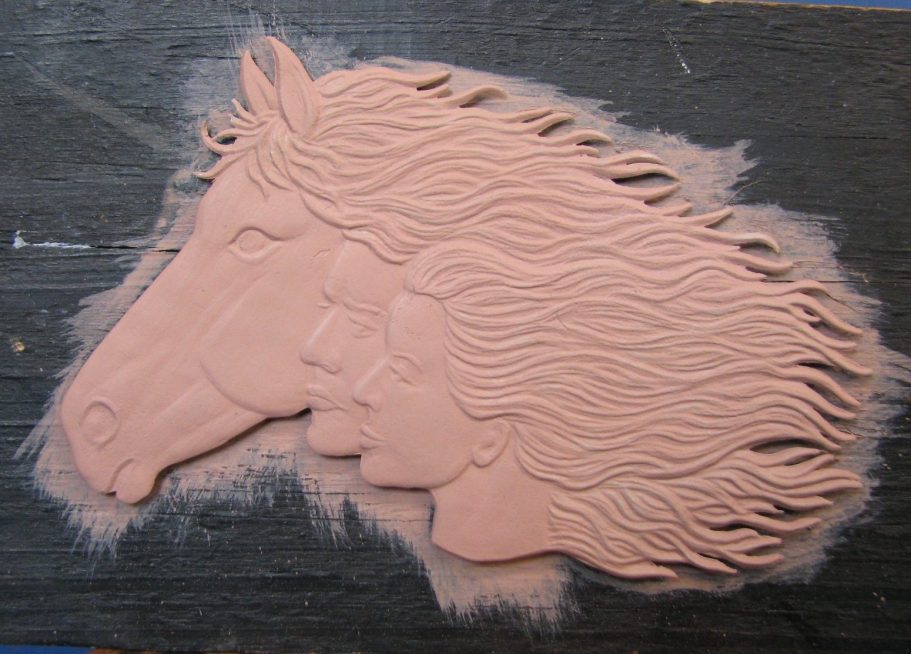
Very few flats are moulded in resin, the normal production being done in White Metal. The only mould lines you’re likely to have to deal with is any flash around the outer edges, and in the case of this flat, small webs of metal between the tips of the flowing hair.
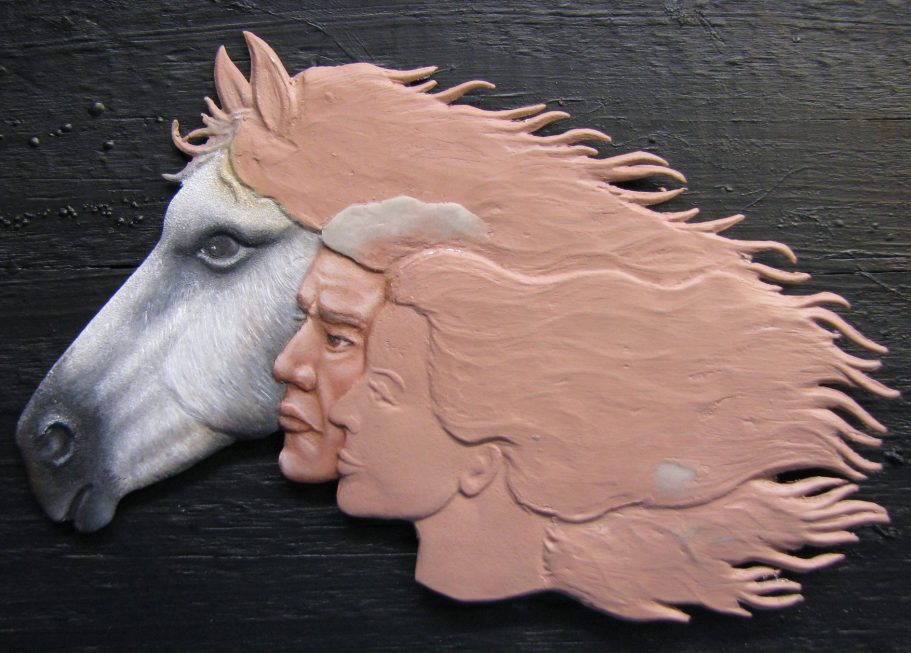
The cleaned up piece is shown in photo #1, although there was a minimal amount of work needed to get it to this stage.
The engraved details are quite deep on this flat – well, in relation to others I have unpainted in the grey army.
So deep in fact, that I considered filling in the section of hair that flows out to the right, to flatten it out almost completely. But for now, I left it alone and began painting the faces.
It seemed logical to start with the horse, as it is topmost of the three and also should seem to be furthest away from the viewer.
In Photo #2 I’ve primed and undercoated the whole flat with several coats of flesh coloured acrylic,
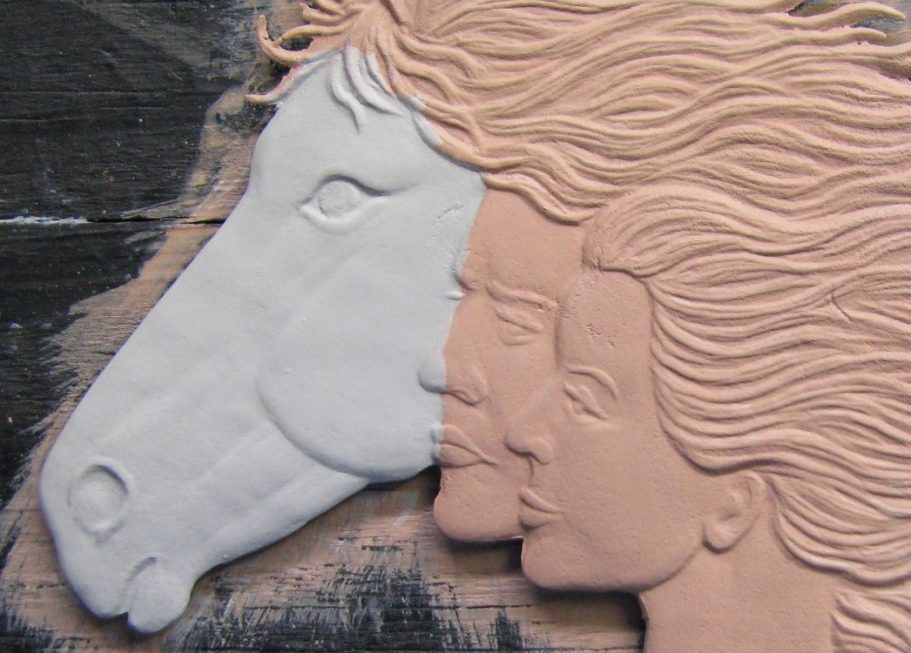
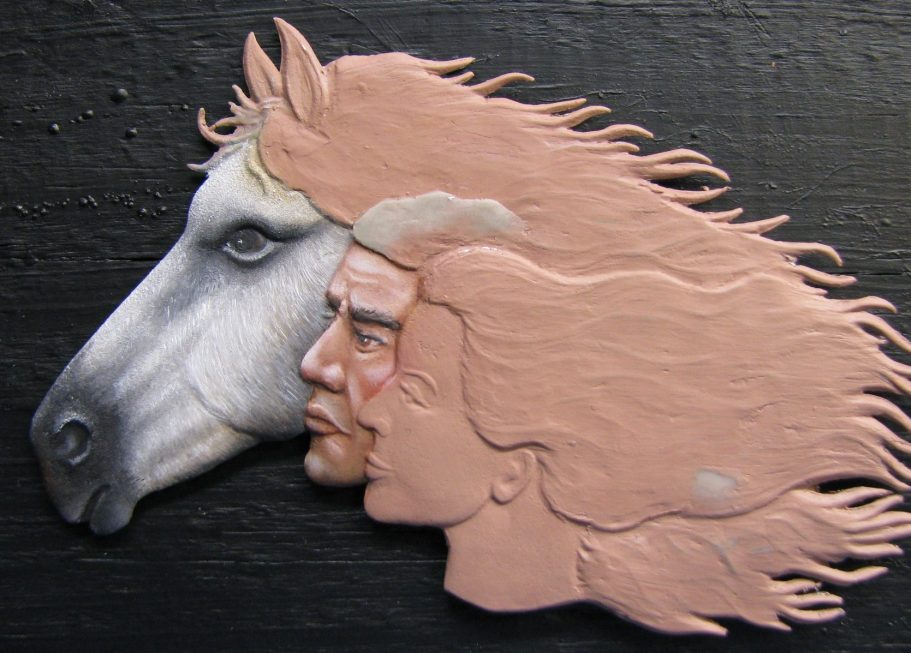
and moving to photo #3 I’ve then added a couple of coats of a very light grey acrylic to the horse’s head.
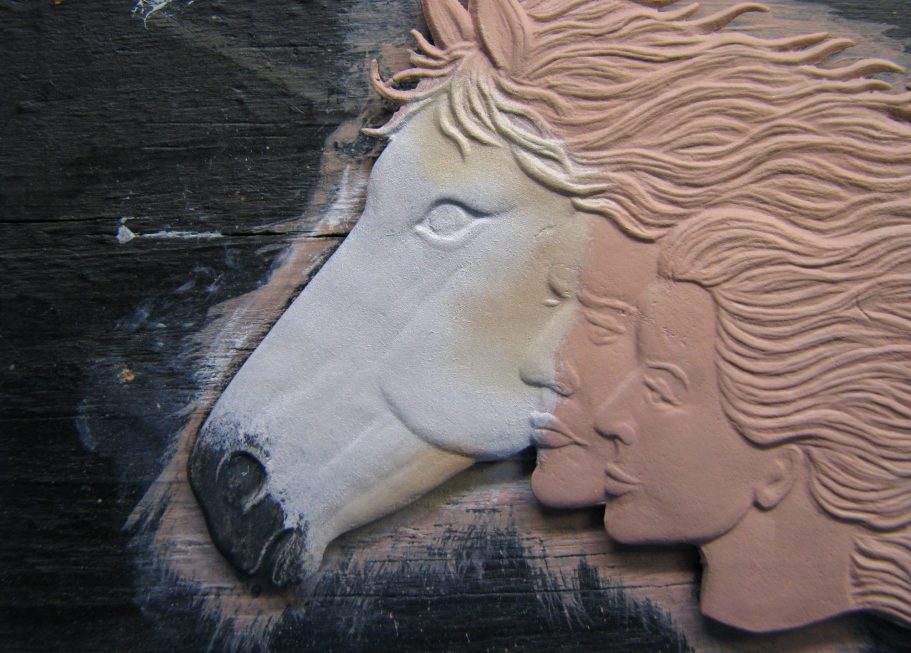
Photo #4 shows the addition of the oil paints, using an all over coating of Titanium White, and gently blending in a tiny amount of Mars Yellow under the chin and around the cheeks.

I’ve also added some very dark grey to the muzzle and around the eyes, using a soft brush to stipple the grey into the white a bit – photo #5.
Using what oil paint there already is on the model, I extended the grey colour out from the eye area and the muzzle, giving the face more definition – see photo #6 – and also to begin marking in the individual hairs on the cheeks, brow and over the nose.
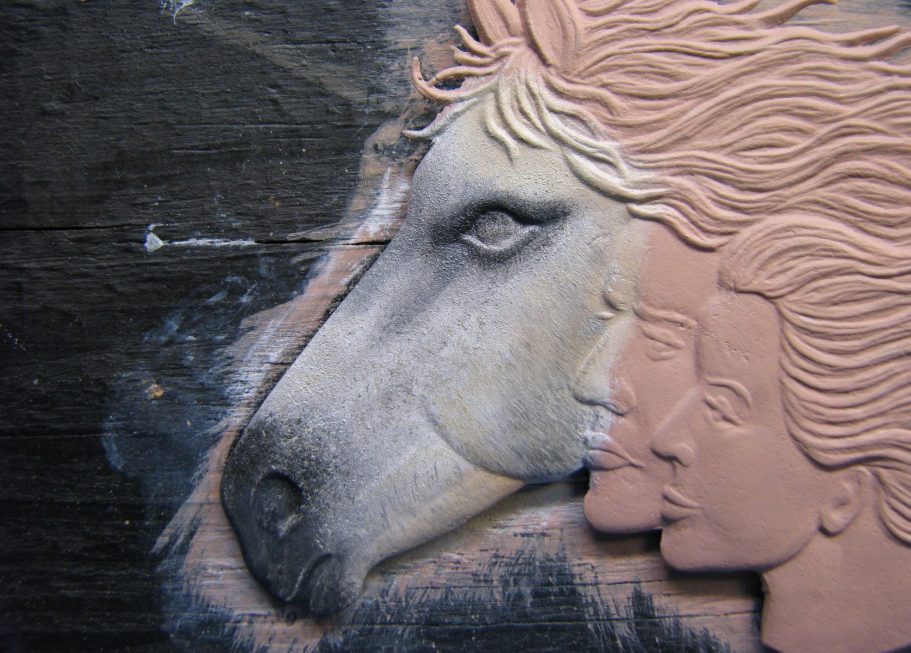
This was enhanced by adding more Titanium White with a fine brush to top off the highlights of the individual hairs, and then using a dark grey colour on the fine brush, to bring back the shadow colour’s definition in certain areas – photo #7.

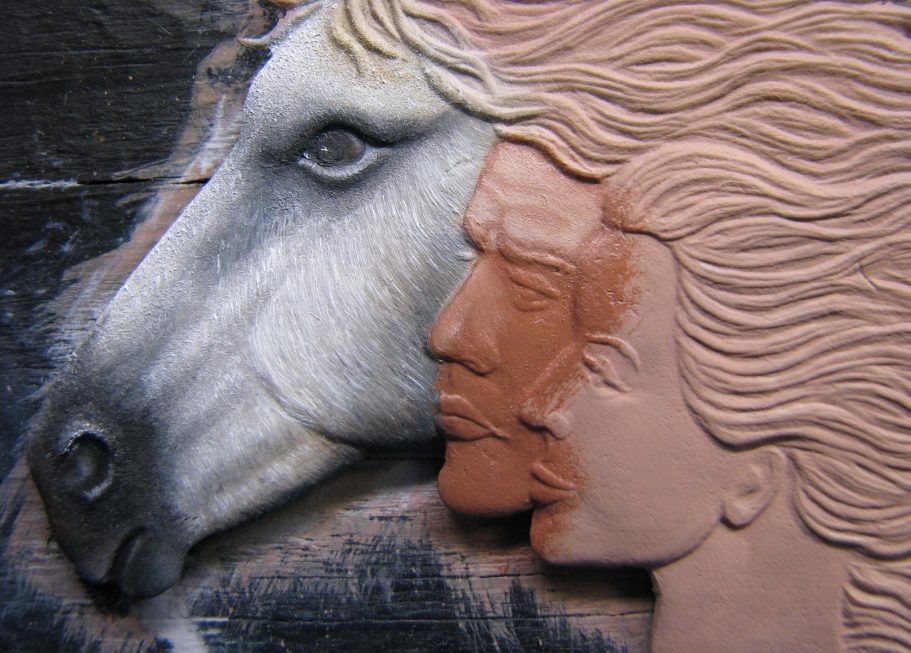
In photo #8 you can see that some further highlighting has taken place on the horse’s head in general, and in particular some work on the muzzle and around the nostrils to give them more definition.
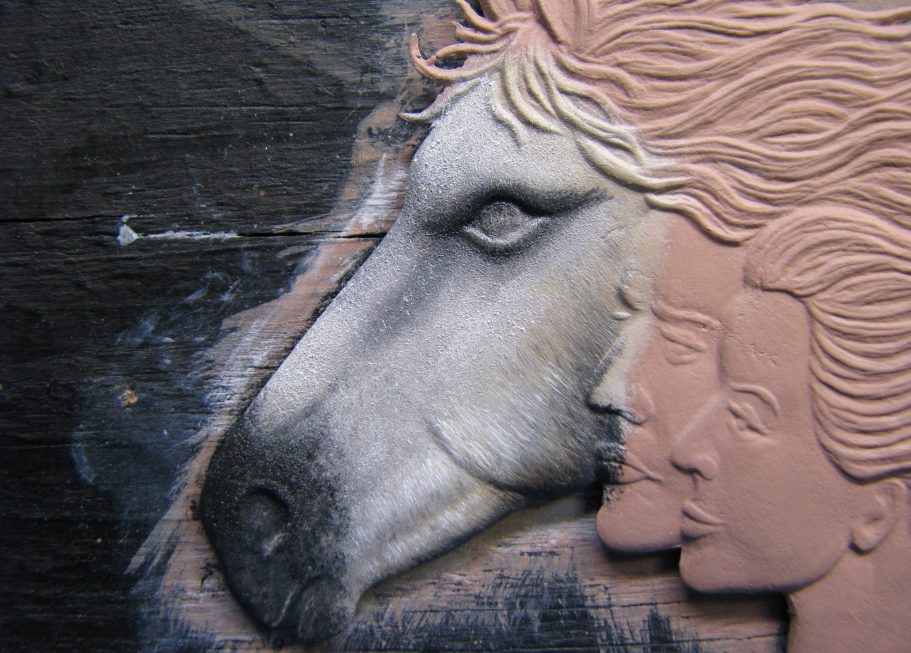
The thing that really brought it to life though is the addition of the eye – photo #9.
A minimal crescent of off white was added to the very back of the eye on the right hand side as you look at it, with a very dark brown added for the iris and Mars Black for the pupil.
To make the eye appear wet, a small catchlight of Titanium White was added towards the left hand side of the eye as you look at it.
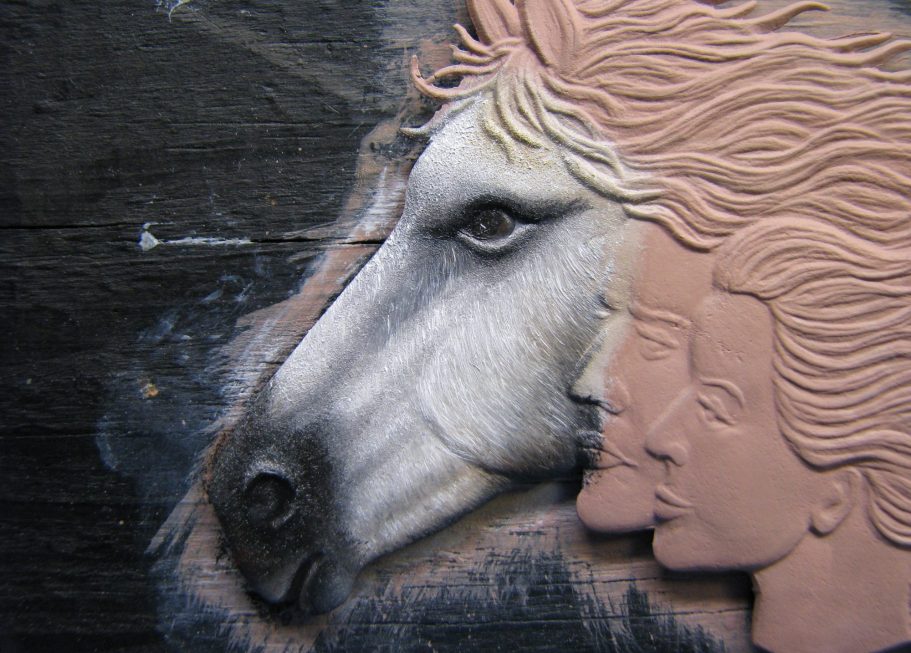
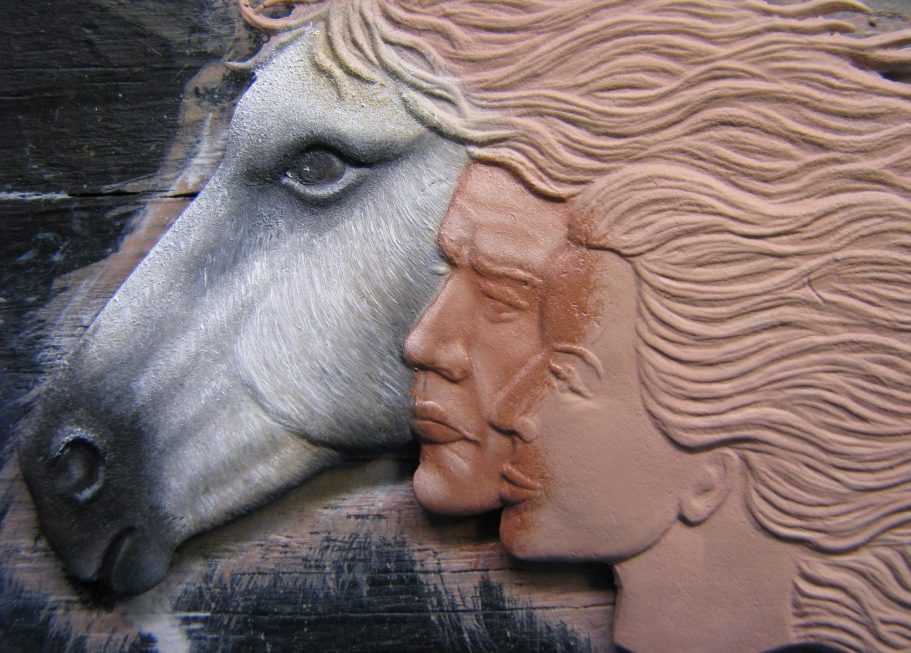
In photo #10 I’ve pulled the camera back a little to view all three heads, and neatened up the man’s face, which will be the next area to be painted with oils.

Photo #11 shows the beginning of this process, mixing Mars Brown with some Titanium White to get a suntanned flesh tone that is laid on the whole of the man’s face with a large brush, and then stippled gently to remove excess paint and to get rid of any brush marks.
The closer look in photo #12 shows that more Titanium White has been added to the forehead, beginning the process of building “worry lines” in that area.
Some of the flesh colour is creeping onto the woman’s face, but that can’t be helped and isn’t something to be bothered about right now.
So long as no paint gets on the horse’s head, as the white areas there will stain easily, which would be very difficult to repair and might even cause the flat to need stripping of paint completely and the whole process starting over from scratch.
Back to the photo’s though, and in photo #13 the lighter colours have been extended to the lower are was of the man’s face. The Titanium White is added in very small dots or fine lines with a small brush; then a larger, clean brush is used to blend the lighter colour in to the paint that is on the surface and, being oils, is still wet.
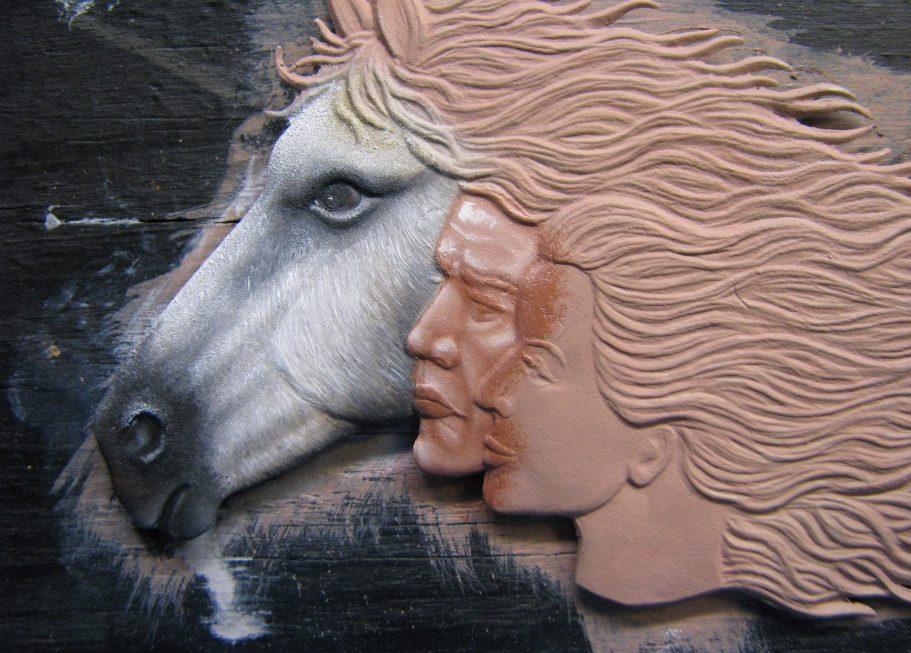
Photo #14 shows the final highlights being added to the man’s face,
and in photo #15 I’ve added the eyebrows and lips, the former with a dark brown, the latter with Mars Brown.
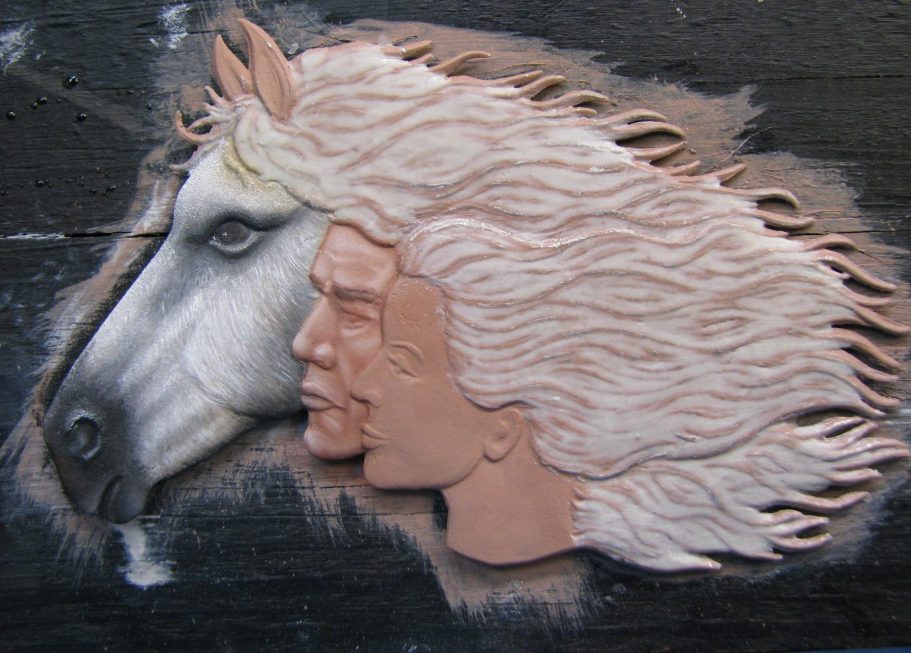
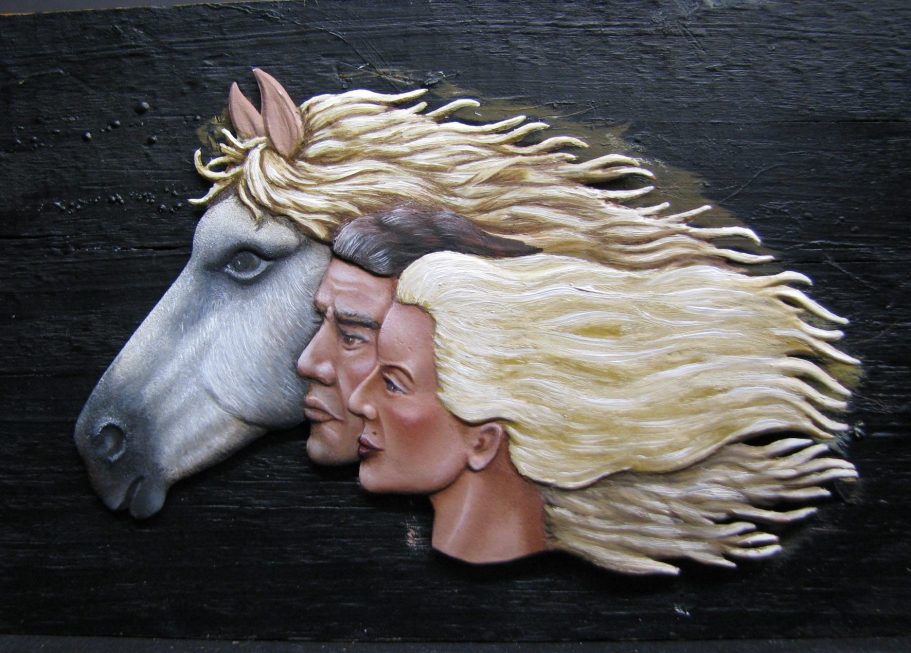
Photo #16 shows an overview of the three heads, and again I’ve added the acrylic flesh colour on the woman’s face in readiness for painting her.
In this shot I’ve also played with lightening the hair areas to see how they will develop, and I am really not liking that engraved detail.
So, in photo #17 I’ve added a thin layer of Magic Sculpt to the hair areas, defining what I perceive will be the separate sections from each head, but filling in the detail that I disliked so much.
I also added the man’s eye at this point, using similar colours to those used for the horse.
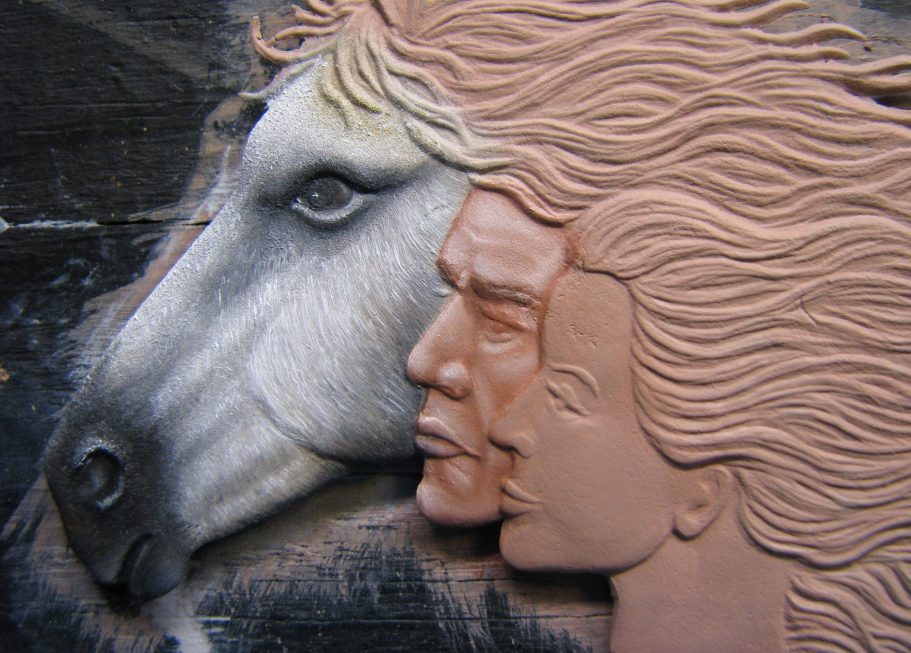
Although not much appears to have been done in photo #18, I have taken the opportunity to look at the balance between the two heads that have been painted up to now, and decided to darken the eyebrow on the man to make them stand out a little bit more.
The reason for the darker skin tone for him will become apparent when the woman’s face is painted, and it is one of the few opportunities I’ve had to be able to demonstrate so well that there is a significant difference needed to render a man’s skin colouration in miniature, compared to that of a woman’s.

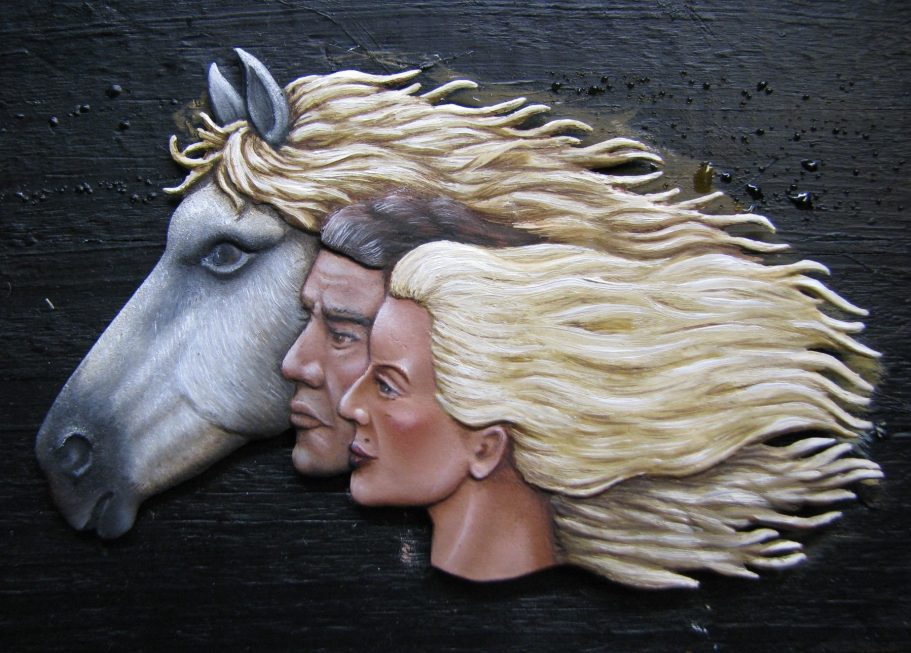
The process begins in photo #19, where I’ve mixed a much lighter flesh tone for the basis of the woman’s face, this has had some highlights added, but with no lines on the forehead, just a smooth change from dark to light,, higher cheekbones, and whilst there is a portion of the neck to play with on this part of the flat, the colour transitions are to remain smooth and gradual.
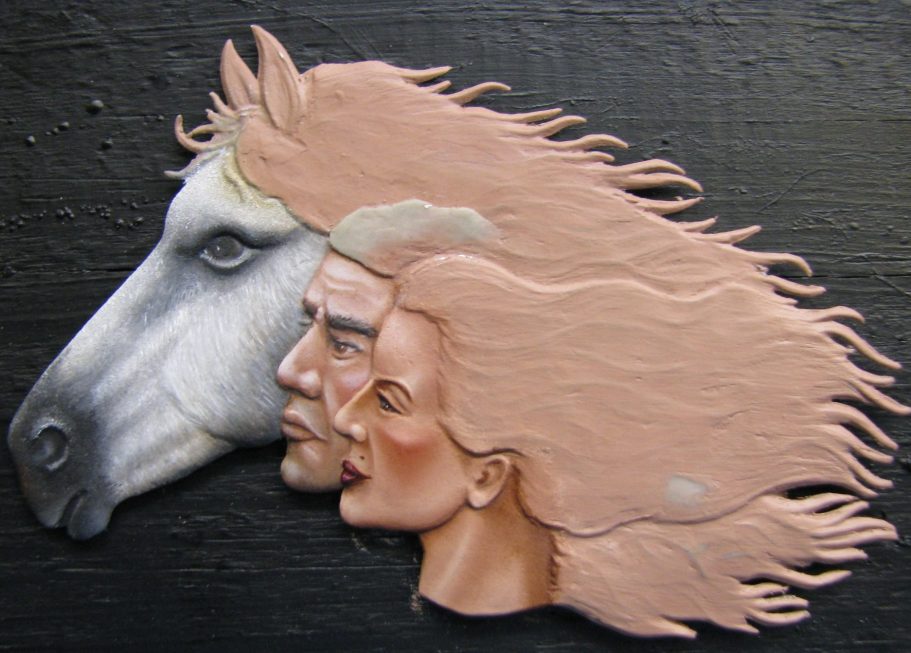
Photo #20 and her face becomes much more interesting , with the addition of thin eyebrows that those added to the man, a light blush added to the cheeks by blending in a very small amount of Carmine to the dry flesh coloured oils already there.
I did paint on some very bright red lipstick, first with a mix of Carmine and Black for the outline, then filling in with just the Carmine, and adding highlights with the initial flesh colour.
Now to tackle that hair and the horse’s mane.
This is the part I was a bit worried about in that I wanted similar colours, but for the distinct differences in whose hair was belonging to who to be easily seen.
That plan went out the window pretty quickly, as the man’s hair just didn’t look right as a blond, but that’s getting much too far ahead of the photos.
Photo #21 shows the horse’s mane being completed, the beginning of this was a mix of Mars Yellow and Raw Umber oils being added to the whole area, then gradually lightening it with Mars Yellow additions, and finally mixes of the Mars Yellow and Titanium White, then moving to pure Titanium White for the highest areas of highlight.
I added the paint with an oldish brush, almost in a combing motion, allowing the brush hairs to split up as it was loaded with paint, and so that when applied, the hairs of the brush, left distinct tracks of where they’d been, thus leaving an effect like fine hairs.
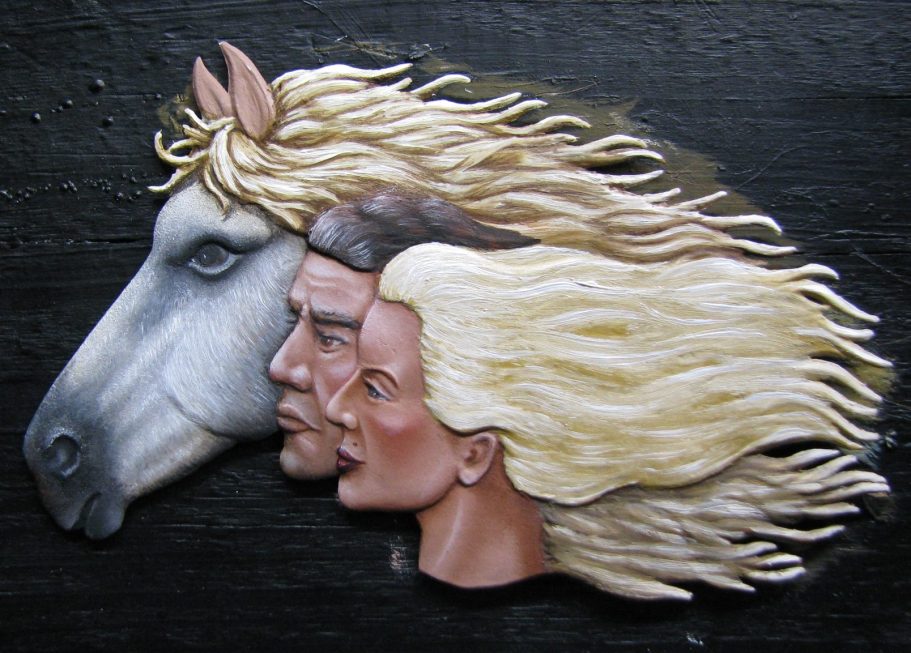
At this point I did try painting the man’s hair in a similar set of colours, but it just didn’t look right – in regard to his complexion, the relationship the colours had to the Horse’s mane, and that his hair section is relatively small compared to the size of the horse’s and the woman’s.
So I repainted the Man’s hair with a very dark brown, adding some highlights, but keeping the overall colour vastly different to the colour of the Horse’s mane that was already finished.
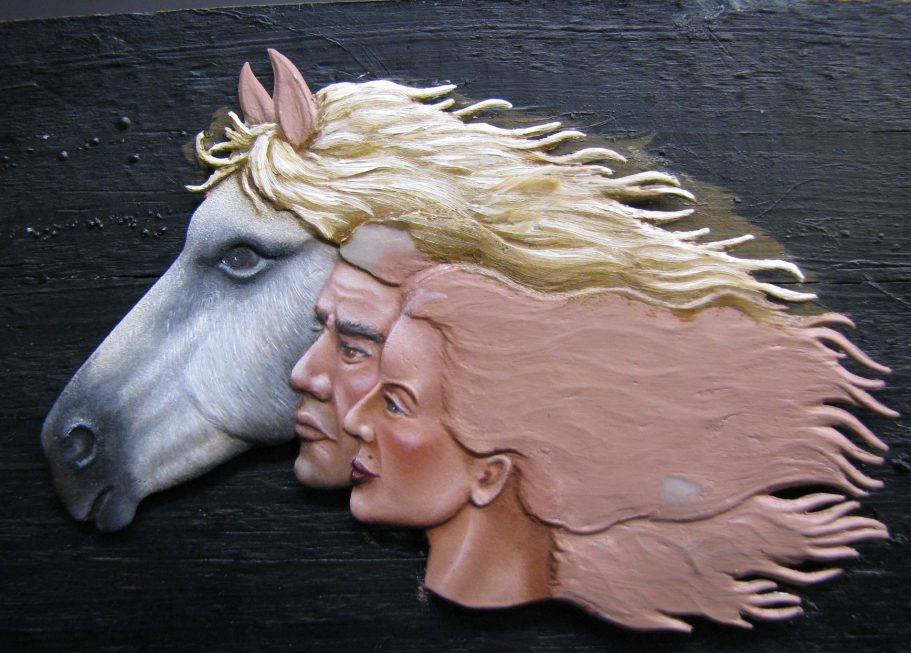
Photo #22 shows the Man’s hair having been completed along with the much lighter blonde of the woman’s hair too. And this is where I think the flat has a bit of a problem.
The hair behind the woman’s neck just looks odd to me. Hair doesn’t grow like that from the back of a woman’s neck, it usually finishes at the line where I’ve finished the lowest area of really light blonde hair, so it can’t be her hair, the flow of the hair would travel in a different direction if it was.
It definitely can’t be the man’s hair either, again, it just looks wrong to be his too.
And it can’t be the horse’s mane for that matter, not with the apparent wind that is causing all three lots of hair to stream backwards in such a manner.
So although I’ve painted it to match in with the horse, I feel that this area should have been removed completely from the flat right at the beginning.
I have left it in place though, but every time I look at it, I want to take a pair of snips and trim it away.
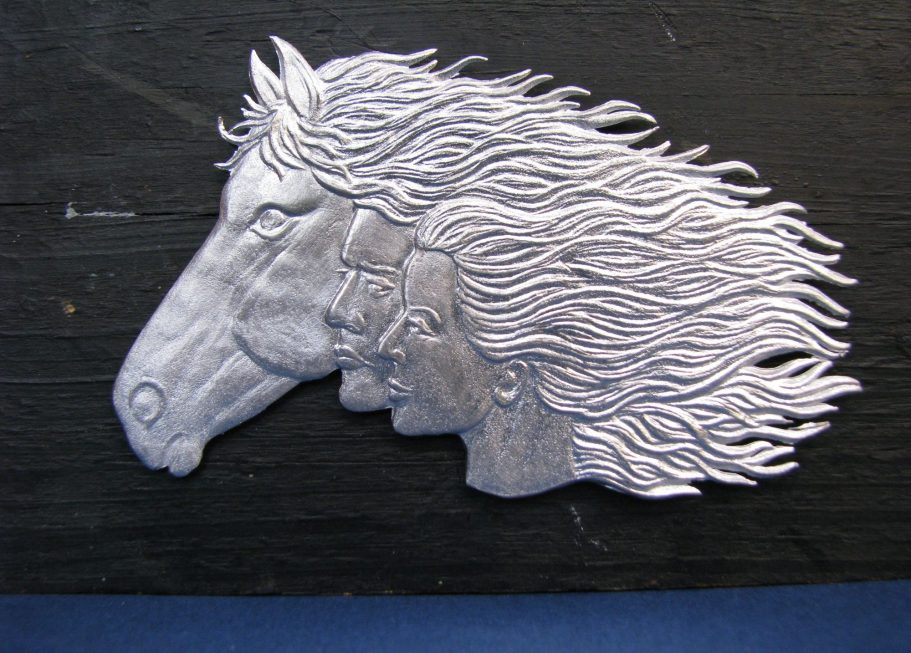
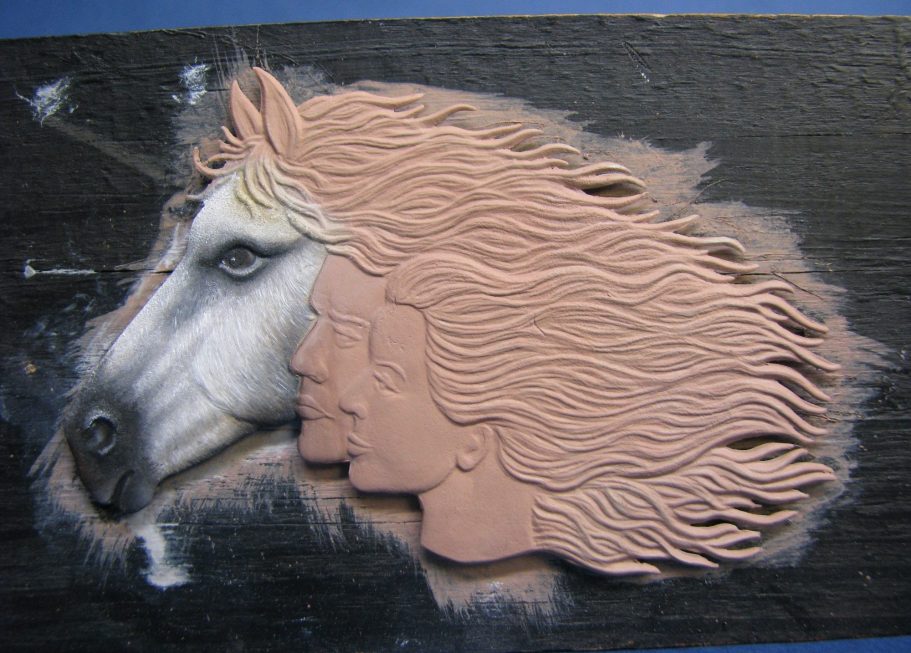
The final shot shows the completed flat, having painted in the horse’s ears and added just a few more shadows to make the three dimensional effect a little deeper.
Final thoughts.
Painting flats is similar, but different to painting round figures. The general rule is that no metallics are used in the painting process, and there’s a lot more latitude to force shadows, and even paint cast shadows that would appear off if done on a round figure.
So there is a lot to be learnt by having a try at painting a flat, a lot of which can be taken back to painting conventional round figures, and some ideas that can improve your painting in general.
I enjoy painting flats, and although sometimes perspective can be a little off on some of them, there are plenty out there to choose from, and plenty of subjects that span historical through fantasy and into sci-fi.
Plus, they take up a lot less space in the display cabinet than a round figure, let alone an AFV or aircraft.
Lorem ipsum dolor sit amet, consectetur adipiscing elit. Nulla euismod condimentum felis vitae efficitur. Sed vel dictum quam, at blandit leo.
Lorem ipsum dolor sit amet, consectetur adipiscing elit. Nulla euismod condimentum felis vitae efficitur. Sed vel dictum quam, at blandit leo.
Lorem ipsum dolor sit amet, consectetur adipiscing elit. Nulla euismod condimentum felis vitae efficitur. Sed vel dictum quam, at blandit leo.
Lorem ipsum dolor sit amet, consectetur adipiscing elit. Nulla euismod condimentum felis vitae efficitur. Sed vel dictum quam, at blandit leo.
Lorem ipsum dolor sit amet, consectetur adipiscing elit. Nulla euismod condimentum felis vitae efficitur. Sed vel dictum quam, at blandit leo.
Lorem ipsum dolor sit amet, consectetur adipiscing elit. Nulla euismod condimentum felis vitae efficitur. Sed vel dictum quam, at blandit leo.
Lorem ipsum dolor sit amet, consectetur adipiscing elit. Nulla euismod condimentum felis vitae efficitur. Sed vel dictum quam, at blandit leo.
Lorem ipsum dolor sit amet, consectetur adipiscing elit. Nulla euismod condimentum felis vitae efficitur. Sed vel dictum quam, at blandit leo.