Painting a Wood Effect with Oil Paints
This is a quick and easy method to paint the back ( or should you wish – the front ) of a wooden shield.
The basic method can be developed to become as complex and detailed as the modeller wishes, and it can be used for painting areas on a model of any scale.
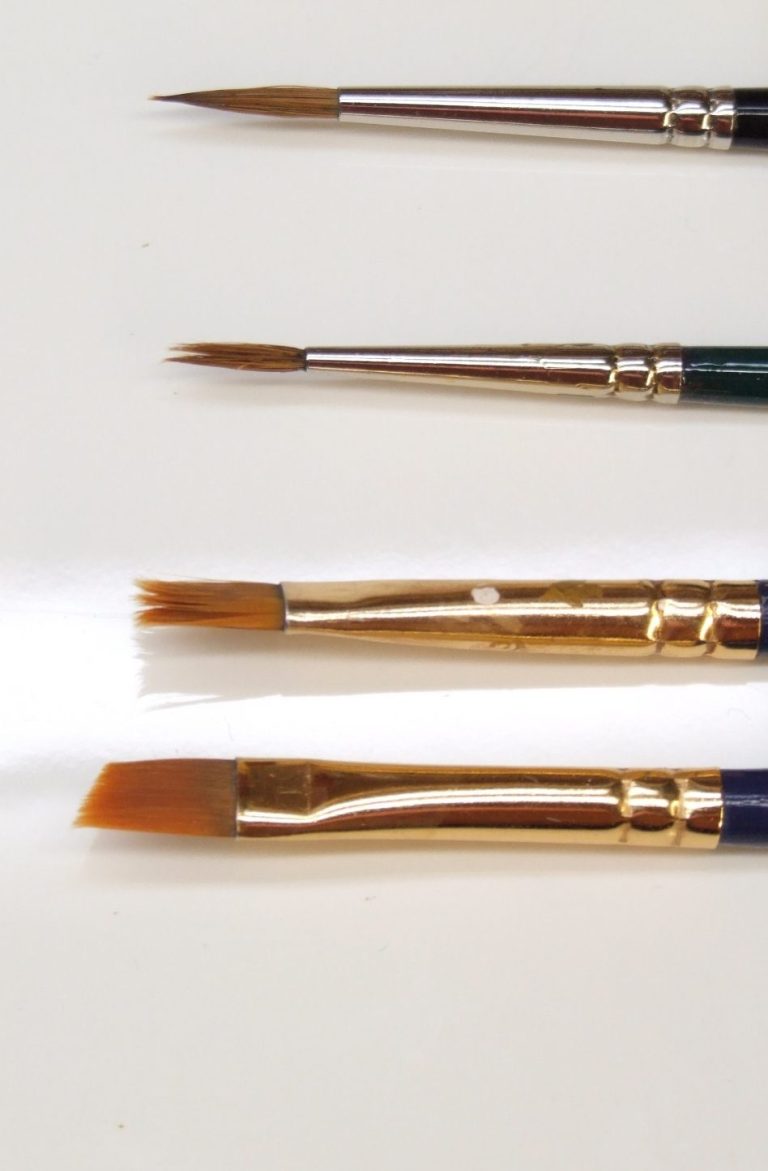
Brushes required.
In photo #1 the brushes necessary for this method are shown. Beginning at the top, there is a fine pointed, no.1 size, Winsor and Newton Series 7 sable brush. This will be used only to add fine details and to spot oil paint onto the surface of the shield.
The second brush down is a rather tired sable brush ( probably a Proline ), that has seen better days. The bristles will no longer form into a point, but instead spread out to a certain extent. This will be used for blending the fine details when the brush above it in the shot has added the oil paint.
Third from the top is a ¼ inch wide “flat” brush, again it’s one that has seen better days, and the tip of it is beginning to spread out. This will be used for applying the main body of oil paint, and for getting a wood grain texture onto the shield.
The bottom brush shown in this shot is one that will be used for applying acrylic primer and also the acrylic undercoat. It’s in a better state of repair, and will impart a smoother finish that the one directly above it.
Paints required.
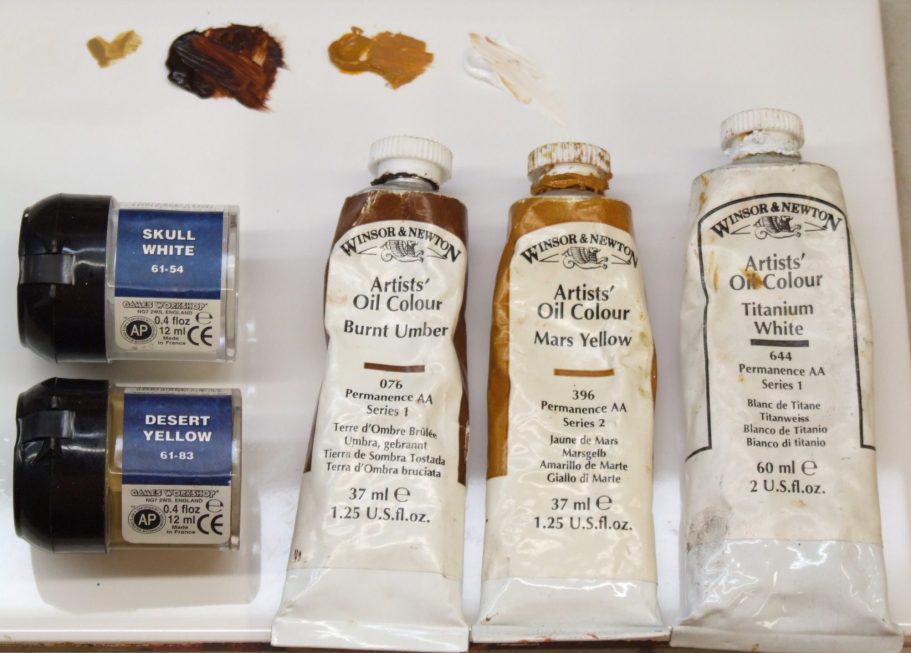
The paints I’ve used for this method are lined up in photo #2. These are a mix of acrylic paints from Games Workshop, for priming and undercoating, and the to actually paint on the wood effect, the artist oils in the tubes will be used. Please note though that white spirit or other thinners are not used at all except for the priming stage.
The method.
O.K. so here we go.
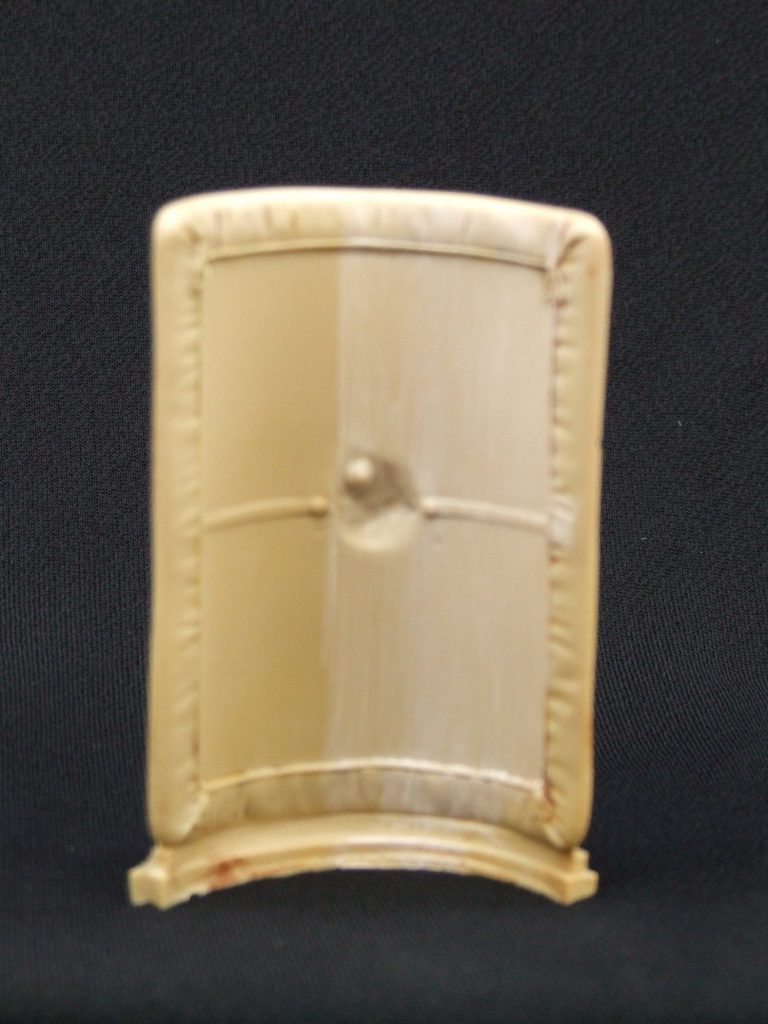
I’ve selected a Roman shield form a Verlinden 120mm figure to show how this method works. I’ve done this for no other reason that it’s relatively big and will be easy to photograph, and that it’s relatively flat and lacking in “wood effect” details. Whilst these scribed details might look good on the bare metal or resin of a kit, and they won’t affect this method’s effectiveness, they would begin to confuse the eye of the onlooker for what I’ve painted on and what the sculptor has already put there.
First of all I added a small amount of the Skull White to some Isopropyl Alcohol. This is available from chemists, or alternatively you can try screen wash fluid that you’d put in the wash bottle of a car.
The Isopropyl Alcohol stops the paint beading on the surface of the model, breaking the surface tension, and also allowing the paint to grab on to the surface of the resin ( or White Metal ) a lot better.
This is shown in photo #3,
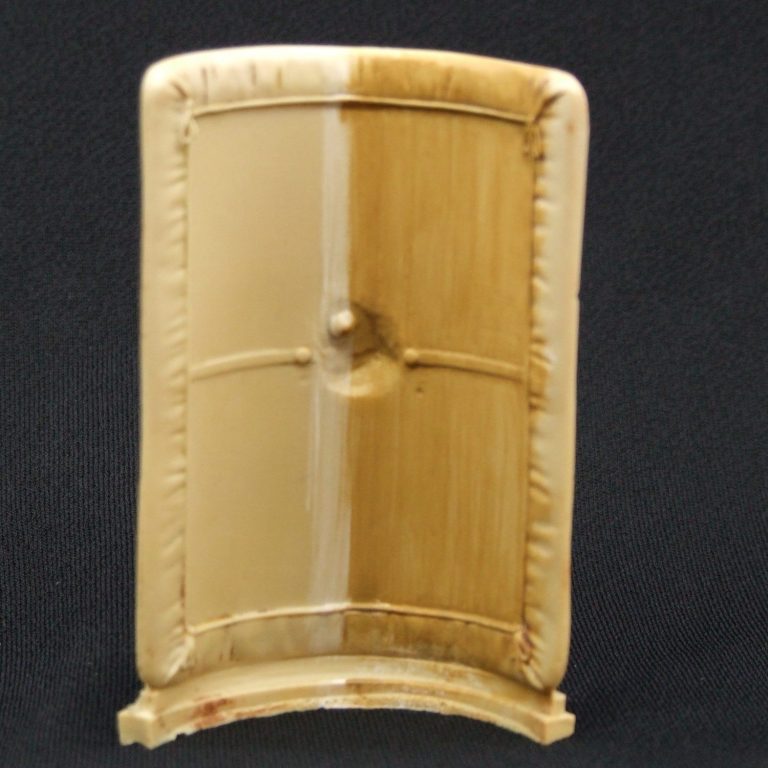
and then in photo #4 I’ve added two coats of the Desert Yellow acrylic, thinning this with some water. The thin coats will cover better than one thick one, and also allow the brush to be drawn in the direction of the wood grain, so that the pattern is already beginning to show in the paint.
In photo #5 I’ve begun to add the darkest of the oil paints – the Burnt Umber. Just a small amount of this is used on the large brush, and is worked into all the details so that there is no undercoat showing.
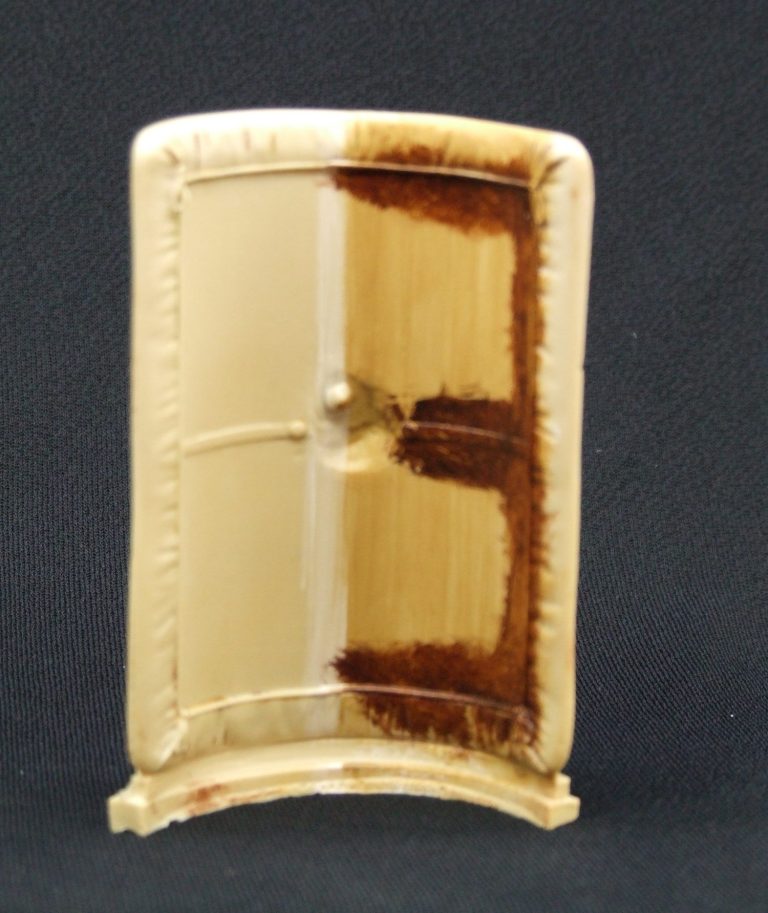
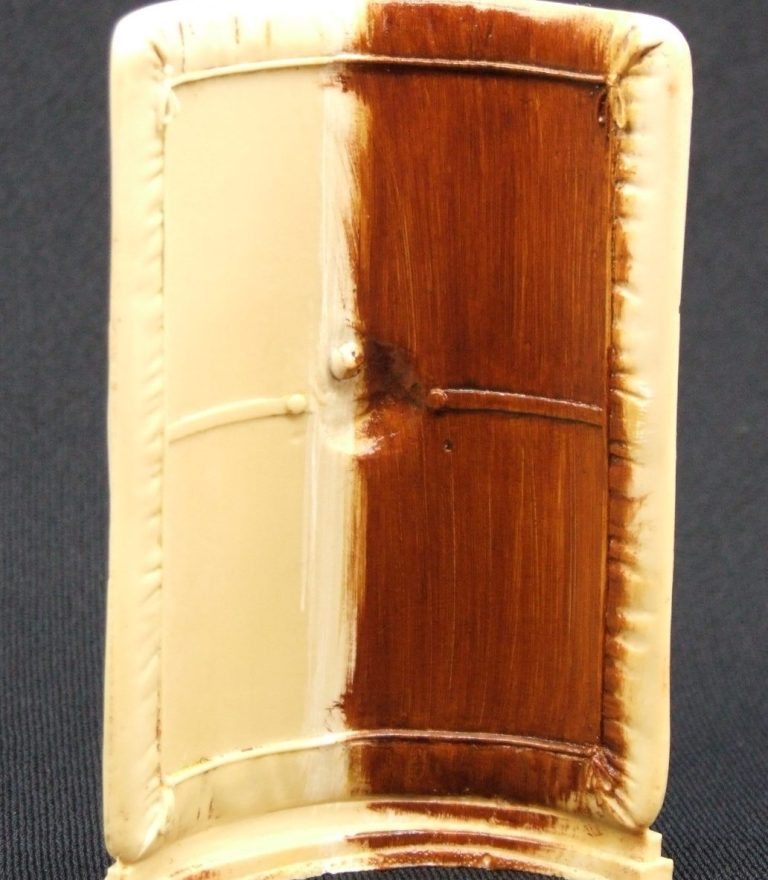
Photo #6 shows this colour then being drawn out, with brushstrokes being allowed to show, and painting so that the direction of the brushstrokes enhances the illusion of wood grain.
By adding a different colour – in this case Mars Yellow, you can see that in photo #7 the painted effect is further developed, and still using the large brush to work the paint, but this time, the colour is being added with the fine brush ( the one at the top of photo #1 ). One trick to remember through this is that if the grain effect starts to fill in, then there’s probably too much paint on the surface of the model. Simply wipe the large brush of onto some tissue paper, or an old T-Shirt, and then use it to go over the area again, allowing it to pull paint off the surface. Keep passing the brush over the wet paint, letting it pick off some of the pigment, and then wiping the brush on the cloth or tissue, until the grain effect is re-established.
To add more highlights to the wood grain, Titanium White is added in linear slashes as seen in photo #8. These are again added using the fine brush, and after wiping as much paint off the large brush as possible, the same motion of passing the large flat brush is used to semi-blend the new colour into those already established on the shield.
One thing to remember is to try and be confident with the brushstrokes, so that you only pass the brush over the area two or three times. If you do it more often than that, the paints will tend to blend in too much, and the grain effect will be lost.
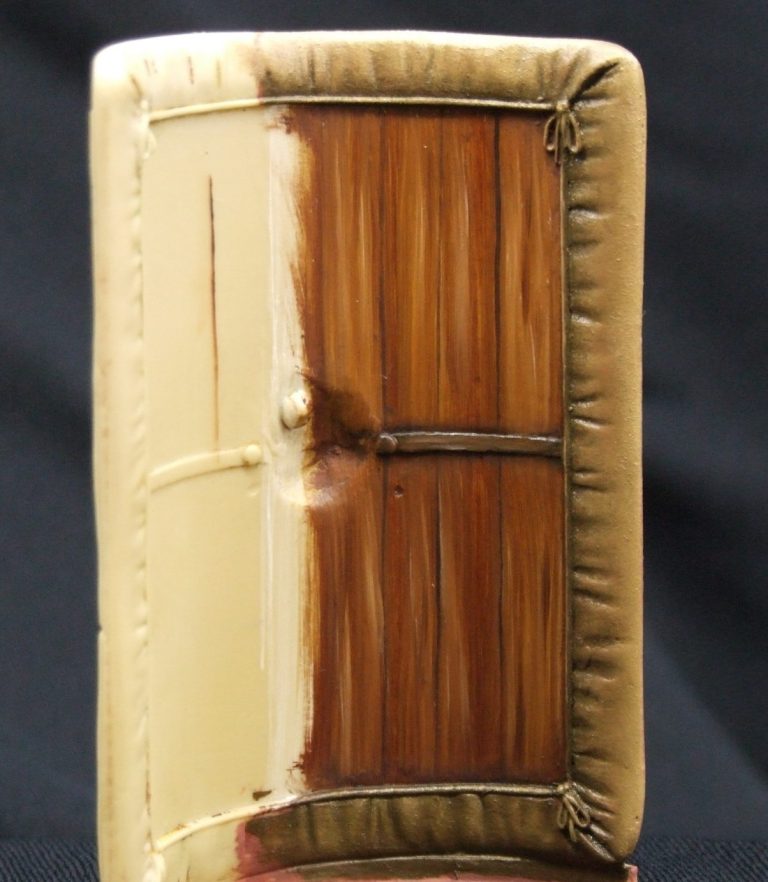
The result of these two or three passes is shown in photo #9. As you can see, the paint has begun to blend in smoothly with the brown and yellow, but the white hasn’t been completely lost.
For a more distinct effect, you could add some more white to the area, although the amount of strokes added must be less, and it’s probably an idea to just stick to strengthening one or two of the already lightened areas.
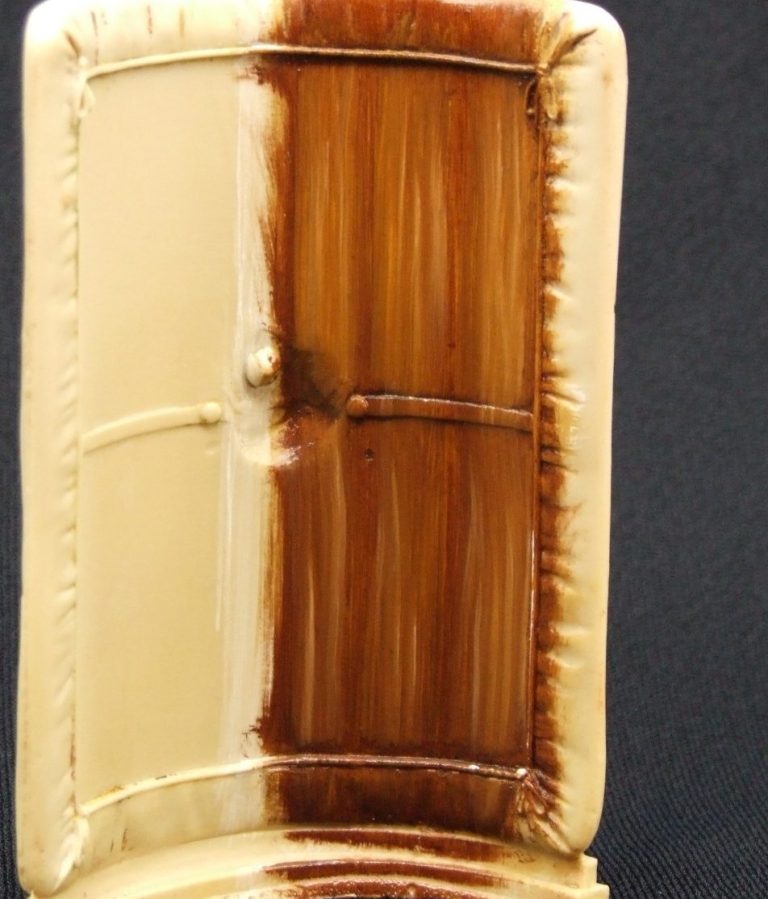
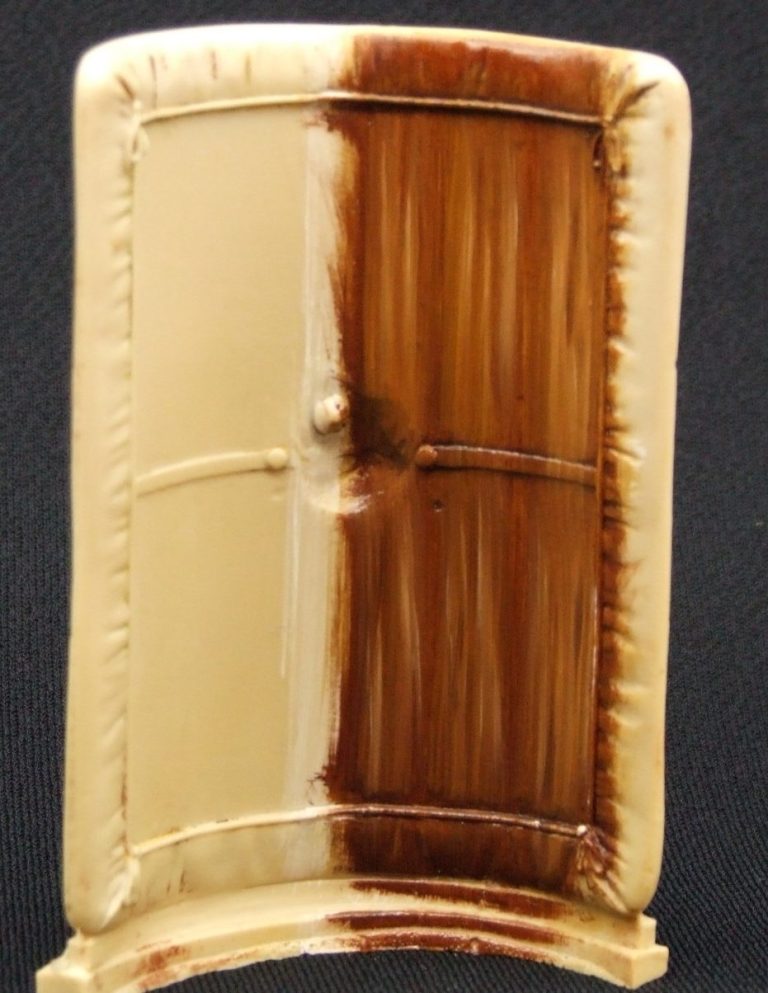
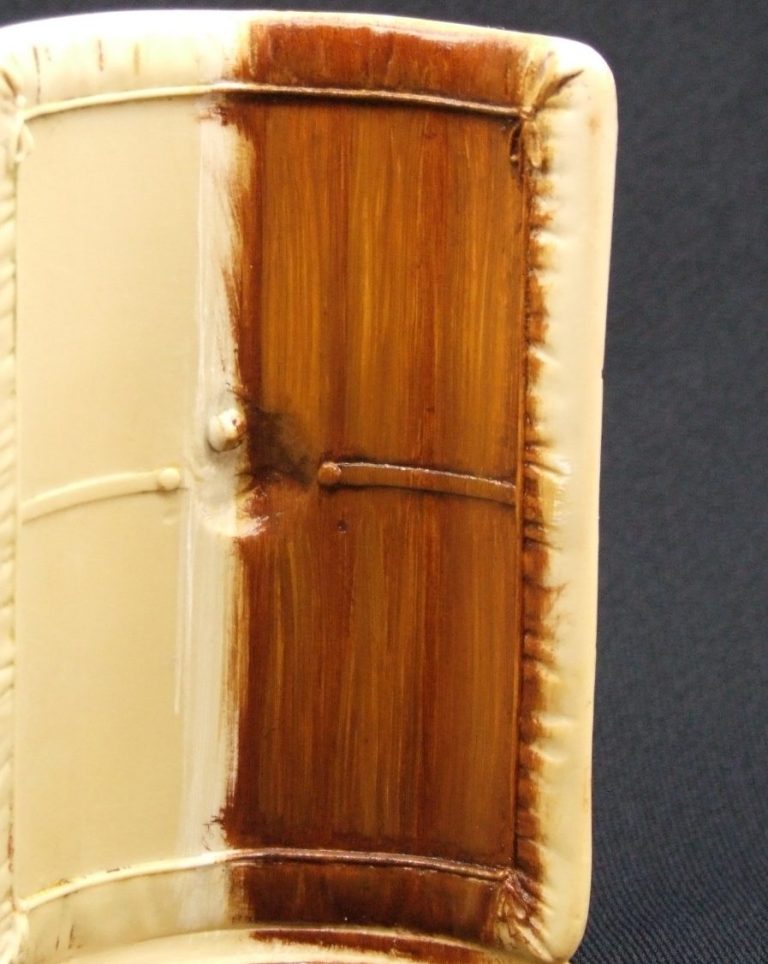
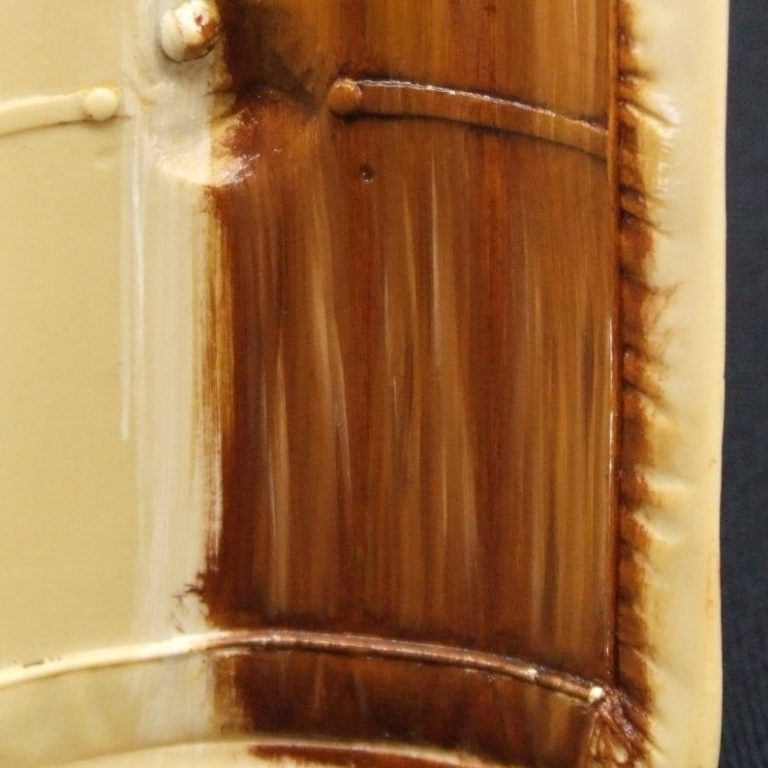
Photo #10 shows the addition of some Burnt Umber oils to places in between the areas of white. These are the knots that would naturally occur in the wood as darker patches, and again a couple of passes of the large brush – after being wiped thoroughly to remove any previous paint – is used to blend the dark colour into the others slightly.
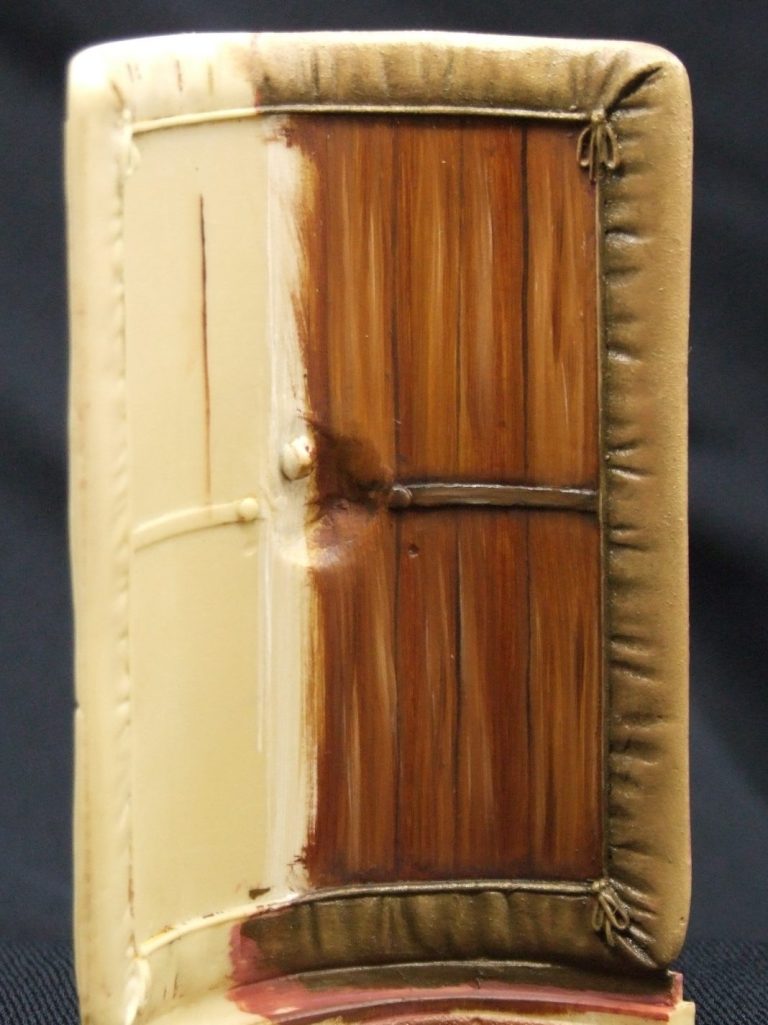
A closer view of the shield appears in photo #11 after the blending has been done. And you can also see the darker paint lodged around the middle strengthening strip, and under the upper edge of where the leather covering finishes.
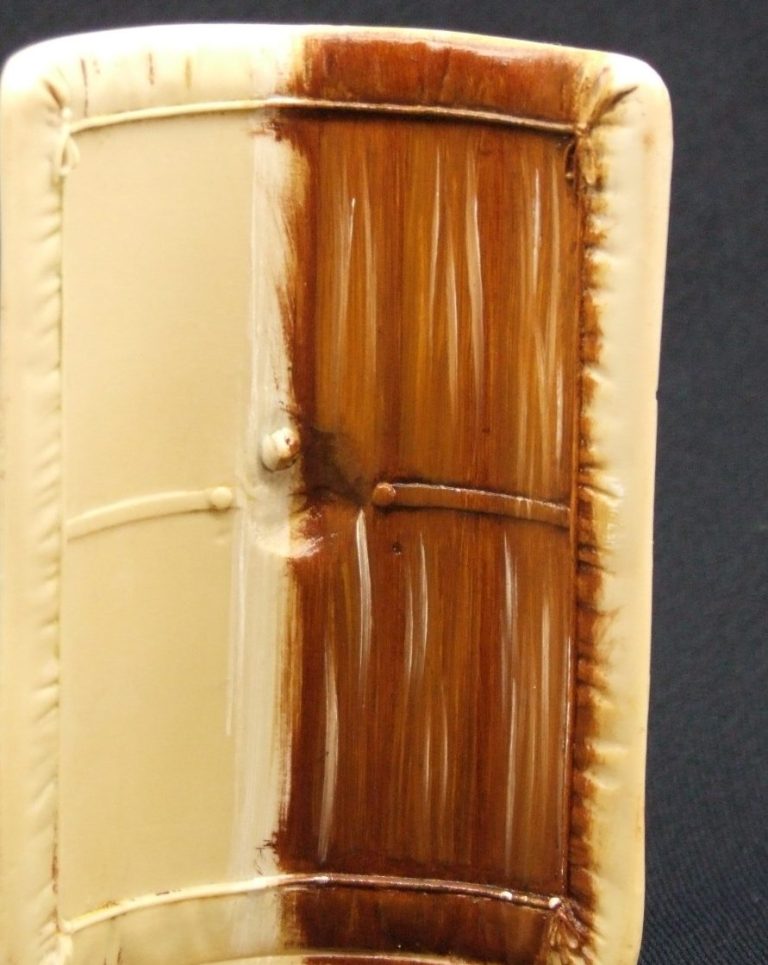
Final additions are the marking out of the individual planks. This I would suggest is done after the wood effect has had chance to dry. Simply because the work done so far is easily ruined, and although I reckon I can turn what you’ve seen so far in less that fifteen minutes, it’s still a waste of valuable time if it all goes pear-shaped now.

So, photo #12 shows how I’ve begun to mark out the planks. These again are done in oils, and utilise the Mars Brown with a little Mars Black. ( Burnt Umber could be used, but it’s not as dense a pigment ).
The colour is applied with a fine brush, aiming for as straight a line as you can get. Because the paint is oil based, and takes a long time to dry, you can use a clean brush that’s been dampened with a little thinners to refine and thin down the line.
The splotch of paint on the unpainted side of the shield is there to demonstrate this, and in photo #13 you can see me in the act of drawing out the paint in just such a manner. Because the rest of the shield is dry, you can do this without the risk of damage to all the work done previously.
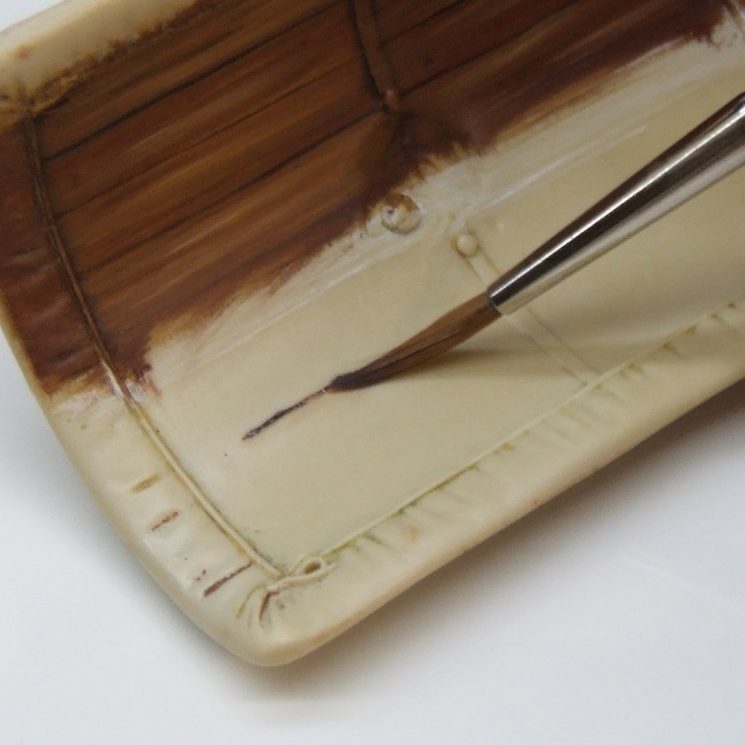
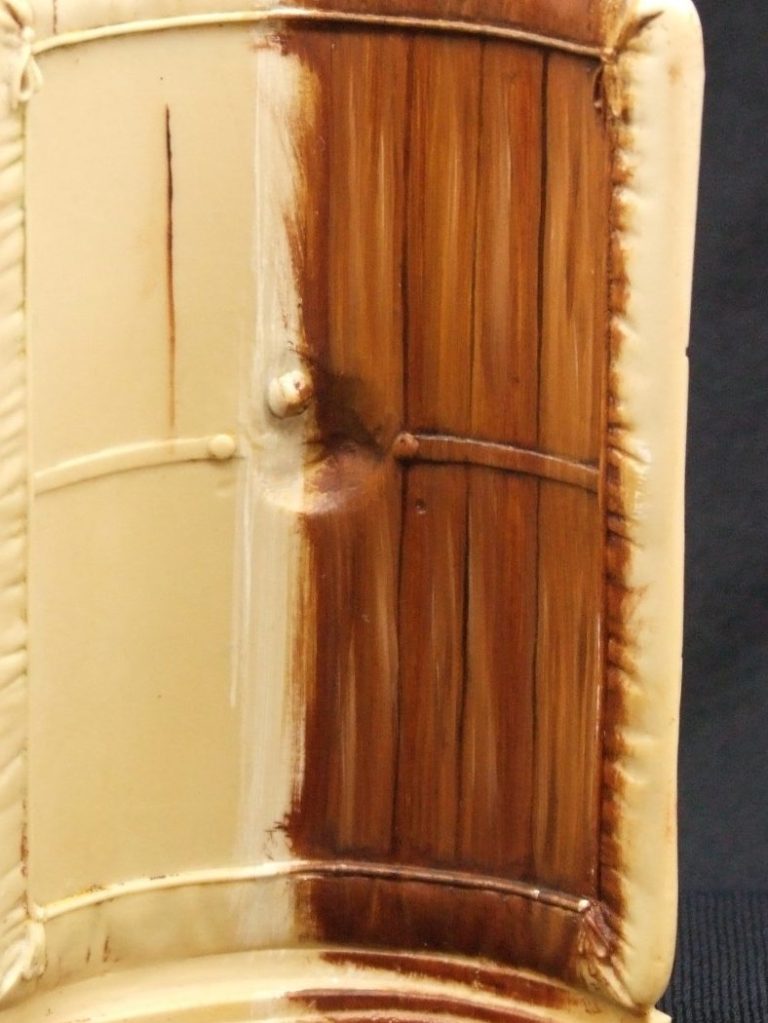
Photo #14 shows the result of this drawing out, and the splodge of paint has been turned into a fine line. So long as the paint is of a dense enough pigment, the line can be thinned to ridiculous proportions, allowing for outlining of areas on models, as opposed to just being used for the application of lines to delineate shield construction.
In the final shot I’ve painted in the edge of the leather cover. This gives a definite border to the wooden area, neatening up some of the edges and allowing you to see what it would look like if the shield were a finished piece. I find that doing this to any area of a model, for example painting a face, the act of putting a coloured border around the area that’s just been finished will let you see a more balanced view of the painted effects. It certainly looks better than in photo #14 with the ragged and untidy edges.