Saladin
1/10th scale resin bust from Oakwood Studios
Painted in 1999
I realise that this is an old article that appeared in Military Modelcraft over twenty five years ago, and although the bust was produced by Oakwood Studios at that time, I seem to remember that the kit had been available from at least one other company prior to that.
Not in the way that 3D files are sold to traders now, with different scales of the same kit becoming available from completely different companies, but simply that moulds and the rights to kits were sometimes traded or sold by one company to another.
Different days, and in some respects, less confusing, because you didn’t see a model appearing for sale, appearing to be “something new” in several different places at the larger shows.
So, an old model, that might reappear if Richard at Oakwood still has the moulds, and chooses to sell them on to have the bust continue it’s life.
A bit of history
The name Saladin is well known to most Western Europeans who have even the most rudimentary knowledge of the Holy Crusades of the twelfth century.
The true name of the man was Salah al Din, but was simplified by the westerners ( as most "foreign" names usually are ) to Saladin. Born in 1138 he became Governor of Egypt in 1171. He was quick to raise an army of intensely loyal followers with whom he set out to destroy the Crusader states, that had been established about one hundred years previously.
The recapture of the Holy City of Jerusalem was also one of Saladins' main targets as well, which he succeded in doing in the latter half of the year 1187. Two years later the army of the Third Crusade arrived in the Holy land, led by our own Richard I, who led his army to recapture Acre and defeated Saladin at the battle of Arsol.
Saladin, despite his defeat, became a great hero. Even in Europe Christian Europe he was regarded as a man of trust and represented the highest symbol of chivalry. Sadly only one year after Richard left the holy land Saladin died ( 1193 )
Barring a few additions from yours truly, that's the background information supplied with this kit, which is certainly enough to whet the appetite of the chaps and chapess's who like to do research in depth. However, I'll just get on with reviewing the kit.
This model was designed and sculpted by Mike Blank of Sweden, and along with several other models of his, is now being marketed by Oakwood Studios.
This is a simple kit, comprising of only one part - painters'll love that, and I'll admit to being dubious about the seemingly high price of 27.50. However don't run off screaming yet. also included in that price is a length of brass rod for mounting the bust to a base, and the bit that makes the price seem much more reasonable is the inclusion of one of Oakwoods' own wooden plynths to mount the model on. All you're going to need then is the paint, brushes and a nameplate.
As for the casting itself, this is very good on the example I got, the only cleaning necessary was the removal of the waste from the bottom of the bust, which was five seconds of a job with a sharp razor saw. other than that, there's no flash at all.
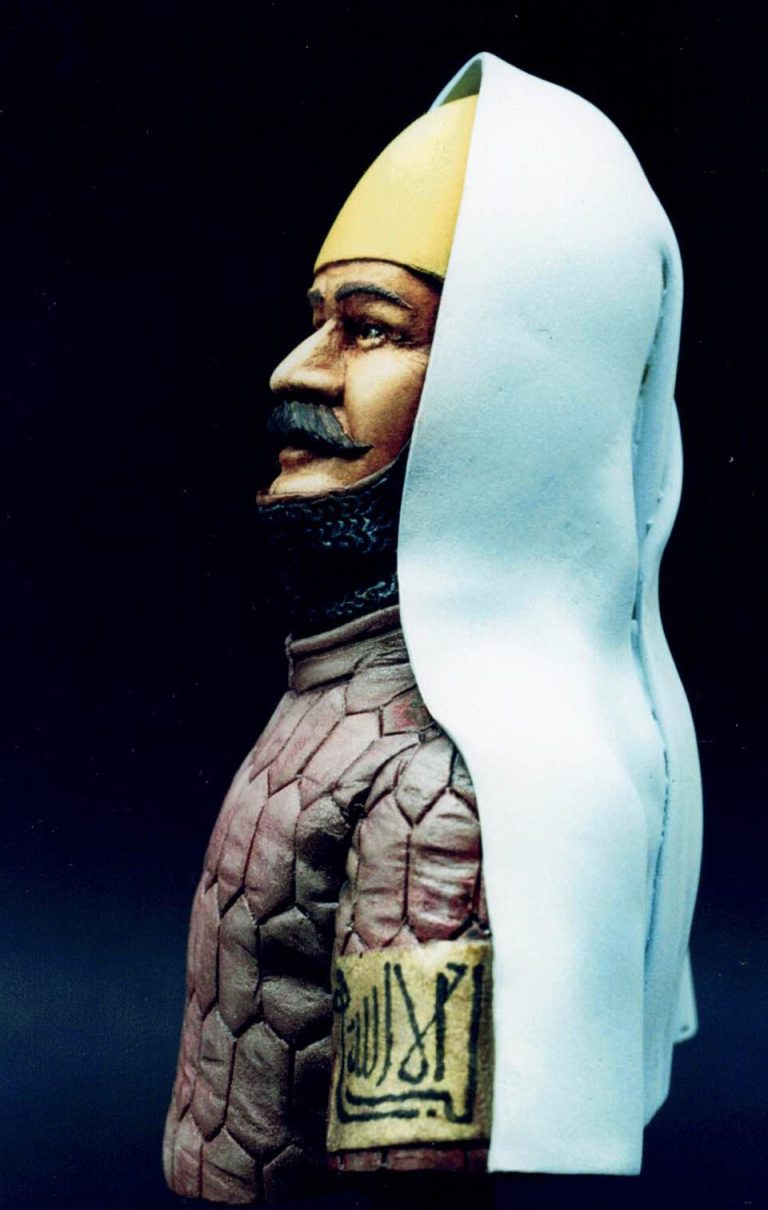
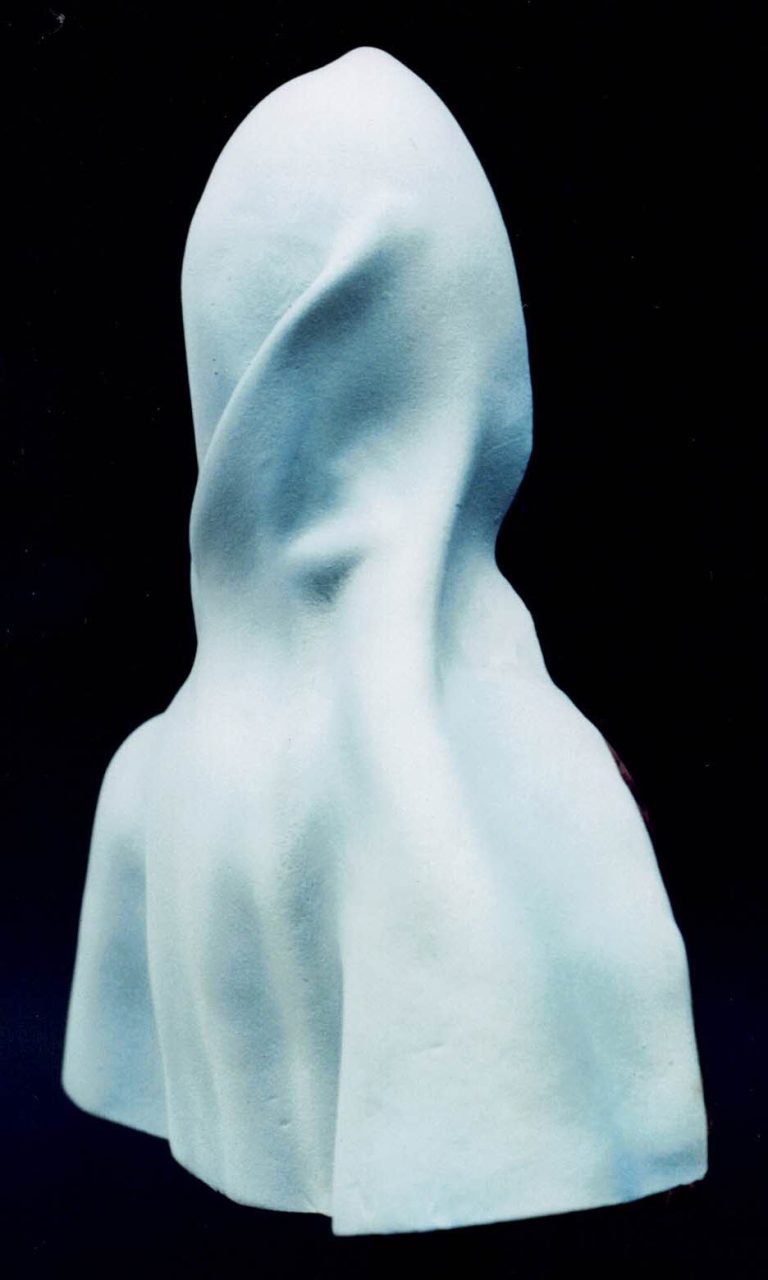
So after a quick scrub with soap and water its ready for painting. Usually I'd start off with the face, but in recent months I've been messing about with an airbrush on some bigger projects, and decided to give it a go on something a little smaller. Also the fact that I've found doing the white areas of a model is much easier with an airbrush, sort of forced the matter too.
To begin with I gave the shawl an overall primer / undercoat of pale blue enamels. This was thinned with Cellulose thinners to help it to flow more easily through the airbrush ( A note here. Always use a mask when spraying toxic substances for any length of time. A proper filter type mask is a good investment, and although it's not cheap - about 15 - 20, the long term health benefits are worth it. And no, being outside the house and spraying things isn't necessarily safe either ! ).
Over the top of the pale blue I then added some light coats of pure white, again using the airbrush, gradually strengthening the intensity of the white to build up the highlights.
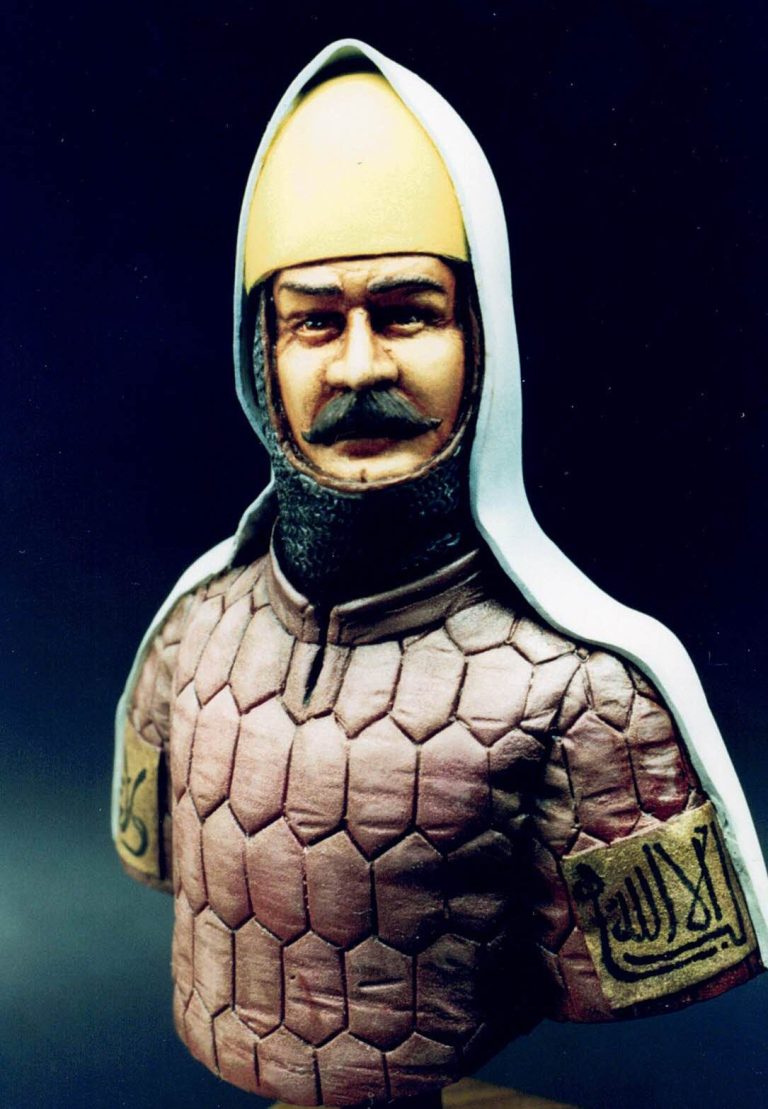
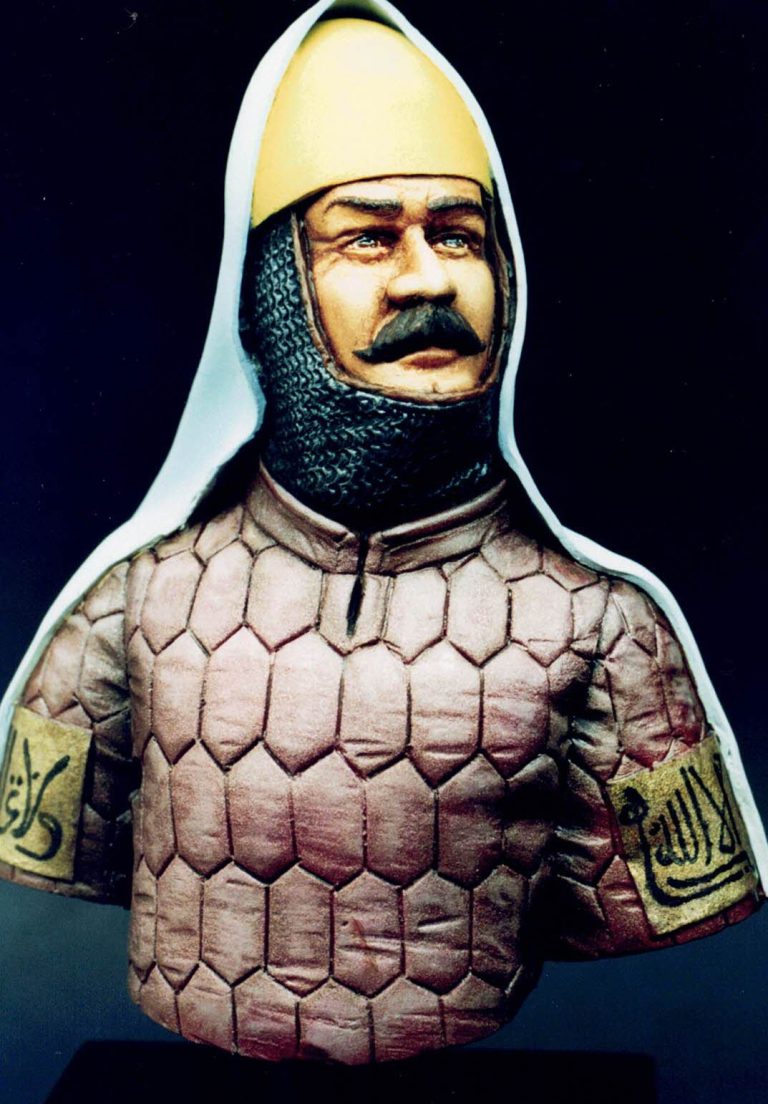
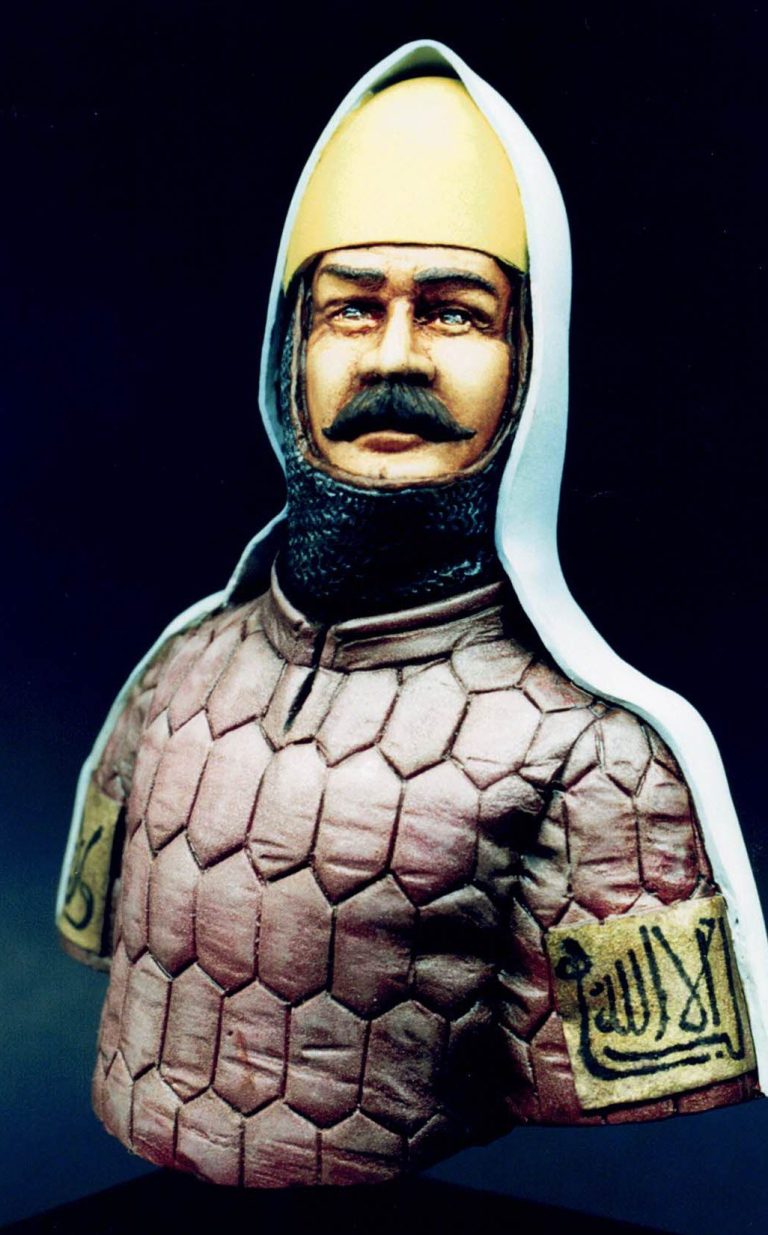
Whilst I had the airbrush out, I used this to paint in the red of the shirt. O.K so it's a very dark red, bordering on purple. Before painting though I had to mask off the white of the shawl. For this I used some short lengths of paper masking tape, placed so that the red / brown of the shirt colour wouldn't be able to creep around the edges and ruin the work already done. To begin with I pre-shaded the "troughs" in between the diamond shaped quilting. I did this by spraying in fine lines of a dark brown directly onto the resin.
This enamel had been thinned with the cellulose thinners ( as had
all the paints used through the airbrush ). Over this I sprayed a fairly light coat of alazarin crimson oil paints which had been mixed with some more burnt umber and a small amount of gold enamel. This gave the satin type, soft reflective quality to the finished colour. For highlights I added a small amount of white to the mix still in the paint cup on the airbrush, and sprayed this "down" the figure by positioning the nozzle of the brush at the head of the figure and spraying from this position only. This gave the highlights on the figure in the places that would be caught naturally by light falling from directly above the subject.
I left this to dry overnight before removing the masking, then it's back to conventional means for the painting. The face was undercoated with a couple of thin layers of humbrol flesh acrylic, and then oil paints added on top of this in my usual method for shadows, mid tones and highlights.
The yellow for the cap was first undercoated in an off white - yellow and white acrylics in a 50:50 mix. This was then coated with oils, beginning with cadmium yellow, shadows being added with yellow ochre and raw umber. For highlights I added very small amounts of white and blended these in to the surrounding area.
The chainmail was painted in acrylics, and I used a wash of black oil paint to add shadows, these being strengthened under the chin by using almost unthinned paint. Once dry a few highlights of silver ink were added to lift the detail a little bit more. on the edge of the mail is a leather strip which was painted in various reddish browns ( burnt sienna, burnt umber and light red ).

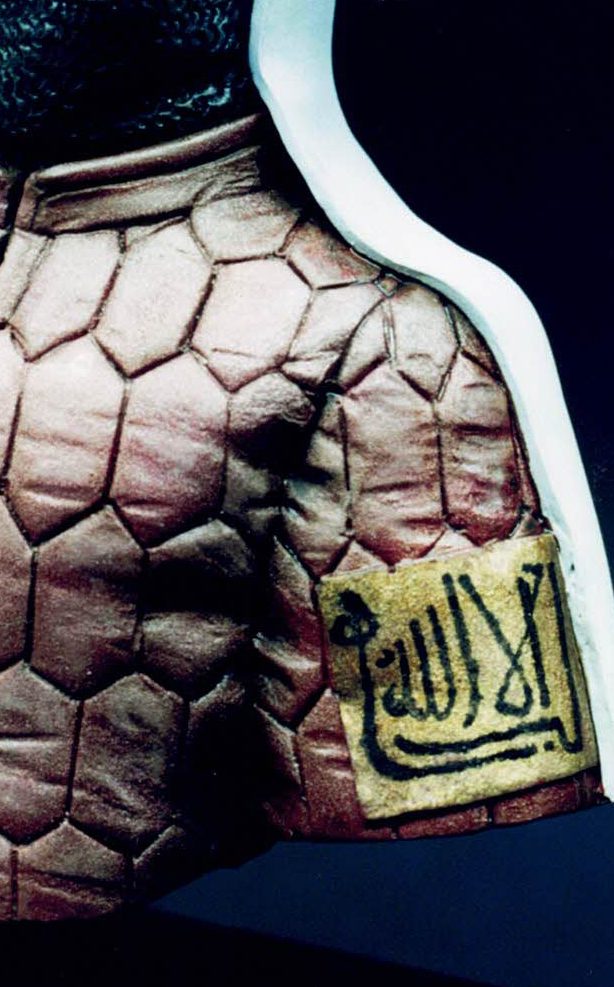
And finally to the gold patches and the script. The gold was simple enough, I used testors gold enamel, and to take away the shine I repeatedly moved the brush over the area until the paint was on the verge of drying. Some shadows were worked in before the paint bad dried too, these being in the form of burnt umber oils. Now the script. I really don't like doing "foreign" script unless I know what it means ( English, French, German and Italian etc. can be looked up in dictionaries containing translations ). This is even more problematical if the alphabet being used is completely different from our own, as here. After all how do I know what I've written.
The script on the box art was O.K. but I have no idea if it's genuine, let alone what it means, and I don't have any references showing the same characters used on those patches. So what I decided to do ( and it may be wrong anyway ) is to copy some script from a wall plaque in the Alhambra Palace in Spain which was partially built by the Moors and so has Arabic styled writing. The writing itself is done with thinned down black oil paint ( 3 parts white spirit to 1 part paint ), and then actully drawing it on with an old calligraphy pen.
The final things to do is paint the underside of the model black, and then add it to the wooden plinth provided. I must admit that I thought the brass rod was a bit on the thin side to be used in this case, so I swapped it for a short length of wooden dowel, but that's hardly going to break the bank now is it.
All things being even, I quite like this model. After all, as I remarked about the Muslim Cavalryman, also sold by Oakwood, there's plenty of models of chaps in armour, but not so many models of their opposing forces for the period around the time of the Holy Crusades. The model is definitely one for the painter, and although beginners will find it a pleasure to paint, I think there's also something there for the more accomplished artist in trying to replicate the satin sheen on the shirt, not to mention getting some realistic shading onto the white shawl.
Many thanks to Richard and Rhona at Oakwood for supplying this review model.