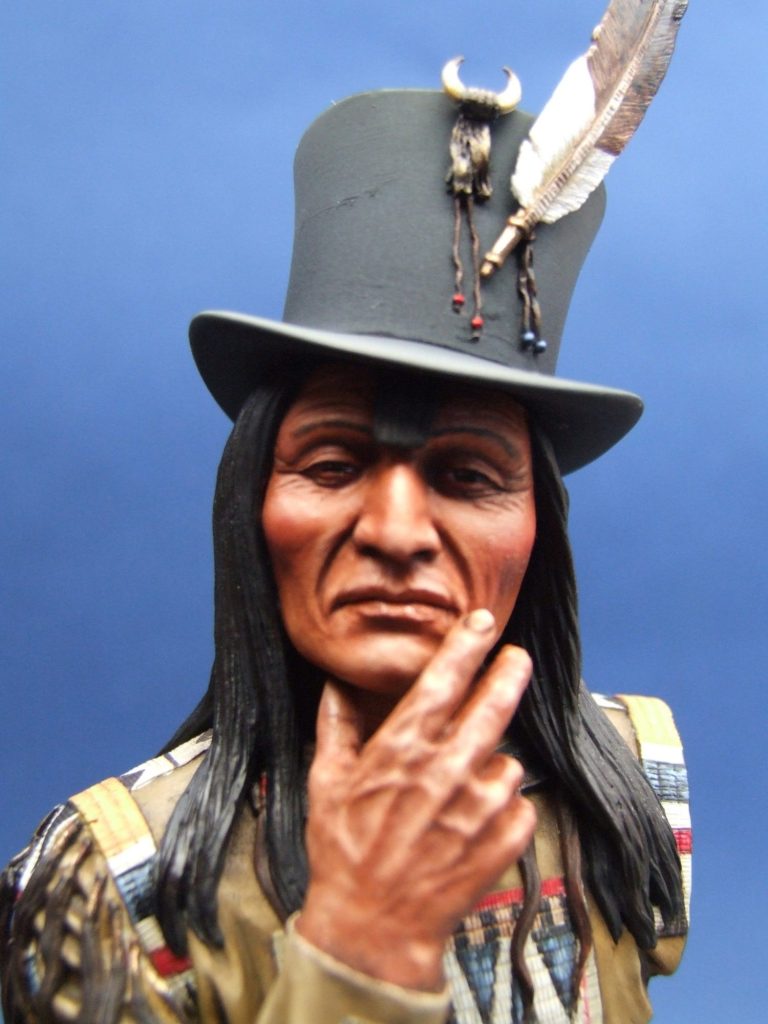
Tall Hat
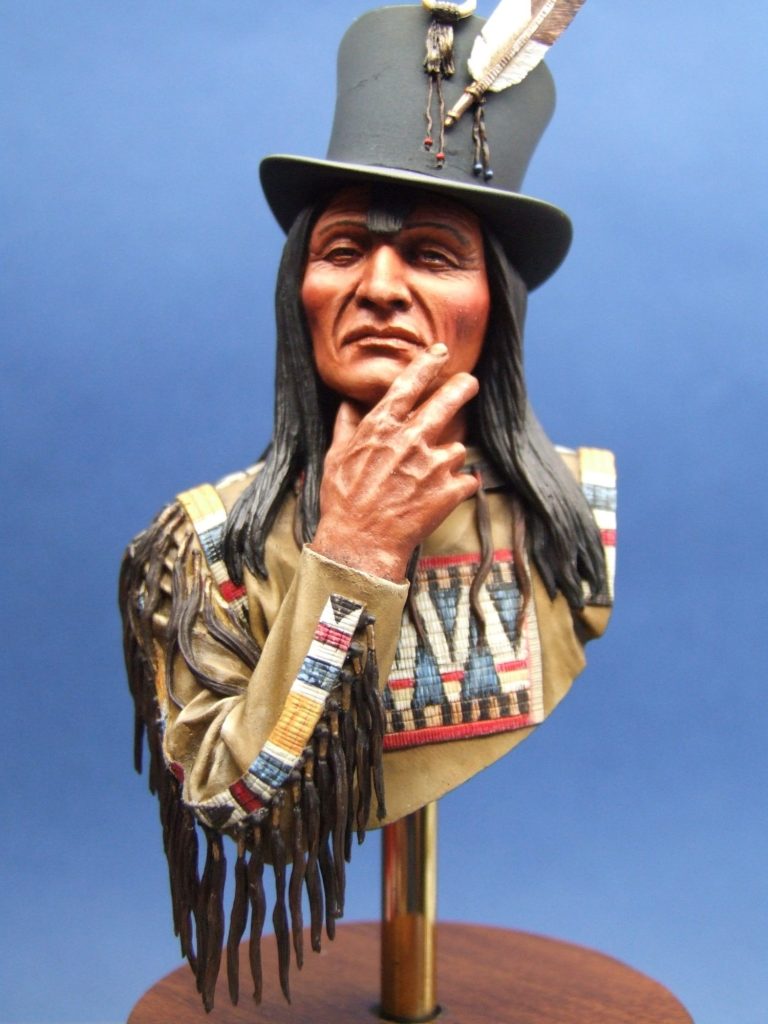
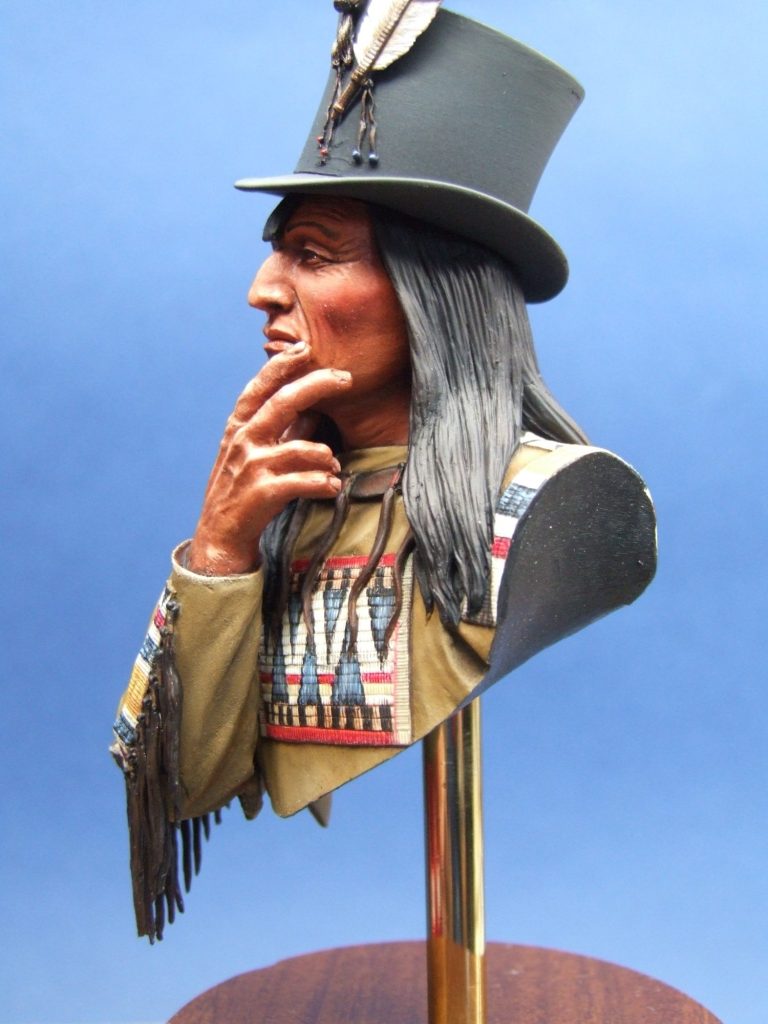
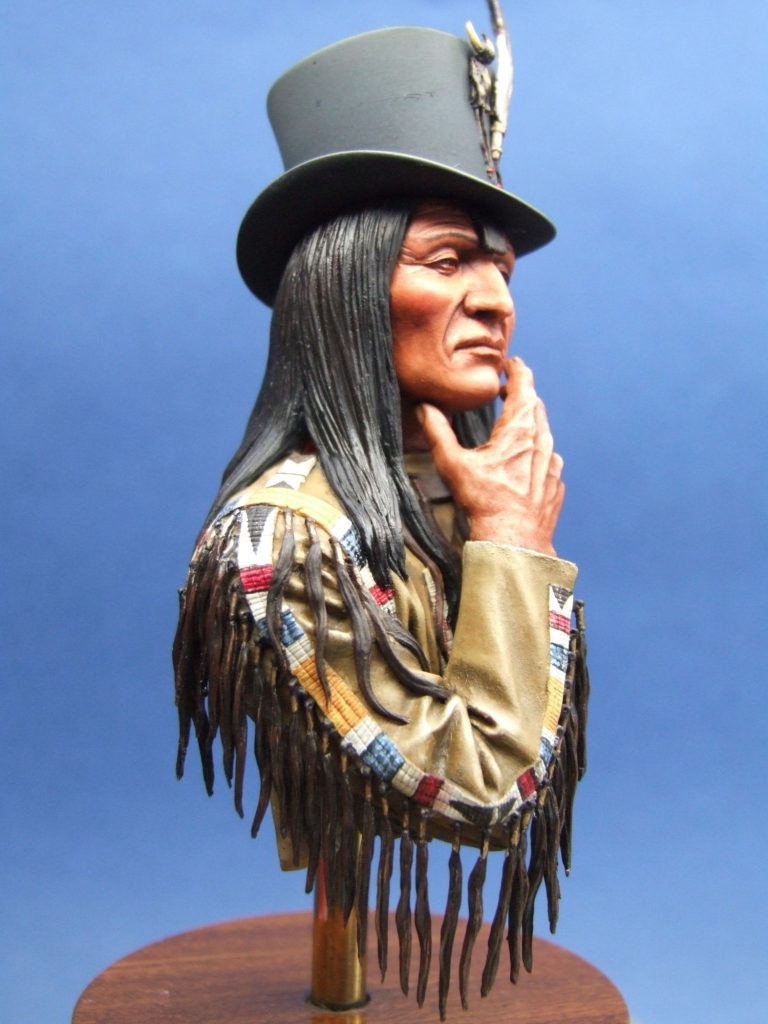
1/9th scale resin and white metal Bust from I and E Miniatures
Painted in 2006
History ?
I tried looking this character up in several of the Plains Indian / Native American reference books that I have, and I can’t find any mention of “Tall Hat” anywhere. Either I’m not looking in the right places, or haven’t got the right books, or possibly the name is purely fictional; I don’t know. All I really cared about was that this was a good looking kit when I bought it several years ago, and now I’ve finally had the time to get around to making it.
About the model.
I&E Miniatures were based near Leeds in the north of England, and showed real promise as an up and coming company. So much so that they had attracted several top sculptors to work for them, commissioned mould making and casting from “top” names within the hobby, and generally looked all set for a long and lucrative stint in our hobby.
I’m not sure exactly went wrong, but they seemed to hit problems and then disappeared in a very short period of time, having traded for two or three years.
As for this particular model, I believe that it was one of the last ones that they brought out. The sculpting of this kit is done by Mike Good, the castings by Ray Lamb of Poste Militaire.
On looking at the box art, which admittedly is quite plain - a half painted effort is used for the cover, which does admittedly make the offering look rather poor – the kit appears to be quite simple. It’s only when you open the box and unwrap the parts that the details become apparent, and all the little additions can be seen.
The main castings are made from Resin; these are well formed, and relatively easy to clean up. The smaller pieces are cast in White Metal; and there are quite a few of these to cope with, as they take in all the scalp decorations for the sleeves and the small details and feather for the hat. Fortunately the location points for the sleeve ornaments are all drilled, although I did drill them out with a small drill bit just to be on the safe side.
Apart from some general and acceptable cleaning, there really is nothing much else to do. The parts go together well, and I thought that I would paint it as separate pieces, only joining the metal hat brim to the resin hat body prior to adding the colours.
You may well be thinking – “Why isn’t there a picture of the components ?”
Well I was sure that I’d taken one, but I can’t find the darn thing anywhere. Having gone digital a while back, I think that it’s even easier to lose or delete files by mistake, rather than actually losing hard copy photos that you can always re-scan.
So my apologies for the lack of pictures.
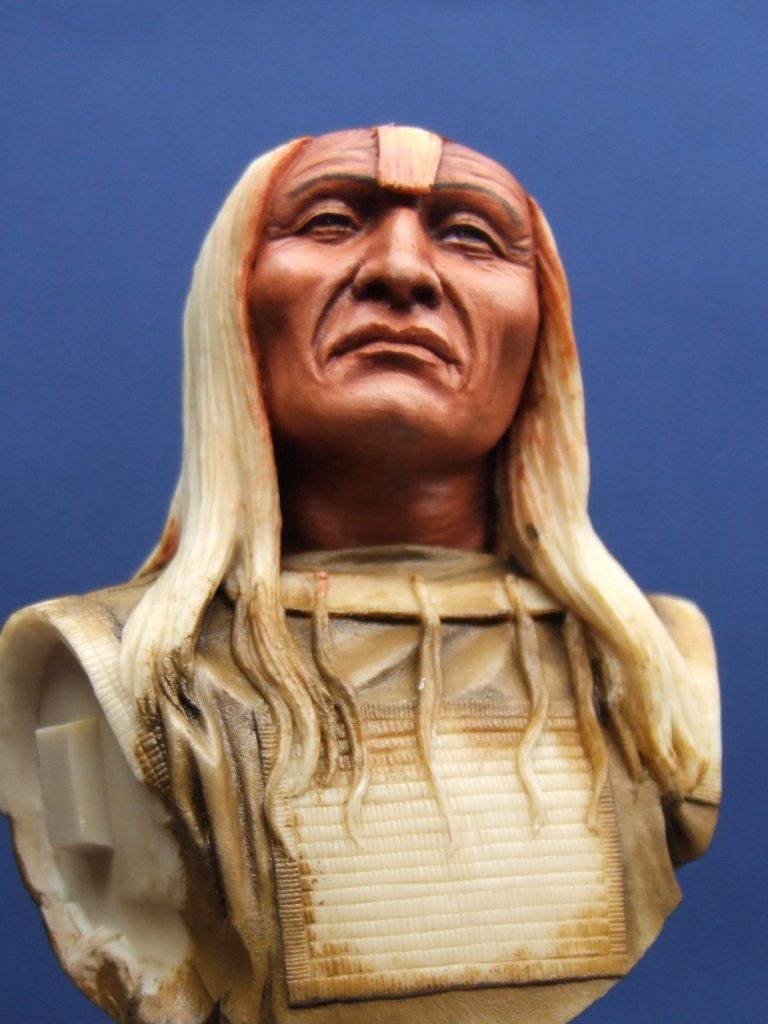
Photo #1 shows how I’ve begun painting the main casting. Because of the way in which the hair drapes down the side of the neck, I would have to get the deepest shades established in the deeper recesses first. Any light paint getting in there would dilute the dark colours, and I’d have to risk adding washes of dark colour to the area later on, which could possibly cause some changes in the gloss / matt effects compared with other areas of the face.
I undercoated with Andrea colour’s darkest flesh tone, and then covered this with some Burnt Umber for those deepest shadow areas on the neck. For the rest of the face and middle of the neck, I painted on some Burnt Sienna oils, blending this into the Burnt Umber on the neck with a soft brush, and using a second soft brush – a fairly large one at that – to take off any excess Burnt Sienna from the surface of the model.
The Andrea Flesh colour began to show through the oil paint quite nicely, and so I began adding mid-tones to the flesh areas with a mix of Burnt Sienna, Yellow Ochre and Titanium White. These colours are mixed on the palette initially in a 1:1:2 ratio respectively, and then when applied they build up the mid-tone gradually. Highlights can then be worked in to certain areas like the bridge of the nose, the cheekbones and the forehead and chin with some of the Titanium White.
I added some Alizarin Crimson to the Burnt Sienna to get the colour for the lips, again highlighting with a little Titanium White.
Photo #2 shows the hand and arm in position. This is just loosely fitted in place, to test the look of the two flesh areas. I’d differed the mix slightly between that used for the hand and that used on the face. This is because whilst the face is exposed to the elements just as much as the hands probably, the skin on the backs of the hands tends to become thinner with age, and so can appear a different colour. I wanted a slightly grey look to the hands, and added more white and a touch of Prussian Blue to the mid-tone oil mix.
Further additions can be seen in photo #2. The eyebrows are just some of the Burnt Umber, almost stippled on with a small brush. Getting the shape even is difficult, and allowing them to fade off evenly at each side is awkward too.
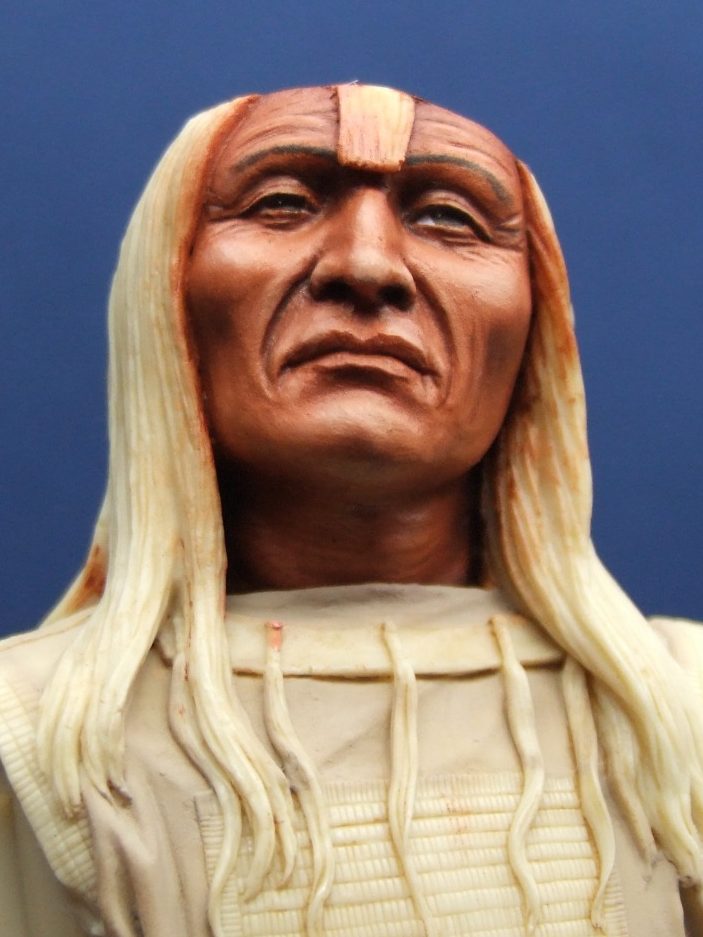
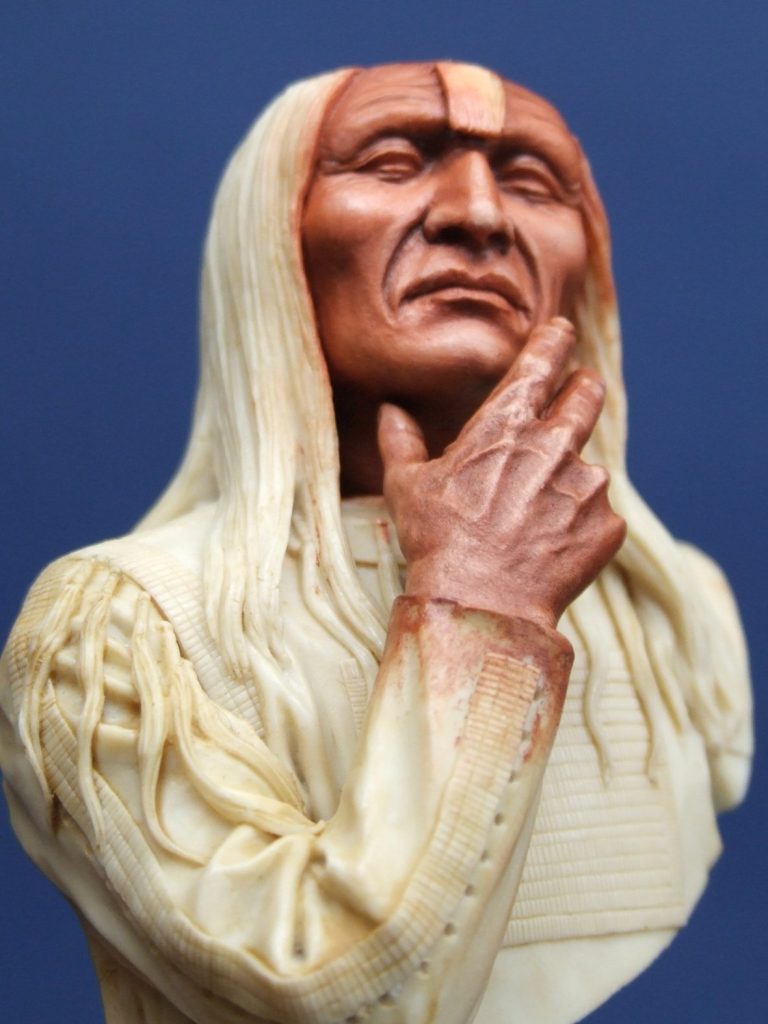
The closer to the eye, the denser the hair tends to be, whilst at the temples the eyebrow tends to become less dense, the hair follicles being spread more widely apart.
The eyes allow little room for play as far as painting colour into them goes. There’s barely space to allow the painter to get the whites of the eye to show beneath a coloured iris, let alone anything fancy like pupils and catchlights.
Also in photo #2 I have undercoated the shirt with a very pale cream / grey colour. This is to start off the hide colouration for the overlay of oil paint that will be done in the next picture.
Development of the shirt can be seen in photo #3, although the colours are still wet here, and thus they look glossy. As they dry, the colour will lighten a little, and they should go to quite a flat matt finish. I used a mix of Yellow Ochre and Titanium White, darkening this to use it for the shadows with some Raw Umber. More white is added for highlights, and any areas that might be more worn.
In Photo #4 the shirt has indeed matted down, and I’ve undercoated the rectangular block that will be painted to represent beadwork in the next few shots.
Beadwork can take several forms, depending upon how modern or how traditional it’s formation is. With the encroachment of the Europeans and their trade goods, glass beads were used by some tribes, whilst originally such things as sections of Porcupine quills were used, these being chewed first – to make them easier to work, and then dyed to add the colours necessary for the desired design.
I drew a design out, adapted from one in the James Bama book of American paintings, and using thinned oil paints transferred it to the main panel on the front of the bust.
Once the main portions of colour had dried, I added some Burnt Umber staining to the edges of the panel to hint at the use of Porcupine quills.
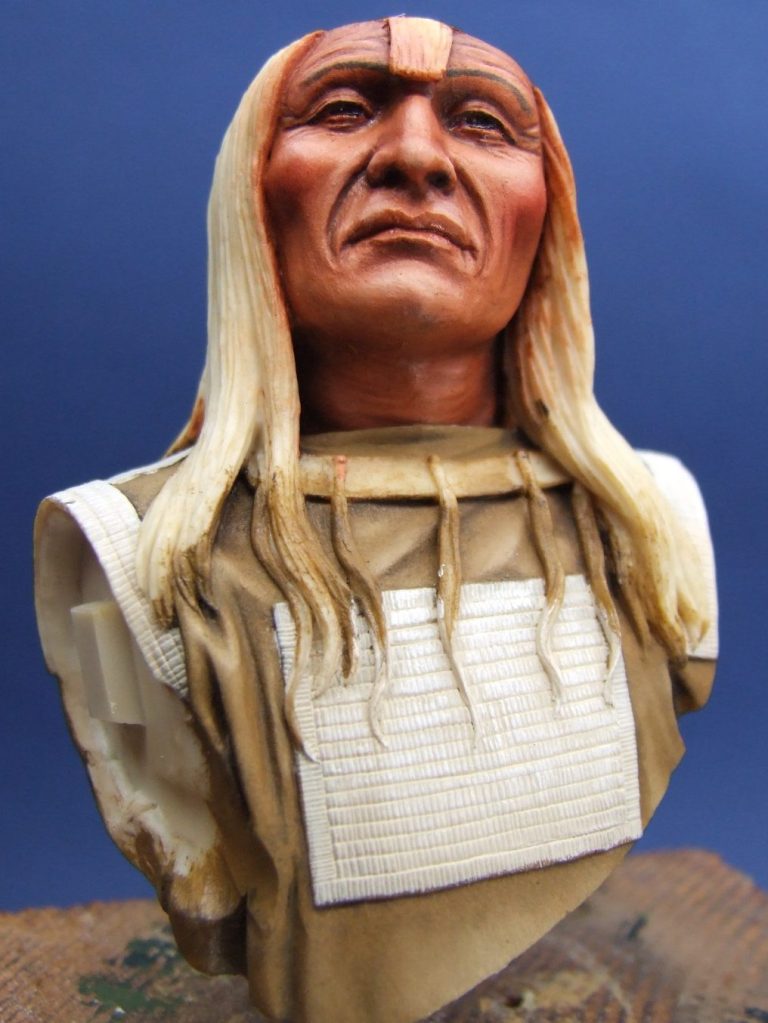
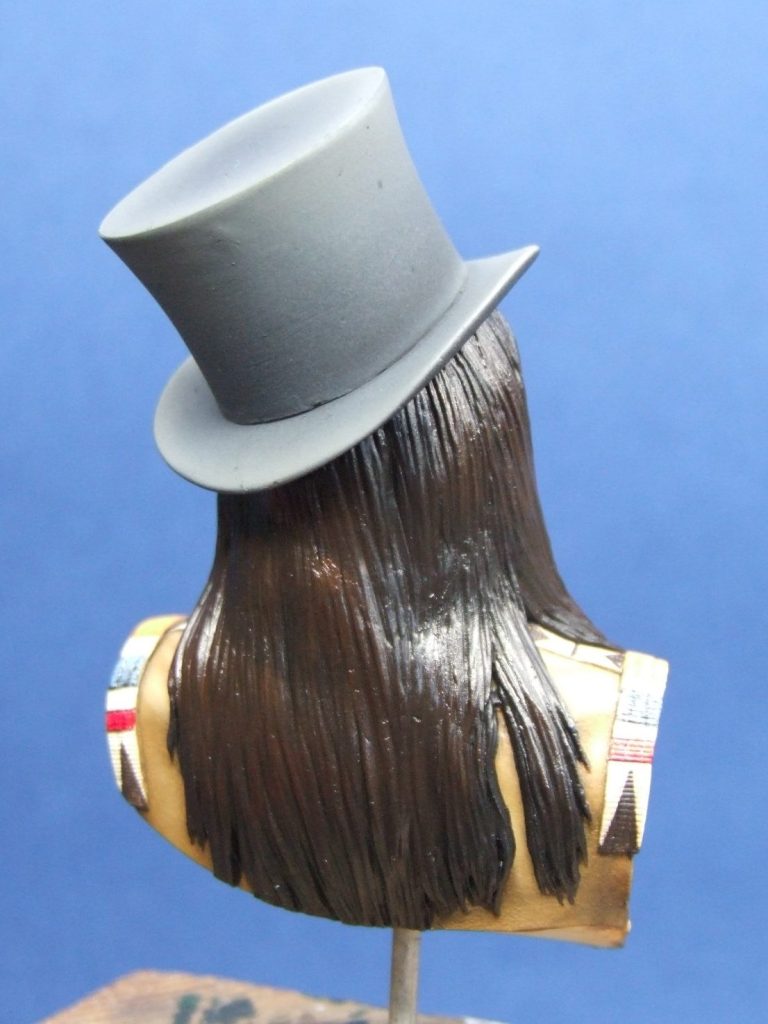
Photo #5 gives you a view of the back of the bust, showing that the hair has also been completed – Matt Black Humbrol enamel, with a Lamp Black oil coat over the top, and some highlighting with Mars Brown.
Black and the brown oils were used for the scalp hair details and the band across the top of the chest that they’re fastened to. A small detail of red being added to the tied off area at the top of each.
The hat is only temporarily in place, I used Humbrol Matt White and Matt Black to paint this, passing them through an airbrush and beginning with pure black, working through a couple of greys to a very pale grey for the final highlights.
Small detail castings have yet to be added to the hat, and their location points can be seen clearly in photo #6.
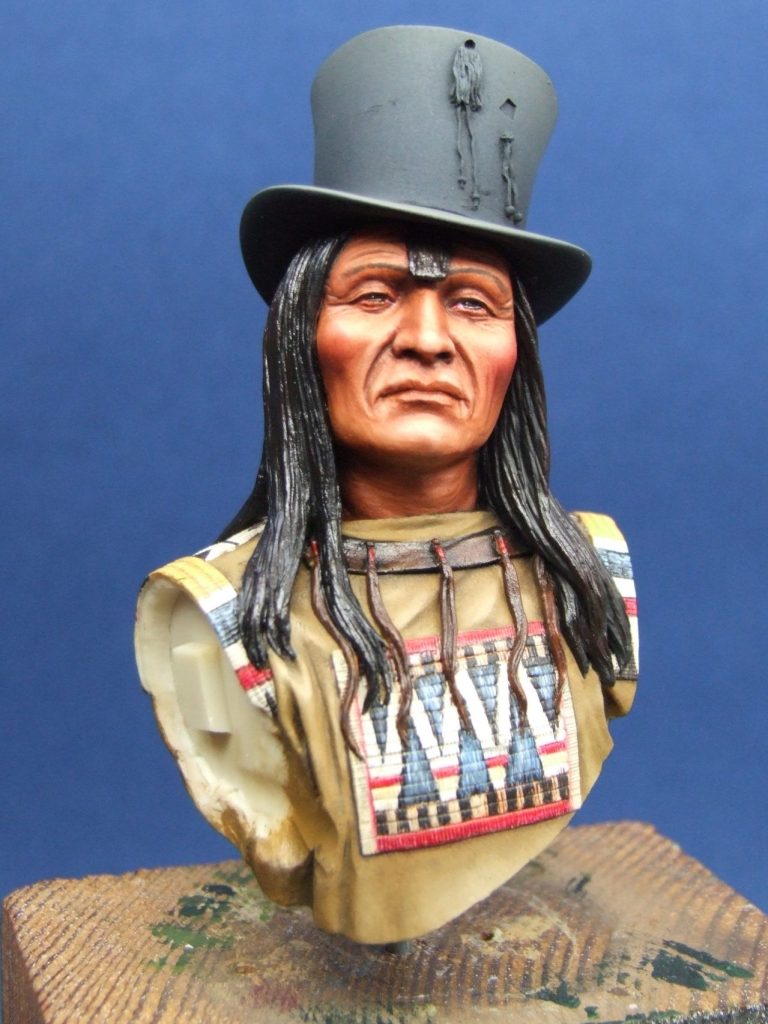
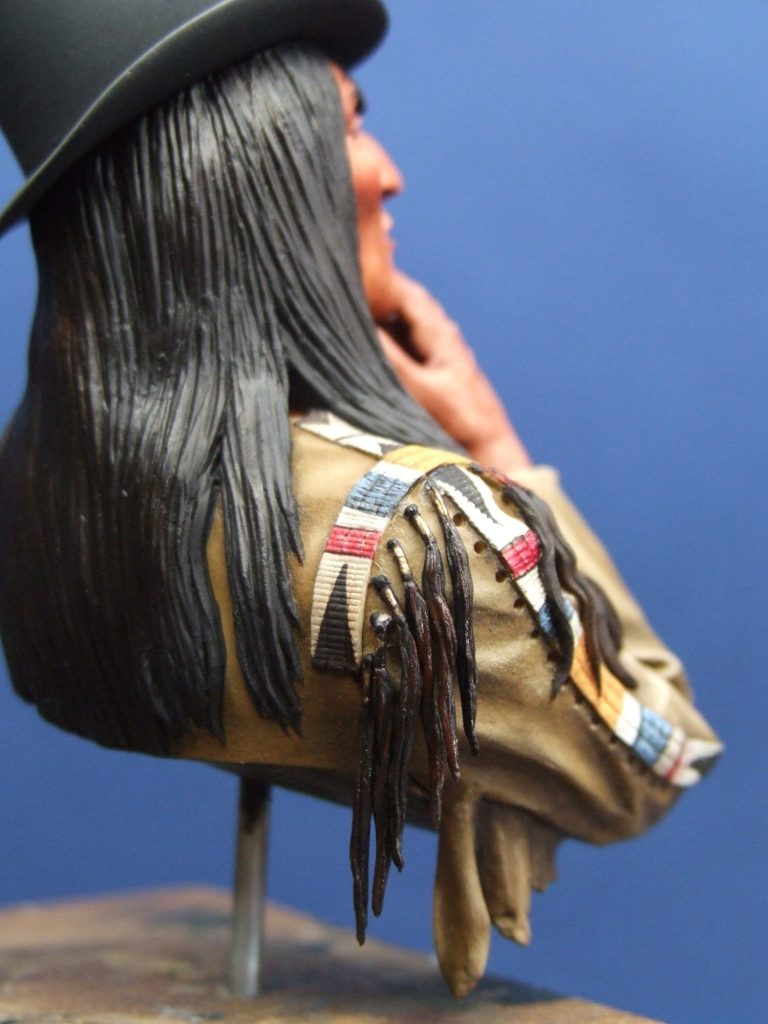
Photo #7 shows the addition of the arm, the beadwork on this has been painted in to match the design running over the shoulders, again using thinned oil paints. Once each of these beadwork areas had dried, a thin coat of gloss varnish was added to give them a shiny appearance.
Now for the fiddly bit; I couldn’t figure out a way of painting the scalp hair detail pieces that were to be added to the sleeve. I could have drilled holes in a piece of wood, and attached each one to that for painting, but then handling them once dry would still risk the paint being rubbed off. Also the addition of the superglue that holds them in place could have fogged the top ends of each, which would have then resulted in me going back and repainting each and every one anyway.
So I decided to glue them in unpainted, prime and undercoat them and do the finishing coats whilst they were in their final positions. I did glue them in place sticking out slightly though. This separated them so that I could get a brush to them easily, and bending them into position was unlikely to damage the paint too much.
The same colours were used as the for the scalp hair on the chest, although I added some small brass / gold metallics for the bead bindings at the top of each one in this section, as opposed to the red for the chest area.
I also painted them in stages, the first lot can be seen in photo #8, and continuing through photos #9 and finally 10, the latter showing the model finished.
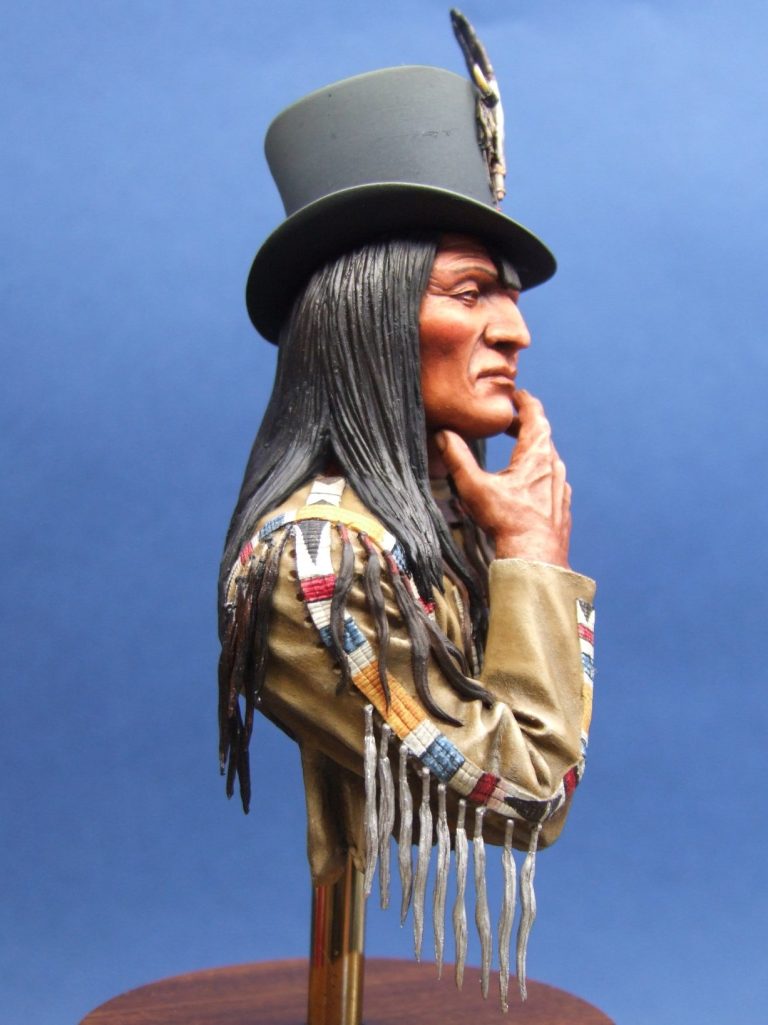
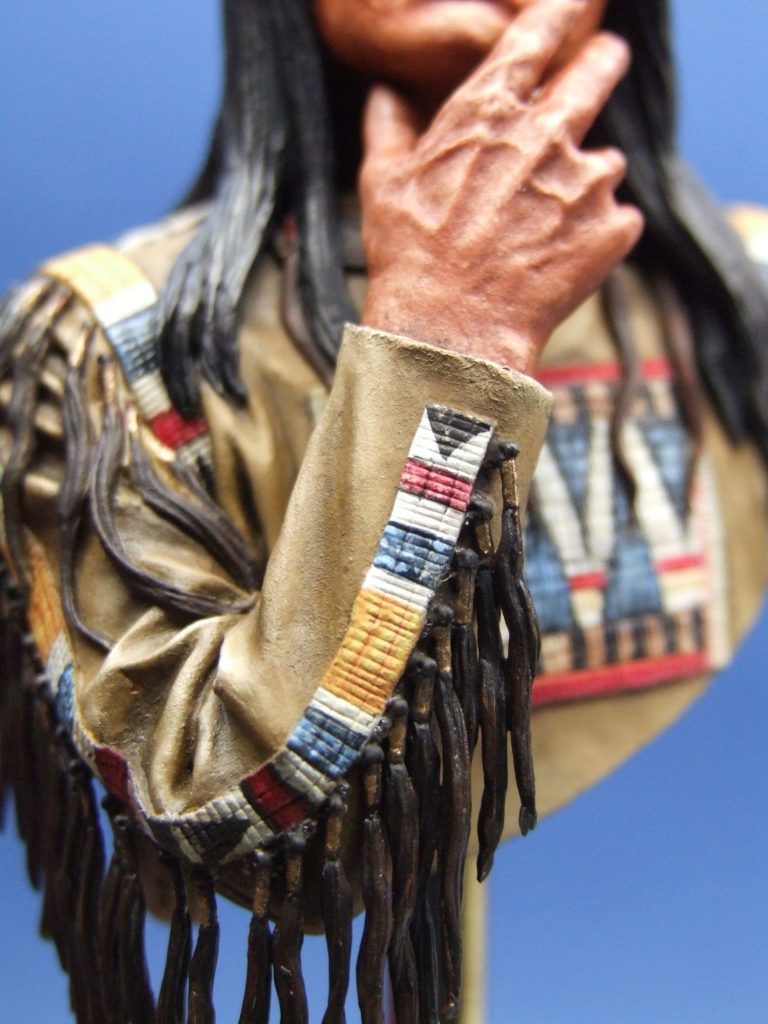
In conclusion
A great shame that I&E Miniatures closed their doors to trade some time ago, as I’ve already mentioned, they had some very good kits. I don’t know if this is necessarily the best of them, as I have little with which to compare it. The simple fact being that the moulds don’t seem to have been sold on, and the folk who bought the models when I&E were operating, must be keeping hold of them.
My thoughts on this kit are that the separate areas are well sculpted and moulded, the attention to details and the split of parts being good for both the person doing the casting, and also whoever then comes to make and paint the piece.
If I have one niggle, it would be that the hand dominates the face somewhat. I know Mike Good did a similar posed bust of a German officer in a leather greatcoat, which met with great acclaim from the modelling public in general, and obviously he’s trying the same formula here.
That’s not to say that it doesn’t work, but that the details on the hand are such that the eye is drawn away from the rest of the model.
Other than that, it’s a good piece; the painting possibilities are quite wide for the chest and arm decorations – within reason of course.
If it was still for sale, then I’d certainly recommend it; but as it isn’t then we can only hope that at some point in the future someone gets hold of the moulds and rights, to start production again.
Lorem ipsum dolor sit amet, consectetur adipiscing elit. Nulla euismod condimentum felis vitae efficitur. Sed vel dictum quam, at blandit leo.
arwnbwrcqewvwrn
Lorem ipsum dolor sit amet, consectetur adipiscing elit. Nulla euismod condimentum felis vitae efficitur. Sed vel dictum quam, at blandit leo.
arwnbwrcqewvwrn
Lorem ipsum dolor sit amet, consectetur adipiscing elit. Nulla euismod condimentum felis vitae efficitur. Sed vel dictum quam, at blandit leo.
arwnbwrcqewvwrn
Lorem ipsum dolor sit amet, consectetur adipiscing elit. Nulla euismod condimentum felis vitae efficitur. Sed vel dictum quam, at blandit leo.
arwnbwrcqewvwrn
Lorem ipsum dolor sit amet, consectetur adipiscing elit. Nulla euismod condimentum felis vitae efficitur. Sed vel dictum quam, at blandit leo.