Tockage
1/9th scale resin bust from MDC
Painted in 2009
Many years ago I read a novel by Eric Van Lustbader – The Sunset Warrior. It was the first in a series of four books set in a future that had seen civilisation mostly destroyed. One of the characters in the first book was called Tockage, and although he was human, the name, and the character always seemed like it should have been an android or robot.
It wasn’t until I saw this bust posted on The Basement Forum by Kev Peart – our man in the MDC camp that the idea of using the name came to mind. In fairness, it’s the first bust of MDC’s that I’d seen that I wanted to do, although looking at the pictures, I felt that I’d probably be adding a few bits to the piece.
Although, as usual, I didn’t rush to do anything about the idea, in fact it was several months later that I picked one of these up from the MDC stall at Euro Militaire.
The quality of casting of this piece is very good. MDC are noted for their resin aircraft castings, and they’ve put all those skills into the figures that they produce. Clean up is simple, casting marks are minimal, and parts are well formed.

Anyone who’s a fan of the Games Workshop range might possibly think this looks a little like the Tau; I thought that too, but there’s a lot of differences, however, changes could be made if you wanted to convert it into something like that.
I didn’t though, I wanted just to add to what’s already there, and I also wanted a relatively quick finish to start me off after Euro and Games Day – a very busy seven days !
The parts are laid out in photo #1 and whilst there’s little clean-up, some of the sculpting is a little rushed. I think that about the whole range, and although probably perfectly fit for purpose, I think a lot of people will choose to use items from this range of busts as a point to begin from, adding or carving away details to change the offered design into something different.
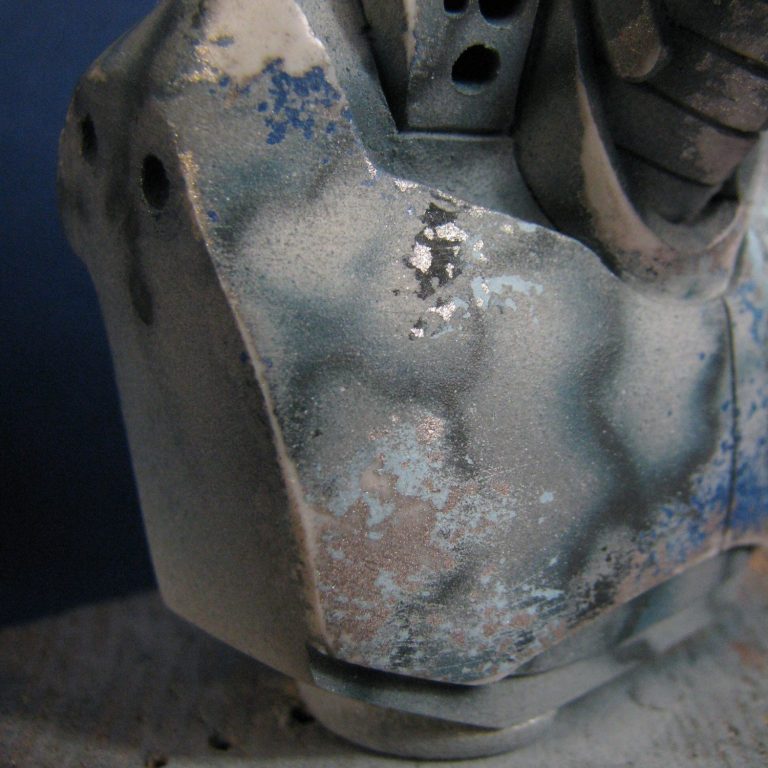
With regard to this bust, I wasn’t happy with the two cog wheels at the back of the head. They’re not particularly well cast, their placement doesn’t seem to suggest that they would do much, and they’re twisted. I considered cutting them out from their position, but that would take quite a bit of work. Replacing them would be a problem too; as I didn’t have anything of an appropriate size that could be put in their place, so basically, I was stuck with them.
Disguising them might well be an option though, so I’d have a think on that as I was drilling out holes for the wire support that would fasten the main casting to a block of wood to enable me to paint it.
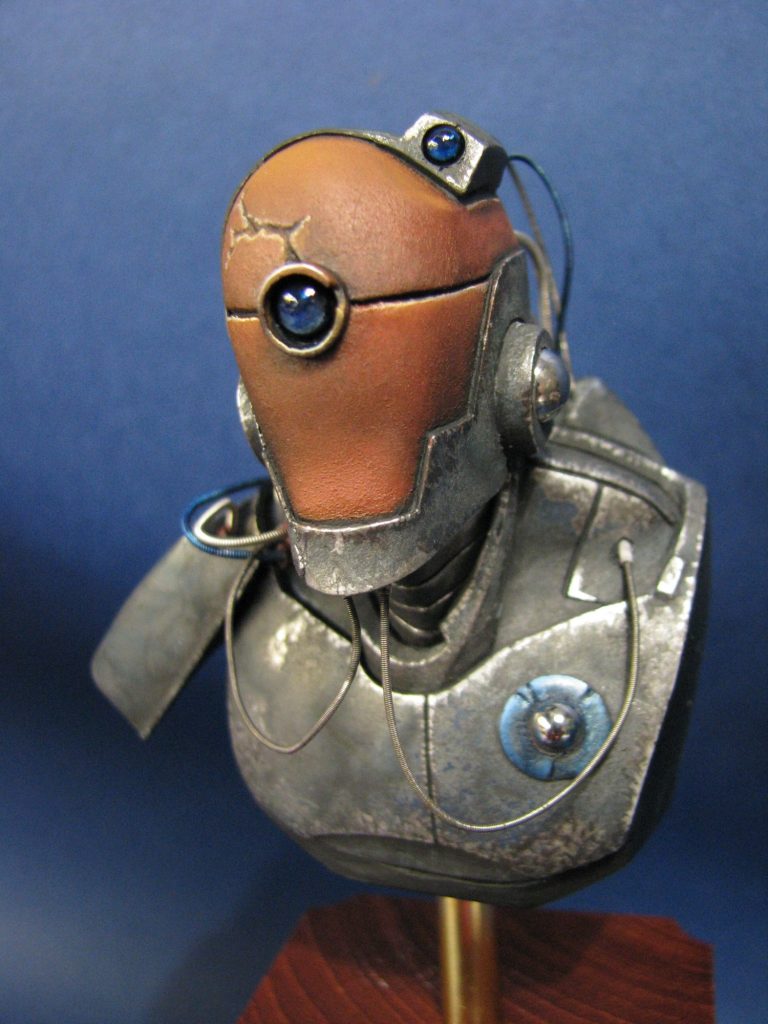
Photo #2 shows a close up of the main casting, and I’ll draw your attention to the “eye”, which has a strange pointed looking lens. Personally, I didn’t like this at all, and so I thought I’d drill this out and add a ball bearing to make a properly convex surface – thus providing a lens shape for when I come to adding the paint.
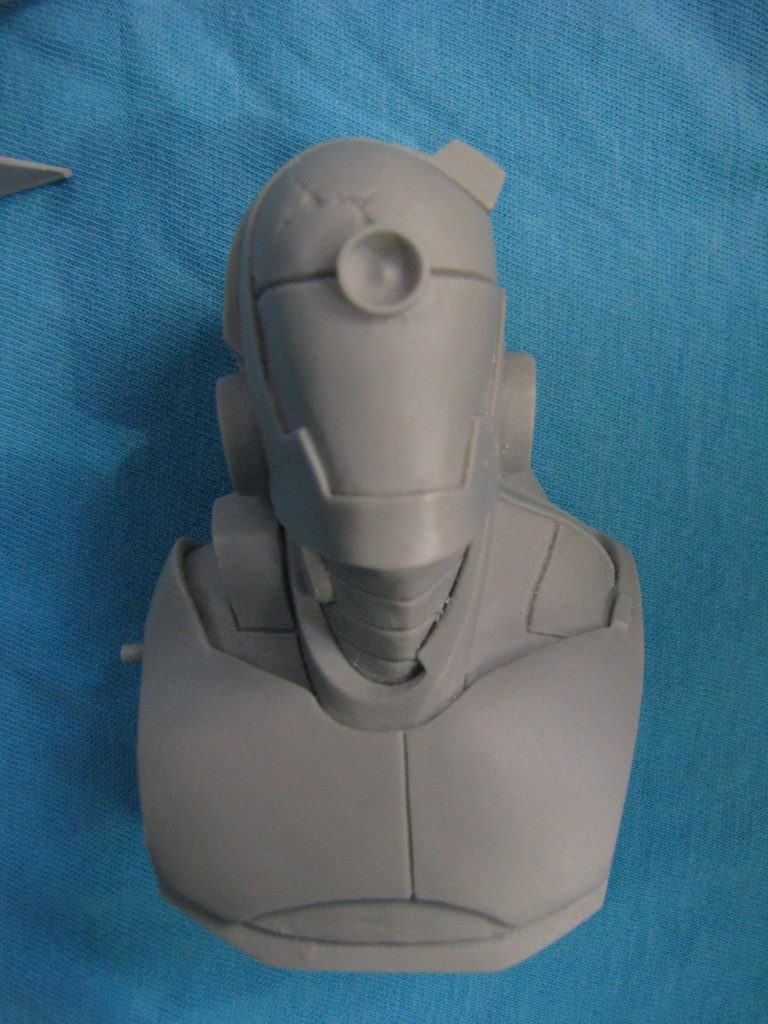
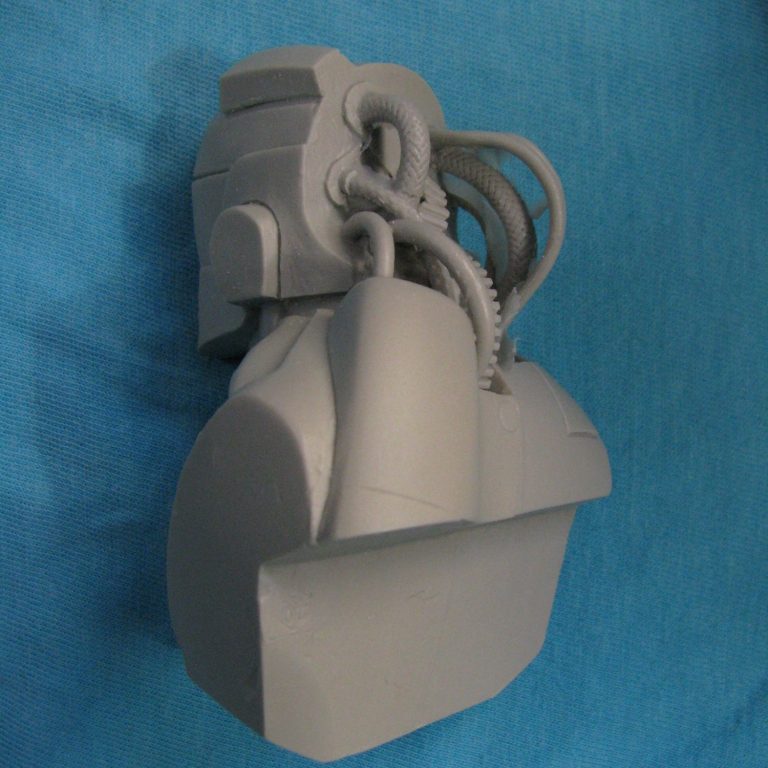
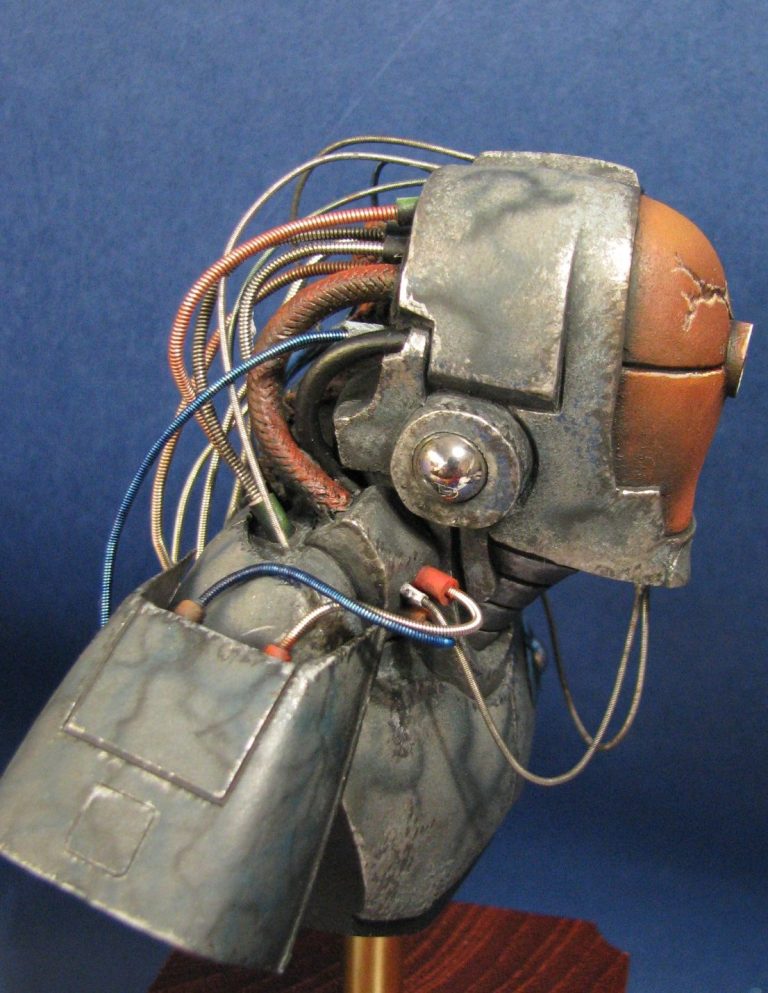
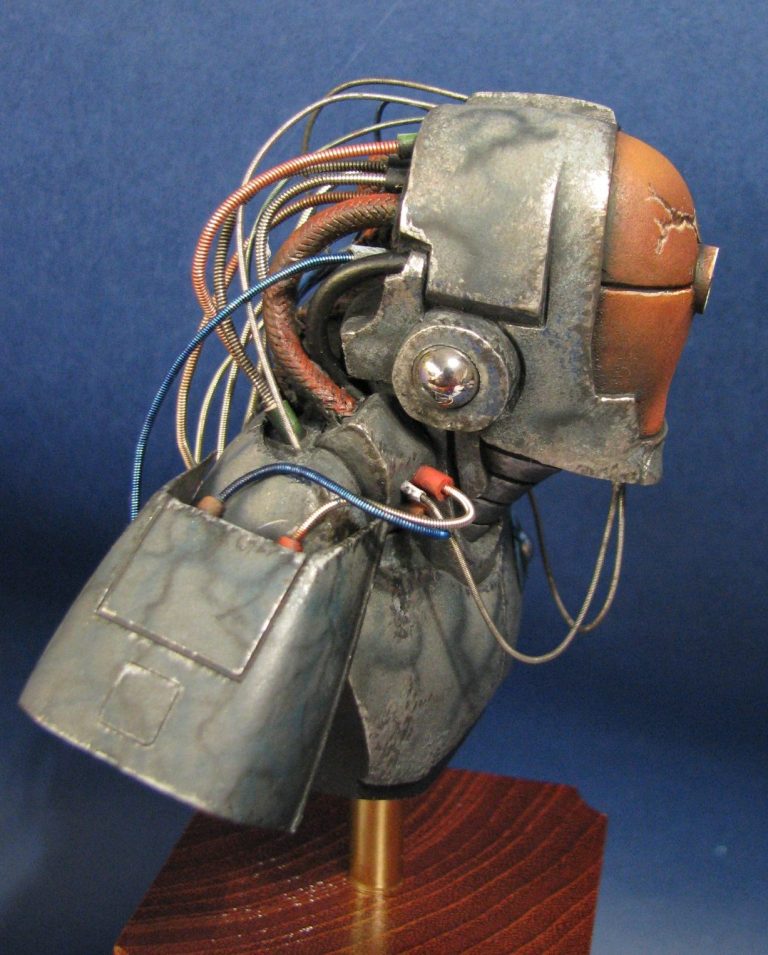
Photo #3 shows some of the back of the main casting – The two cogs are just about visible here, although you can’t see how twisted they are. The wires are well done, although there are some moulding fillets and flash to clean off – which isn’t difficult, but use a sharp scalpel and work carefully.
The shoulder cover that is shown in the first shot is a bit odd, and at this point though people were commenting on it’s similarity to the intake on a Hawker Hurricane ( or the like ).
In photo #4 I’ve begun adding guitar wires to the back of the head. The small connectors at the ends of these wires are just short lengths of the plastic sheathing from electrical flex, and also you can see that I’ve drilled another hole into the side of the head in the place that would approximate where the ear would be on a human. I did this to both sides of the head, to even things up, and it added a bit of life to a previously flat and detail-less surface.
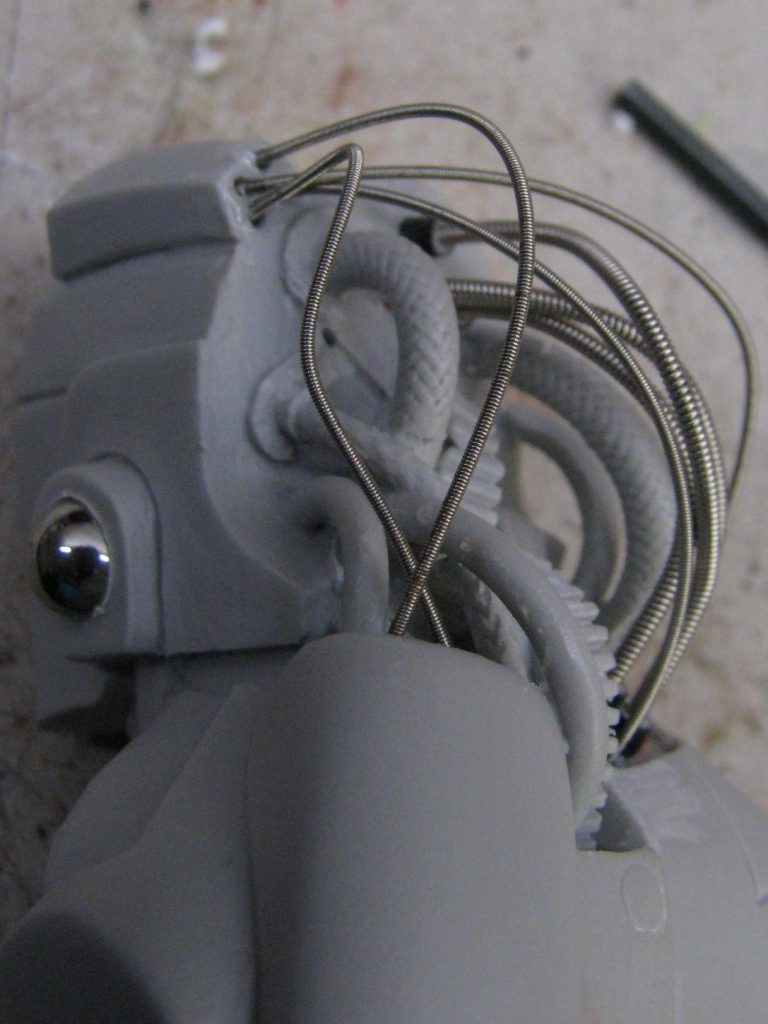
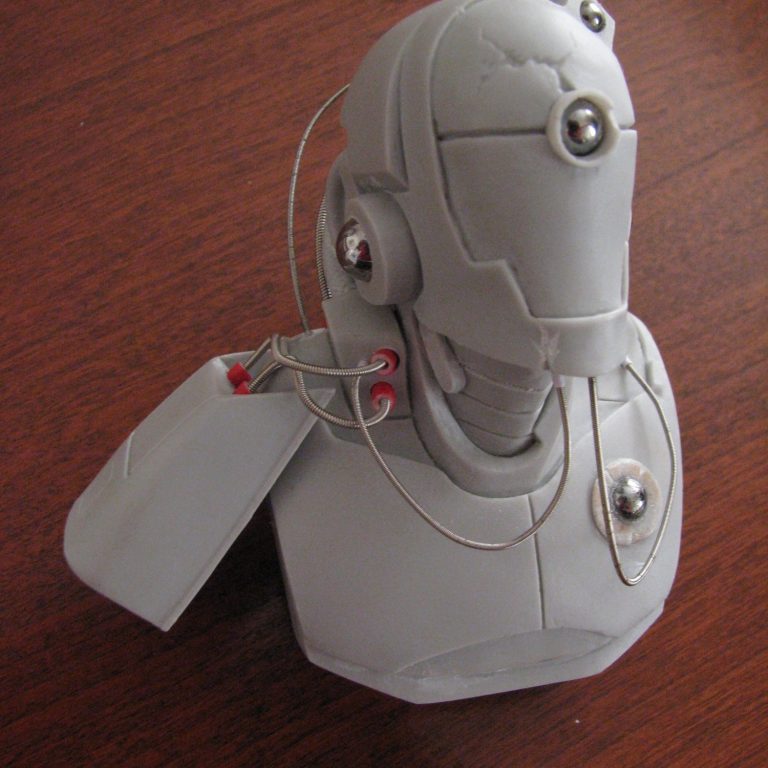
Photo #5 shows the front of the bust again – I’ve gone a little mad with the drill and ball bearings here – adding them as mentioned for the eye and ears, but also to the small sensor on the top of the head and one for the chest too. The disc that goes around this latter bearing is actually made from a curl of resin that was produced when drilling out one of the holes. I flattened the curl out and glued it into place.
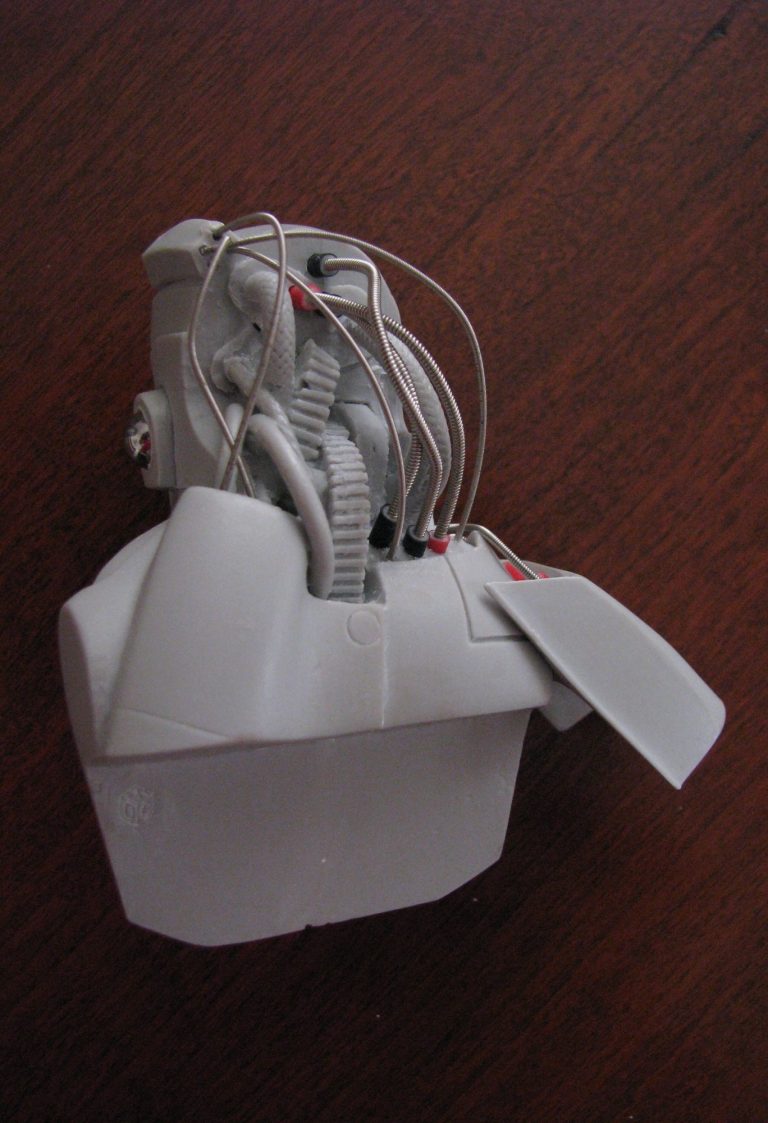
There’s more guitar wires being added in photos #6, #7 and #8, and this shows how the back of the head is being gradually camouflaged. I thought that I’d add some more still, but was running out of options for where they might plug in.
When in doubt though, simply make it up, and I thought that by having some of the wired left dangling, it might suggest that they plug in lower down, or that they are options that can be plugged into the back of the head when the ones that are located have been removed.
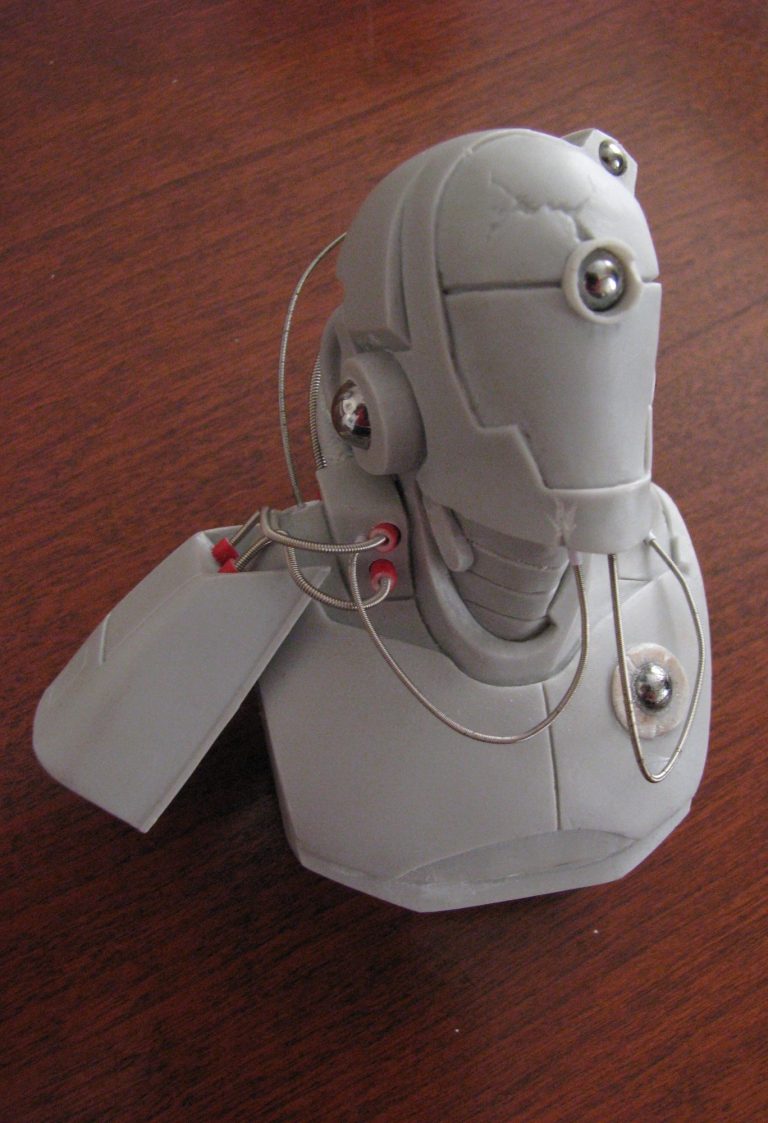
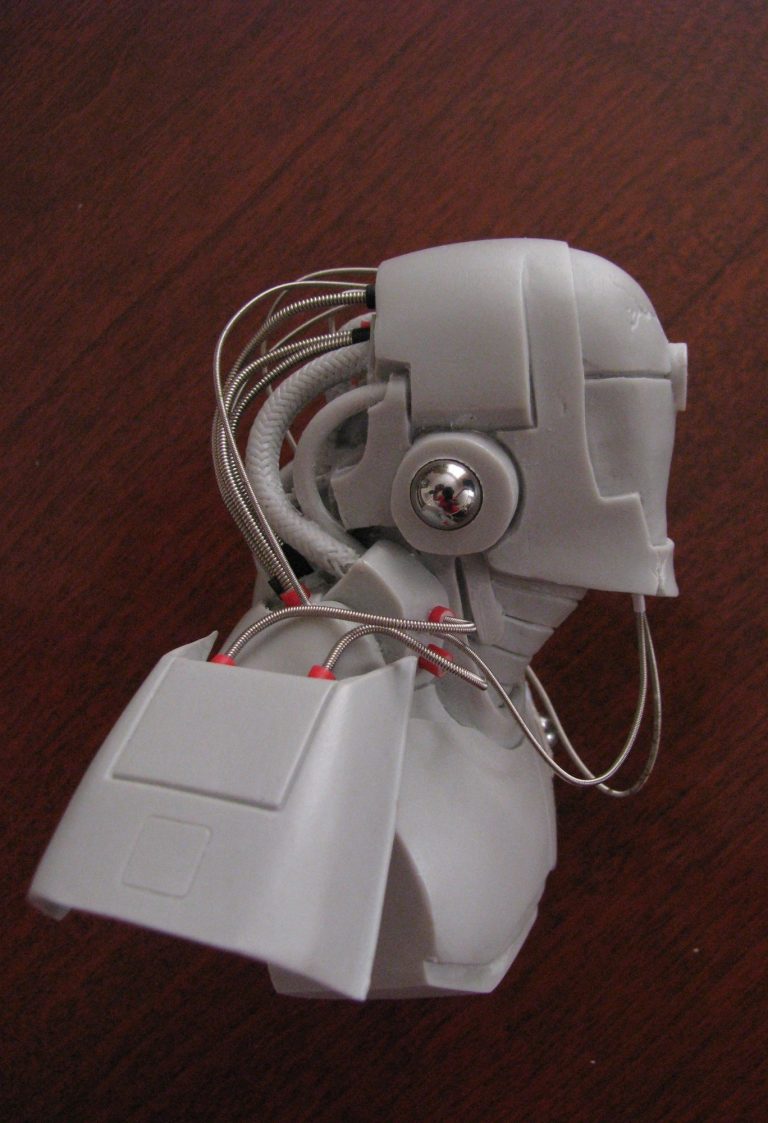
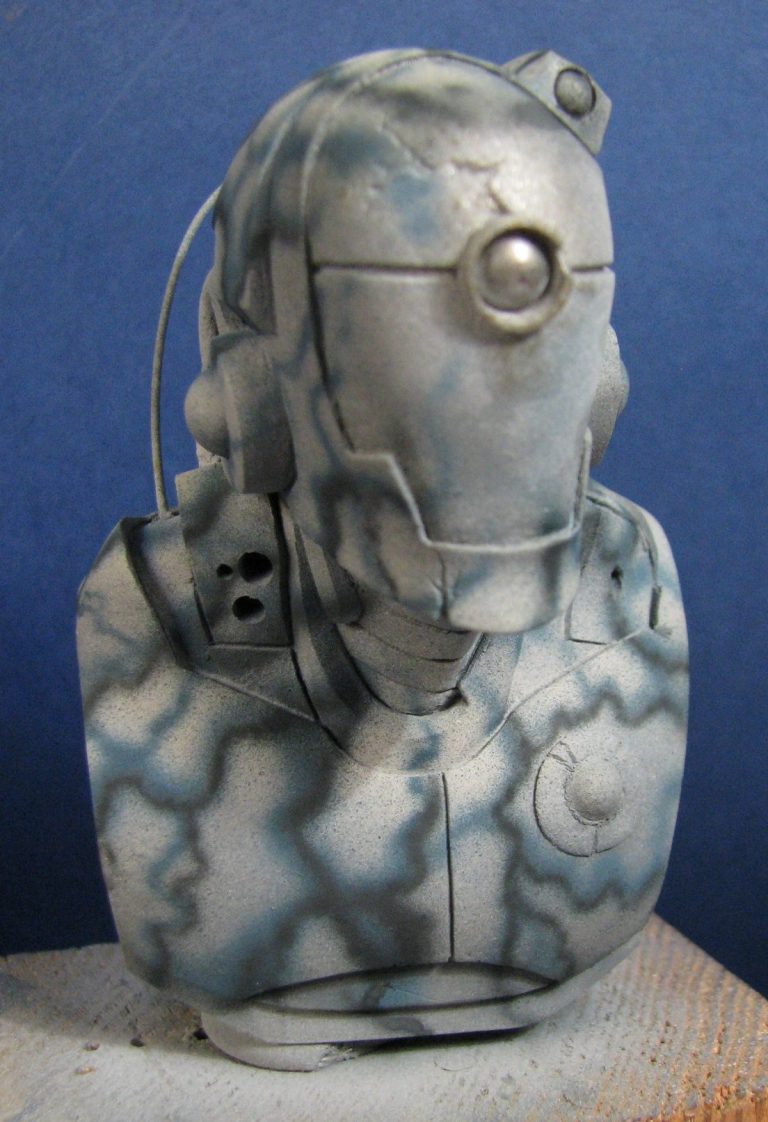
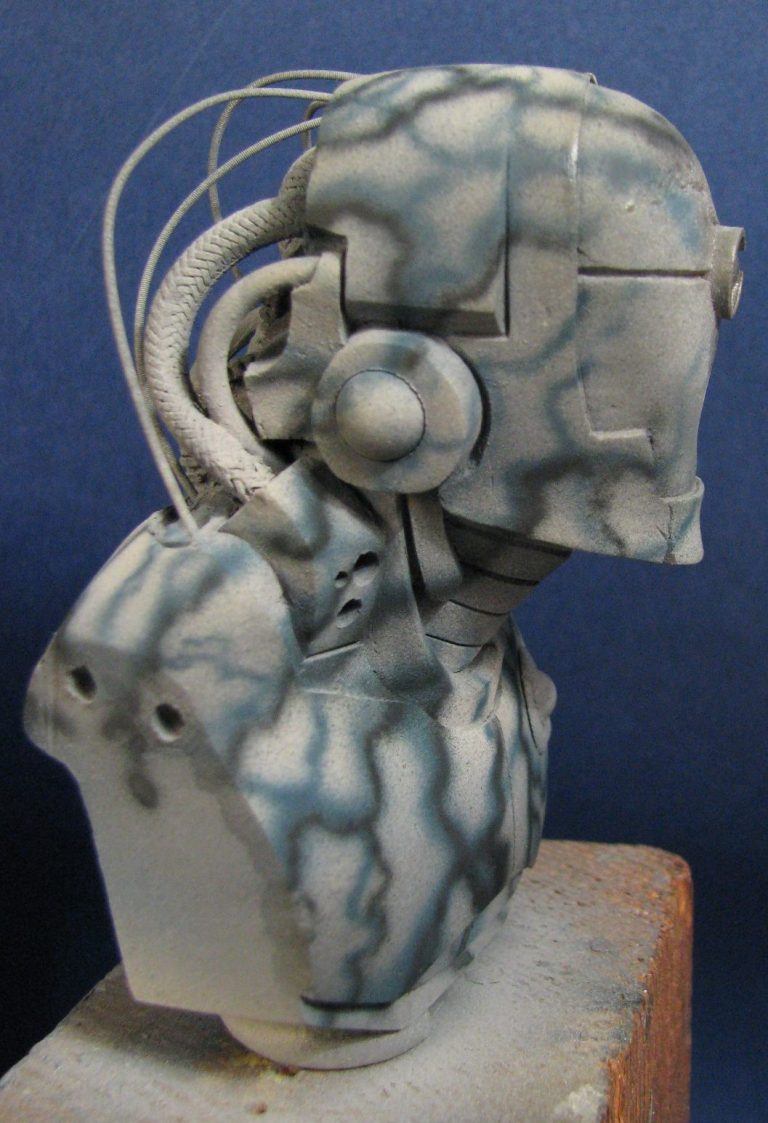
Photo #9 and #10 show the second attempt at painting the bust with an airbrush. I wanted to have a damaged and weathered look, and so I began by spraying the whole thing with some silver enamel. This was left to dry in the drying cabinet overnight, then I dabbed on some small amounts of Marmite ( yes, the horrible brown goo that some folk smear on bread – Ugghhh ! ). Anyway, it has an excellent use for modelling, that being that acrylic paints don’t stick to it.
So, using a grey, a blue and a black, mixed up from Tamiya colours, I sprayed on a very basic urban camouflage scheme.
To cut a long story short, this worked only in the sense that bricks can fly.
So it didn’t, actually.
The idea with the Marmite is that you use a soft brush and some soap to gently remove the Marmite and the paint that’s covering it, thus leaving the silver paint showing that’s underneath. With me having made a proper mess of the colours – much too bright – on the first try, I thought that I’d make it look like he’s had a re-paint at some point, rather than trying to strip the whole thing off again.
Remember I said I wanted this to be a quick paint-job ?
So once again, the Marmite was added, and this time more muted colours used for the camo scheme.
This worked a lot better, and the added bonus was the brighter colours showing through in patches where the Marmite had covered them – cool ! See photo #11
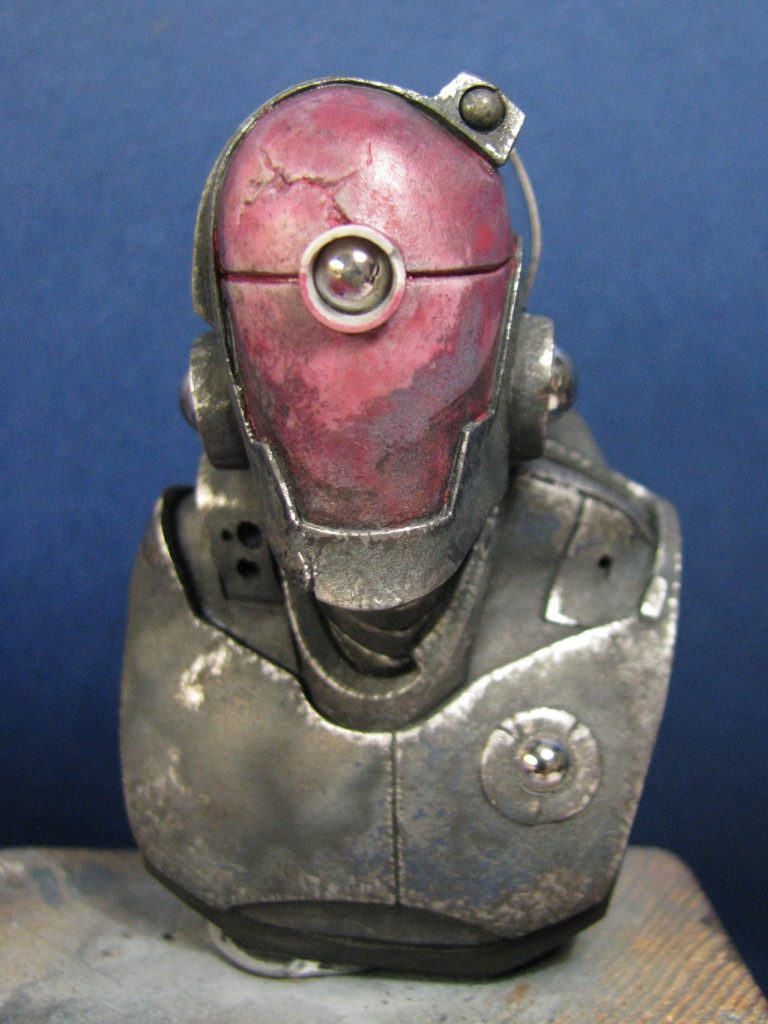
Once washed off and dried, I added a thin wash of Mars Black oils to the whole piece. This was gently dabbed off, but sorted out the colours even further by muting them down, blending them in to each other more, and also defining the panel lines a lot better – see photo #12.
Photo #13 shows the face undercoated with an orange acrylic ( GW foundation colour ), and I’ve also added some silver ( GW Chainmail plus some Chaos Black for the shading and Winsor and Newton Silver Ink for the highlights ) to the neck.
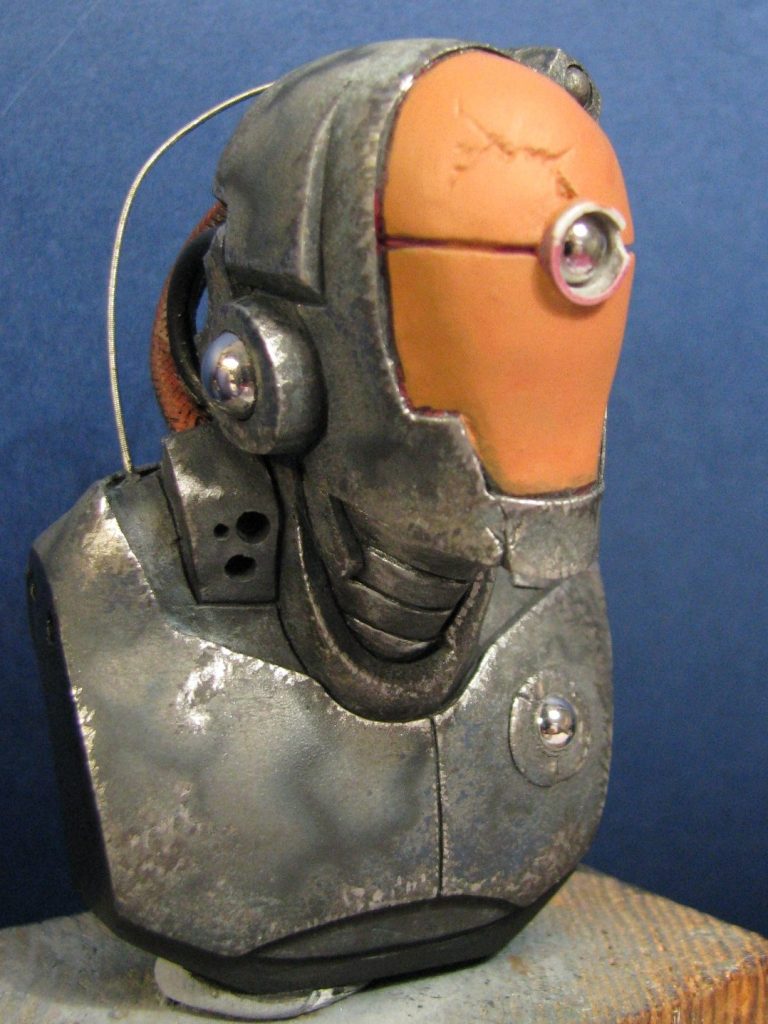
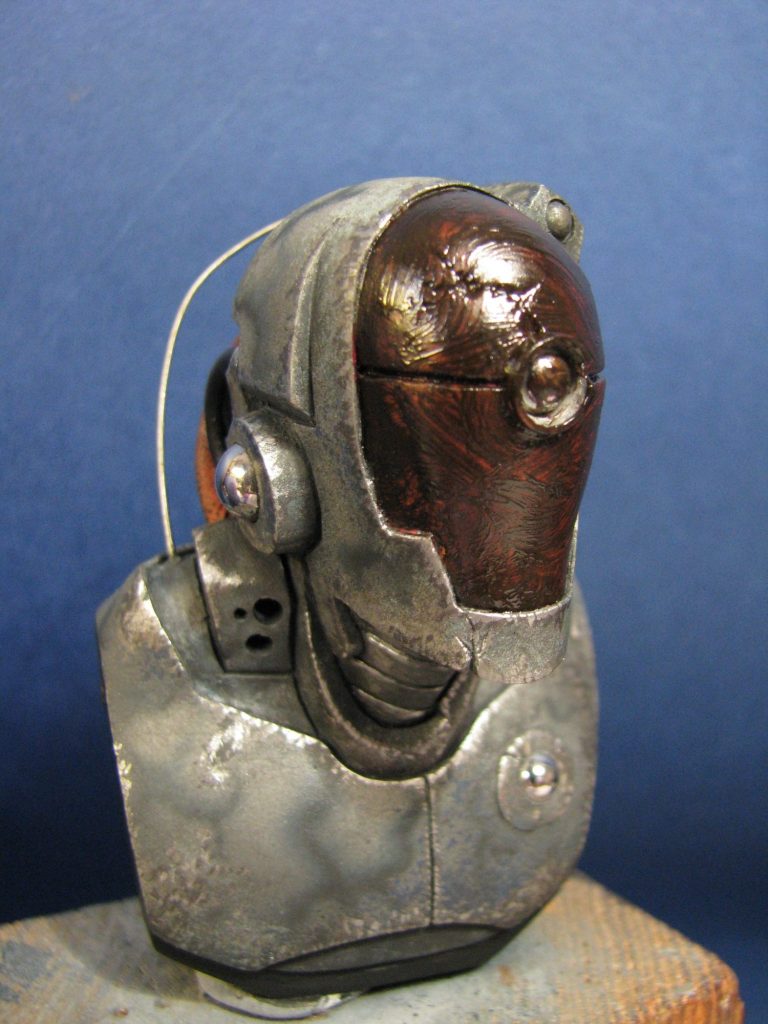
Sometimes people ask to see how the oil process works, well the beginning of that is shown in photo #14. Te rusty orange undercoat is pretty close to the colour I wanted for the highlight, and to get the rest of the colours blended in, I begin by adding a coat of dark brown – in this case Burnt Umber.
Most of the colour is removed with a soft cloth ( an old T-Shirt will do just fine, and then into that are blended the mid tone and highlight colours.
For the mid tones I used some Mars Brown, then gradually blended some Light Red into that, and finally some Mars Yellow.
The idea is to pick the areas that you want to appear as raised and catching the light that falls from above, and then add mid-tones and highlights to these. The oils allows a lot of time to blend, and I use a fairly large flat brush to do this, stippling ( because I want a crumbly raised texture ), and wiping excess paint off the brush at regular intervals. The stippling motion blends the paint together, but you must be careful not to move the brush about too much, otherwise the different colours just mix all into one, and there’s no definition between the lighter and darker sections that you wanted to build up.
The finished “face” is shown in the next shot – can you tell that once I got going I forgot to stop to take photos ?
One thing I did to, and forgot to mention, was to remove most of the wires from the bust prior to painting with the airbrush. Some of the finer ones I’d glued into place, and these had to stay, but the ones that could be removed, were.
I had to Blu-tac them to a piece of paper with a diagram of where they went, so that I could put them back in the right places once the painting had been done.
The final shots show the bust finished – well mostly. I did go back and paint up the socket ends of the plugs, these looked too plastic as they were – without paint – so I added some shadows and highlights with oils.
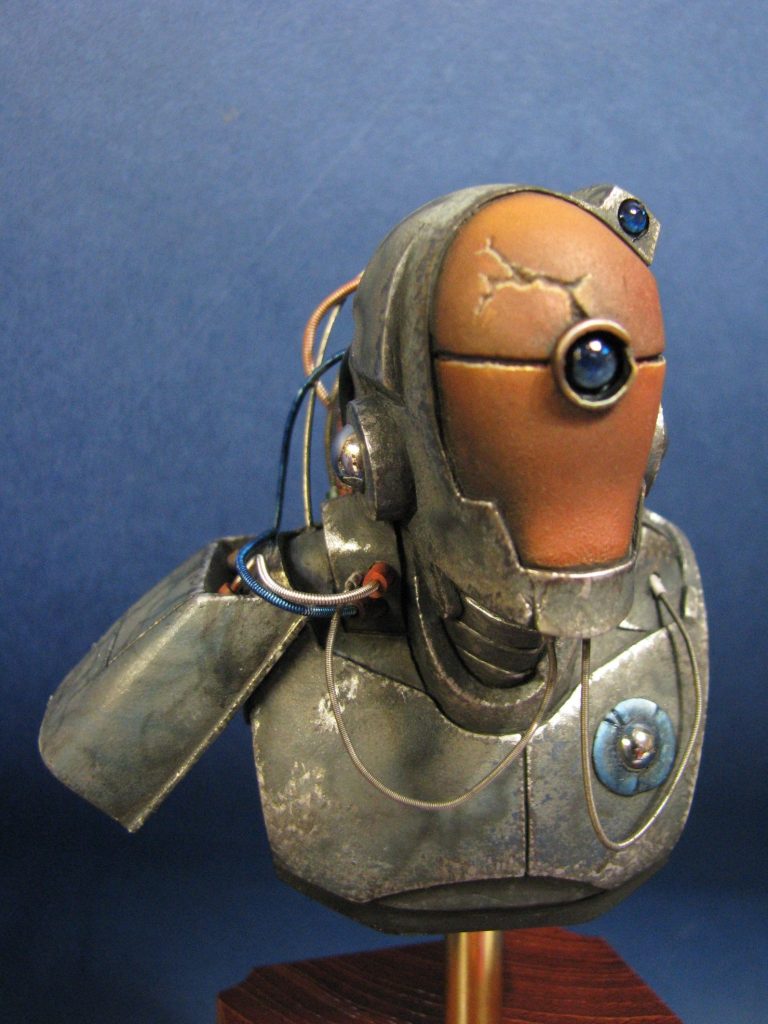
Conclusion.
I think it fair to say that this bust, and the rest of the range that it comes from are both good value and of varied enough subject to allow most modellers something that they might like to paint. I also think that the original sculpting – whilst skilled – has been rushed.
it's unfortunate that MDC stopped trading a couple of years ago, however old kits do turn up now and again on eBay, and are worth picking up
The price is fair though, and the production is good.
Having said all that, I also feel that a lot of modellers who’d either like to have a go at altering something, or just want to start sculpting, could do worse than look at these as a starting point. Certainly this one has had little actual work done to it, but having posted pictures on social media, it’s surprising how many folk have said that it looked good and that they’d now think about what they could do with this one, or one from the range by MDC.
I suppose a little imagination, a little putty and the derring-do to make a start on something like this is all that’s needed. Certainly in this time of “Credit Crunch” the cheaper offerings ( and comparatively, these are cheap ), might just keep people buying stuff.
This one, which goes by the name of Zephyr in the MDC catalogue. Back then it was £19.95 plus postage, and for the sake of some old guitar strings and some electrical flex sheathing, it wasn't expensive at all.
Admittedly, this was a quick fix, and took me no more than a week to complete; it’s not so bad in this day of 90mm figures costing nearly a pound per millimetre !