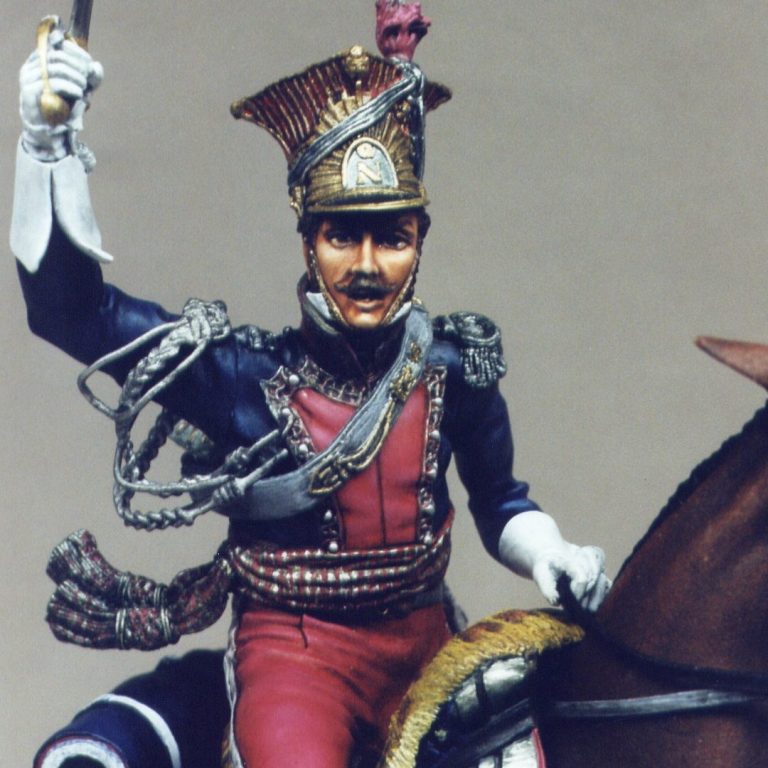
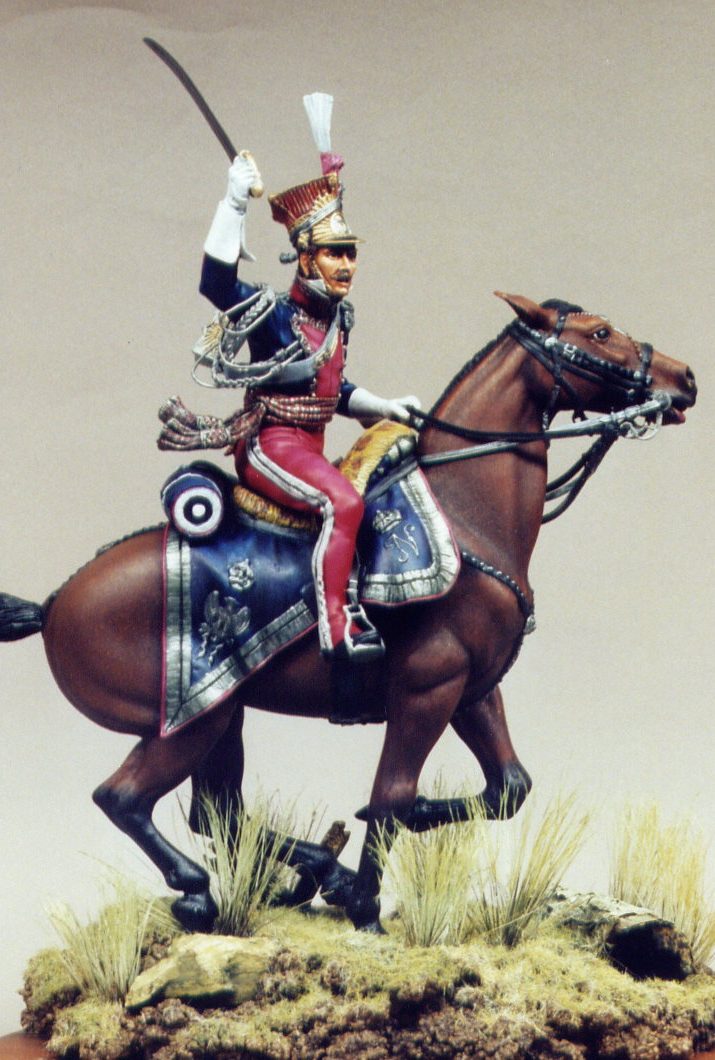
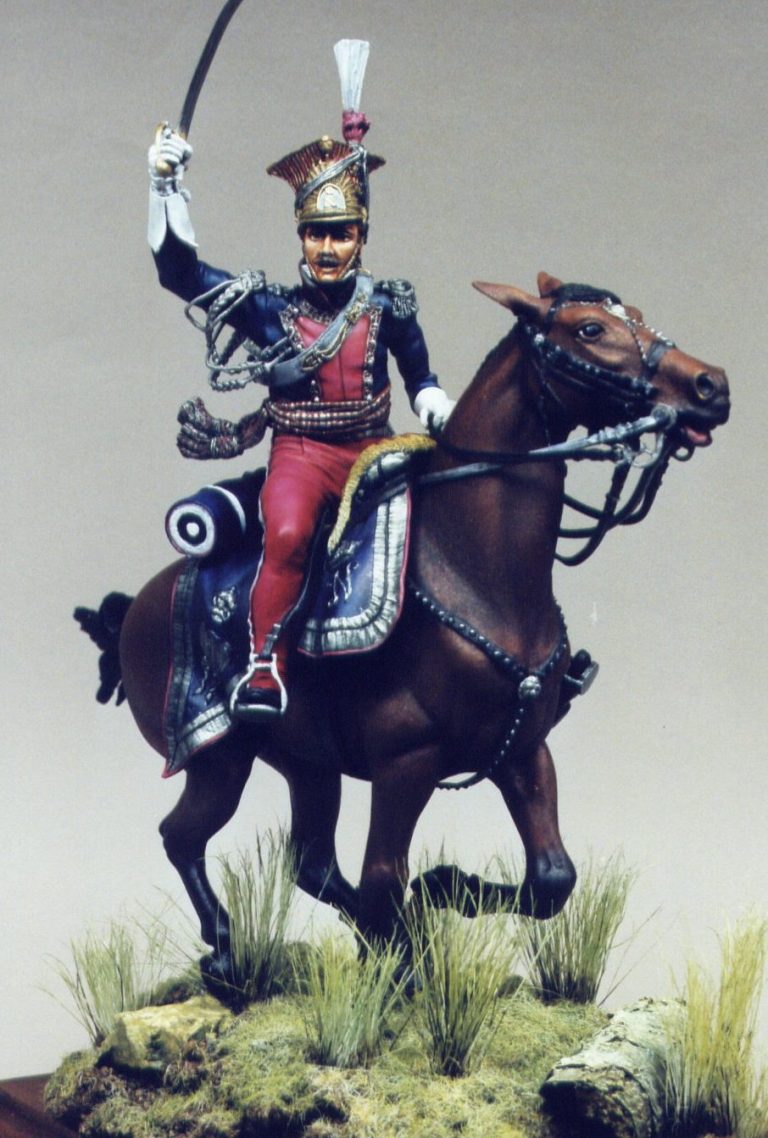
Polish Lancer
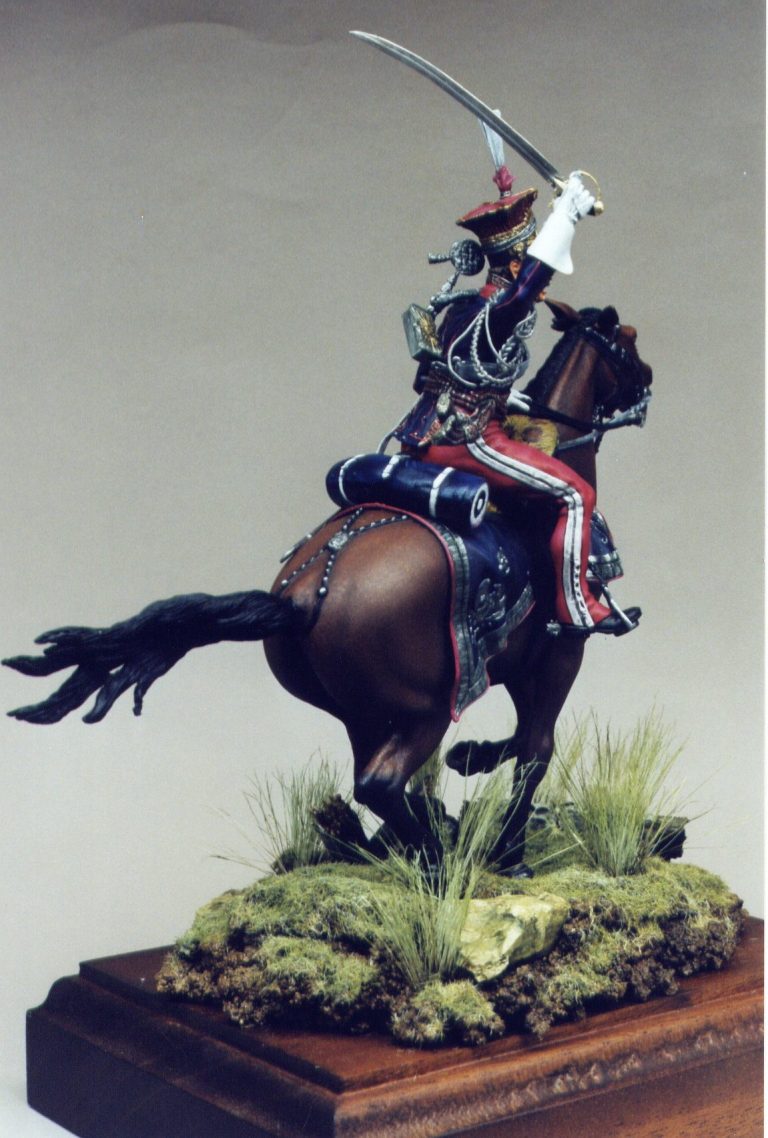
90mm white metal kit from Pegaso
Painted in 2026
A brief history
The Polish Lancers - Regiment de Chavau -Legers Polonais de la Garde - were first raised as a guard regiment in 1807. They were organised from Polish volunteers and made into two companies consisting of four squadrons in each of those companies.
In 1809, following the battle of Wagram, they began using lances, and had this incorporated into their name, making them a lancer unit rather than just on of the guards.
1812 saw a fifth squadron added to the 1st Regiment, and in 1813 the 2nd Regiment was disbanded, a sixth squadron being made up from this to be added to the 1st Regiment. At this time the first three Squadrons were designated as "Old Guard" whilst the second three were given the honorific of "Middle Guard". A seventh squadron was added later that same year, and this was categorised as "Young Guard". This seventh squadron was made up from men of both Polish and Lithuanian stock.
The end of 1813 saw the lancers reduced again, combining the men of the seven squadrons into a mere four, and joining on to them a regiment of "Eclaireurs-lanciers.
When Napoleon was exiled to Elba in 1814, a squadron of the lancers accompanied him, and upon his return in 1815 the regiment was reformed from Poles who had remained in France. This reformed regiment fought both at Ligny and also at Waterloo.
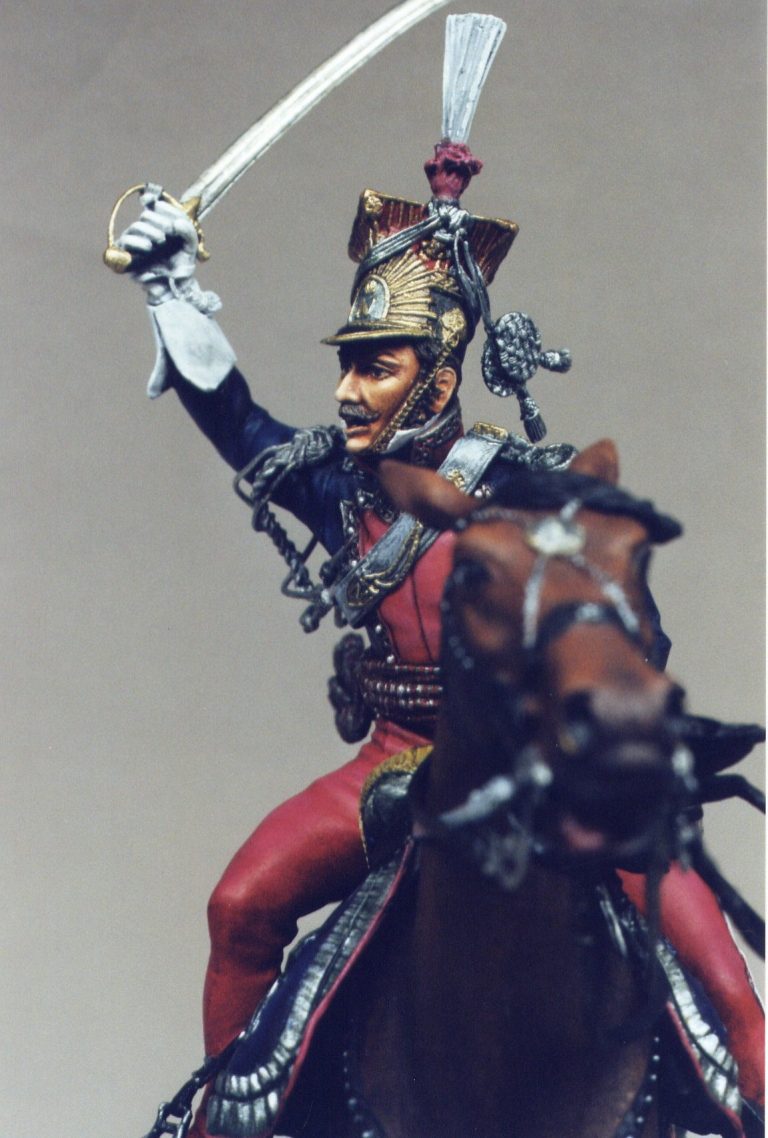
The dress of the company when it was first raised was deemed, by some of the volunteers themselves to be of more importance that that of actually going into combat. Several uniforms were necessary, the dress uniform consisting of White and Polish Crimson, whilst battle dress was the dark blue and crimson as seen on this model. There was a separate "Ballroom uniform" for attending functions, and it was usual for the cumbersome sabre to be swapped at such times for a more compact epee.
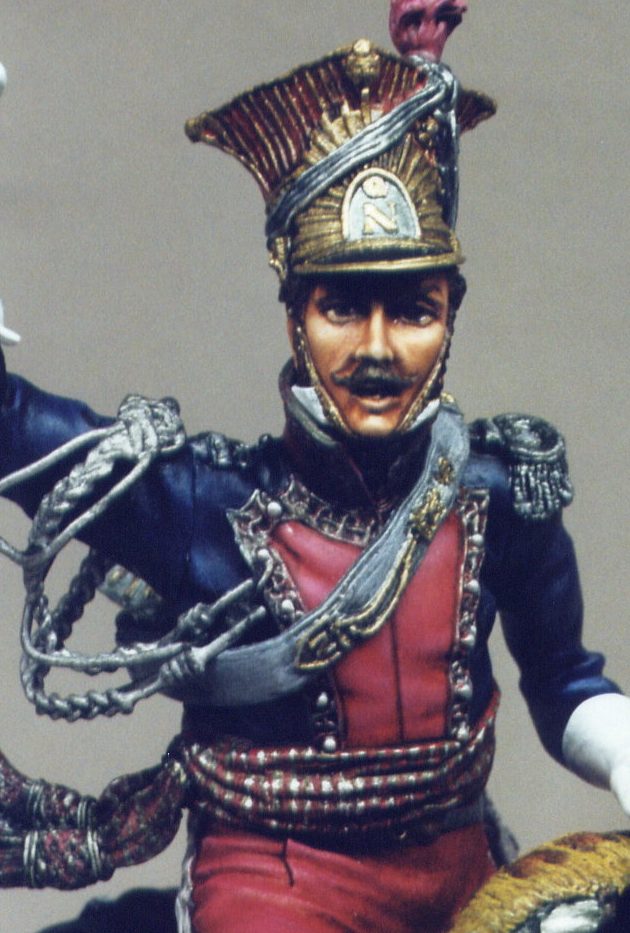
Officer’s uniforms differed from that of the troopers in that the white wool and pewter decoration and buttons were replaced by silver. The material used in the tailoring of all their clothes was much better quality, and hence much more expensive. Foul weather covers were made use of by both officers and troopers, and it was not uncommon to see such things as the silver cross belt with a crimson cover, or the czapska with a black, oiled wrap.
One thing I hadn't realised was that the regiment was originally given musketoons upon their raising. These were kept even when they were given lances in 1809, along with a brace of pistols and the sabre.In 1813 it was remarked upon that the second rank in charge would hardly need their lances, and so a redistribution of weapons took place to take this into account. The second rank were given sabres, musketoons and bayonets, and single pistols.
Possibilities with the kit.
Having consulted with various bits of reference material, both historic and also looking at other people’s models, I came to the conclusion that this kit is possibly a representation of General Krasinski. I'm not 100 % sure of this, as having looked at pictures of a model rendition of this person from Ivo Preda in the Bill Ottinger "Historex Masterclass” book from Windrow and Greene some details, such as the trim on the outer leg of the pants, and some detail additions required on the breast of the jacket are different. These differences could be easily added, and a very nice "personalised" version of the model would result.
The model
I think I should begin with the box rather than the model. The box is the usual dark blue glossy slide cover that is to be expected from Pegaso, and as commented by others, at last this company sees fit to add a colour picture of a painted model to the face of the cover.
Inside there are lots of white metal parts, well moulded, and relatively clean of flash. There is also a multi-lingual card explaining the colours to be used to paint the subject.
The parts are well protected in soft foam, and on the example I had there was no damage due to transit.
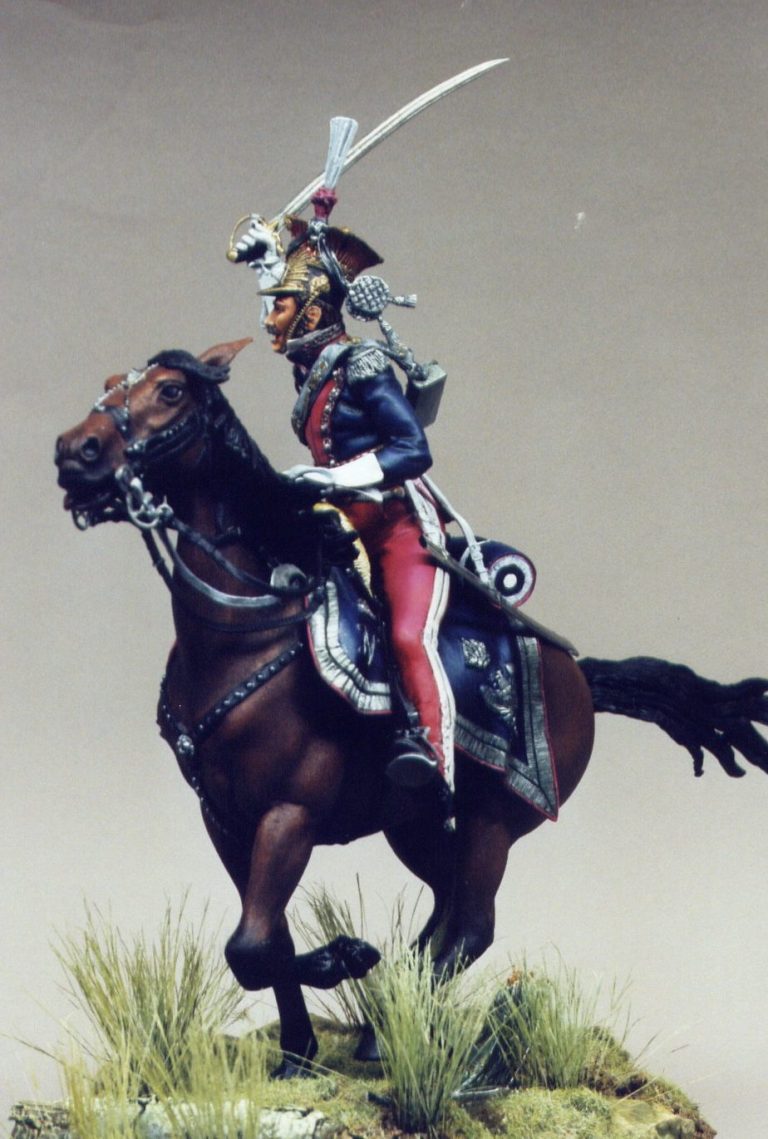
If I was to find a fault so far it would be lack of a back view to the model - in colour please gentlemen - just to help with the painting. Most people will probably have the relevant research material in their libraries, but at this sort of money perhaps just that little bit extra effort from the manufacturer would be warranted.
What I will say though is that this is my only misgiving about the kit. It fits together rather well, and although the horses' neck may seem a little long to some, at least it fits in place without gaps, ledges or masses of filling.
There appears to be a steel rod of approximately 4mm diameter running up the foreleg that is in touch with the ground, how far this extends into the body of the casting I am unsure, but I get the impression that this horse will not be one for bending over to one side after a few months in the display cabinet, and should be safe to take to shows should one wish.
If you were worried by the lack of support, then the steel rod should assuage your fears, but just as a further safeguard, one of the back hocks is in contact with the damaged wagon wheel, and is supplied with a hole that a pip on the wheel fits into. The down side to this was that the fit of the wheel into the rut it's meant to sit in was a bit wobbly, and I would have to add clear resin to this area once the painting and construction was all done so that it would appear to be a water filled puddle.
I spent some time cleaning the kit, or at least going over it in minute detail trying to find those ever elusive mould lines. I got most of them prior to a coat of primer, but as usual some still needed catching after the primer had dried and before I could add any colour to the piece.
I also took time to add pins into some of the joints, this not least to strengthen the eventual fastening of the model together, but also to act as handles for the parts during painting.
Once all parts were cleaned and primed with a spray primer, painting could begin. I decided to paint the model in sub-assemblies, bringing these parts together at, or as near to, the end of painting as possible.
I found that the horse could be almost fully constructed prior to paint being added, the only bits being left off were her tail ( Well it's missing the relevant "bits" to be a boy ! ), and also leaving off the breast strap and the reins, as these would prove delicate during painting. I also added the saddle and shabrack, and once the glue had dried, drilled a hole into a block of wood for the pin on the supporting leg to fasten into whilst painting took place.
By comparison, the figure was left almost totally in kit form, having only the stirrups glued onto the soles of the shoes, and the stirrup straps bent into roughly the correct shape to go on the inside of the figure's legs once he was seated on his mount.
Painting the model
I began by painting the horse. This is a departure for me in that I normally paint the face of a figure first when beginning a project. I've found however in the past that painting the horse first seems to get things moving, and working between the horse and rider alternately allows each newly painted area plenty of time to dry.
In the instructions it is noted as being a light bay. I decided to mix up some colours for this, rather than just using colours straight from a tube. There's probably not much difference to the outcome overall, but playing about with different mixes was fun. In the end I chose a shadow colour mixed up from equal parts of Burnt Sienna, Brown Madder Alizarin, Yellow Ochre and one or two dabs of Flesh Tint and Lamp Black.
The lighter colours were only added to this in the smallest amount, their presence being there so that when the lighter colours for the mid-tone and highlight are mixed up, the three colours arrived at ( Shadow, Mid-tone and Highlight ) will all have common constituents and so look more natural when put together on the model. The mid tone was mixed up using a high bias of the Burnt Sienna, and the highlight using more of the Flesh Tint and the Yellow Ochre.
The horse was primed with a couple of thin coats of Humbrol white, this being followed by a coat of "Desert Sand" In this instance the Desert Sand is going to be light enough to act as a final highlight, the three oil colours being applied very thinly, and stippled to blend them into each other.
I've found in the past that using a stiffer haired brush - Hogs hair or even one of the cheap plastic bristled brushes - on this size of model leaves lots of texture on the surface of the paint, and looks like the short haired coat of the animal in question. I'm still trying to get enough reference shots built up so that I can work out the direction of hair growth over the body of the horse, but the method, to me at least, leaves an effect that I find more pleasing than the "smooth" haired horses sometimes seen on display.
I let the paint dry fully on the horse, then strengthen the shadows with the addition of some more Lamp Black afterwards. Once the horse is done, the details of the shabrack and the saddle cover can be blocked in using, in my case, Humbrol enamels.
The fact that my horse ended up a darker colour than intended was because my initial attempt looked too pale and washed out. I decided to add washes to darken the colour, but this ended in disaster. I stripped all the paint off the horse using "Nitromors" which is a household paint stripper available from most DIY stores, and once the kit had been washed and re-primed, I could begin again .
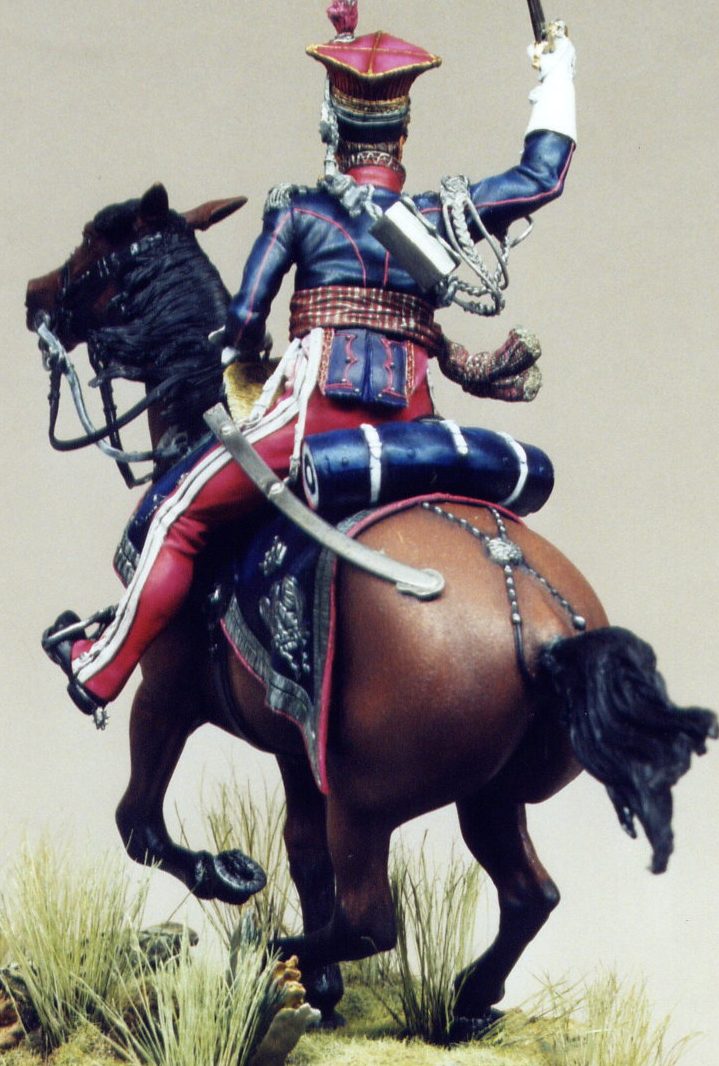
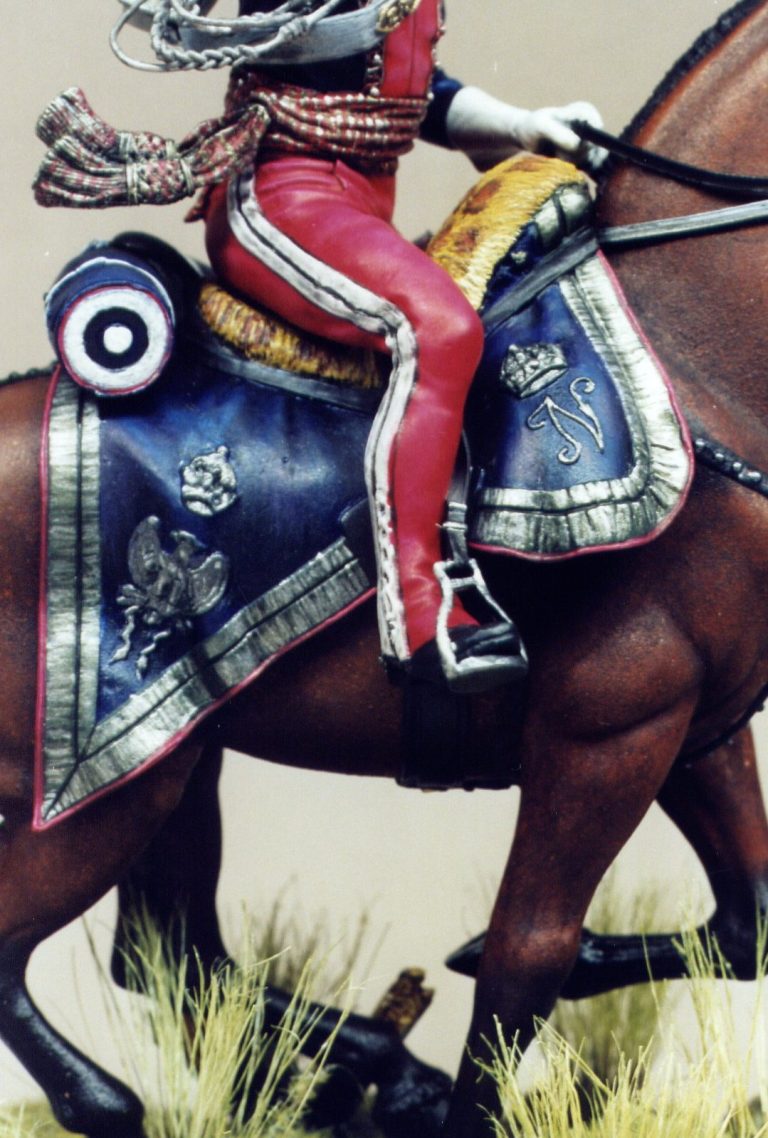
Blue oils are always a problem to paint with, as they tend to dry with a gloss finish. However, I thought I'd give it a go for the blue on the shabrack. It seems to have worked pretty well, although not perfectly matt, I did apply some of the same paints used to an old model and left this to air dry. This second model had a more distinct sheen, and I think I'll be using the "heat dry" method in future. For information I used and old shoebox placed in the airing cupboard with the model propped inside this for 24 hours to slow cook the painters using a heat source - "Crock-pot", light bulbs, or radiators - to help speed the drying of paint. This apparently also tends to get rid of a lot of the gloss finish that oil paints can sometimes exhibit when dry.
To represent the silver decoration on the edge of the shabrack, I used an undercoat of dark green enamel, mixed up from grass green and gloss black. Over this, once dry I added a thin coat of silver mixed with an equal amount of gloss black, this being applied in distinct lines to try and emulate the stitching of the silver thread used on the full sized original. I then added highlights of pure silver, again trying to stick to the lined appearance of the full sized item. I do find representing gold and silver decorations on cloth very difficult to reproduce. Too much metallic paint, and too smooth a finish and it looks like solid metal. too little metallic paint and it looks like dull cloth. I was happy with the result on the shabrack, but I think it's too dark. This one has seen quite a bit of weathering is the excuse I'm giving. I used this method to represent all silver decorations on the rest of the model, sticking to black undercoat and silver for the metal areas. Although this might not appear to have worked as well as I'd have liked, it does at least differentiate between what is woven cloth and bullion, and what is solid metal.
The only metal area I didn't paint was the sword blade. I actually polished this up and then sealed with a gloss varnish.
The blue areas of the shabrack and also on the officer’s jacket were painted with an undercoat of dark blue, this being covered with a coat of oils. I began with Prussian blue, lightening this with additions of white to form both the mid-tones and some very restrained highlights.
Now for the pink. I've been having a dabble with acrylics of late, and far from being proficient with them, have at least managed to discover some "new" out of the pot colours. One of interest is "Blood Red" from Games Workshop. If my blood was this colour then I think I'd be beyond even the best doctor's tender ministrations, this notwithstanding, seems to be a perfect undercoat for the pink areas of the jacket and trousers.
I even used it as the finishing coat on the piping on the officer’s jacket, and also on the piping on the shabrack by simply mixing in some dark green to "grey" the brightness down.
The oil colour I used for the pink was Crimson Lake and by mixing in a tiny bit of monastial green, I could shade the areas sufficiently without muddying the colour. The highlights proved less successful in my opinion, I tried white, which pushed the colour too far towards pink, and even using flesh tone didn't seem to improve things. I didn't try orange, but having thought long and hard about the colour change when adding the white or the flesh tint, perhaps I should have tried that colour instead.
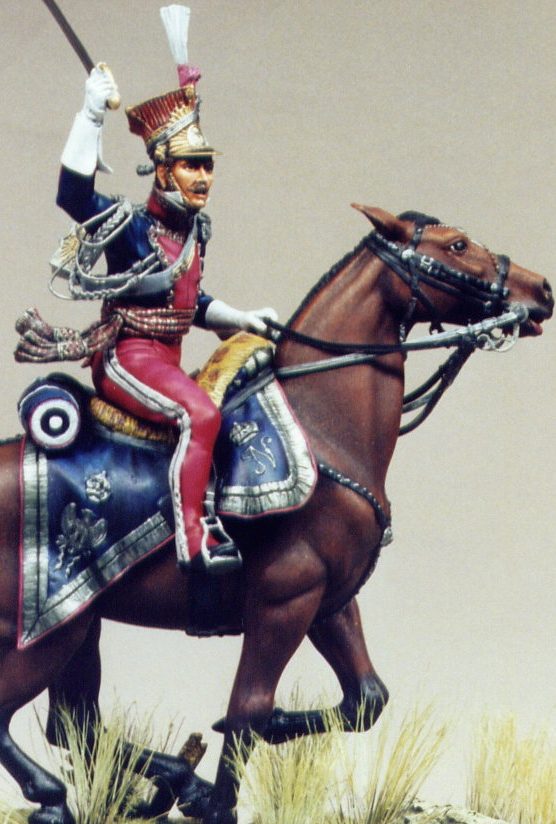
I'd better mention the sash, which is, according to the instructions, crimson with silver stripes. I found that painting this in reverse, so to speak, the silver being done first, shaded etc. then adding the red acrylic which was itself shaded by the underlying dark / light areas of the silver. Highlighting and shading these two colours separately could provide one with the most horrible of painting nightmares I'm sure.
With the gloves I decided to try using the acrylics. I began with a pale grey, mixed from black and white, adding washes of pure white to this to build up areas of highlight. It seems to have worked better than my last forays with acrylics, but these are rather small areas to work in, and I don't think I'll be tackling things like whole horses for some time with this medium.
For all the gold / brass areas I returned to the trusty old Humbrols, Gold being used in its pure form to highlight undercoats mixed from "Brown Bess" and Gold.
All tack and belt work on the horse was painted with semi-gloss black enamel, and the decorative studs and bosses painted in silver, as too were any buckles.
The groundwork
As I've mentioned earlier in this article, I wasn't too sure of the added strength that the cartwheel would supply to the horse. To remedy this I decided to discard the groundwork supplied. I was going to have to extend it anyway, and as it's quite nicely sculpted - as groundwork goes, I thought it'd come in more useful on some other project.
I selected a wood plinth of suitable size, and drilled a hole in this to accept the pin and wire protruding from the horse's hoof. After test fitting, I removed the horse, and put an old paintbrush handle in the hole to stop it getting filled in with the groundwork mix.
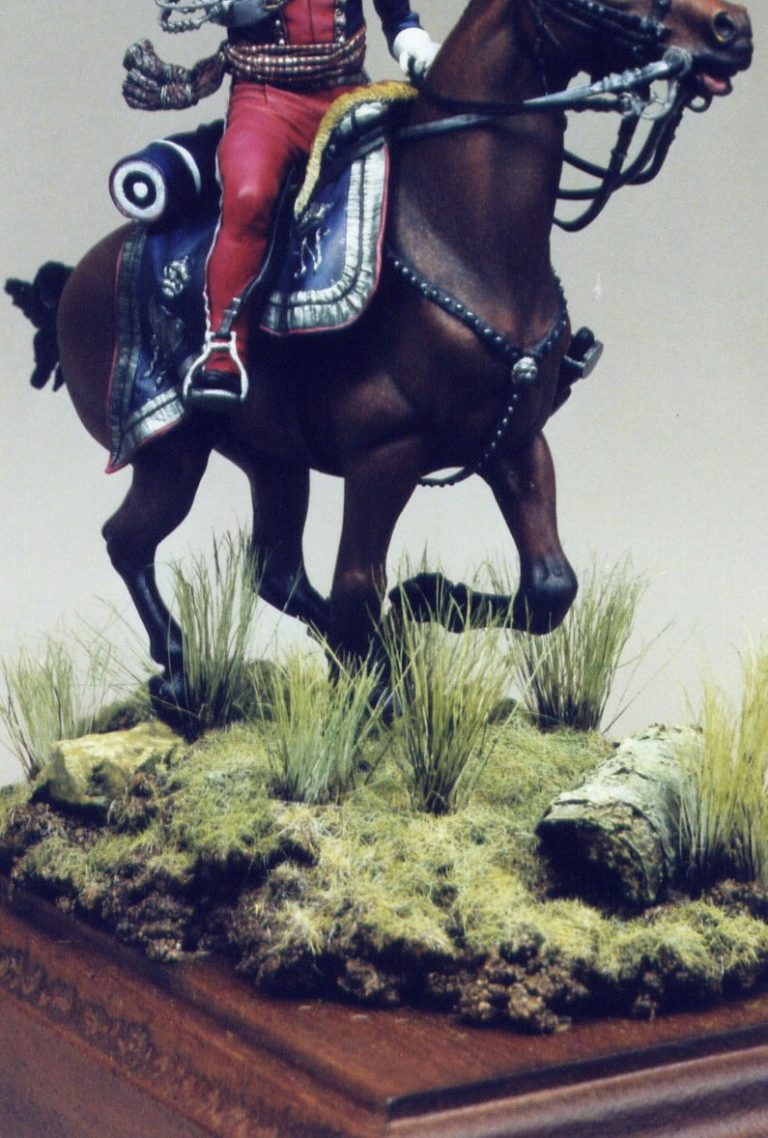
For the new groundwork I used ready mixed filler, white glue, brown acrylic, cat litter and some hair chopped from and old paintbrush. This was all mixed into a yucky looking mess ( always reminds me of nappies for some reason ?), and then applied to a wooden plinth.
While the groundwork hardened, I pinned and glued the wagon wheel to the horse, testing the fit of the two parts with the original groundwork supplied with the kit. This was so that they were all in the correct position.
After about half an hour the "yucky mess" had begun to harden, and I pressed the horse into position, with the wheel attached, this giving a definite placing for the model, which would allow the glue more chance of gripping.
With the groundwork still tacky I also added some cut down hairs from the old paintbrush, these to act as longer stemmed grass, the shorter "static grass" being added once the groundwork was painted and fully dry.
Some assembly
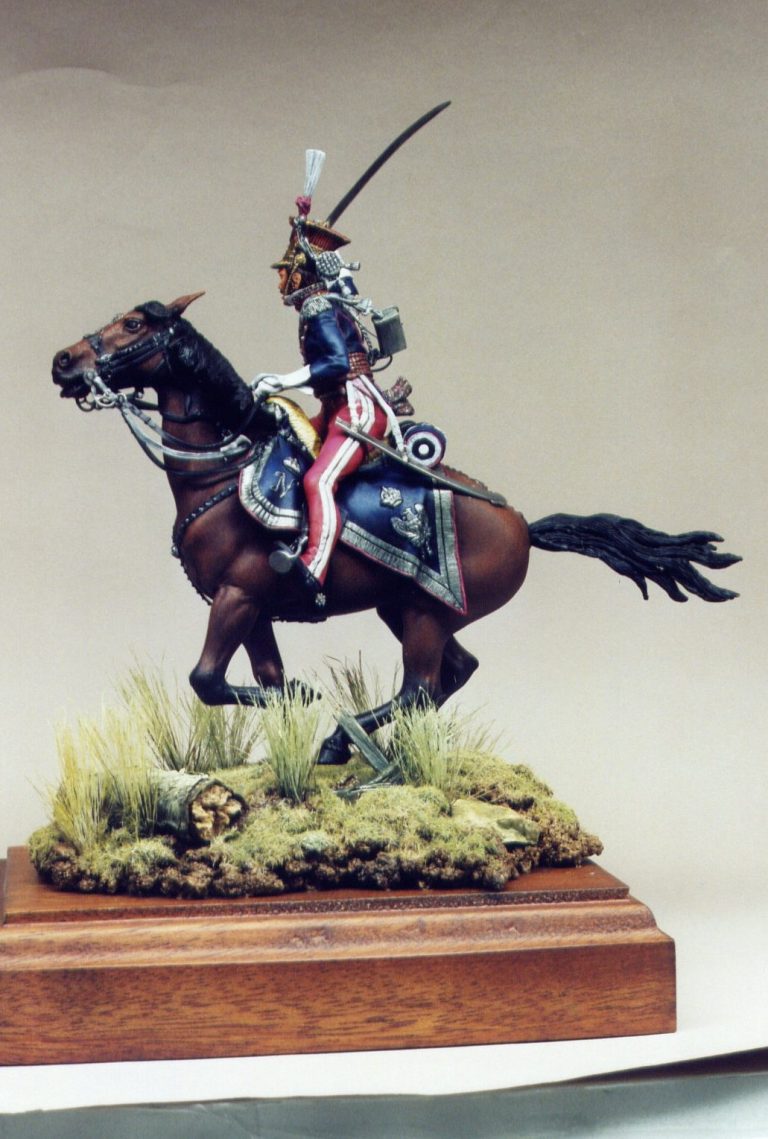
Now to see if things fit. I glued the bit into the horse's mouth ( Alright, it is two side pieces that actually fit onto pins at the side of her mouth ). Then once dry, I attached the first set of reins. These were then painted with the silver "braid" mix, the ends of these disappearing under the shabrack ( With the movement of the horse's galloping ). Now for the problems.
My initial moan about a rear view is now adjusted to requiring an additional side view - the other side please. It took me a while to work out what ( I think ) the other "5th rein" is doing. There is a chain decoration hanging around the neck, this I think should be lengthened with a spare bit from the reins and then the decorative crescent added to its end. The rein that then comes from the foremost ring under the horse's chin is then joined to the strap coming off the left hand side of the shabrack.
I may have been guessing a bit here, but sight as my excuse several variations on Napoleonic rein set-ups, no help whatsoever in the instructions, and having book bashed all the below mentioned reference sources for enlightenment. What I really kicked myself for is having thrown away the Airfix instructions on their 54mm kits many years ago, where you had to build up the reins from plasticard, 'cos I'll bet that the information I required was on them. Please Pegaso take notice, and give us some in depth destructions !
Apart from that problem, things fitted together well, the waist joint on the figure is particularly good, as too is the neck joint. The sash and the plume are slightly less positive, but nevertheless require no filler.
The final parts to be added are the braded loop and plaits on the shoulder, the right arm, after the cross belt and bag, and then the sword. With the rider in position, the main set of reins can be added, bending these into shape, and then painting them before being glued in place.
Summing up
This is a superb kit; it actually fits together extremely well, only needing some minor putty work on the horse halves. The subject is a good choice, giving the converter several possibilities for his skills, not to mention keeping us "straight from the box" builders happy with a good subject choice.
I'm still not impressed with the instructions or reference photo. These need reviewing by the company I feel, and bringing into line with the likes of Andrea, especially with the high cost of this kit.
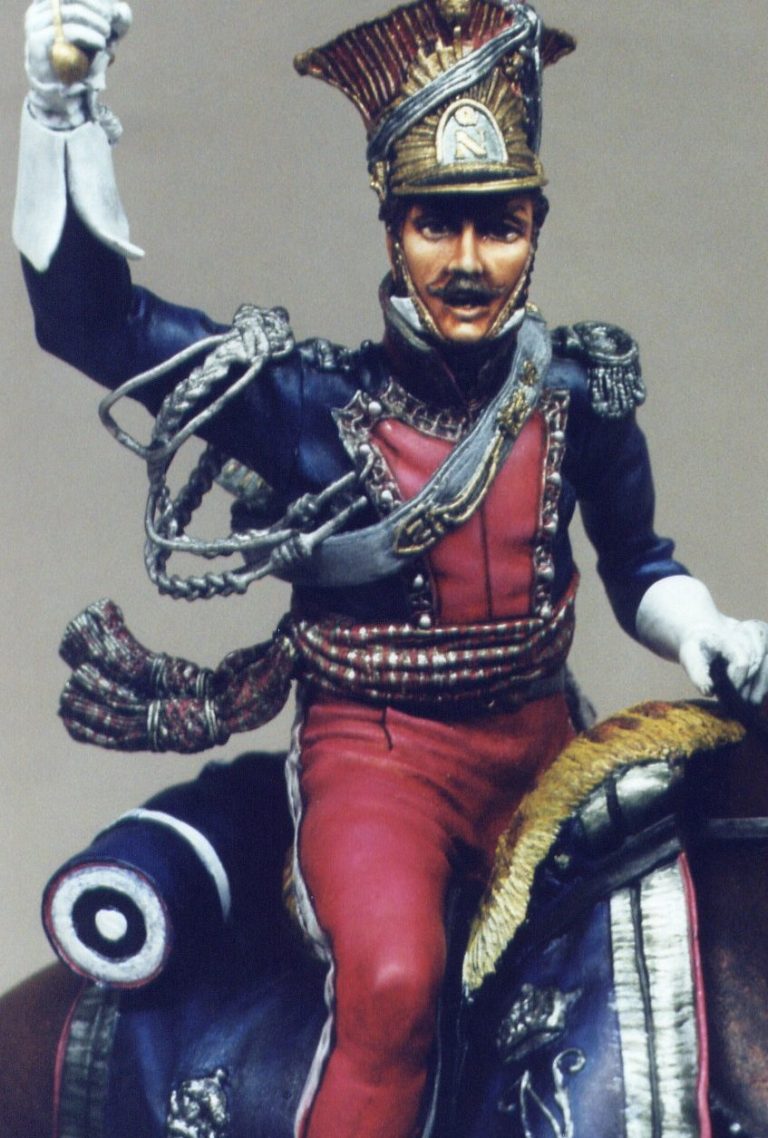
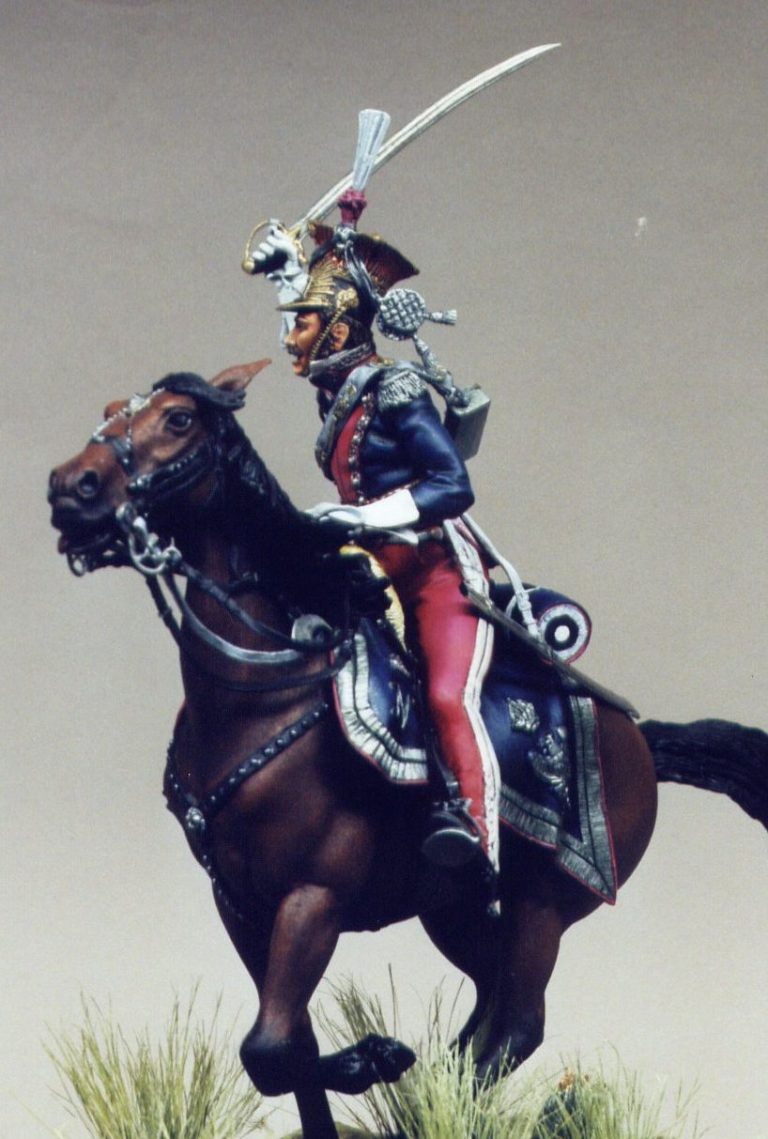
Overall though, it makes a very nice and colourful addition to any collection, and would seem to have been engineered to last.
The model is available from Historex Agents, but please telephone them for the exact price and also any postal charges that may apply.
References :- Napoleon's Guard Cavalry - Osprey Men at Arms No 83. by Emir Bukhari and Angus McBride.
Fontenoy du Waterloo. ( French text, but very good picture plates. )
Napoleonic Plastic Figure Modelling. Bill Ottingers Historex Masterclass. Windrow and Greene.
Lorem ipsum dolor sit amet, consectetur adipiscing elit. Nulla euismod condimentum felis vitae efficitur. Sed vel dictum quam, at blandit leo.
Lorem ipsum dolor sit amet, consectetur adipiscing elit. Nulla euismod condimentum felis vitae efficitur. Sed vel dictum quam, at blandit leo.
Lorem ipsum dolor sit amet, consectetur adipiscing elit. Nulla euismod condimentum felis vitae efficitur. Sed vel dictum quam, at blandit leo.
Lorem ipsum dolor sit amet, consectetur adipiscing elit. Nulla euismod condimentum felis vitae efficitur. Sed vel dictum quam, at blandit leo.
Lorem ipsum dolor sit amet, consectetur adipiscing elit. Nulla euismod condimentum felis vitae efficitur. Sed vel dictum quam, at blandit leo.
Lorem ipsum dolor sit amet, consectetur adipiscing elit. Nulla euismod condimentum felis vitae efficitur. Sed vel dictum quam, at blandit leo.